With this three-move stretching routine, you can develop healthier hips and strengthen your lower body. I recommend adding an exercise mat or one of the best yoga mats to perform them on.
Despite what you might think, you don’t need to spend 30 minutes to an hour stretching and mobilizing your body to notice the benefits of stretching. In fact, for most people, a short routine performed in the morning, at lunchtime, or in the evening can be more accessible.
If you’re short on time, just plucking a few of the best lower body stretches and consistently adding them to your daily routine can help strengthen your muscles, increase flexibility and build range of motion around your joints.
Here’s how to do the stretches, the benefits for your hips and hamstrings and why I recommend them.
What are the 3 lower body stretches?
Here’s how to develop healthier hips through stretching.
1. Lizard lunge
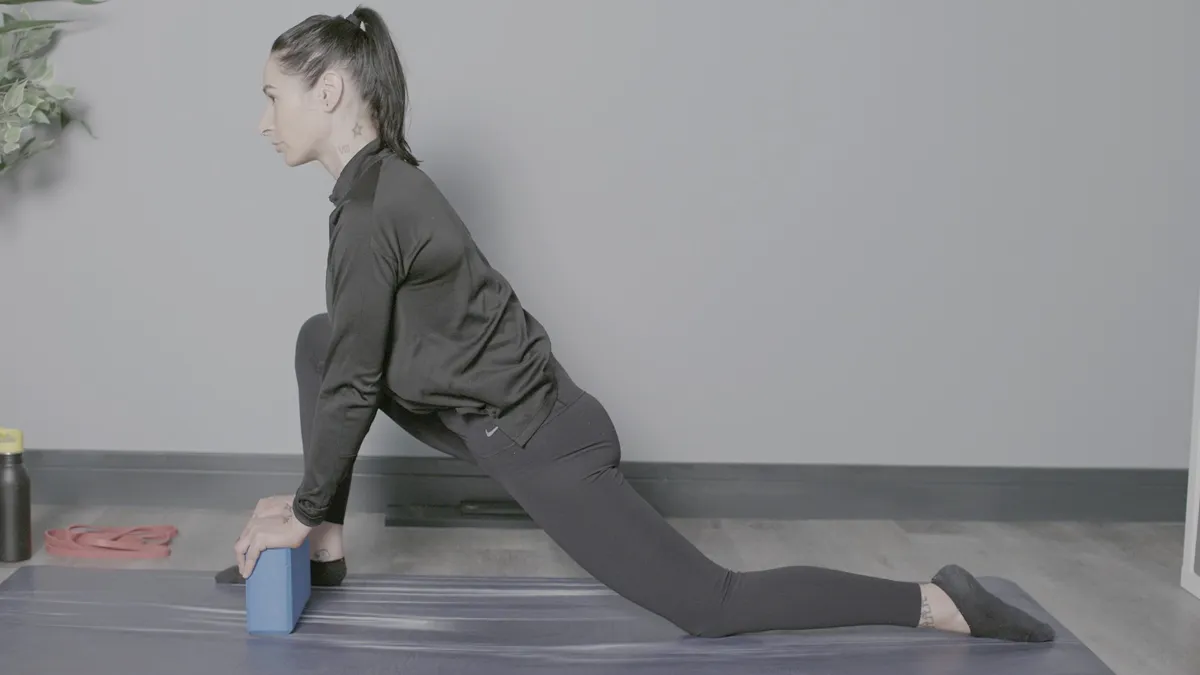
Lizard lunge stretches the fronts of the hips — the hip flexor muscles — and the glutes. Although the focus is primarily on finding length along the front of the body, a slightly wider front-foot stance can help you reach deeper into the piriformis (a deep gluteal muscle) and your groin.
To begin with, use a block or similar to elevate your hands if you have very tight hips, and try to reduce the height of the block over time. Eventually, you may place your hands on the mat, bend your elbows, or even rest your elbows on the mat next to your inner leg.
The key is to keep a long and straight spine and avoid hunching. For this reason, I always cue clients to lift their chests and reach forward rather than collapse into the stretch. To advance the stretch further, edge your fingertips as far forward as possible. You can add a gentle rocking motion forward and backward, keeping your front heel planted, to help mobilize the ankle and stretch the calf.
How:
- Start with your left leg forward and right leg back, right knee supported on your mat (low lunge)
- Place a block on the inside of your left foot and rest your hands on the block. Choose a height that works best for you
- Press through your front foot and adjust your right knee until you can feel a deep stretch through your right hip flexor. The top of your right foot should be pressed into the mat
- Draw your left knee forward over the ankle toward your toes and hold the stretch
- If you prefer, open the left knee, press your hips forward and rest on the outer side of your left foot to target more of the glutes
- Hold
- Slowly release the stretch, then switch sides.
2. Downward facing dog

While not typically used as an out-and-out “stretch,” downward dog is focal in yoga because of its wide range of benefits. The static hold or its more dynamic expression (peddling the heels, for example) develops hamstring flexibility, stretches the arms, shoulders and upper back and releases tension across your entire body.
For many, a downward dog also offers the chance to focus on breathing and a reset between postures or poses. Often, after several cycles of breathwork, you can find more depth in the stretch as muscles begin to relax. There are a few things I wish I had known as a yoga beginner, and one is to never rush breathing.
How:
- Start on your hands and knees in a tabletop position
- Place your hands shoulder-width apart and feet roughly hip-width apart
- Inhale, tuck your toes and lift your knees
- As you exhale, send your hips upward and backward and press through your hands
- If you have tight hamstrings, maintain a soft knee bend, then draw your heels downward toward the mat
- Send your gaze between your legs
- Draw your shoulders down your back and pull your biceps inward toward each other
- Spread through your fingers, draw your belly button toward your spine and focus on lifting the hips as you inhale and drawing your heels downward on the exhale
- Hold. Peddle the heels if you prefer.
3. Forward fold

Forward fold is primarily a posterior chain stretch, meaning your lower back, glutes and hamstrings stretch as you reach your fingertips toward the floor. If you have tight hamstrings, position a block beneath your hands. If you can, place your fingertips or palms onto the mat just in front of your toes.
How:
- Stand with your feet hip-width apart and spread your toes into the mat
- Inhale, reach your arms overhead and stretch upward toward the ceiling
- As you exhale, hinge at your hips and send your bum backward
- Fold over your legs, softening your stomach toward your thighs
- Place your hands onto the mat or block and look between your legs
- Relax your upper body
- Keep a soft bend in your knees if you have tight hamstrings and draw your hips upward
- Hold.
As you hold the stretch, focus on breathing toward your stomach and softening your chest toward your thighs on every exhale. If you enjoy adding movement to your forward fold, lift onto your fingertips or hands, raise your chest and look forward as you inhale (as pictured above), then fold again as you exhale.
What is the 3-move stretching routine?
This short but effective stretching routine combines gentle movement with deep stretching and breathwork, creating awareness of your body and promoting a sense of calm and relaxation, which can help boost mental strength after a stressful day or even first thing in the morning.
Unlike a yin yoga class, you won’t spend several minutes in each pose, rather you’ll cycle through stretches for several rounds instead. Afterward, your muscles should feel more open, and as you cycle through rounds, you may be able to soften further into each pose. Always direct your attention to particular areas of tightness and practice sending your breath there.
How:
- Downward dog: 30 seconds
- Lizard lunge (left side): 45-60 seconds
- Downward dog: 30 seconds
- Lizard lunge (right side): 45-60 seconds
- Downward dog: 30 seconds
- Forward fold: 60 seconds
- Repeat 3-4 rounds.
Start in your downward dog. Stay here for 30 seconds, focusing on inhaling through your nose and exhaling through your mouth. From here, lift your left leg and step forward into a lizard lunge on your left side. I recommend holding the stretch for 45 to 60 seconds.
Transition back through another 30-second downward dog, then repeat the lizard lunge on your right side. Slowly return to downward dog, hold for 30 seconds, then walk your hands and feet toward each other to the center of your mat into your forward fold. Hold for 60 seconds, return to your downward dog and repeat for 3-4 rounds.
More from Tom's Guide
- Pilates instructor shares a 40-minute workout to 'wake up your deep core' and improve your posture
- No, not pull-ups — here's one bodyweight exercise that builds biceps and back strength without weights
- I did 50 floor-seated shoulder presses every day for a week — and it wasn’t just my arms that got a workout