Prepping Your UFD
For this job, I’ll haul out the first UFD I ever bought: a venerable FujiFilm 256 MB UFD that’s at least 10 years old.
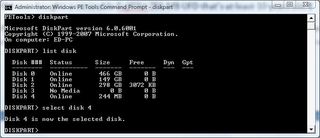
Inside the PETools command window, you’ll invoke the diskpart utility, then issue the sequence of commands shown in the next sequence of screenshots, except you must be very careful to select the disk number that corresponds to your UFD. This is easier than you might think as these commands will illustrate:
- 1. After you insert the UFD in your system and it becomes visible to Explorer, type "diskpart" into the command window. After that, type “list disk” to list the disks that the utility recognizes by number and size. Note that Disk 4 is only 244 MB in size—obviously, it’s our target here. Your UFD should be equally easy to identify. If in doubt, remove all other UFDs from your system so only one small-capacity device appears in this list. Select that disk by number, so in this case type "select disk 4."
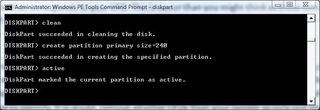
- 2. Next, you’ll wipe that disk clean, create a primary partition of a size no larger than what’s listed in the Size entry, select that partition, and make it active. See the screenshot for precise syntax.
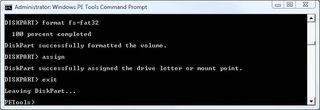
- 3. Finally, you’ll format this disk for the Fat32 file system, assign it a drive letter, then exit the diskpart utility. Warning: even on small UFDs this format operation can take a while (the bigger it is the longer it takes).
- 4. To create your bootable Windows PE image on the UFD, you must now copy the ISO directory inside c:\winpe_x86 over to this pristine flash drive. The following xcopy command does this job nicely (use Windows Explorer to make sure you reference the correct drive letter all the way at the end of this command, which in this case is drive J:, although yours will probably differ):
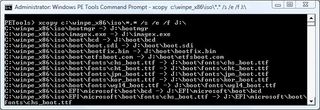
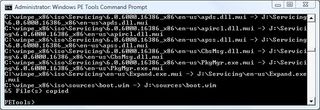
We shot the first and last bits of this final xcopy command because it was too long to show in total. Note that the file named boot.wim is stored in the \sources\ directory—this becomes important in our next exercise. For now, please understand that this is the Windows image you created using the copype.cmd command at the very beginning of this exercise. This contains the entire WinPE 2.0 environment, but does not include the System Recovery Options we depicted in the screenshot that kicks off this story.
Sign up to get the BEST of Tom's Guide direct to your inbox.
Get instant access to breaking news, the hottest reviews, great deals and helpful tips.
Current page: How to Prepare USB Flash Drive - WinPE Boot Drive - Tom’s Guide
Prev Page How to Create a WinPE Image - USB Boot Drive - Tom’s Guide Next Page How to Create and Manage a WinRE Image File - Tom’s GuideEd Tittel is a freelance writer, trainer, and internet consultant. His work has appeared on many sites, including Tom's Guide, Tom's Hardware, TechTarget, and more. He has also contributed to multiple books, including the "For Dummies" series, where he wrote about HTML, HTML4, XHTML, XML, and CCS. He was also series editor of the Exam Cram books until 2005.
-
masterwhitman What, no mention of BartPE or UBCD4Win (Ultimate Boot CD for Windows)? These are two projects that are vastly superior to Microsoft's method (both are built on WinPE but have expanded capabilities) and are far easier to use.Reply -
when I saw this I thought it was going to be a review of Bart's PEBuilder... It's saved my a$$ many times. Far superior to WinPE...Reply
How about a comparison/companion article? or an article on tools gearheads & techies find indespensible? -
average joe Vista's PE is far more advanced than XP's. The BartPE project is based of XP's PE. Barts is amazingly useful and I can't wait till they move to from PE 1.1 to PE 2.0.Reply
Some "fairly new" systems will not boot from usb so always carry a cd version as a backup. -
"I usually grab Imagex.exe and the Package Manager using the commands shown in the next screen capture."Reply
Hmmm... I don't see a 'next screen capture' showing the commands used to get imagex and Package Manager. -
LightWeightX Good start to the guide until you get to the WinRE. In section 5, step 2, you describe using imagex and the secret is the number 2 argument however you do not give an example of the command. In the WinPE you use a 240 MB partition, then in WinRE you state you need at least 512 MB.Reply -
sdybas Show us howto "use imagex to grab the Windows RE image from the Vista-installation media." Thanks.Reply -
Good article, but it makes a few omissions and goofs here and there.Reply
1. For using imagex to grab the WinRE image, check out this link:
http://blogs.msdn.com/winre/archive/2006/12/12/creating-winre-using-waik.aspx
2. "x64" won't work when you're using copype.cmd - it has to be "AMD64". Just replace all instances of x64 with AMD64 in this procedure, and it'll work.
3. For the image showing how to grab imagex and the package manager, click on the picture above the text to open up the gallery, then click one pic forward.
