Creating the WinPE image
Not counting download time, it will take about an hour to complete this project. Here’s what you must do to create the necessary files to copy to your UFD, presented in the order in which these steps must be completed:
- 1. Download the Windows AIK and ISO Recorder v3, if you need or want it (both are linked to from the previous page).
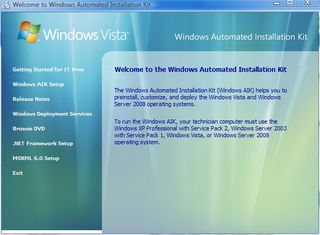
- 2. Burn the ISO image onto a DVD, then run the file called startcd.exe to launch Windows AIK. Here’s what you’ll see on-screen:

- 3. Click the option labeled “Windows AIK Setup” (Please note that platforms upon which you install AIK must meet this software’s Technician PC requirements, which means a Vista PC with a CD/DVD burner, image-burning software, .NET Framework 2.0, and network access. RAM must at least total 512 MB, while 1 GB or more is recommended. See "Build a Technician Computer" for all the details). Next, click your way through the installation screens to make the WAIK tools available on your desktop.
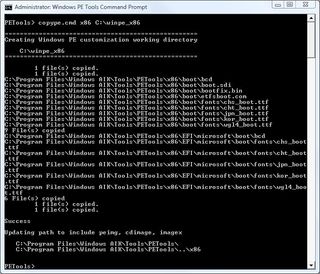
4. Click Start> All Programs> Windows AIK> then Windows PE Tools Command Prompt. This produces the following screen (we’ll show all additional commands in this display frame, where I changed the command prompt to PETools> ):

- 5. Type Copype.cmd x86 C:\winpe_x86 at the command line. Here, use x86 for a 32-bit environment and x64 for a 64-bit environment. The location on your PC where all the various WinPE binaries, optional components, and directories will be created is at C:\winpe_x86.

- 6. Next, you can copy any tools or utilities that you might wish to use from the WAIK Tools directory for your architecture (x86 for 32-bit Vista and x64 for 64-bit Vista) into the ISO subdirectory one level below C:\winpe_x86. I usually grab Imagex.exe and the Package Manager using the commands shown in the next screen capture.
That’s pretty much all there is to setting up the Windows PE image that you’ll eventually copy to your UFD. The next sequence of commands is listed in the next screen shot.
Sign up to get the BEST of Tom's Guide direct to your inbox.
Get instant access to breaking news, the hottest reviews, great deals and helpful tips.
Current page: How to Create a WinPE Image - USB Boot Drive - Tom’s Guide
Prev Page Create a Bootable WinPE USB Drive - What You Need - Tom’s Guide Next Page How to Prepare USB Flash Drive - WinPE Boot Drive - Tom’s GuideEd Tittel is a freelance writer, trainer, and internet consultant. His work has appeared on many sites, including Tom's Guide, Tom's Hardware, TechTarget, and more. He has also contributed to multiple books, including the "For Dummies" series, where he wrote about HTML, HTML4, XHTML, XML, and CCS. He was also series editor of the Exam Cram books until 2005.
-
masterwhitman What, no mention of BartPE or UBCD4Win (Ultimate Boot CD for Windows)? These are two projects that are vastly superior to Microsoft's method (both are built on WinPE but have expanded capabilities) and are far easier to use.Reply -
when I saw this I thought it was going to be a review of Bart's PEBuilder... It's saved my a$$ many times. Far superior to WinPE...Reply
How about a comparison/companion article? or an article on tools gearheads & techies find indespensible? -
average joe Vista's PE is far more advanced than XP's. The BartPE project is based of XP's PE. Barts is amazingly useful and I can't wait till they move to from PE 1.1 to PE 2.0.Reply
Some "fairly new" systems will not boot from usb so always carry a cd version as a backup. -
"I usually grab Imagex.exe and the Package Manager using the commands shown in the next screen capture."Reply
Hmmm... I don't see a 'next screen capture' showing the commands used to get imagex and Package Manager. -
LightWeightX Good start to the guide until you get to the WinRE. In section 5, step 2, you describe using imagex and the secret is the number 2 argument however you do not give an example of the command. In the WinPE you use a 240 MB partition, then in WinRE you state you need at least 512 MB.Reply -
sdybas Show us howto "use imagex to grab the Windows RE image from the Vista-installation media." Thanks.Reply -
Good article, but it makes a few omissions and goofs here and there.Reply
1. For using imagex to grab the WinRE image, check out this link:
http://blogs.msdn.com/winre/archive/2006/12/12/creating-winre-using-waik.aspx
2. "x64" won't work when you're using copype.cmd - it has to be "AMD64". Just replace all instances of x64 with AMD64 in this procedure, and it'll work.
3. For the image showing how to grab imagex and the package manager, click on the picture above the text to open up the gallery, then click one pic forward.
