Galaxy S9 User Guide: Tips, Tricks and How-Tos
Here's what you need to know about getting the most out of your Galaxy S9 or S9+, including which features to enable and disable.
Set Up the Fingerprint Reader on the Galaxy S9
With the Galaxy S9, Samsung addressed one of our biggest complaints about its smartphone lineup by moving the fingerprint sensor. Instead of being right next to the rear-facing camera, as it is on the Galaxy S8 and Note 8, the S9’s sensor now sits just beneath the camera stack. In theory, that means you won’t smudge the lens when aiming to unlock your phone.

That’s good, because using your fingerprint one of the better ways to secure your Galaxy S9. Samsung’s new phone offers other biometric ways to verify your identity, including iris scanning, facial recognition and a combination of the two in the new Intelligent Scan feature.
MORE: Get Started With Galaxy S9: What Features to Enable
But you need a fingerprint, passcode or iris scan to authenticate your identity for mobile payments. (Intelligent Scan won’t cut it.) Besides, sometimes it’s easier to unlock your phone with the press of a finger or a quick PIN number than it is to hold it at arm’s length so the camera can detect your face. Even if you don’t regularly use the fingerprint sensor, it’s still worth adding a scan of at least one finger to your phone.
Here’s how to get that fingerprint sensor set up on the Galaxy S9. —Caitlin McGarry

1. Open the Settings app.

2. Tap Lock screen and security.
Sign up to get the BEST of Tom's Guide direct to your inbox.
Get instant access to breaking news, the hottest reviews, great deals and helpful tips.

3. Select Fingerprint Scanner.

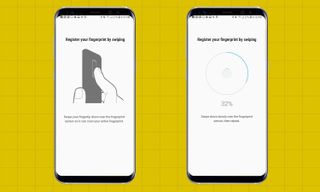
4. Follow the on-screen directions to swipe your finger over the sensor so that it can register your fingerprint. I found the scanner was able to read my fingerprint just by repeatedly pressing on it, but your mileage may vary.

5. After adding one fingerprint, you can scan others by tapping Add. Or you can stop there by tapping Done.

6. Give the sensor a test run by scanning the fingerprint you just added.

7. If everything’s working, tap Turn On to use fingerprint unlock to get into your smartphone.

8. Edit your fingerprint names so you know which finger you’re using.

9. At this point, you can choose to add more fingerprints and select whether you want to use the fingerprint scanner to verify your identity on the web, in apps and for mobile payments.
Current page: How to Set Up the Galaxy S9’s Fingerprint Reader
Prev Page How to Set Up Intelligent Scan on the Galaxy S9 Next Page Galaxy S9 Camera Guide: How to Use All the New FeaturesTom's Guide upgrades your life by helping you decide what products to buy, finding the best deals and showing you how to get the most out of them and solving problems as they arise. Tom's Guide is here to help you accomplish your goals, find great products without the hassle, get the best deals, discover things others don’t want you to know and save time when problems arise. Visit the About Tom's Guide page for more information and to find out how we test products.
