Galaxy Note 8 User Guide: Features to Enable and Disable
Use this step-by-step guide to get your Galaxy Note 8 up and running the way you want it.
After what seemed like an eternity, you’ve finally gotten your hands on your shiny new Samsung Galaxy Note 8. The Note 8 is a powerful beast with scads of new features, and it’s time to take a tour of its major abilities.
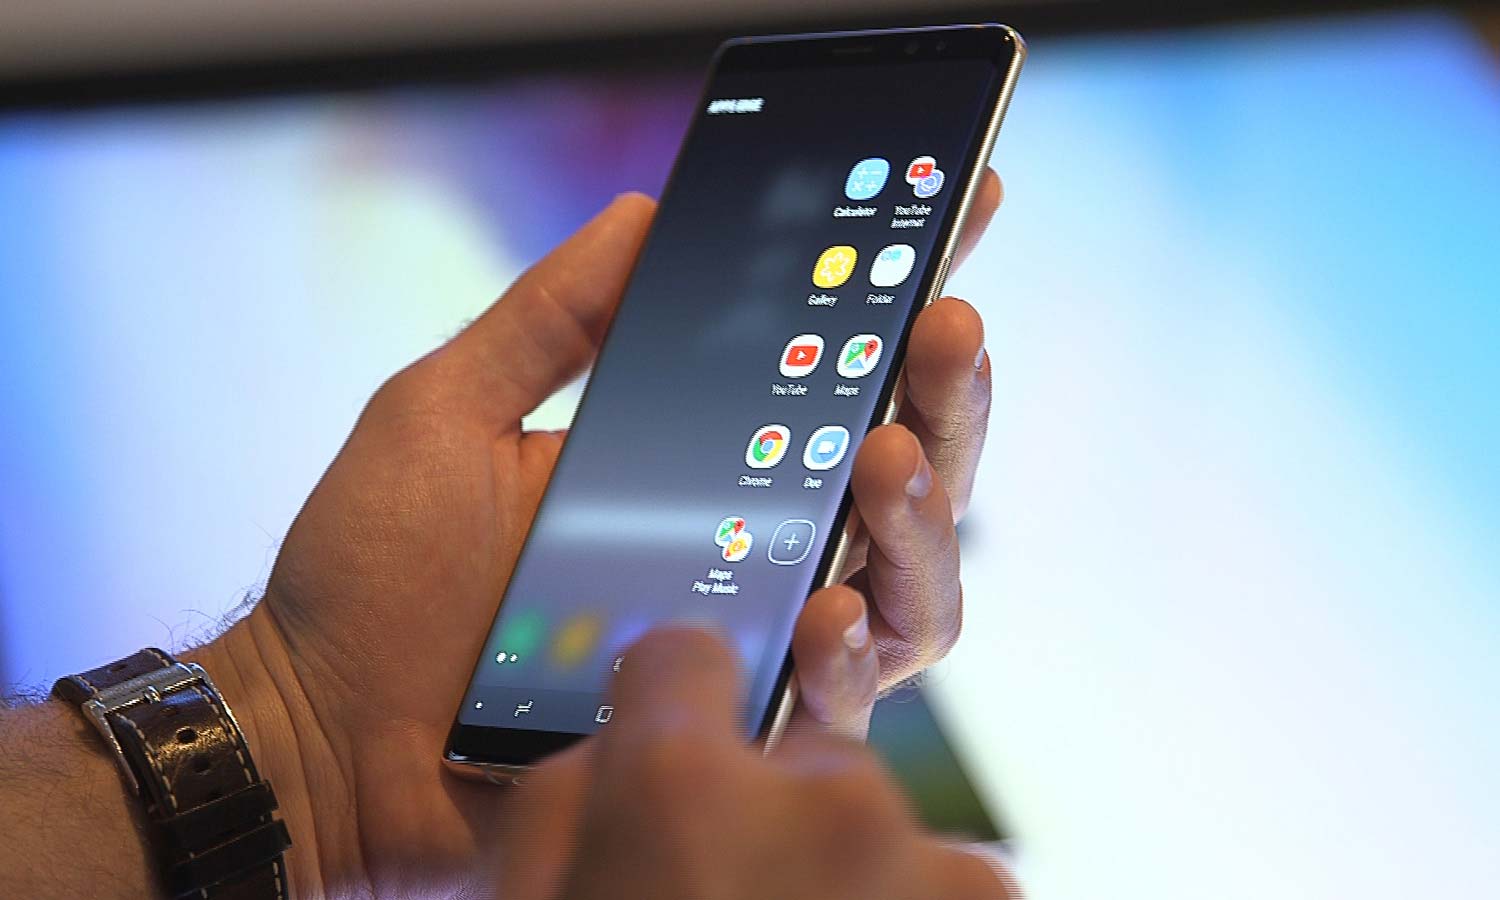
While you’re likely never to use every Note 8 feature extensively, it’s a good idea to try them out. After all, anything you enable can always be disabled or turned off if you don’t like it.
MORE: Why the Note 8 Is Worth Every Penny
Like other Android smartphones, the center of attention with the Note 8 is the device’s Settings, where you can make the most of your phone by customizing nearly every aspect. Here's how to get the most out of your Note 8.
Turn on Screen Mode
Sure, the Note 8’s AMOLED display is one of the largest, brightest and most detailed screens to grace a phone, but it also provides tremendous flexibility in how items look. With four modes, color temperature adjustments and the ability to fine tune the color balance, it can be customized for how you use it.
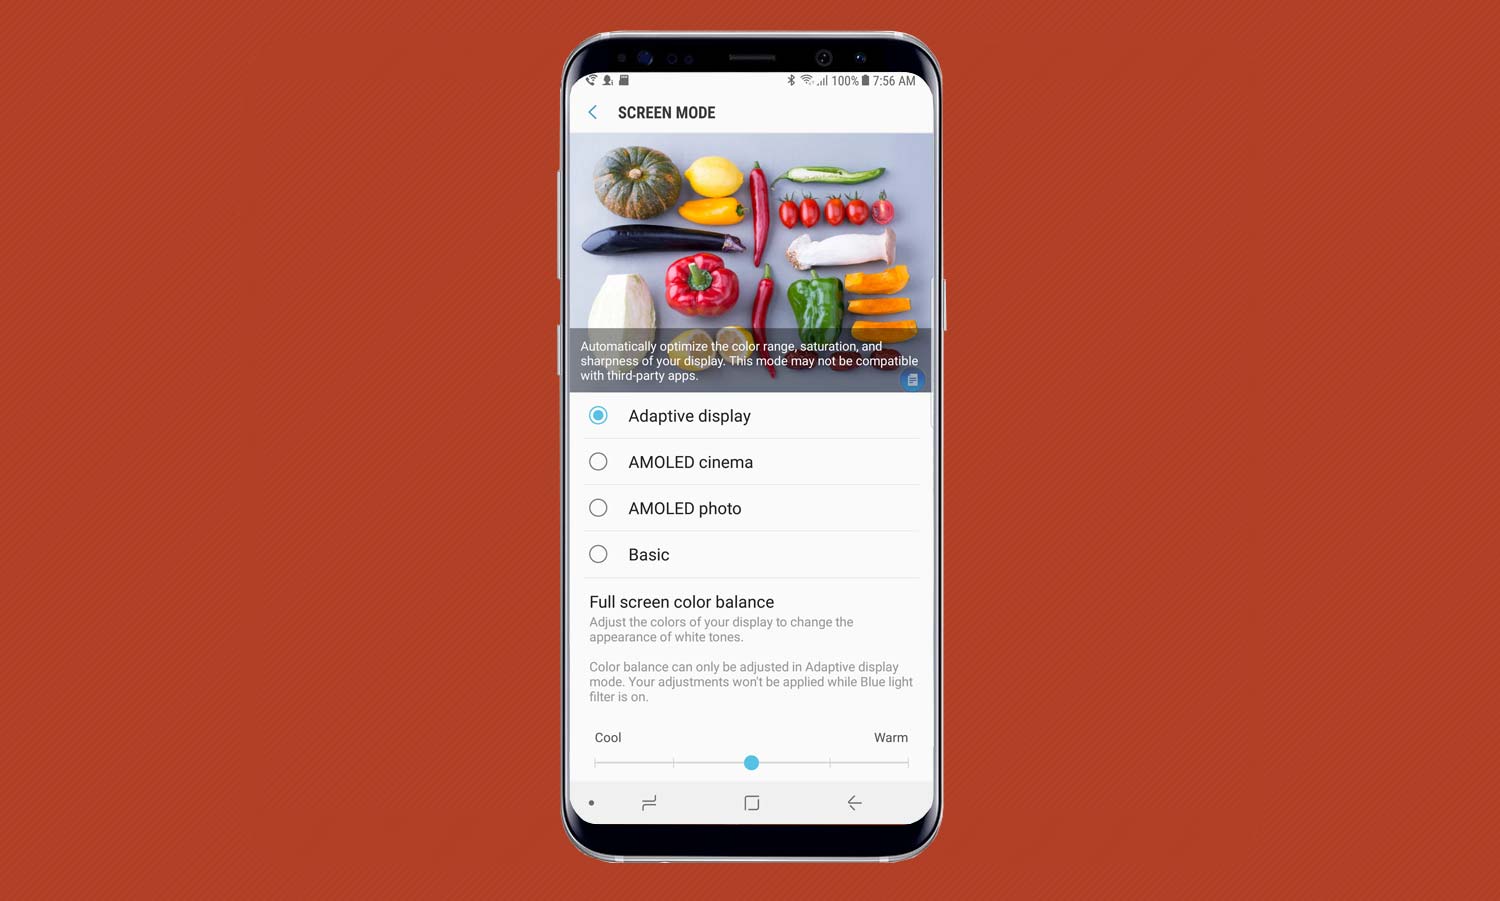
Here’s How: Go to Settings, tap on Display and then Screen Mode. You’ll see four different display modes that can be enabled: Basic (sRGB standard), AMOLED photo (a little added saturation), AMOLED cinema (more saturation that can make items look garish and unnatural) and Adaptive display (adjustments based on what’s displayed).
I use the Adaptive display setting because it lets me adjust the screen’s color temperature and the balance between red, blue and green; these aren’t available with the Cinema, Photo or Basic settings.
Sign up to get the BEST of Tom's Guide direct to your inbox.
Get instant access to breaking news, the hottest reviews, great deals and helpful tips.
Turn on the Blue Light Filter
In addition to causing eye strain and keeping you up at night, too much blue light from a phone screen can damage your retina and worsen macular degeneration over time. But your Note 8 can cut its blue light output.
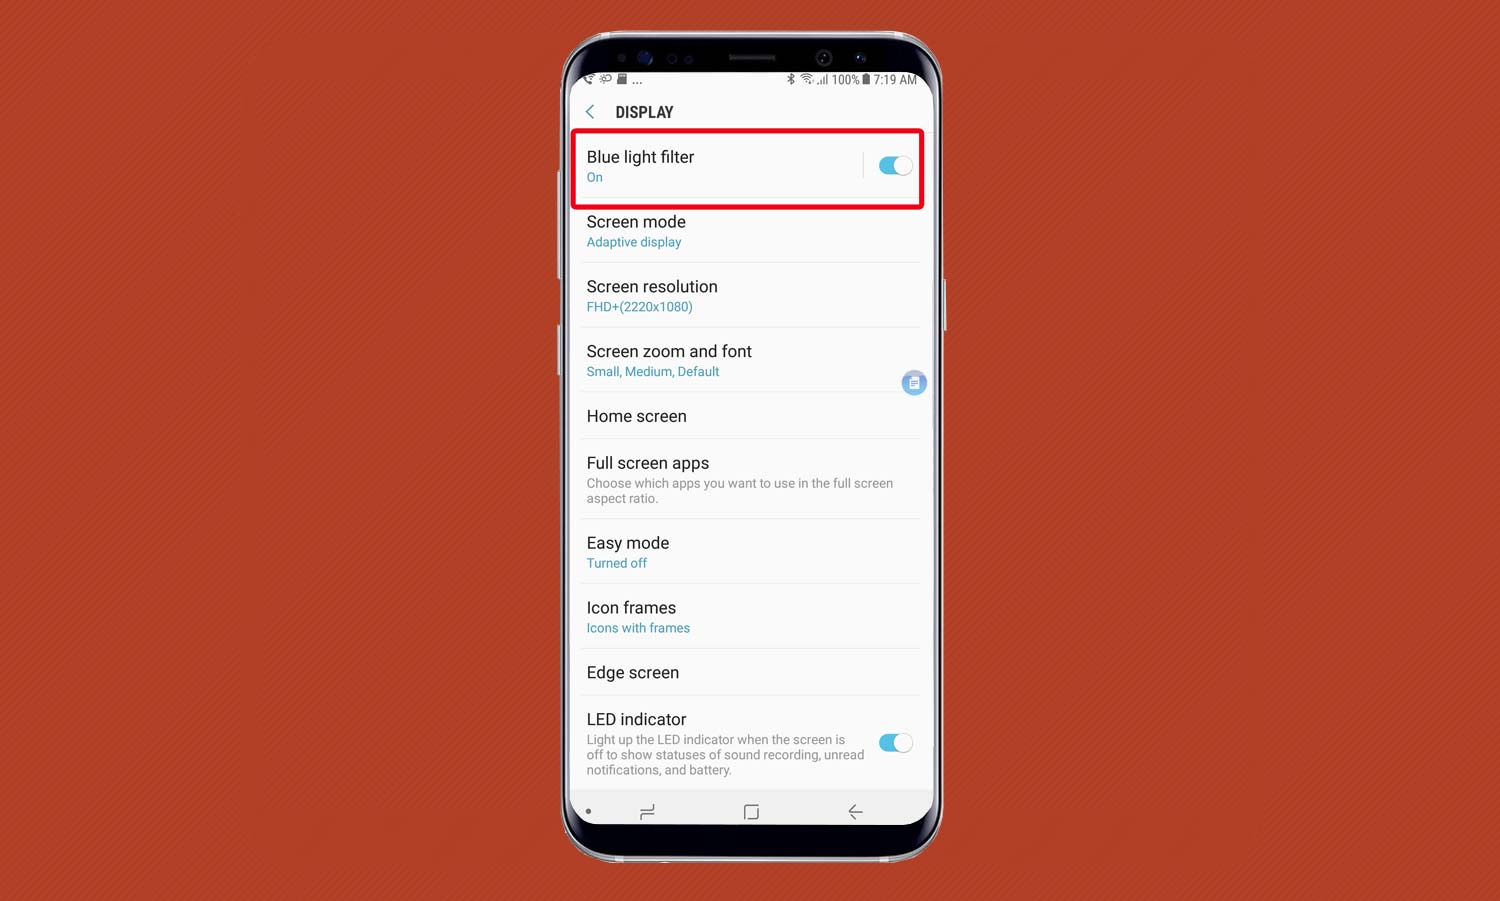
Here’s How: Go to Display and find the Blue light filter. To enable the feature, just tap it, and the screen will deliver less blue light to your eyes. You’ll immediately see that the Note 8 screen has turned yellowish, to show the lack of blue light in its mix.
Set Up the Always On Display
One of the coolest things to enable on your Note 8 is the Always On screen, which can give you an at-a-glance look at the time, upcoming appointments or more. The feature draws a little extra power from the battery, but it’s worth it to avoid looking at a black screen and have some useful info just a glance away.
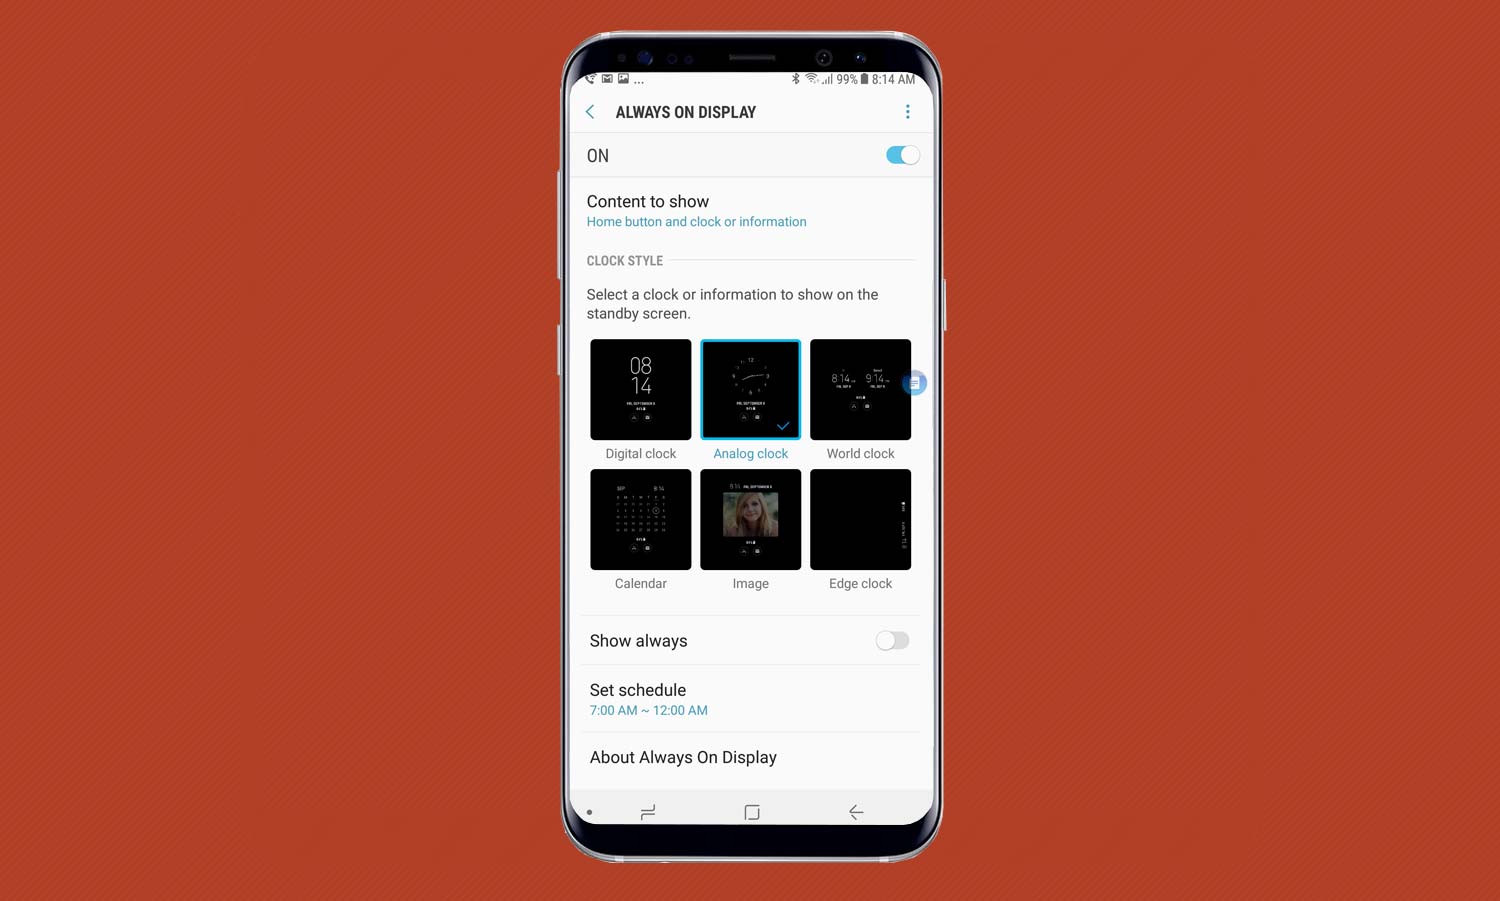
Here’s How: Start at the Settings’ Display section and tap on Lock Screen and Security, followed by Always On Display. Here, you can pick from six different display formats, including three clocks, a calendar, photos and even a clock that’s squeezed in the curved edge of the display.
I’ve set up the old fashioned analog clock with the date and battery level, but the display can be set to always be on (which helps if you use your phone as a bedside clock) or based on a schedule (if it sits charging all night).
Set Up the S Pen
One of the things that sets the Note 8 apart from Samsung’s Galaxy S8 and S8+ is the powerful stylus that brings this phone a step closer to being a tablet. There’s a lot to enable and make yours with the Note 8’s S Pen, but happily it’s all in one place.
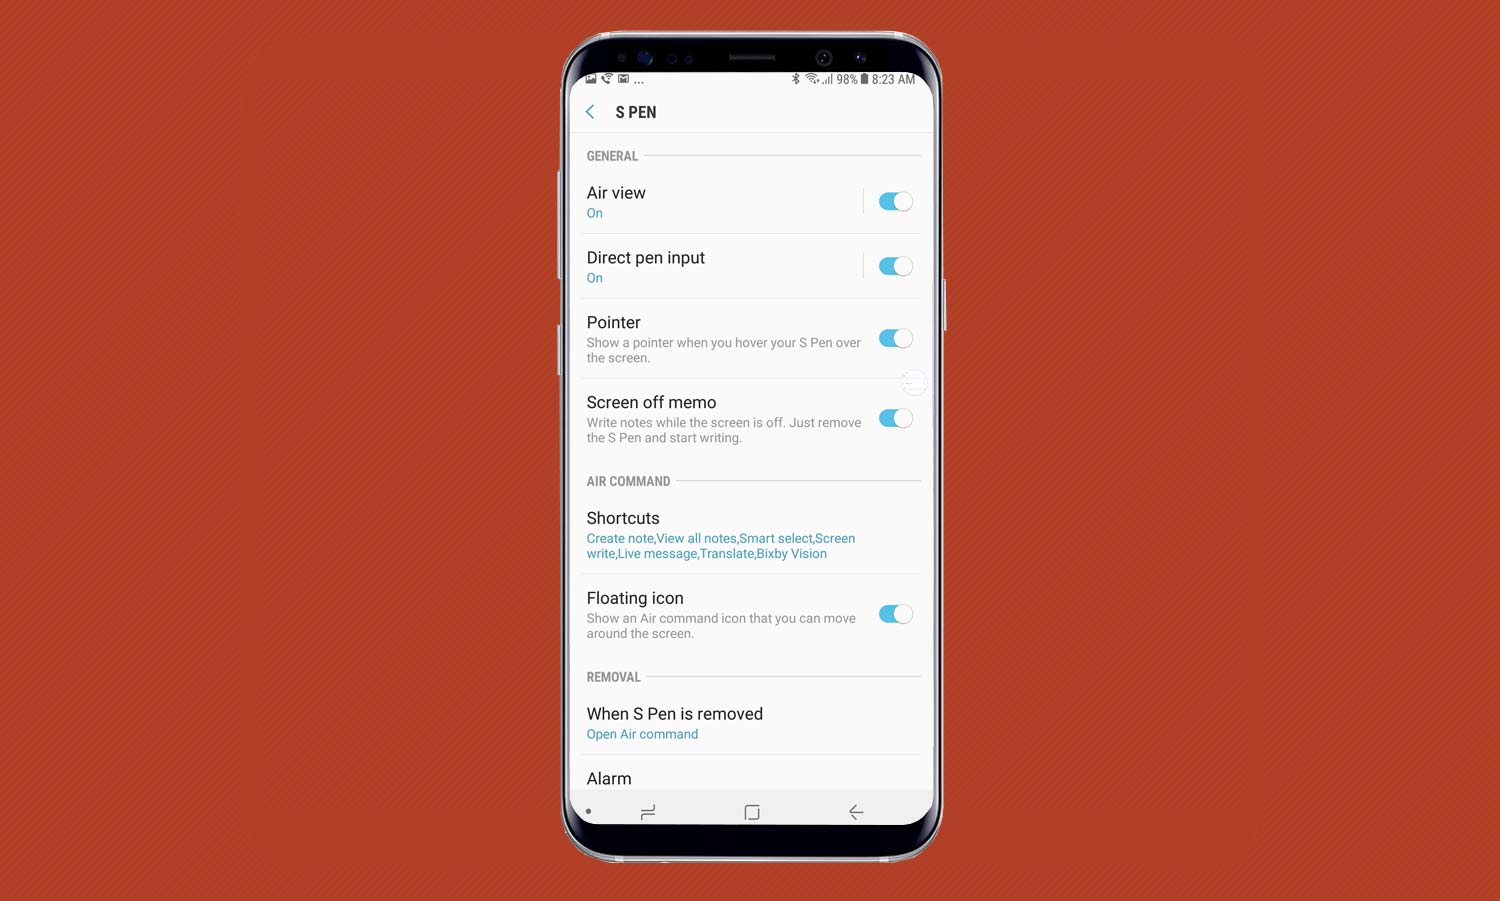
Here’s How: To pick and choose among the S Pen’s many features, go to the Settings’ Advanced Features. At the top, you’ll see a link for the S Pen’s page, where you’ll find a world of customization options, including the ability to add haptic vibrations when you draw or write, a way to save power when the pen’s not being used and an alarm setting for when the pen and phablet get too far apart. That latter feature can help keep you from losing the stylus, since replacements cost $50.
Adjust Your Display Resolution
While the Note 8’s screen is capable of a resolution up to 2960 x 1440, it comes set to 1480 x 720 by default. Changing the resolution immediately puts everything on your phone in its best light.
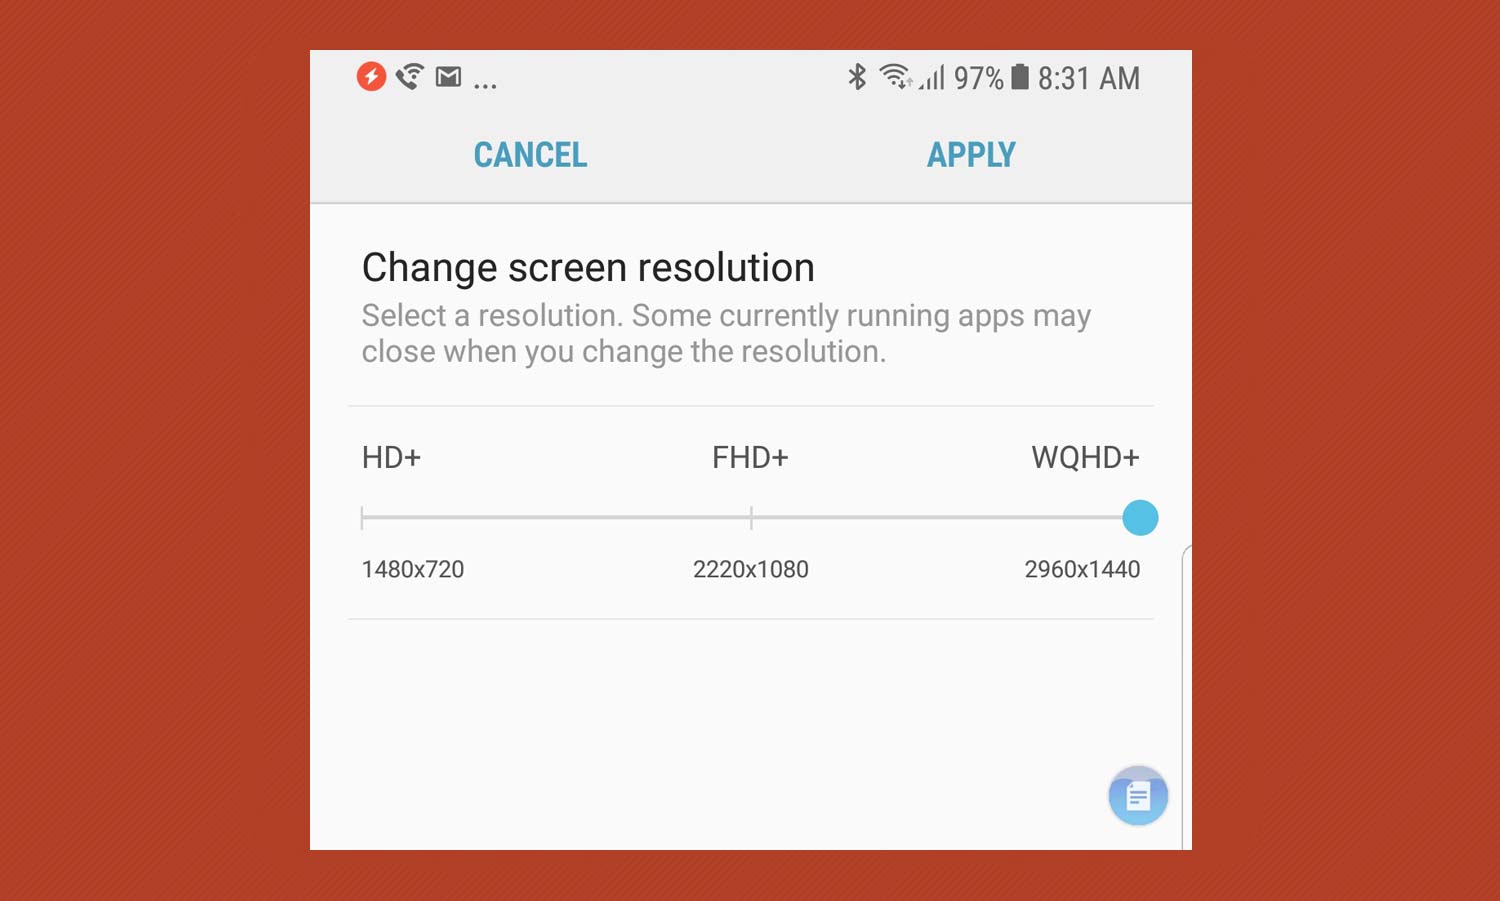
Here’s How: In the Display section of Settings, you can make the change by tapping on Screen resolution. Then, slide the dot to pick from 1480 x 720, 2220 x 1080 and 2960 x 1440.
Turn On Full Screen Apps
Most apps on the Note 8 use a set 16:9 aspect ratio, but given the Infinity Display’s 18.5:9 aspect ratio, that leaves a blank area at each end of the Note 8’s long and narrow screen.
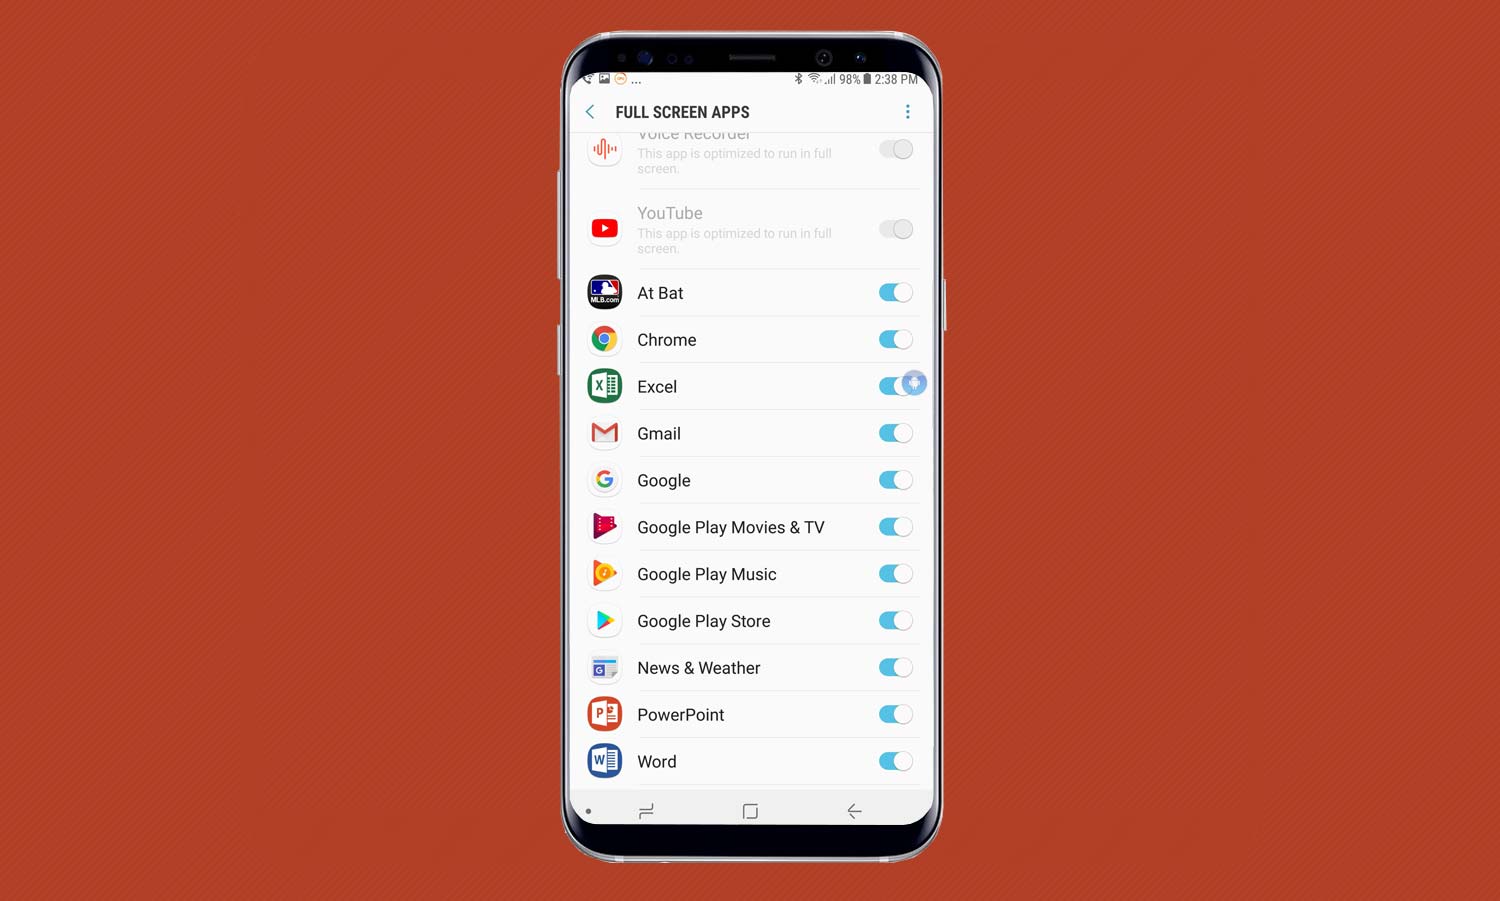
You can do something out this by designating many (but not all) software to run full screen. Beware: apps will be stretched slightly to fill the space.
Here’s How: Start at the Settings’ Display section and tap on Full Screen Apps. There, you’ll find a list of those apps that are already set up for full screen viewing as well as many that you can enable or disable top run full screen.
If you don’t like the look of apps in full screen mode, you can always go back and undo it.
Activate Edge Panels
The Note 8’s curved screen really comes into its own with Edge Panels, which allow you to open apps, access contacts and more by rolling your finger over the display’s side edge.
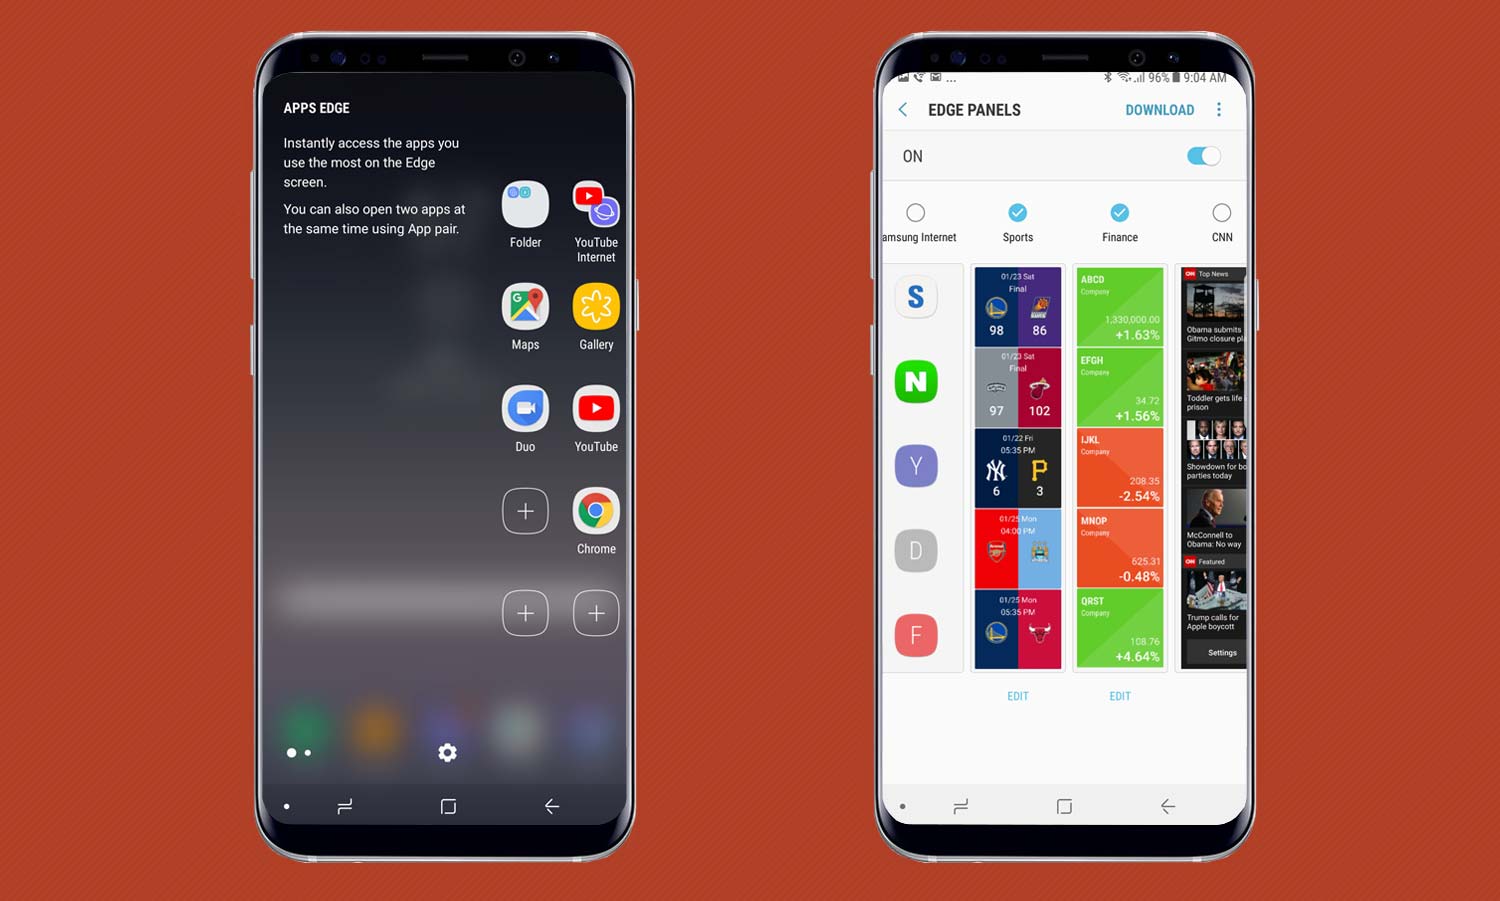
Here’s How: On the right edge of the Note 8’s screen is a 1-inch white bar. If you drag it towards the display’s center, the screen shows the apps that have been enabled for the Edge Panel. Tap the settings gear at the bottom to choose which contacts to add as well as things like making a call or even news, sports and finance headlines. Pick carefully, because the panel fills up quickly.
Set Up Dual Apps
A big addition to the Note 8 is the ability to pair two apps so they open together in a split screen format, providing multitasking abilities that other big phones can only dream of.
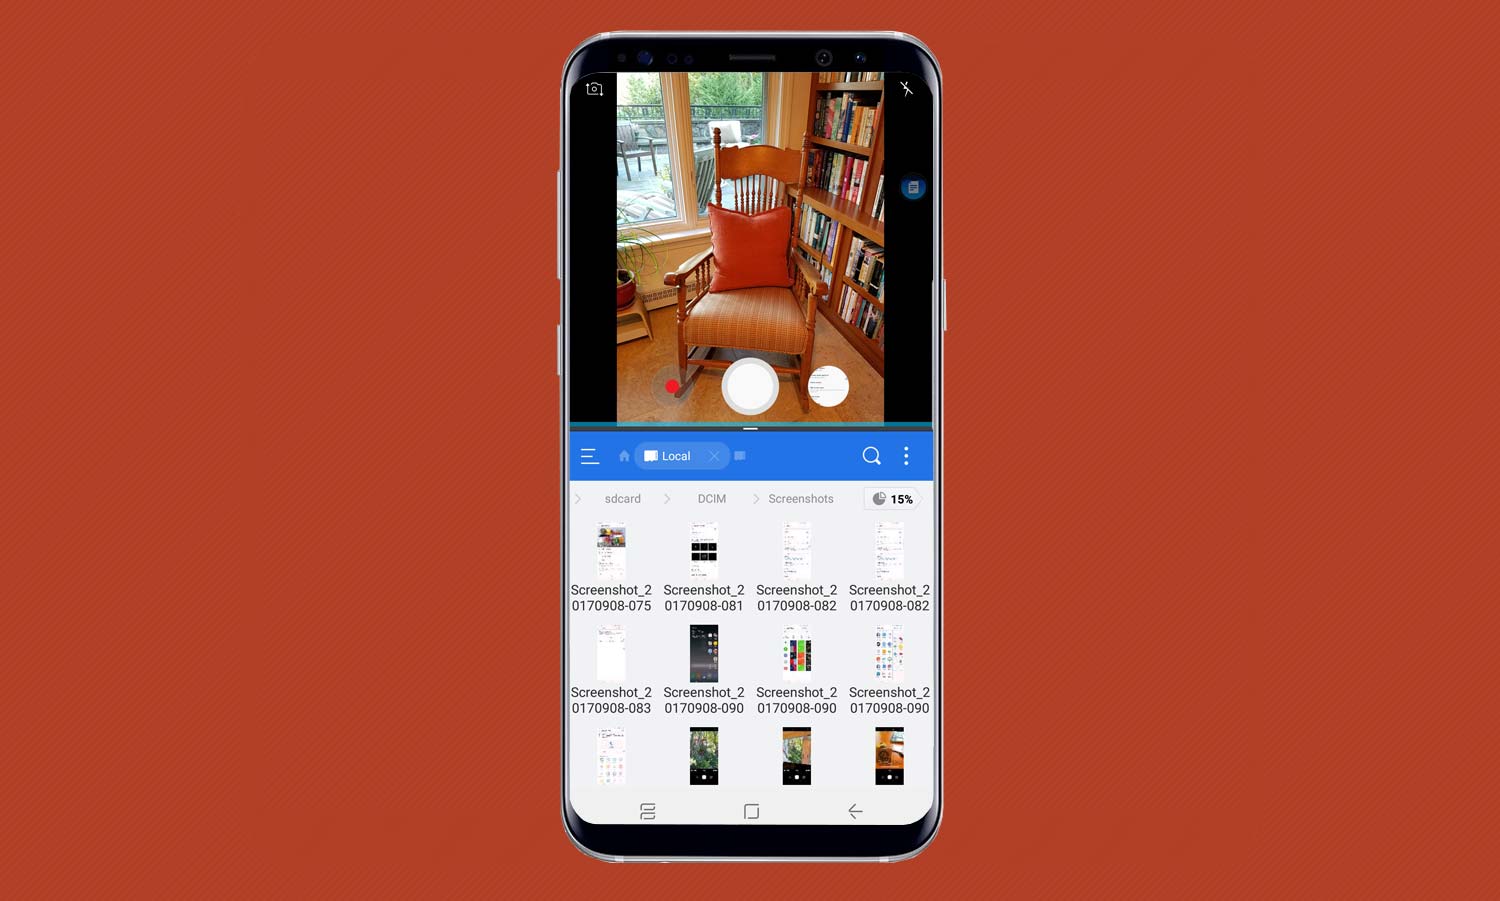
Here’s How: Start by pulling the Apps Edge panel from the white bar on the right edge of the screen. Then, tap one of the available plus (+) icons and then the Create App Pair. You’ll need to pick two from the Note 8’s Multi Window Apps to pair together, such as the email and calendar or browser and YouTube. Once you’re at the Apps Edge screen, tap Create App Pair in the upper right corner and Finish by dragging your two icons into the space above.
I’ve paired the camera with the ES File Explorer so that when I shoot a picture, I know it’s been saved.
Set Up Bixby
Like Microsoft’s Cortana and Apple’s Siri, Samsung’s Bixby has a cloud-based voice response system that is based on artificial intelligence. Getting it set up is a little more involved than just telling Bixby what you want, though.
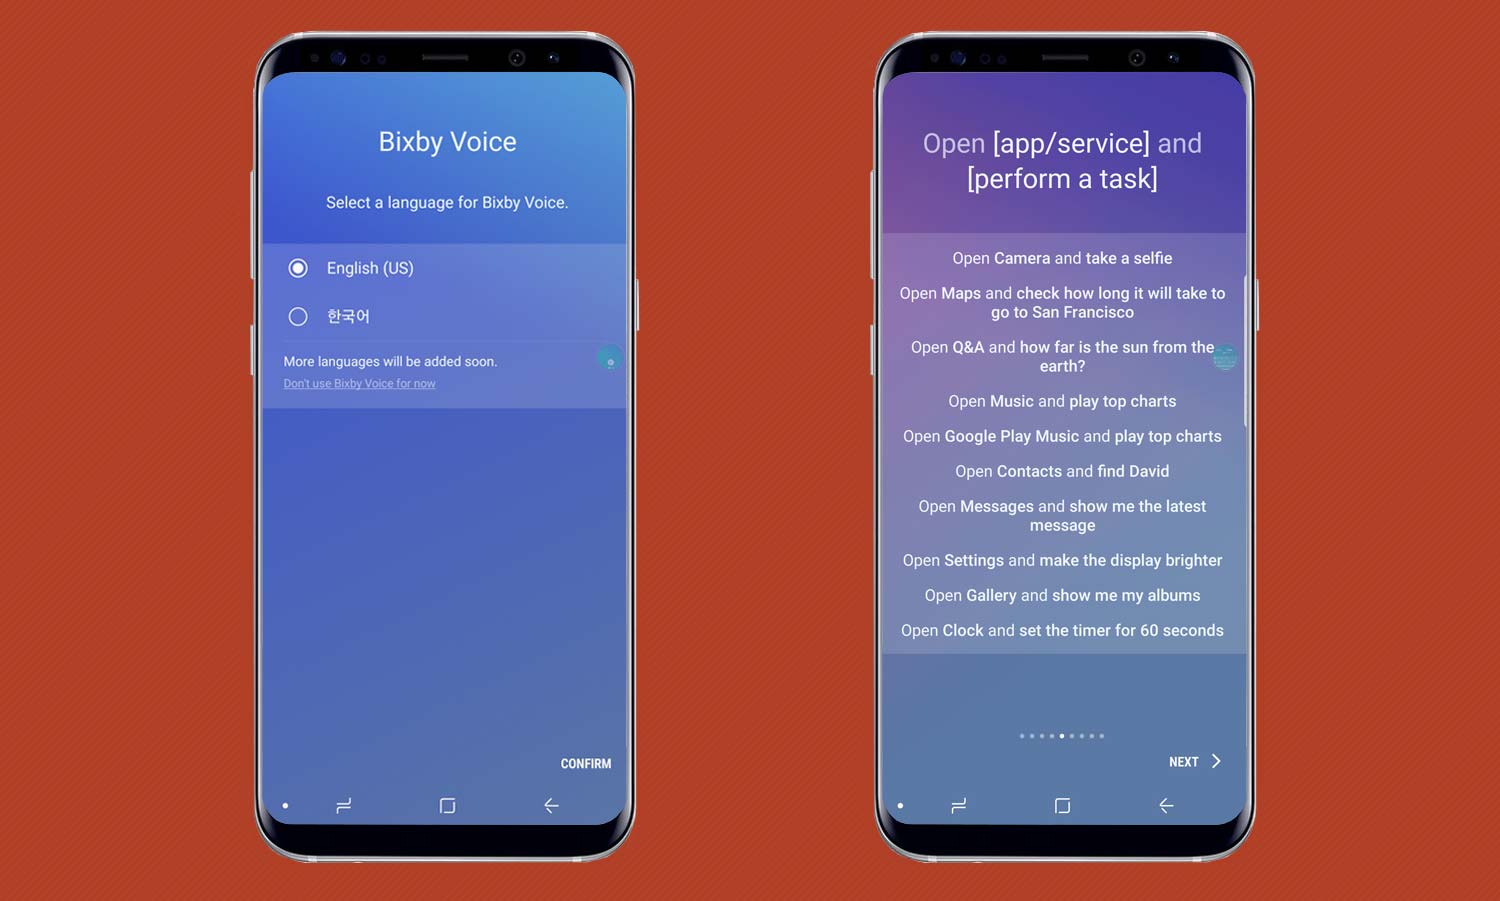
Here’s How: If you haven’t noticed, there’s an extra key on the left side of the Note 8 to wake up Bixby, establish a cloud connection and have it listen to your voice.
First, enable the feature by pressing the Bixby key, deciding on English or Korean and agreeing to the policies and licenses as well as whether you want to receive ads.
MORE: Bixby Is the Right Solution to the Wrong Problem
It takes a few minutes of voice training, but Bixby is powerful and lets you perform tasks like open the lock screen vocally or tell Bixby what music to play. My favorite is that I can now tell Bixby to set a timer for 15 minutes while my lunch is cooking. It can even make posting your next selfie a matter of just telling Bixby to do it.
Set Up Quick Camera Access
The Note 8’s cameras are incredibly powerful and provide a wide variety of shooting modes and after-the-fact effects. If you’re tired of getting to the camera via the home screen, there’s a better way.
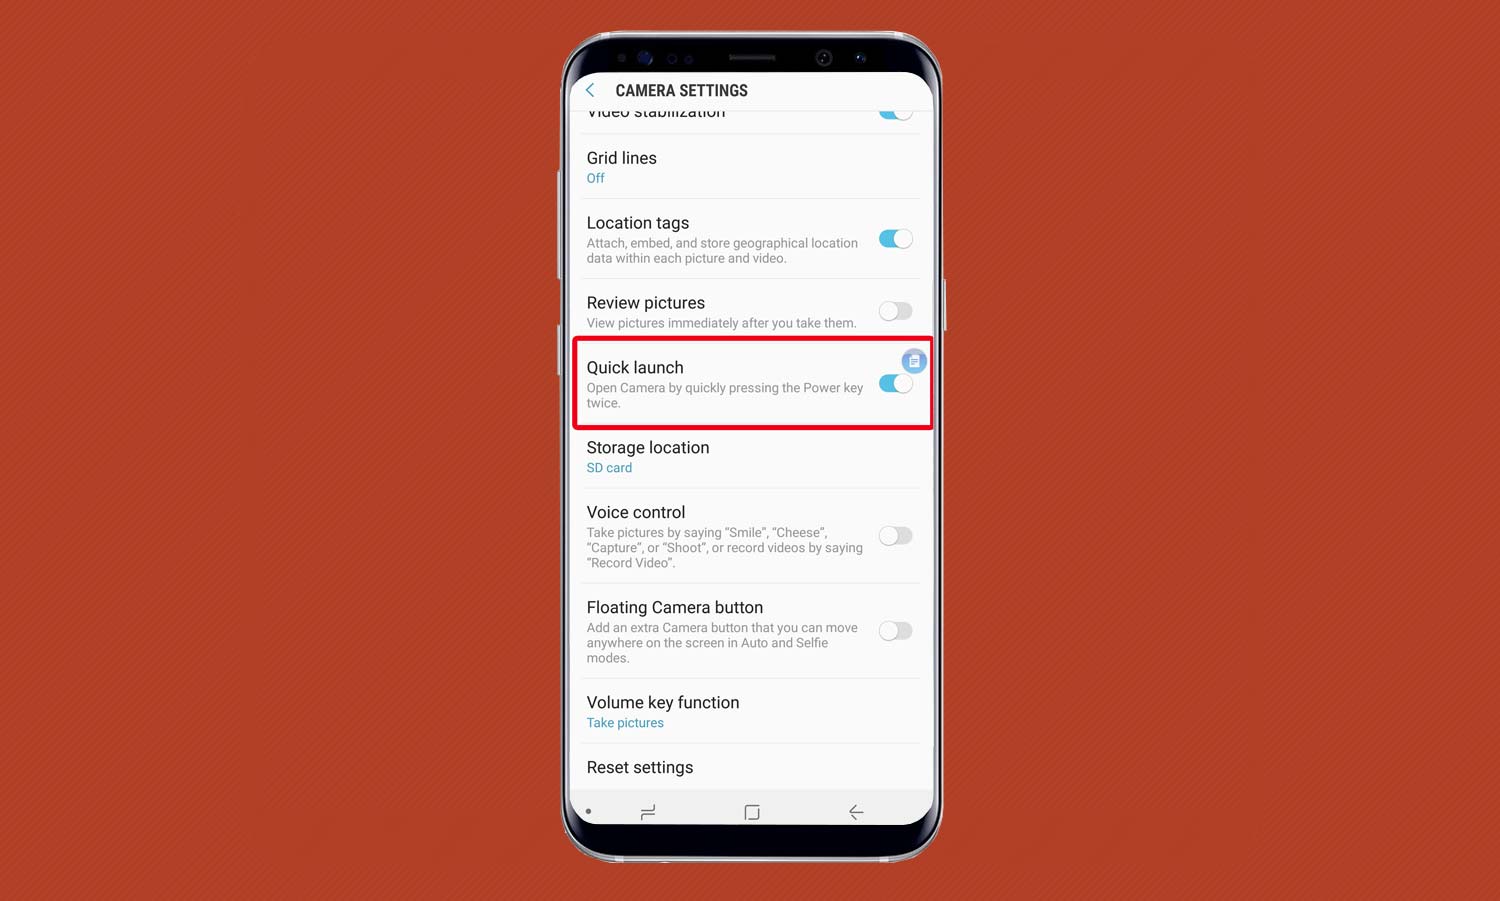
Here’s How: Start by opening the Camera from the Home screen and tapping its settings icon in the upper right. From here, you can enable Quick Launch. Next time you want to grab a shot, double-tap the power button (the one on the right side of the phone), and the camera is ready to shoot.
Insert a Micro SD Card
All the images you capture from the Note 8’s twin lenses can chew up your storage very quickly, with 12-megapixel photos for each photo. That’s what the microSD slot on the Note 8 is for. The slot can hold up to a 256GB microSD card to dramatically increase the 64GB of storage that comes with your Note 8.
Here’s How: Press the end of a paperclip into the hole at the top of the phone to open the card carrier. After putting the card into the carrier, press it to lock the card in place. You now have lots more storage space available.
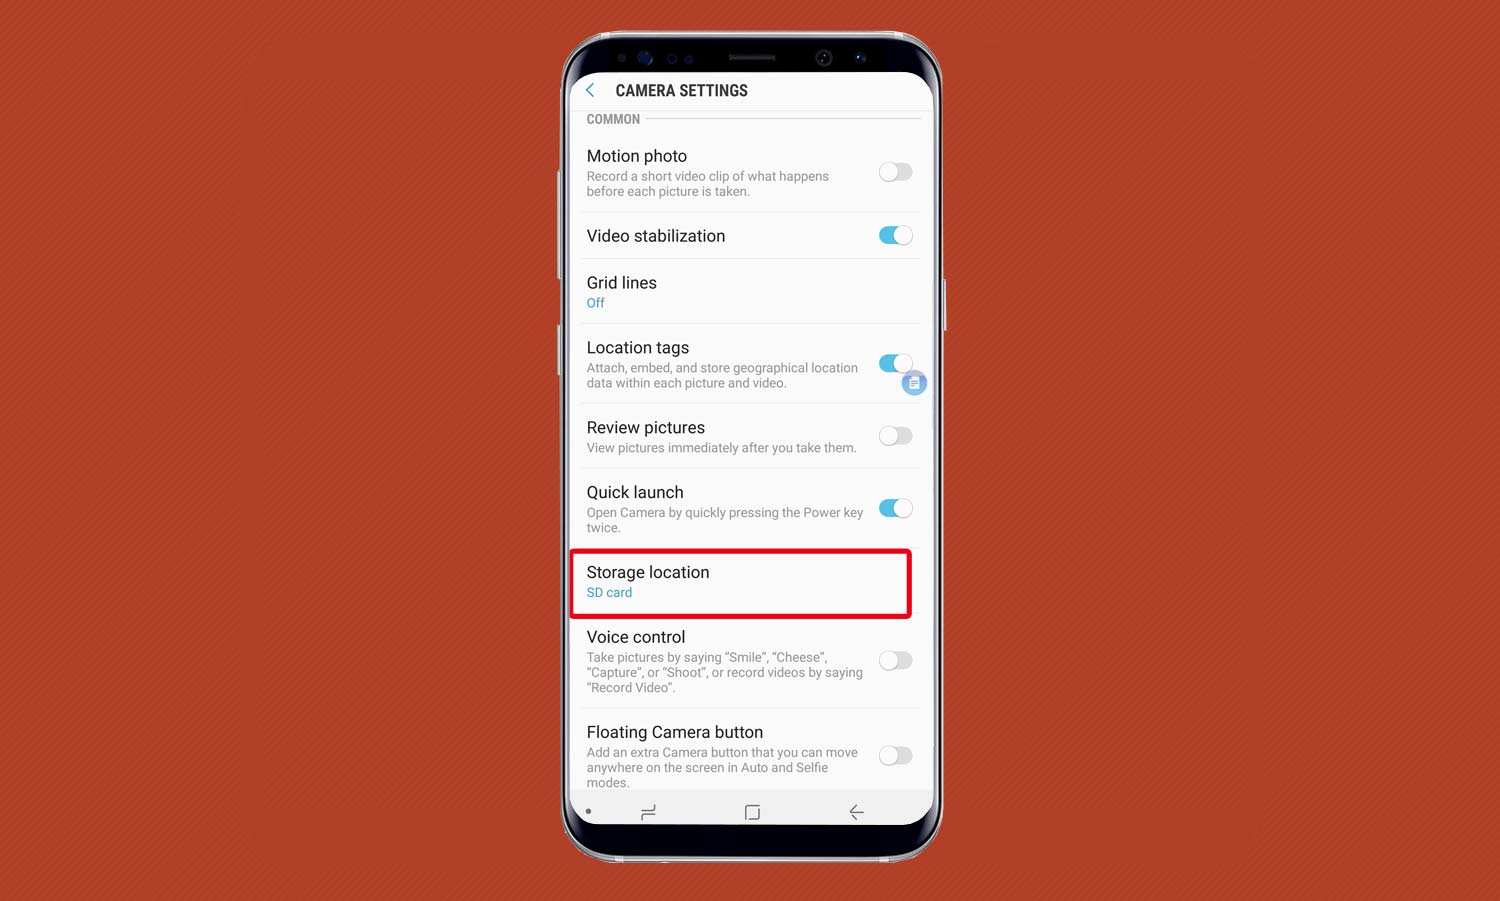
The next step is to save your new photos and videos on the card, by opening the camera and tapping on the settings gear logo. After scrolling down to Storage Location, change that setting to SD card.
Enable NFC
As is the case with the Galaxy S8 and S8+, the back of the Note8 has a near field communications (NFC) chip under the surface for moving small amounts of data wirelessly. Before you can use it, though, you’ll need to enable the feature.
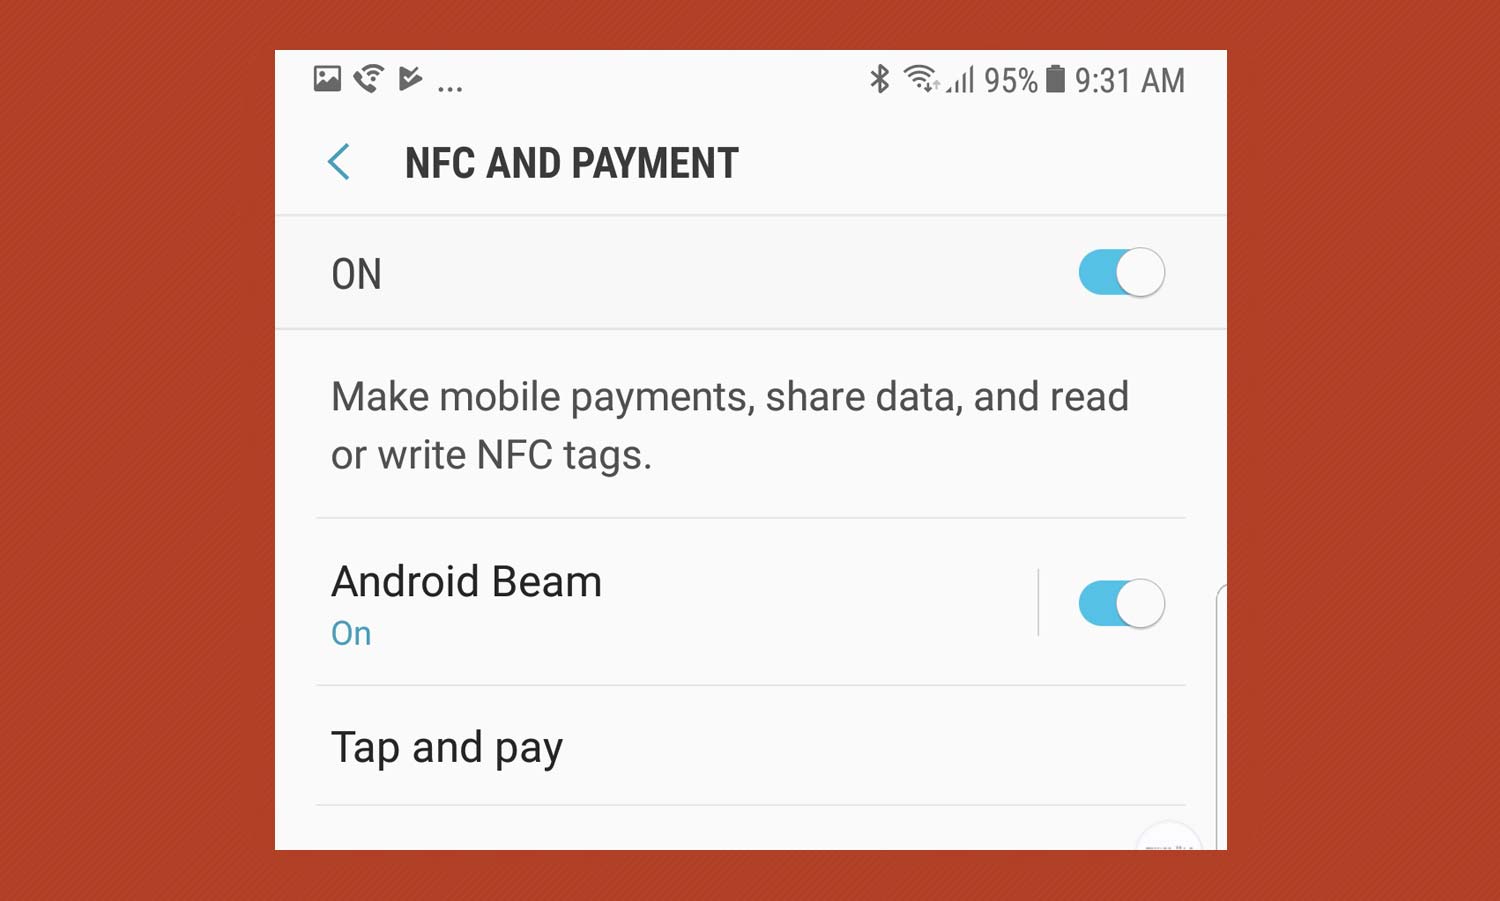
Here’s How: Start at the Settings’ Connections section and tap NFC and Payment to open the page. Then tap the on/off button at the top of the screen to enable the feature. While there you can open the Tap and Pay page to enable Android Pay or Samsung Pay. Speaking of which...
Enable Samsung Pay
It seems as if every company has its own digital payment system, and Samsung is no exception with Samsung Pay. Samsung’s mobile wallet works with many large banks, American Express and an increasing number of merchants, and once you turn on the feature, you can go on a phone-based shopping spree.
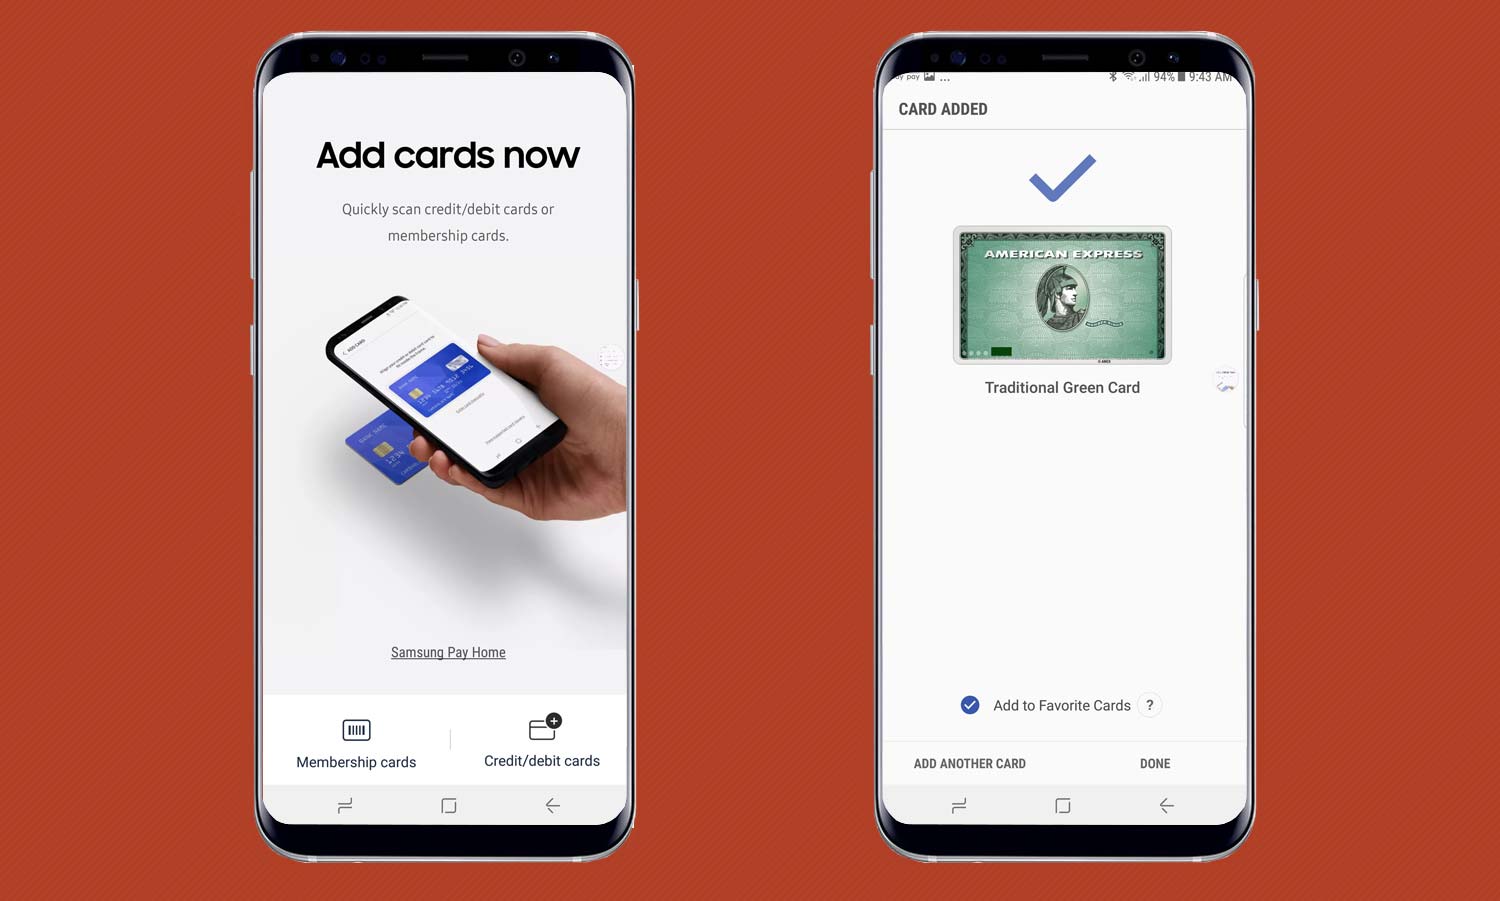
Here’s How: After tapping the Samsung Pay icon on the home screen, you’ll see that it’s already linked to your Samsung account and has your email address listed.
Tap Start to get the ball rolling by agreeing to the service’s license. (You can read the details but it’s thick with lawyer-speak.) After entering and confirming a PIN, you’ll need to add a credit card to actually pay for what you buy by aiming the Note 8’s camera at the card’s front. The phone lifts the pertinent info, but you will have to enter your name, the card’s verification code and your address.
After Samsung Pay validates the card, you’re set to shop.
Set Up Samsung Pass: Facial Recognition, Iris Scanning and Fingerprint
If you haven’t already secured your phone with a biometric ID, now would be a good time to do so. In addition to a password, PIN or tap pattern, the Note 8 can authenticate you based on your face, your eyes or fingerprint.
Because the Note 8 places its fingerprint scanner too close to the rear cameras, I’m going to have the phone know me by my blue eyes.
Here’s How: The first step is to go to the Lock Screen and Security section and tap on Samsung Pass. There, you’ll start a wizard for registering your eyes, face or fingerprints.
MORE: Step-by-Step: Set Up Iris Scanning on the Note 8
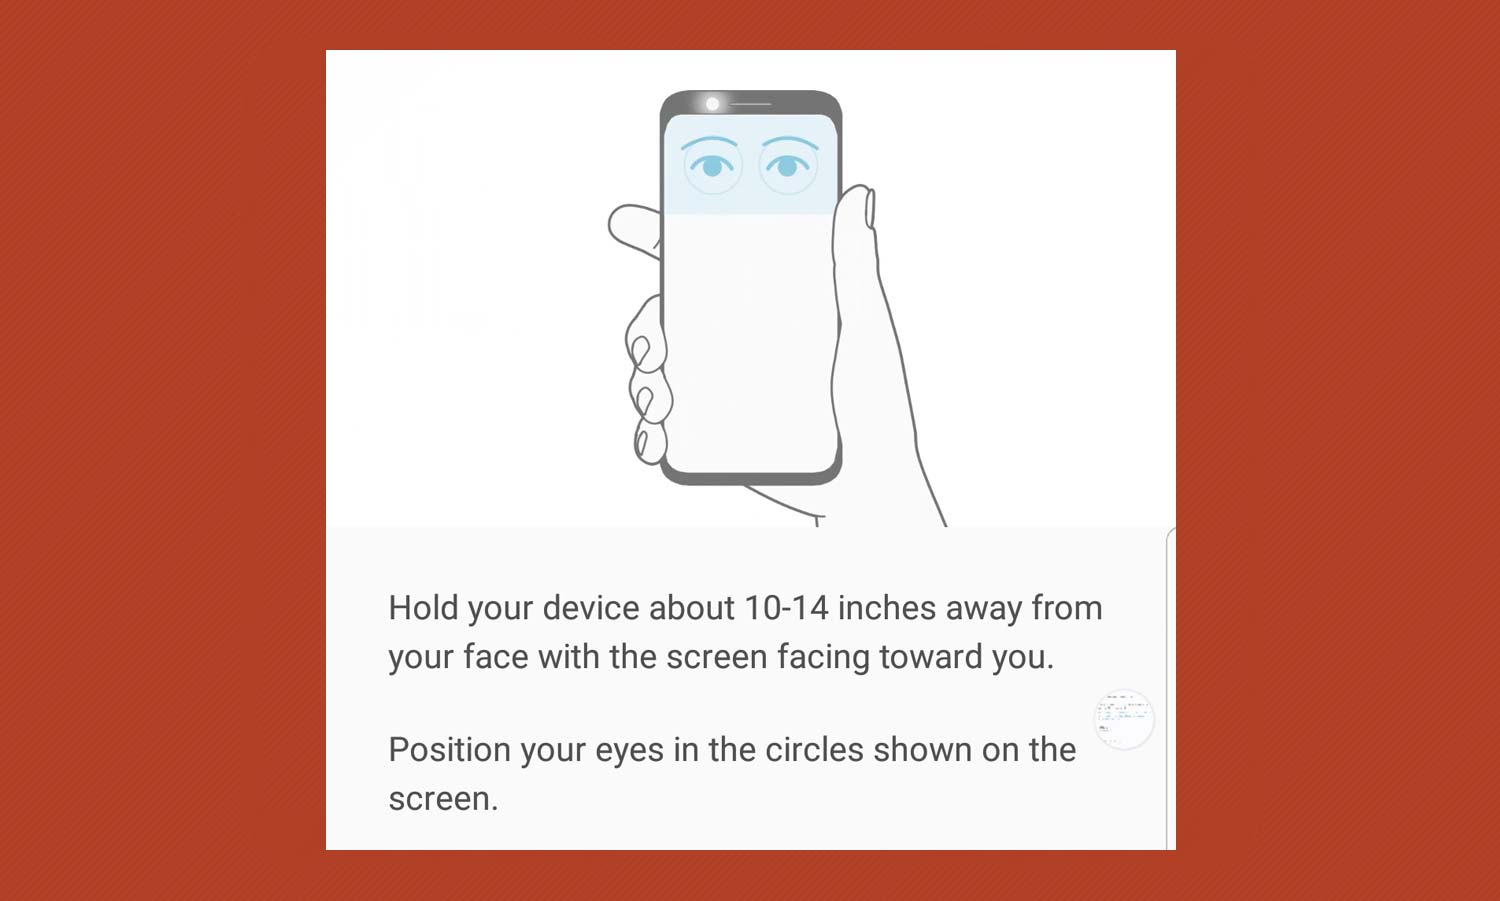
I first had to take my glasses off so the camera could see my irises unobstructed. Then, holding the camera about a foot from my face, I had to line up two circles so my eyes fit in them. It’s awkward but I got it on the fourth try and now, my lock screen and payment are set to my eyes.
Choose Your Icon Frames
With the Note 8 you get the choice of squared off icons or a variety based on what the app developer wants them to look like.
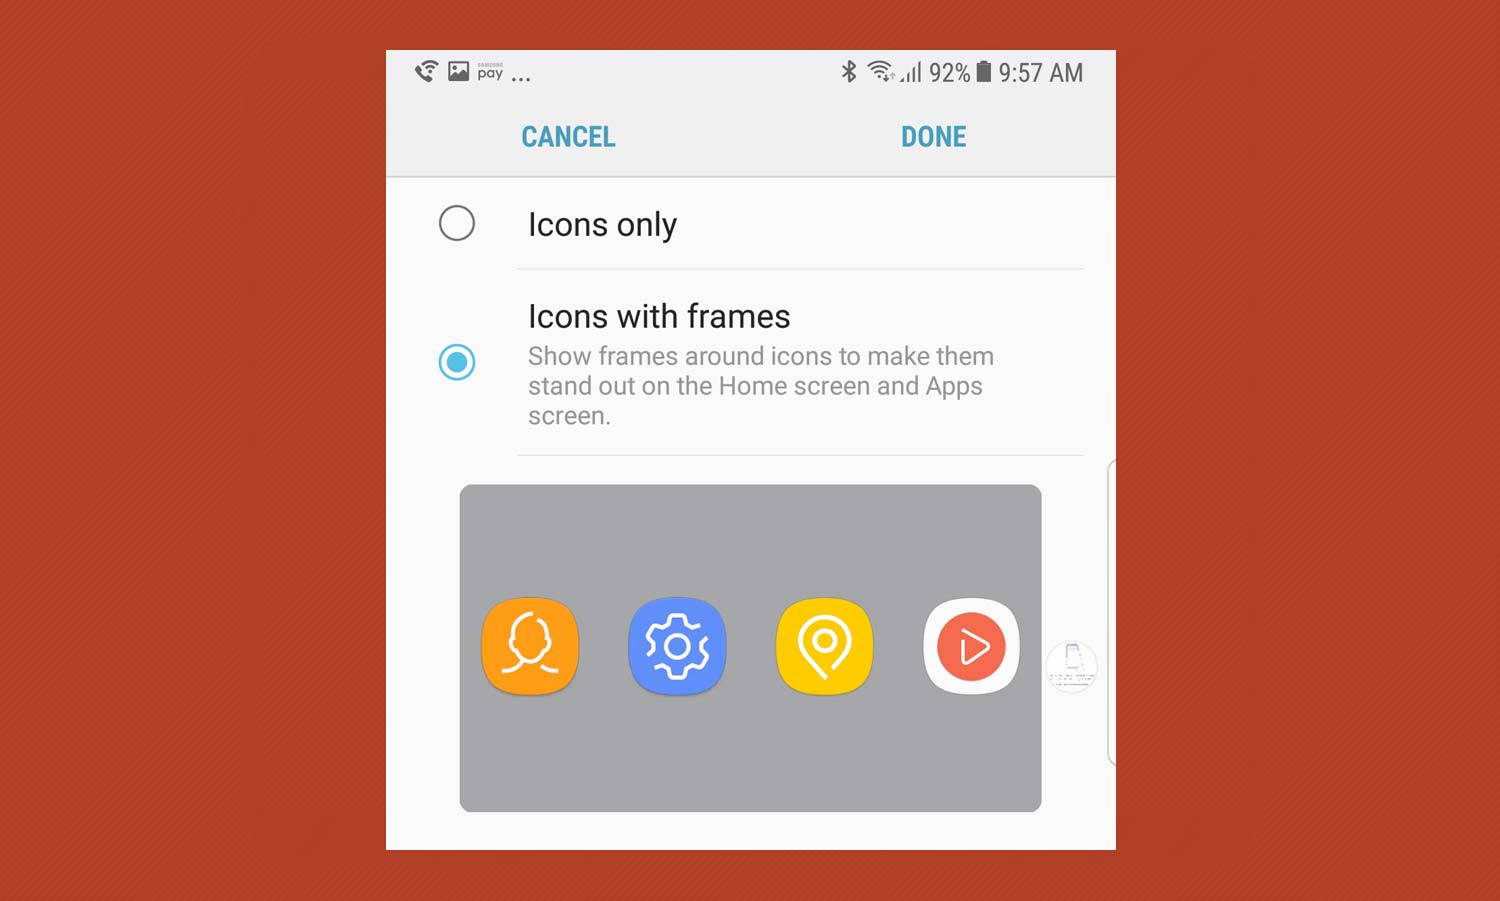
Here’s How: It’s my phone and I’ll be as compulsive as I want to, so I’m going to change the format to the standard squared-off frames. Go to the Display section of Settings and tap on Icon Frames. Then, you have the choice of frames or going frameless. Tap one to move on to something more important.
Pick Your Theme
A plain background and Theme are OK for most, but I like to customize it for my phone. If you feel the same, here’s how to pick a new theme.
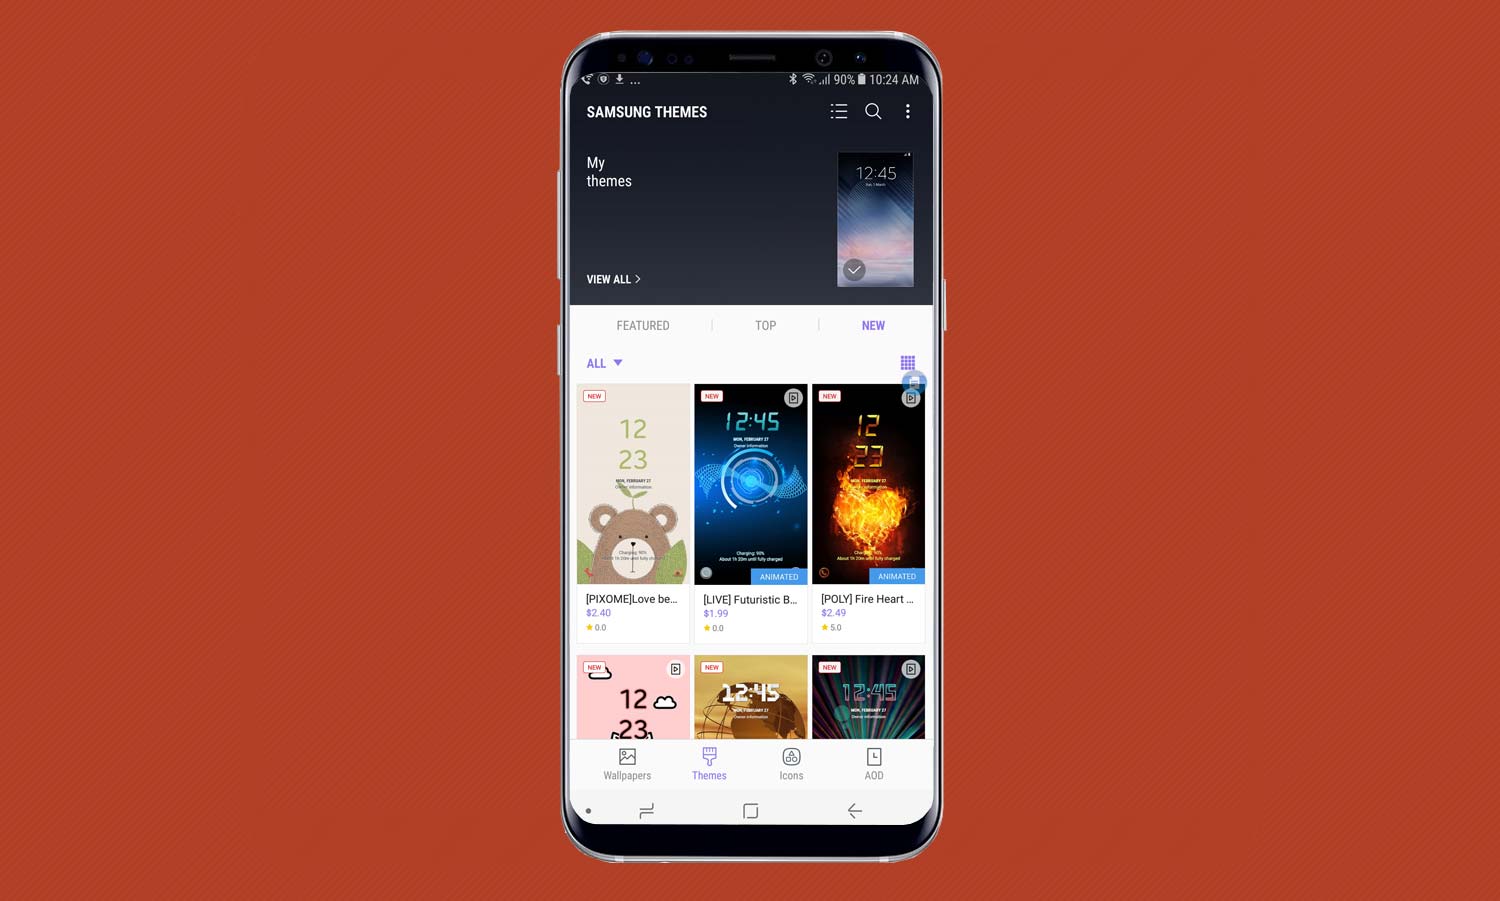
Here’s How: Go into the Wall Papers and Themes section in the Display portion of Settings, and tap on Samsung Themes. Here, you’ll find everything from themes based on nature and mechanical items to stuffed animals and fire. Most options are free, but some can cost a few dollars.
Block Accidental Touches
Who hasn’t butt dialed a call or found their phone’s screen was on while in a pocket or bag? There’s now a way to prevent it on the Note 8.
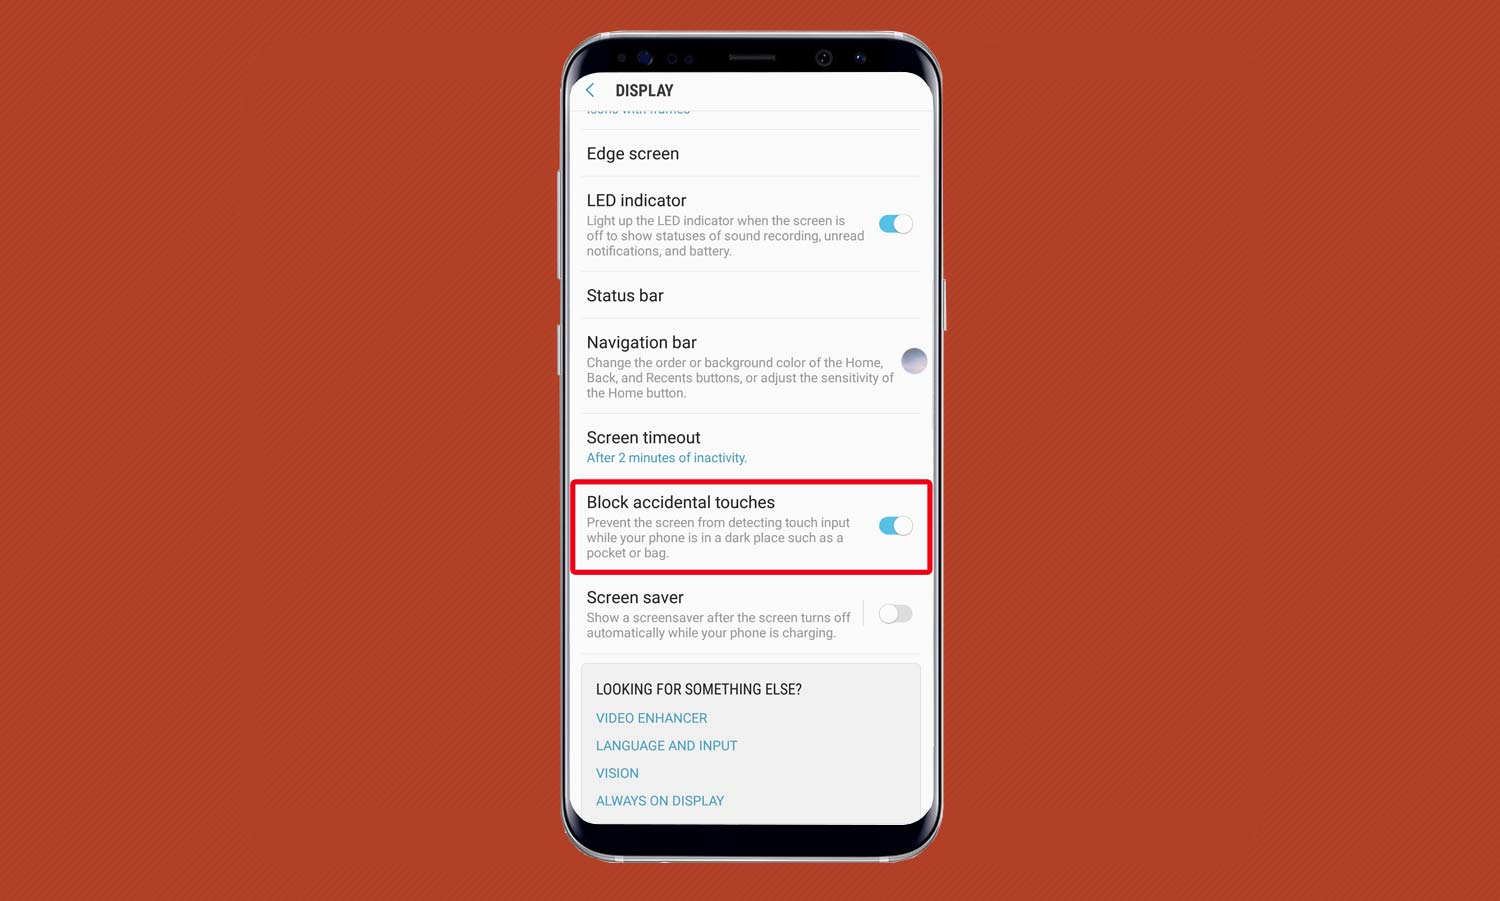
Here’s How: The Note 8 has a feature called Block Accidental Touches that can stop this by keeping the phone asleep and its screen inactive when it’s in a dark place. Start at Settings, pick Display and then tap on Block accidental touches.
Enable Special Gestures
With the Note 8’s large touch-screen, the world is literally at your fingertips when you set up the phone’s smart gestures. But there’s a bunch of special gestures available that go beyond zooming in and out on an image.
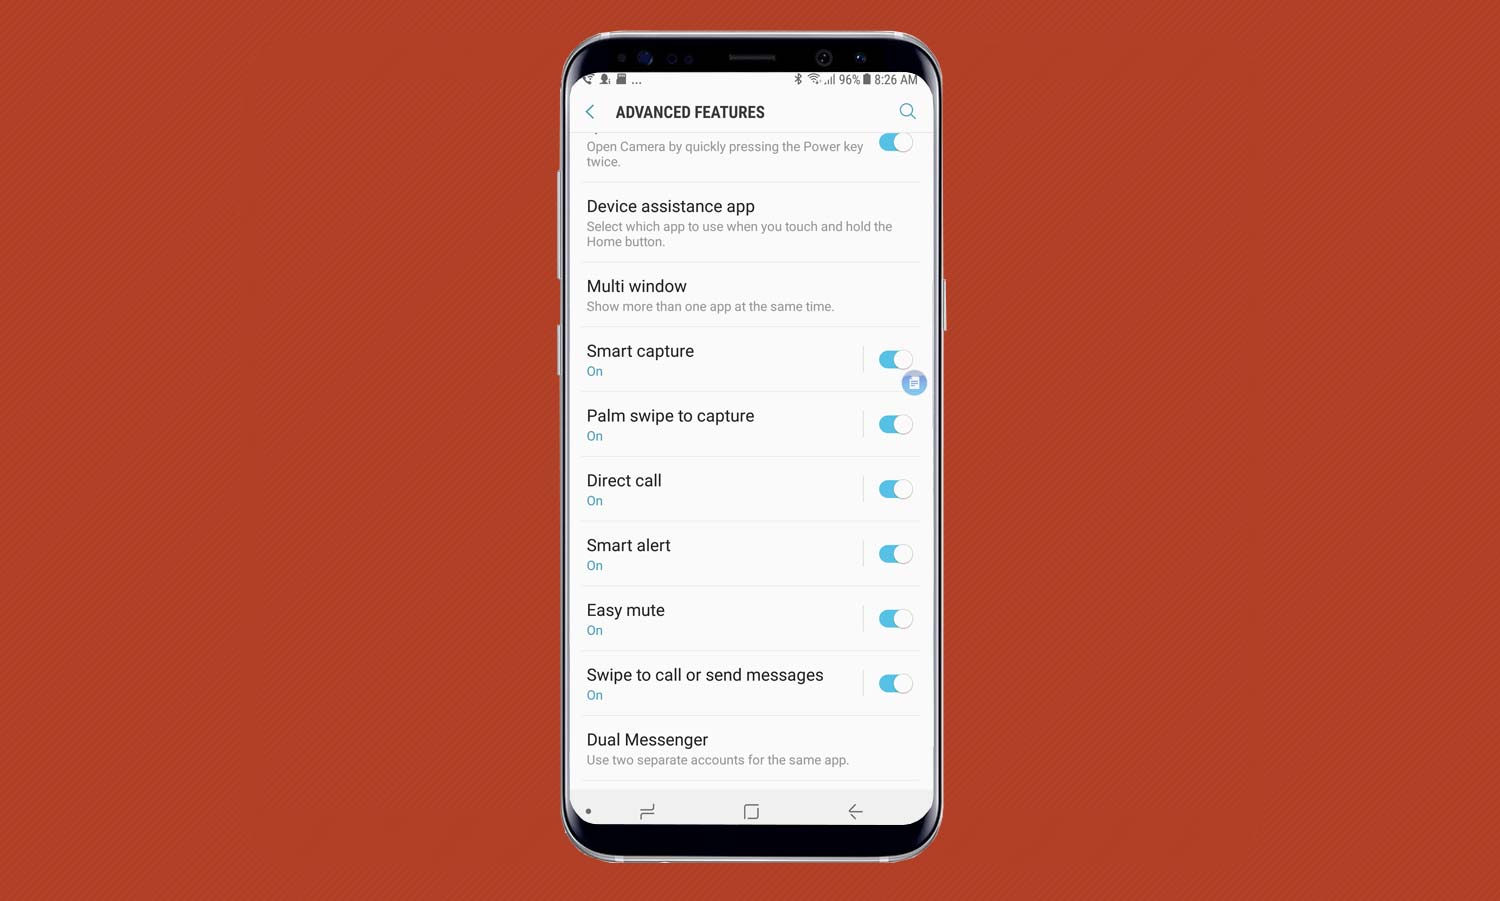
Here’s How: First, open the Advanced Features section in the Settings menu. Near the bottom of the page, you’ll see six tasks that you can manage with a swipe or a tap, from muting the audio (by covering the screen with your hand) to making a call or sending a text (by swiping over the contact).
Not enough? You can resize and move the screen around with your thumb using the Note 8’s On-Handed Mode; it’s in the middle of the Advanced Features page.
Enable Secure Folder
We all have secrets, and the Note 8 can keep them. All you need to do is set up Note 8’s Secure Folder, which encrypts the contents, regardless of whether what you’re saving is a compromising photo or bad poetry.
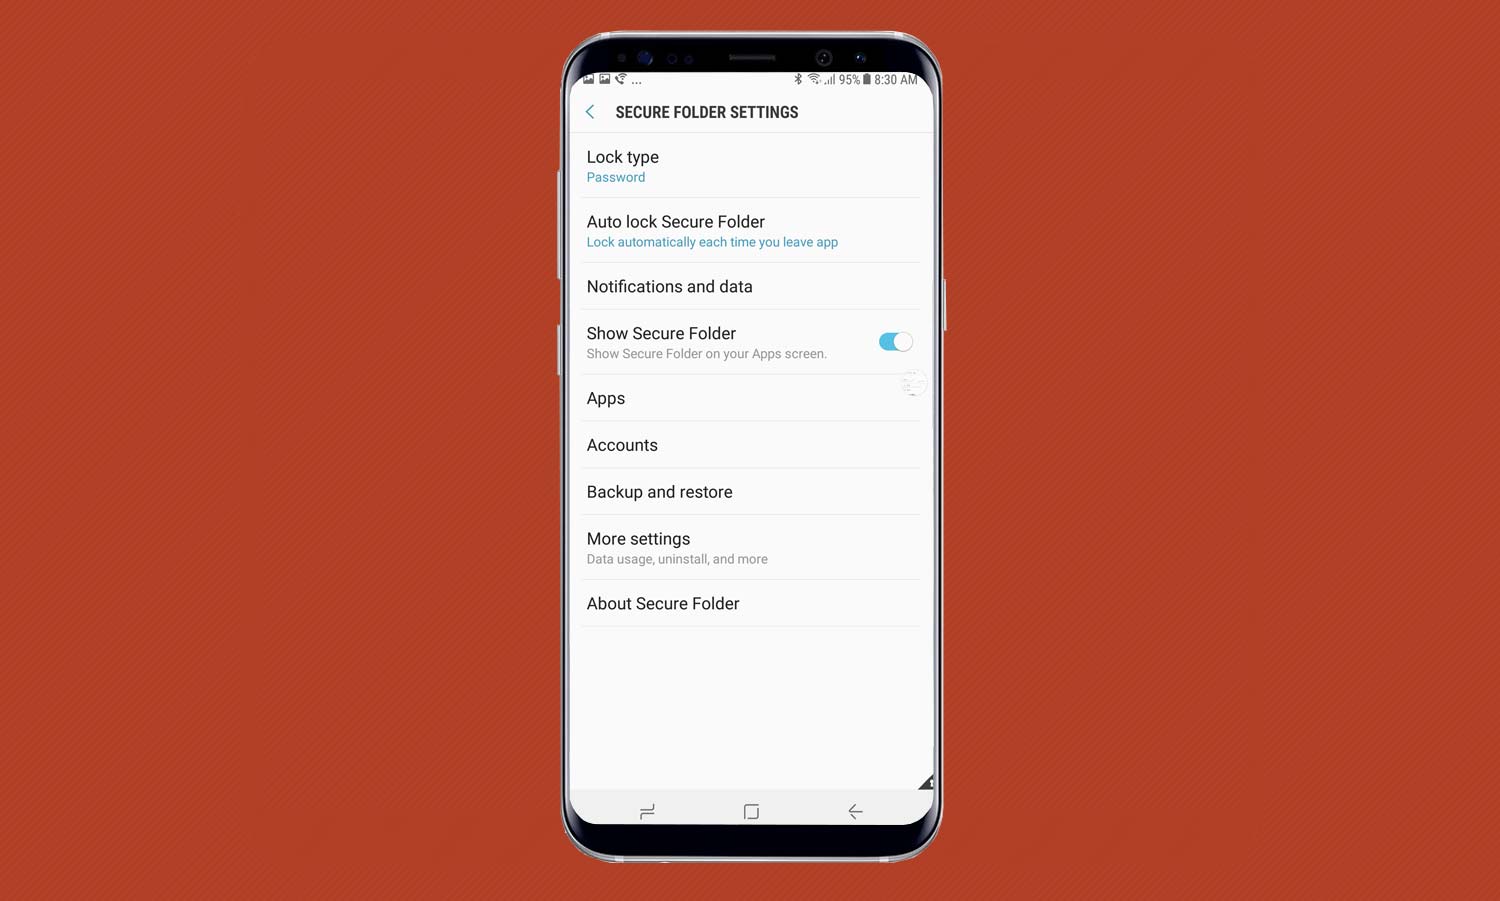
Here’s How: The first step is to go to the Home screen’s Samsung folder, which has a Secure Folder icon. After setting up your password, PIN, pattern or biometric iris, fingerprint or facial recognition data, it takes a minute for the folders to be set up.
After that, anything you put in any of these folders is far from prying eyes.
Turn on Video Enhancer
Why get a large-screen phone and not get the best video? The Note 8’s Video Enhancer uses video processing techniques to sharpen less-than-4K video, although it won’t work on every app.
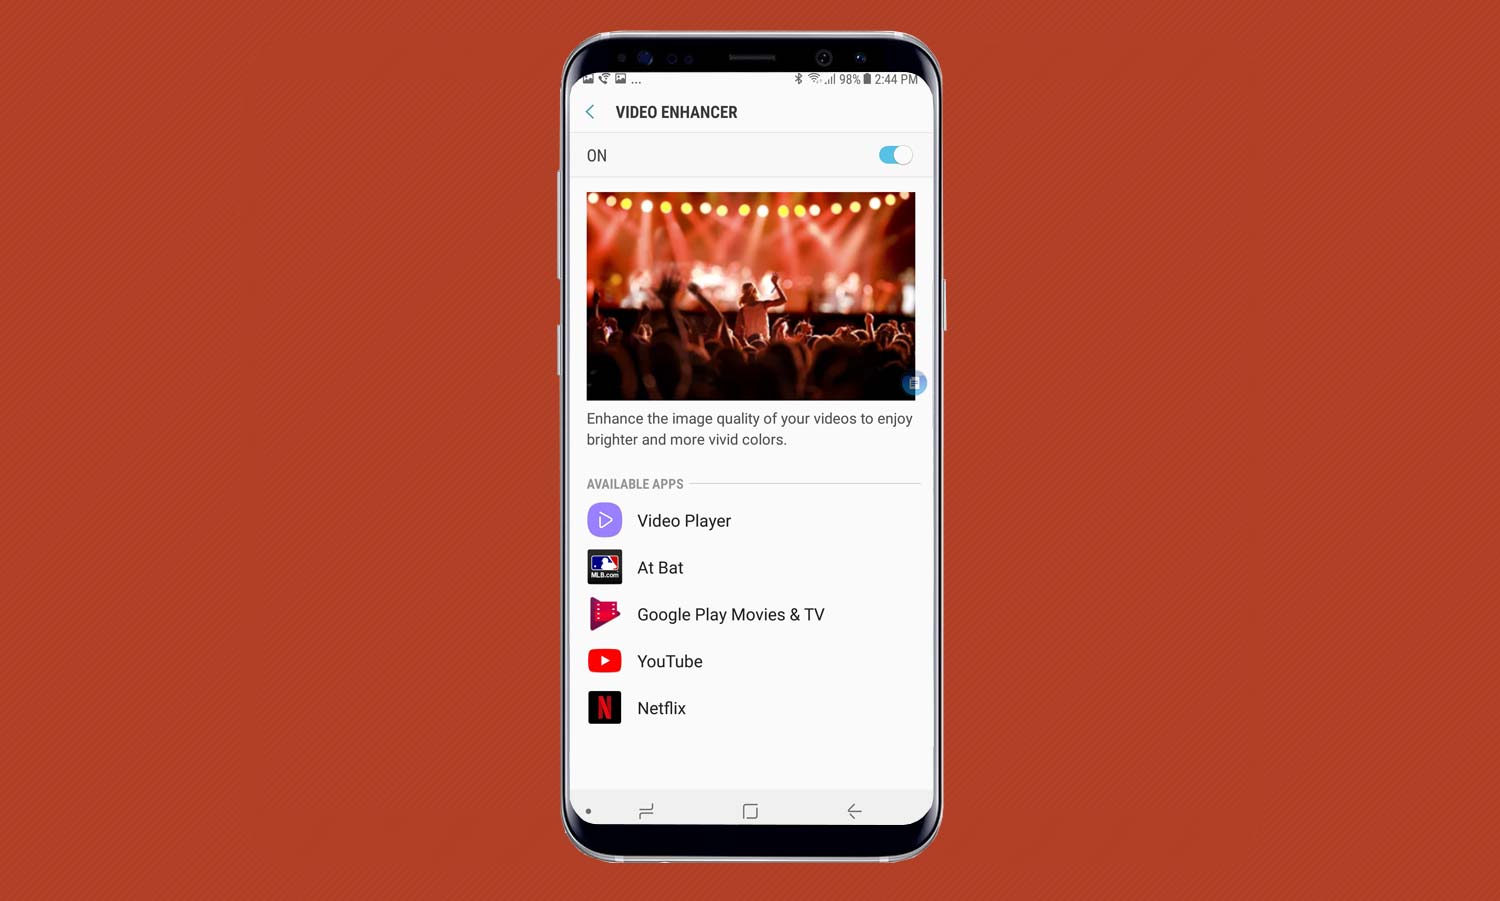
Here’s How: In the Display section of Settings, go to Advanced Features and scroll to the bottom of the page. There, you’ll find a button for turning the enhancer on and off.
That section also leads to a page that lists all the apps that can take advantage of the processing. It’s available for the included Video Player, Netflix, YouTube and third-party apps like MLB At Bat.
Brian Nadel is a freelance writer and editor who specializes in technology reporting and reviewing. He works out of the suburban New York City area and has covered topics from nuclear power plants and Wi-Fi routers to cars and tablets. The former editor-in-chief of Mobile Computing and Communications, Nadel is the recipient of the TransPacific Writing Award.
-
solitudezen Is there a way to get all excess words off camera screen. I take art photos. I have never put a sticker on a photo and don't really see as a need. Bixby has, so far, been more annoying than useful. That obnoxious voice popping out of nowhere if accidentally touch side of screen had to go as soon as I figured out how to shut it up. That voice out of thin air at 2 am insomniac news reading might as well have been the clown from IT popping out from under covers.Reply -
respite2410 I took the plunge into the Note 8 after having an LG V20 as my daily driver. The wide angle camera experience was okay but I found I had more use for a good zoom lense. Both the optical and digital zoom really deliver great quality photos. I traded in my G4 to get $300 off of the purchase price plus a free Gear 360 to boot. I had originally ordered the S8+ but I changed my mind after finding out how good the cameras were and how useful(and fun) that stylus could be. Any way you look at it, this is an awesome piece of equipment. Well done Samsung!Reply

