How (And Why) to Overclock Your Android Device
Overclocking isn’t just for PCs. Learn how to overclock your Android for a faster phone and better battery life.
Step Two: Flashing a Custom Kernel
Custom kernels are the key to overclocking, but they actually do a lot more than simply allow you to overclock. Custom kernels also often have extra features that improve or modify various aspects of your phone. Some kernels have deep sleep states for additional power savings, others allow a device’s capacitive buttons to light up in place of a notification light, and some have all of the features and modifications combined. As a result, there can be an awful lot of different kernels to choose from.

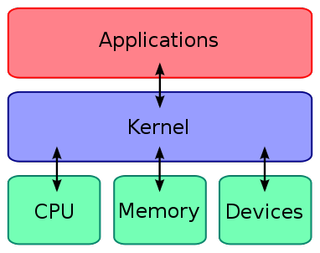
But before we get ahead of ourselves, you might want some information on just what exactly a kernel is. In the briefest of explanations, a kernel is the core of an operating system. It manages the system’s hardware to best serve the needs of the applications. Because Android is an open source platform, kernel code is available to the public, and because Android is a Linux based operating system, there are already thousands of developers familiar with kernel creation.
Kernels handle things like CPU speeds and voltages, and a custom kernel can have a modified CPU table that allows for speeds well beyond the CPU’s original specifications. To start overclocking, all you need is an overclocking-enabled kernel, but it’s important to choose the right one.
Finding the right Kernel
The best place to start your search for a custom kernel is on the XDA Developers Forums, specifically the forum for your particular device. Which features a kernel offers are all a matter of personal preference; however, it is absolutely crucial that the kernel you choose is compatible not only with your specific device model, but the version of Android that you have installed as well. Kernels are also often separated into those meant for stock ROMs, and those meant for custom ROMs.
If you are unsure if a kernel is compatible with your device, ask before attempting to install it. Flashing the wrong kernel will prevent your device from booting properly and can even permanently brick it.
Flashing a Custom Kernel
Sign up to get the BEST of Tom's Guide direct to your inbox.
Get instant access to breaking news, the hottest reviews, great deals and helpful tips.
Once you’ve confirmed that the kernel you’ve selected is compatible with your device and its software configuration, flashing it is quite simple.
Start by booting into your custom recovery mode, such as with the button combo while powering on or using the ROM Manager app. If you haven’t already, it is wise to create a “nandroid backup.” This will back up everything currently on your phone except for an SD card.

A nandroid backup is created through the custom recovery mode by selecting “backup and restore” and then selecting “backup.” This step can take several minutes dependent on how much you have installed on your device.
When it’s finished, connect your phone to your computer via USB (if you haven’t already) and select “mounts and storage” followed by “mount USB storage.” Then, on your computer, open your phone’s storage folder and copy the “clockworkmod” folder to a safe place. You can restore your phone to its current state at any time by copying that folder back to your phone, booting into recovery mode, selecting “backup and restore” followed by “restore” and choosing the appropriate date.

While your phone is still connected to your computer, download and copy your kernel file to your device. It will be a .ZIP file, but do not unzip it.
With the kernel file on your phone and the backup folder in a safe place, select “Unmount” followed by “Go Back” to get to the main recovery menu.
As an optional but highly recommended step, select “wipe cache partition.” This will not erase any of your data but will remove any cached information that may conflict with your new kernel.

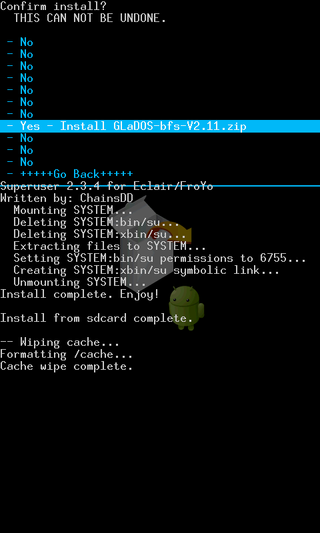
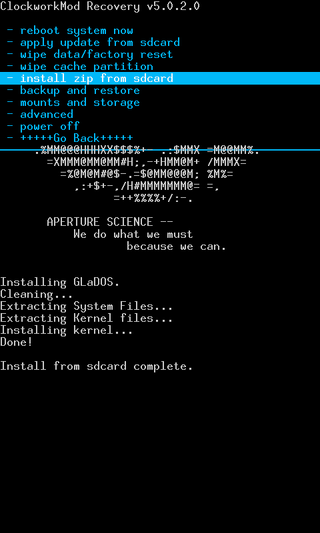
Lastly, select “install zip from sdcard” followed by “choose zip from sdcard.” Find the kernel file you copied to your phone, select it, and choose “Yes” to start the flashing process. This will take several seconds to a minute. Do NOT restart the phone or pull the battery during this part.

Once flashing is complete, select “reboot system now.” The first boot can take up to 10 minutes while applications are optimized for the new kernel. With the new kernel installed, you’re just about ready to start overclocking.
Current page: Step Two: Flashing a Custom Kernel
Prev Page Step One: Rooting Next Page Step Three: Using SetCPU-
razor512 I have my HP touchpad overclocked to 1.89GHz which is somewhat decent from the stock 1.2GHz. Really breathes new life into a dual core ARM CPU.Reply
PS wanted to add that there is a way to save battery life without losing performance.
Justy like how every CPU has it's own max overclock, every CPU also has it's own minimum voltage per given clock speed
You can extend your battery life by adjusting the voltage for each clock speed step to a lower level (to test for stability, use your overclocking app to cap the clock speed to the desired level, then run a few benchmarks)
you can generally lower almost all of the voltages and thus give your self a decent battery life boost without losing any performance, and best of all, you can still keep your overclock
simply set the lowest stable voltage for each clock speed in the list.
During what most would consider normal use, you rarely ever hit the CPU's max speed, and if you overclock, you are even less likely to hit the overclock speed (many overclocking apps will record the CPU clock speed history and you will see how little those higher clock speeds are used (but when they are used, they really show their benefit, (especially when loading web pages and launching applications)
All in all, find your max clock speed and fine your lowest voltage for each clock speed in the table, and you will have a device that bas better battery life and much faster performance
(the lower voltage tweak takes longer to do than the max overclock because you will be testing every single clock frequency in the list for stability each time you lower it's voltage -
razor512 wanted to also addReply
(sry for the typos in the previous message sees they still did not add a edit feature)
anyway, most of those benchmarks base their scores on more than just the CPU but the overclocks only really effect the CPU, (depending on the device, you can overclock the L2 cache and in some cases, even the GPU and RAM ) -
I think your Linpack results are a bit off. A higher score in Linpack is better, and the Nexus S can get 60+ MFLOPSReply
-
quantumrand HurrpancakesI think your Linpack results are a bit off. A higher score in Linpack is better, and the Nexus S can get 60+ MFLOPSReply
Very sorry, you're right! The Linpack table is incomplete. The numbers listed are the times in seconds it took to complete the test.
The stock Nexus S speeds scored an average of 16.8 MFLOPS and the 1.4GHz speeds scored 23.6 MFLOPS. While the Linpack "top scores" page lists the Nexus S getting 60+ MFLOPS, it's not actually true. Those scores are from other devices running custom ROMs ported from the Nexus S. -
zblade It is no surprise that overclocking the CPU did not do much for game benchmarks, this is no different to PC gaming unless it is a heavy CPU intensive game. You should of overclock the GPU as well. Tegrak Overclock Ultimate is what you want to use to overclock both CPU and GPU.Reply
I think people would be interested in seeing real world performance difference between overclock GPU and CPU -
kj3639 After getting my Epic 4G (Galaxy S) when it had Eclair on it, I've found the performance increase from overclocking pales in comparison to optimization brought on by Google and the excellent ROM community. Froyo brought a JIT compiler, Gingerbread EXT4 partitions and ICS finally has a hardware accelerated GUI, making it iOS smooth. The ROM community has really cleared out the crap, making my phone lean. Compared to my Eclair Epic, my ICS Epic feels like it's a full generation ahead. Overclocking... yeah it helps a bit, but software optimization does so much more in the Android world.Reply -
razor512 if you look at the benchmark details you will see that the 40% overclock actually netted a 40% boost in the CPU benchmark scoreReply
PS while overclocking helps, a device with more RAM helps even more especially when paired with a custom ROM. if your device has 1GB of RAM, then you can have custom roms where more elements of the OS are buffered into RAM, this allows for a more iphone like experience when it comes to transitions in the UI. By default, android unloads UI elements and other graphical elements from memory when they are not visible, but it can be modded to keep it so you get a smoother UI experience, eg widgets not having to redraw when you rotate the screen, and all native UI's within the OS load instantly. (takes more RAM but not an issue if you have 1GB
PS for really good demo of what overclocking can do, try playing HD video that is not GPU accelerated, on my HP touchpad, I can have 3 720p flash videos playing at the same time with no lag when at 1.89GHz
I can also play a single, large 1080p 10 bit movie (10+GB in size) smoothly and that MKV file is not supported by the GPU so that is all CPU
If you have an android or any other device that can be overclocked, then you owe it to yourself to overclock it, the benefits are not noticeable at all times but during the times when they are noticeable, they are really really noticeable. -
Devon Day It's been a good nearly two years since this article got put out. And it's been a good nearly four years since my LG Optimus S released to the public. From my experience with that old phone, adding a custom ROM helps to speed it up quite a bit and overclocking really makes it fly in comparison to its stock performance.Reply
On newer hardware the benefits of overclocking may be less noticeable, but it is very noticeable on old devices.
Right now my LG Optimus S runs Android 4.1.2 and is overclocked to 768MHz, using SetCPU, when the battery isn't being charged and the screen is turned on and in use. Not only am I overclocking it, but I'm also attempting to balance out performance and battery life by using profiles in SetCPU to underclock it when not in use. This is compared to when it ran stock Android 2.3.3 at 600MHz. Yes, the performance increase is very noticeable and makes installing a custom JellyBean ROM and overclocking very worthwhile.
