15 Essential iPhone 8 Tips for Getting Started
Take advantage of your new iPhone 8 or iPhone 8 Plus by enabling these features as soon as possible.
iPhone 8 Setup Guide
The iPhone 8 and 8 Plus have hit stores, with phones arriving in the hands of anyone who preordered them. After you ogle the stunning glass back on your new phone, it's time to turn on the iPhone and check out all the new features — and maybe get reacquainted with some older ones.
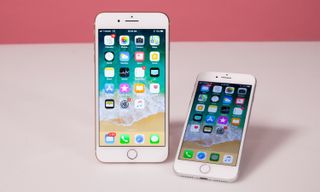
Here's a look at the first things you should do when setting up your iPhone 8 or 8 Plus.
Restore from Backup
If you already own an iPhone, you can move all your apps and data over to your new phone using an iCloud backup; connecting your phone to your computer and restoring your data from an iTunes backup does the same thing. With iOS 11, the process is even easier, with a new automatic setup feature.
MORE: Awesome Hidden iOS 11 Features
How to do it: Put your new iPhone 8 next to your old device. A prompt will pop up asking if you want to pair the two devices. If you do so, then your new iPhone will automatically sign into iCloud, iTunes, the App Store, iMessage, your iCloud Keychain and FaceTime, plus restore all of your device settings, from Wi-Fi network to keyboard preferences.

All of the content from your old device is quickly and seamlessly restored on your new phone. If you've never set up Siri, your Home button or your True Tone display preferences, you can do that now; otherwise, your iPhone 8 will automatically have those backed up and ready to go.
Set Up Touch ID
You can skip this part, but you'll want to set up Touch ID eventually, so you might as well do it now. Taking advantage of the iPhone 8's fingerprint sensor adds a layer of security, both for unlocking your phone and authenticating mobile payments.
Sign up to get the BEST of Tom's Guide direct to your inbox.
Get instant access to breaking news, the hottest reviews, great deals and helpful tips.
How to do it: You can set up the iPhone 8's Touch ID when you first set up your phone or by selecting Touch ID & Passcode from the Settings app menu.

Apple requires you to lift and press your finger on the Home button multiple times to get a complete scan. An on-screen visualization of your fingerprint is your guide; you can see what parts of the finger pad still need to be scanned.
You can add multiple fingerprints and name them, and you can even add other people's fingerprints to Touch ID. (Just be sure you trust them to unlock your phone.)
Turn on Hey, Siri
Siri is the iPhone's voice-activated assistant, and it's even smarter and more natural-sounding in iOS 11 (which comes preinstalled on your iPhone 8).
MORE: Best New iOS 11 Features
If you've already used Siri, you won't have to set it up again thanks to iOS 11's Automatic Setup feature. If you haven't used Siri, Apple will guide you through activating the assistant when you turn on your iPhone for the first time, or you can turn on Siri under Siri & Search in the Settings app menu.
How to do it: To set up Siri, you have to say, "Hey, Siri," several times so the assistant will recognize your voice and respond to it rather than someone else's. (This is useful if you have multiple iPhone owners in one house or office.) Then, you can choose whether Siri is male or female, and pick an accent — American, British or Australian. My Siri is a male Brit, but your mileage may vary.
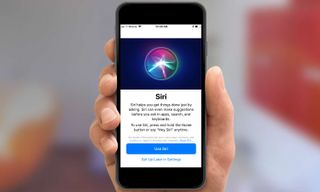
Finally, toggle the settings on to make sure Siri will listen for the "Hey, Siri" command, allowing the Home button to summon Siri and allowing your iPhone to listen for Siri even when the device is locked.
Set Up Apple Pay
Chip cards were supposed to be faster and more secure than their magnetic-swipe predecessors, but instead, chip card transactions are slow, and that extra layer of security hasn't prevented scammers from stealing my card number. Apple's mobile payment service, Apple Pay, is lightning-fast compared to a chip card transaction; just hold the iPhone up to the in-store payment terminal and use Touch ID to confirm your purchase.
Apple Pay stores your credit and debit card details on the iPhone itself, using a hardware feature called a Secure Element. This makes Apple Pay more secure to use than a service that stores your card numbers in the cloud.
How to do it: Setting up Apple Pay is almost as easy as using it. You'll be prompted to set up Apple Pay when you first set up your new phone, but you can also access the feature by going to Settings and selecting Wallet & Apple Pay.

To add a card, position it in front of your iPhone camera so it's in the on-screen frame. (You can also add your card details manually, but who wants to do that?) After the iPhone camera scans you card, enter your name and the three-digit security code on the back of the card. Behind the scenes, Apple will contact your card issuer to verify the details and add the card to Apple Pay. This happens almost instantaneously, and you'll get an alert from your bank or credit card company that your card has been added to Apple Pay.
You can add multiple cards to Apple Pay and select which one to use at the moment you buy something. To add another card down the line, either select Wallet & Apple Pay in the Settings app menu or do it directly from the Wallet app. You can also use Settings to change which card to bring up first by default.
Turn on Find My iPhone
Find My iPhone has helped many an iPhone owner find their lost or stolen device, so I recommend that you take advantage of this feature.
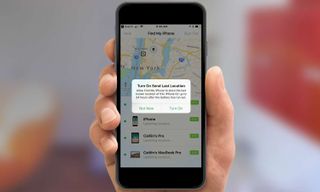
How to do it: Open the Find iPhone app on your new iPhone 8 and sign in with your Apple ID. Voila! That enables Find My iPhone to pinpoint your device's exact location, even if it's nowhere near you, using the same app on any of your other iOS or macOS devices. You can also lock a device, activate Lost mode and remotely erase the phone, all directly from the Find iPhone app. Locking a device means that someone who finds it (or steals it) has to have your Apple ID and password to activate the phone, even if it's been erased. This feature is a must-use for protecting your data and finding your stuff.
Experiment with 3D Touch
Apple introduced 3D Touch a few iPhones back — the iPhone 6s, if you want to get technical — but if you haven't upgraded in a while, you may not know that you can access a slew of app shortcuts just by pressing a little more deeply on your iPhone screen than you normally would.
How to do it: You don't actually have to open an app to see your most recent activity or jump into one of the most frequently used features. Just press a little harder on an app icon to see the options offered in the transparent shortcut pop-up window. (The display will respond with a tiny vibration when you've pressed hard enough to activate 3D Touch.)
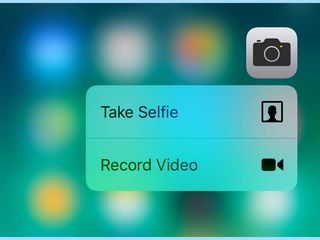
This is useful when you need to quickly jump into an app, like opening the Instagram Stories camera to capture a super-cute dog before she passes you on the street. This also works in more practical situations, like checking the weather forecast in the iOS Weather app or composing a new text message in the Messages app.
Even longtime iPhone users forget about 3D Touch, but it really is useful once you figure out what shortcuts you actually need.
Customize Control Center
If you're upgrading from an older iPhone, you'll notice that Control Center on your iPhone 8 looks a whole lot different. That's because Apple gave it a makeover in iOS 11.
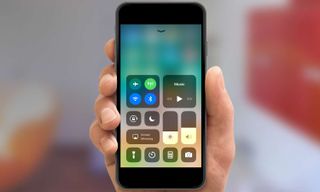
How to do it: Now, when you swipe up from the bottom of your screen, you'll actually be able to customize what you see in Control Center. There are 11 default widgets, ranging from the flashlight (of course) to calculator, camera, music and Wi-Fi shortcuts. But you can change the Control Center panel so it features only the widgets you want by selecting Control Center in the Settings app menu. Check out our guide to customizing Control Center here.
Install ARKit apps
Apple is going all in on augmented reality with iOS 11, and you should install a few AR apps on your new iPhone as soon as you can. You can find them in the App Store, where Apple has curated an AR section that includes all of the available augmented reality apps. Watch that space; there's more to come.

How to do it: You don't need a new iPhone to take advantage of Apple's augmented reality features, just a device with an A9 processor capable of running iOS 11. We dive into how Apple's ARKit works here and pick some of our favorite new AR apps here.
Play with Portrait Mode
iPhone 8 Plus owners get a bonus photo feature called Portrait Lighting, made possible by that device's dual-lens camera. With Portrait Lighting, you can change how the subject of your photo is lit, even after you photograph them. (Sorry, iPhone 8 users — you won't be able to take advantage of these Camera app settings.)

How to do it: Open the Camera app on your iPhone 8 Plus and select Portrait Mode from the bottom menu. You'll immediately see the various Portrait Lighting effects: Natural Light, Studio Light, Contour Light, Stage Light and Stage Light Mono. Stage Light and Stage Light Mono are a little finicky; you have to make sure your subject is perfectly framed in the circle on-screen, and even then the effects are uneven. But this is a beta feature, so we expect it to improve with software updates.
Turn on Night Shift and True Tone
These two iPhone features change the color of your screen to adapt to the time of day and your surroundings. Night Shift, which has been around since iOS 9.3, transforms your screen from a cool blue tone to warmer shades to help you ease into sleep. True Tone, a new addition to the iPhone 8 and 8 Plus, automatically adapts your iPhone screen's brightness to the light in your environment. In the past, you had to manually adjust your screen in Control Center, but now True Tone does the work for you.
How to do it: Both Night Shift and True Tone can be turned on under Display & Brightness in the Settings app. You can also access them in iOS 11's Control Center by pressing on the control that adjusts your display's brightness.
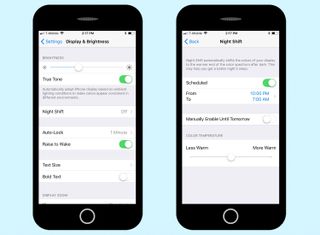
Night Shift is customizable, so you can schedule it according to your bedtime and adjust the warmth of the nighttime display (some like it ultrawarm, and some like it just a little less blue).
Change your wallpaper
If you're anything like me, you're extremely lazy about customizing your devices. Life is packed with enough decisions to make, and Apple's default wallpaper is just fine. But every so often, I remember that an iPhone should reflect me as a person, and I experiment with another wallpaper. (I always end up leaving the default option in place, but don't be like me.)

How to do it: Open the Settings app and scroll down to Wallpaper. Tap on "choose a new wallpaper," and select from photos you've taken or dynamic, still and live photos that Apple has preinstalled on the device. Live wallpapers are particularly cool, because they move when you 3D Touch them.
Set Up Emergency SOS
Find My iPhone aims to solve your device distress, but what about when it's you who's in trouble? There's Emergency SOS, Apple's way of helping you quickly alert emergency services when you're in trouble.
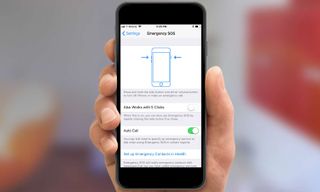
How to do it: Emergency SOS is located in your Settings app. From there, you can enable a five-click gesture, rapidly clicking the iPhone's side button five times, that will trigger a 911 call. You can also press and hold the side button and volume button (either up or down) to activate Emergency SOS. And you can set up emergency contacts, who will receive text messages with your current location when the 911 call is placed from Emergency SOS.
Adjust Auto-Lock
Your iPhone defaults to a 1-minute Auto-Lock, which means your iPhone display will lock down and require a pass code or Touch ID to unlock. If you're trying to multitask by looking at your iPhone display occasionally while doing other things, that 1-minute default is pretty annoying.

How to do it: Under Display & Brightness in the Settings app, you can change the Auto-Lock setting to 5 minutes or even adjust it to never if you like living on the edge.
Turn on Do Not Disturb
As much as you love the iPhone 8, sometimes you need to disconnect. That's where Do Not Disturb comes in. This setting silences all alerts on your phone. You can schedule Do Not Disturb for meetings or when you go to bed, and allow calls from specific VIPs to come through. iOS 11 brought Do Not Disturb to driving; you can manually turn it on, set it to activate automatically or choose to activate it when your phone connects to your car's Bluetooth. This will limit distracted driving, because you won't even see incoming calls or texts.
How to do it: You can customize every Do Not Disturb setting — and there are many options to choose from — in the Do Not Disturb section in your Settings app. You can even create a custom text that will automatically be sent to your contacts when they try to reach you while you're driving. If something is truly an emergency, that contact can reply to your message with "urgent" to break Do Not Disturb.
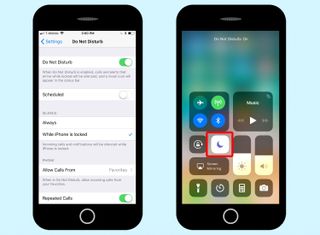
To quickly toggle on DND, swipe up to view Control Center and tap the moon icon. When customizing Control Center, you can also add a specific control to turn on the feature when you're driving.
MORE: Managing Do Not Disturb in iOS 11
Buy a wireless charger
You may have heard that the iPhone 8 and 8 Plus now feature wireless charging, a standard that many premium Android phones adopted years ago. The bad news: Apple doesn't include a wireless charger in the box. If you have a Qi wireless charger in your house, that'll do the trick. But Apple worked with Mophie and Belkin to create two $60 wireless charging bases that are specifically designed for the new iPhones. The company is also making its own AirPower charging dock, but that won't be available until 2018.

How they work: The Mophie and Belkin charging docks will support fast wireless charging when Apple rolls that feature out in a future iOS 11 update. That means these specific bases will charge your iPhone up to 50 percent faster than other Qi wireless chargers. If juicing up quickly is important to you, you may want to consider investing in one of these chargers, which are available to buy right now in the Apple store or via Apple's website.
Caitlin is a Senior editor for Gizmodo. She has also worked on Tom's Guide, Macworld, PCWorld and the Las Vegas Review-Journal. When she's not testing out the latest devices, you can find her running around the streets of Los Angeles, putting in morning miles or searching for the best tacos.
