iPhone 6 Camera Quirks – and How to Fix Them
Even the best phone camera on the market isn't perfect. These workarounds for the iPhone 6 and 6 Plus cameras will yield even better photos.
The new camera in the iPhone 6 and iPhone 6 Plus is one of the best smartphone cameras we've seen. Its superfast autofocus and use of local tone mapping to rein in overexposure put the camera in a class of its own.
But no gadget is perfect, and the iPhone 6 camera needs a little handholding for best results. In certain situations, the iPhone 6 camera can suffer from three (fixable) glitches: poor white balance, low contrast and discolored skin tones. We've seen these results in photos from two iPhone 6 and three iPhone 6 Plus models we tested. We shared the photos with Apple to confirm that the cameras were not defective and that we didn't make any mistakes when shooting with them.
MORE:Best and Worst iOS 8 Camera Apps
Luckily, you can often fix these problems by changing how you compose shots or by using tools built into the new iOS 8 camera app. However, it's well worth the $1 to $5 for third-party camera apps that simplify the process, yield better results and provide advanced photographic controls, to make a great phone camera even better.
Quirk 1: White balance and the purple problem
White balance is the process of recognizing and neutralizing any tint in light that distorts colors. These distortions are easiest to see on a white object (hence the term), which, depending on the light, can have a bluish or orangey cast.
The iPhone 6 (read review) and 6 Plus, however, have a unique white-balance quirk we haven't seen before: Some colors, especially reds and browns, sometimes appear purplish. In many of our shots during reviews and follow-up tests we saw items including apples, red peppers, a brown stone church and even green grass take on a purple cast. This happens in photos that lack a neutral tone such as white, gray or even beige.
The iPhone 6 camera needs these neutral tones more than other cameras to get the white balance right. You can see the effect in this video of red peppers at a farmer's market, shot with an iPhone 6 Plus. The white balance changes as I move my hand farther into the frame.
Sign up to get the BEST of Tom's Guide direct to your inbox.
Get instant access to breaking news, the hottest reviews, great deals and helpful tips.
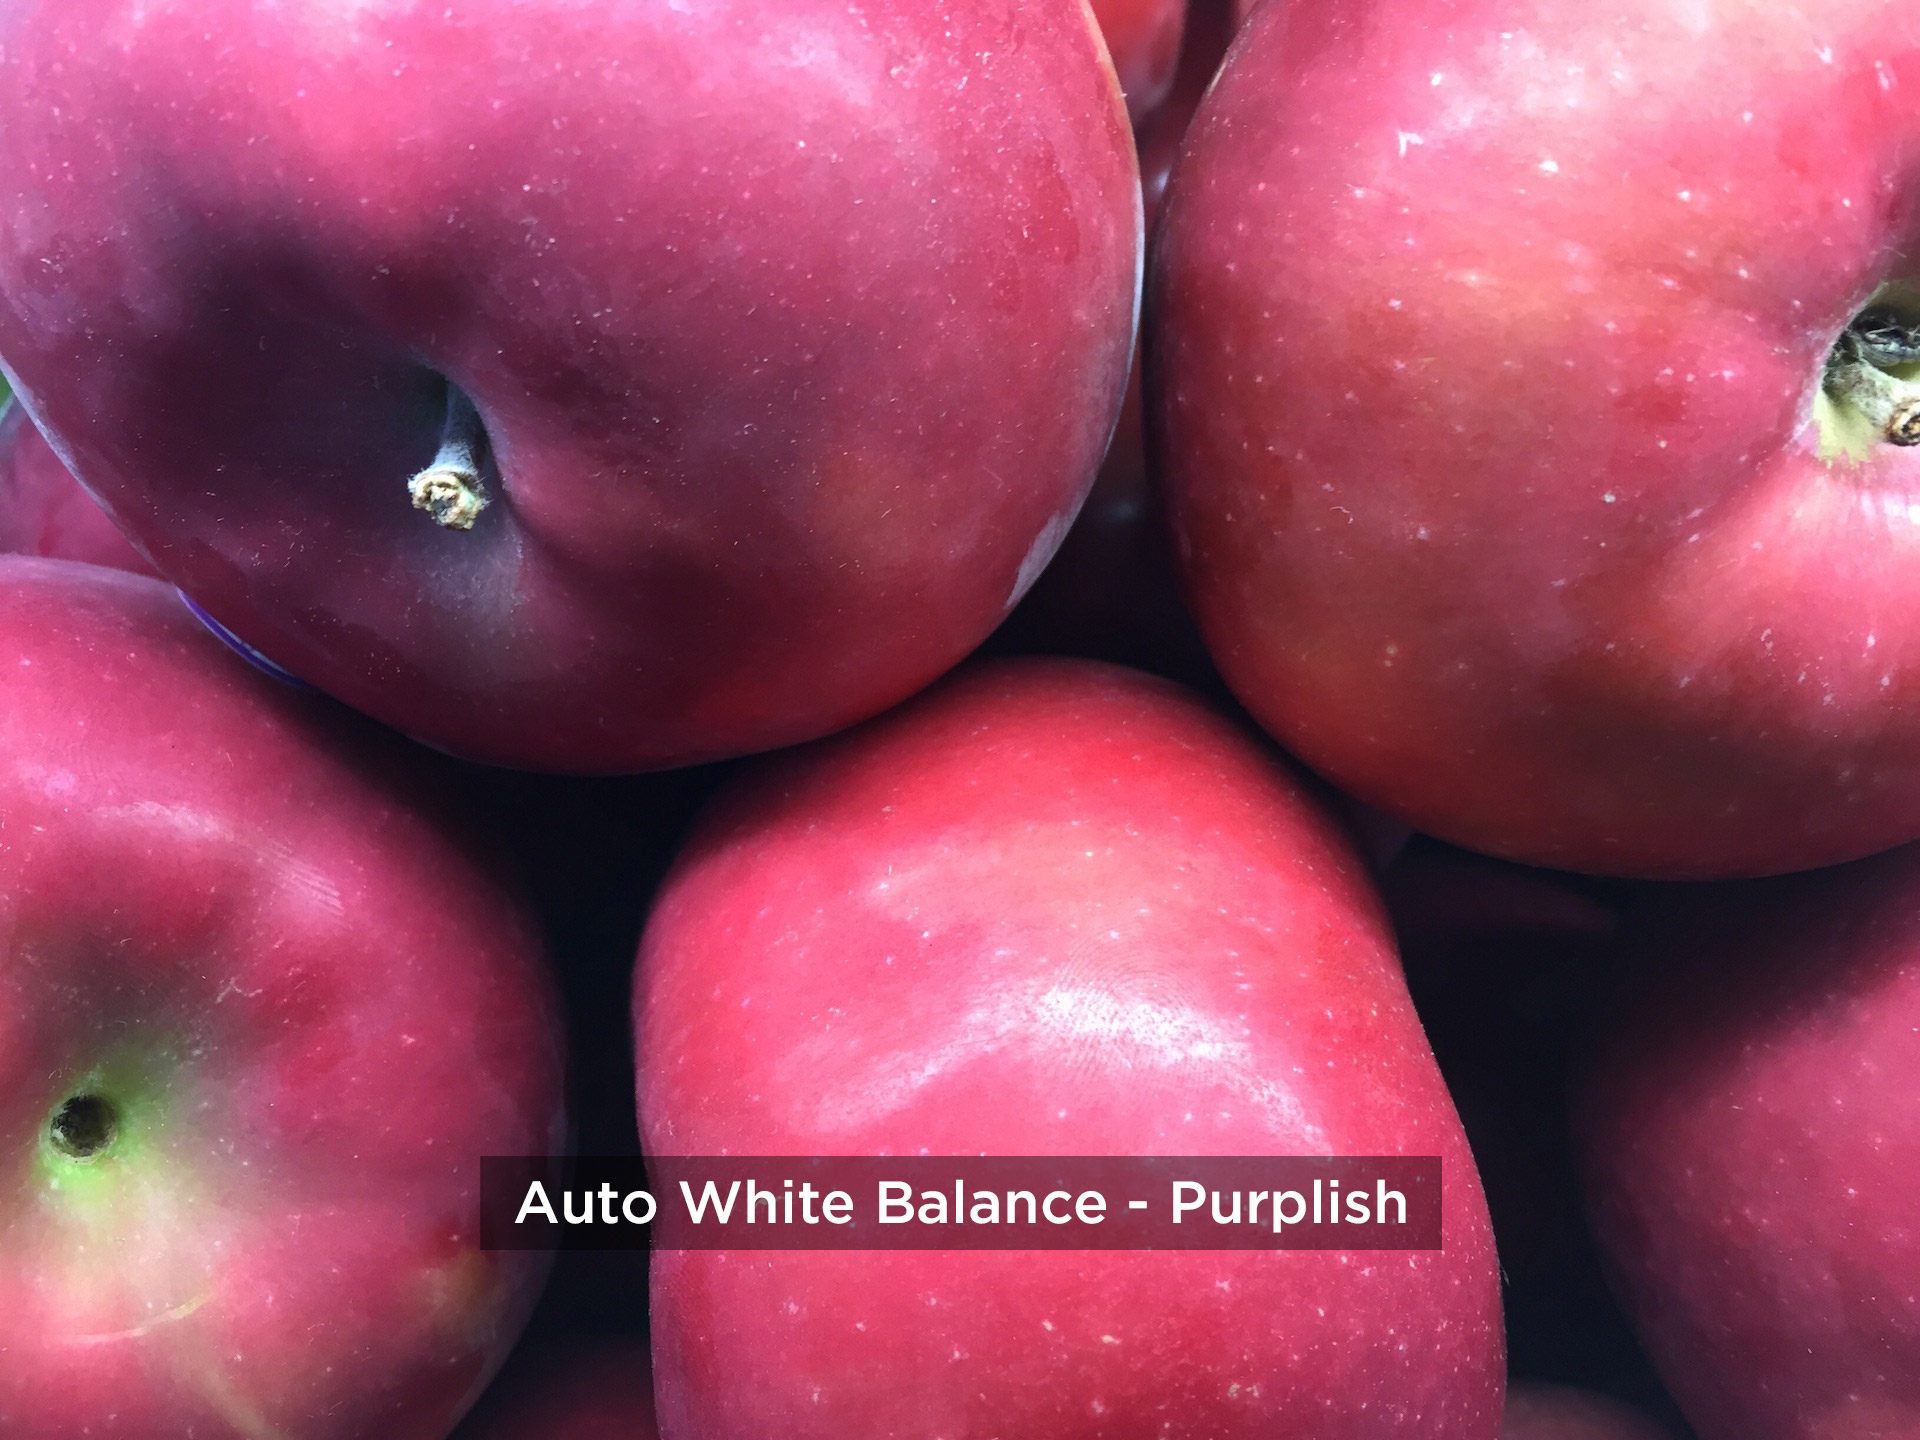
The same thing happens in this tight shot of apples. With no neutral shade to measure, the camera produces a purplish image.
Simple Fix: Recompose
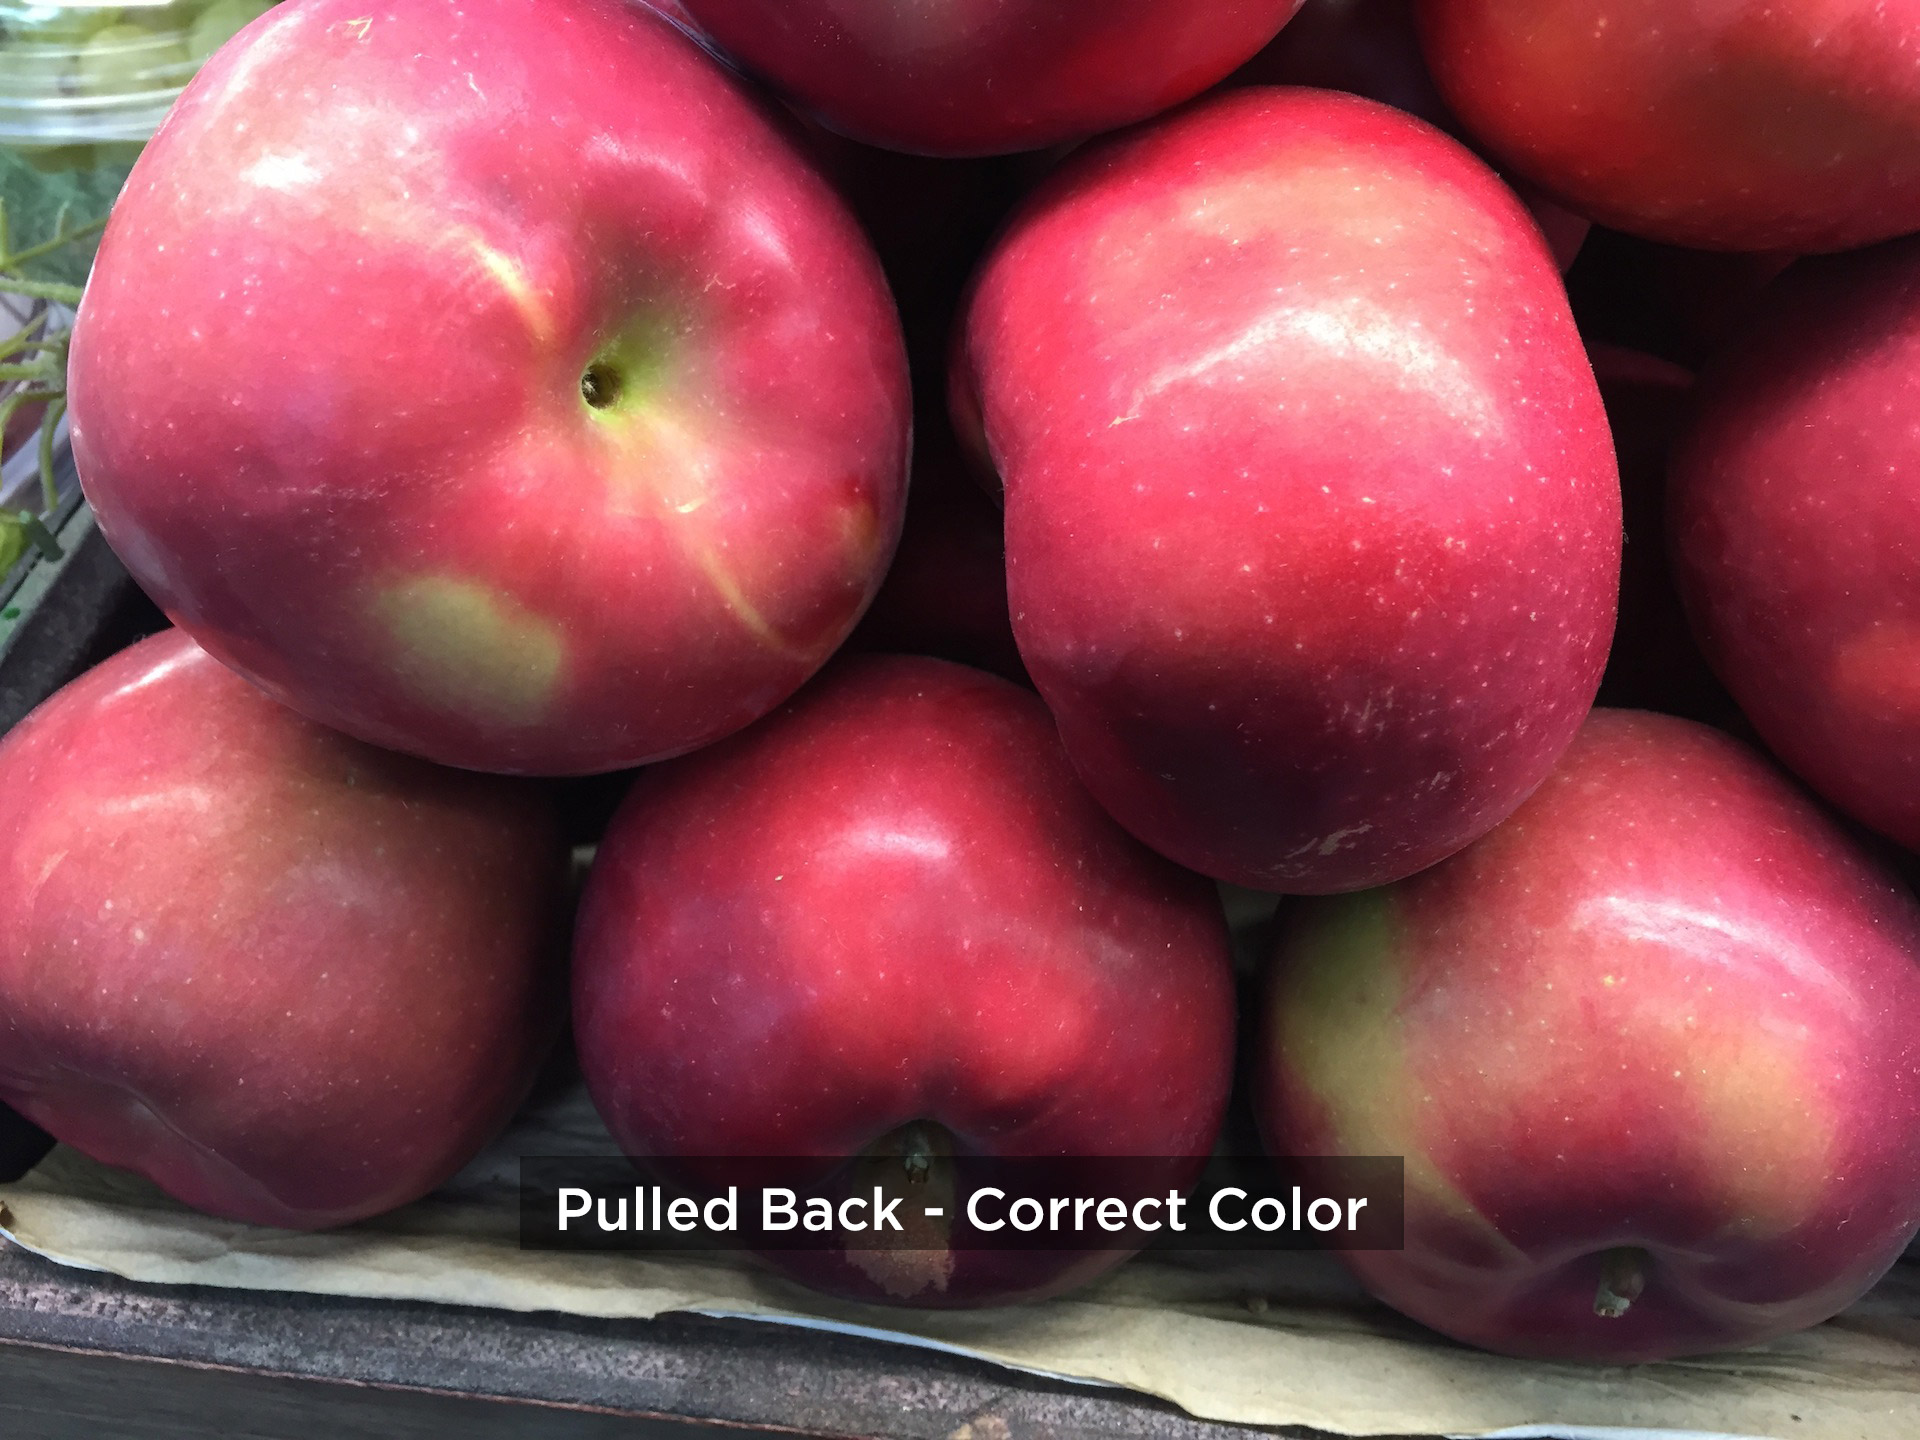
If you can, recompose the shot to include a neutral tone, from which the camera can better take a color reading. Here, I pulled the iPhone 6 Plus camera back to capture some of the plywood shelf — which provided more of a neutral shade. You can crop out such items after taking your photos. (The "only" 8-megapixel photos still provide plenty of resolution to allow cropping.)
Advanced Fix: Adjust White Balance with an App
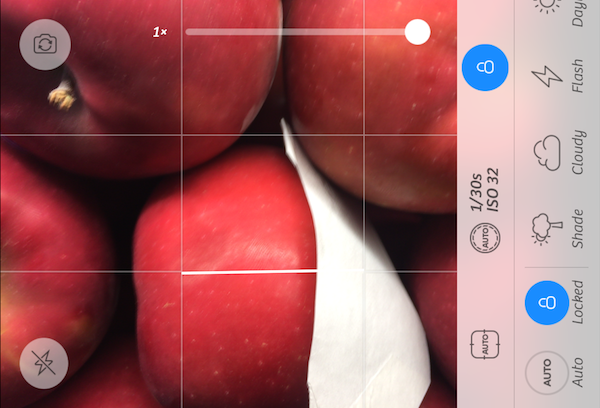
If you can't easily change the composition, you can manually adjust the iPhone's white balance with an app such as Camera+ ($1). It allows you to override the iPhone's auto white balance and select a preset designed to neutralize the color in settings such as fluorescent lights, incandescent bulbs or candlelight.
Several camera apps also allow you to lock white balance to a custom setting. To do that, add something white or gray to your photo (the back of a cash register receipt worked for me), then press the lock button.
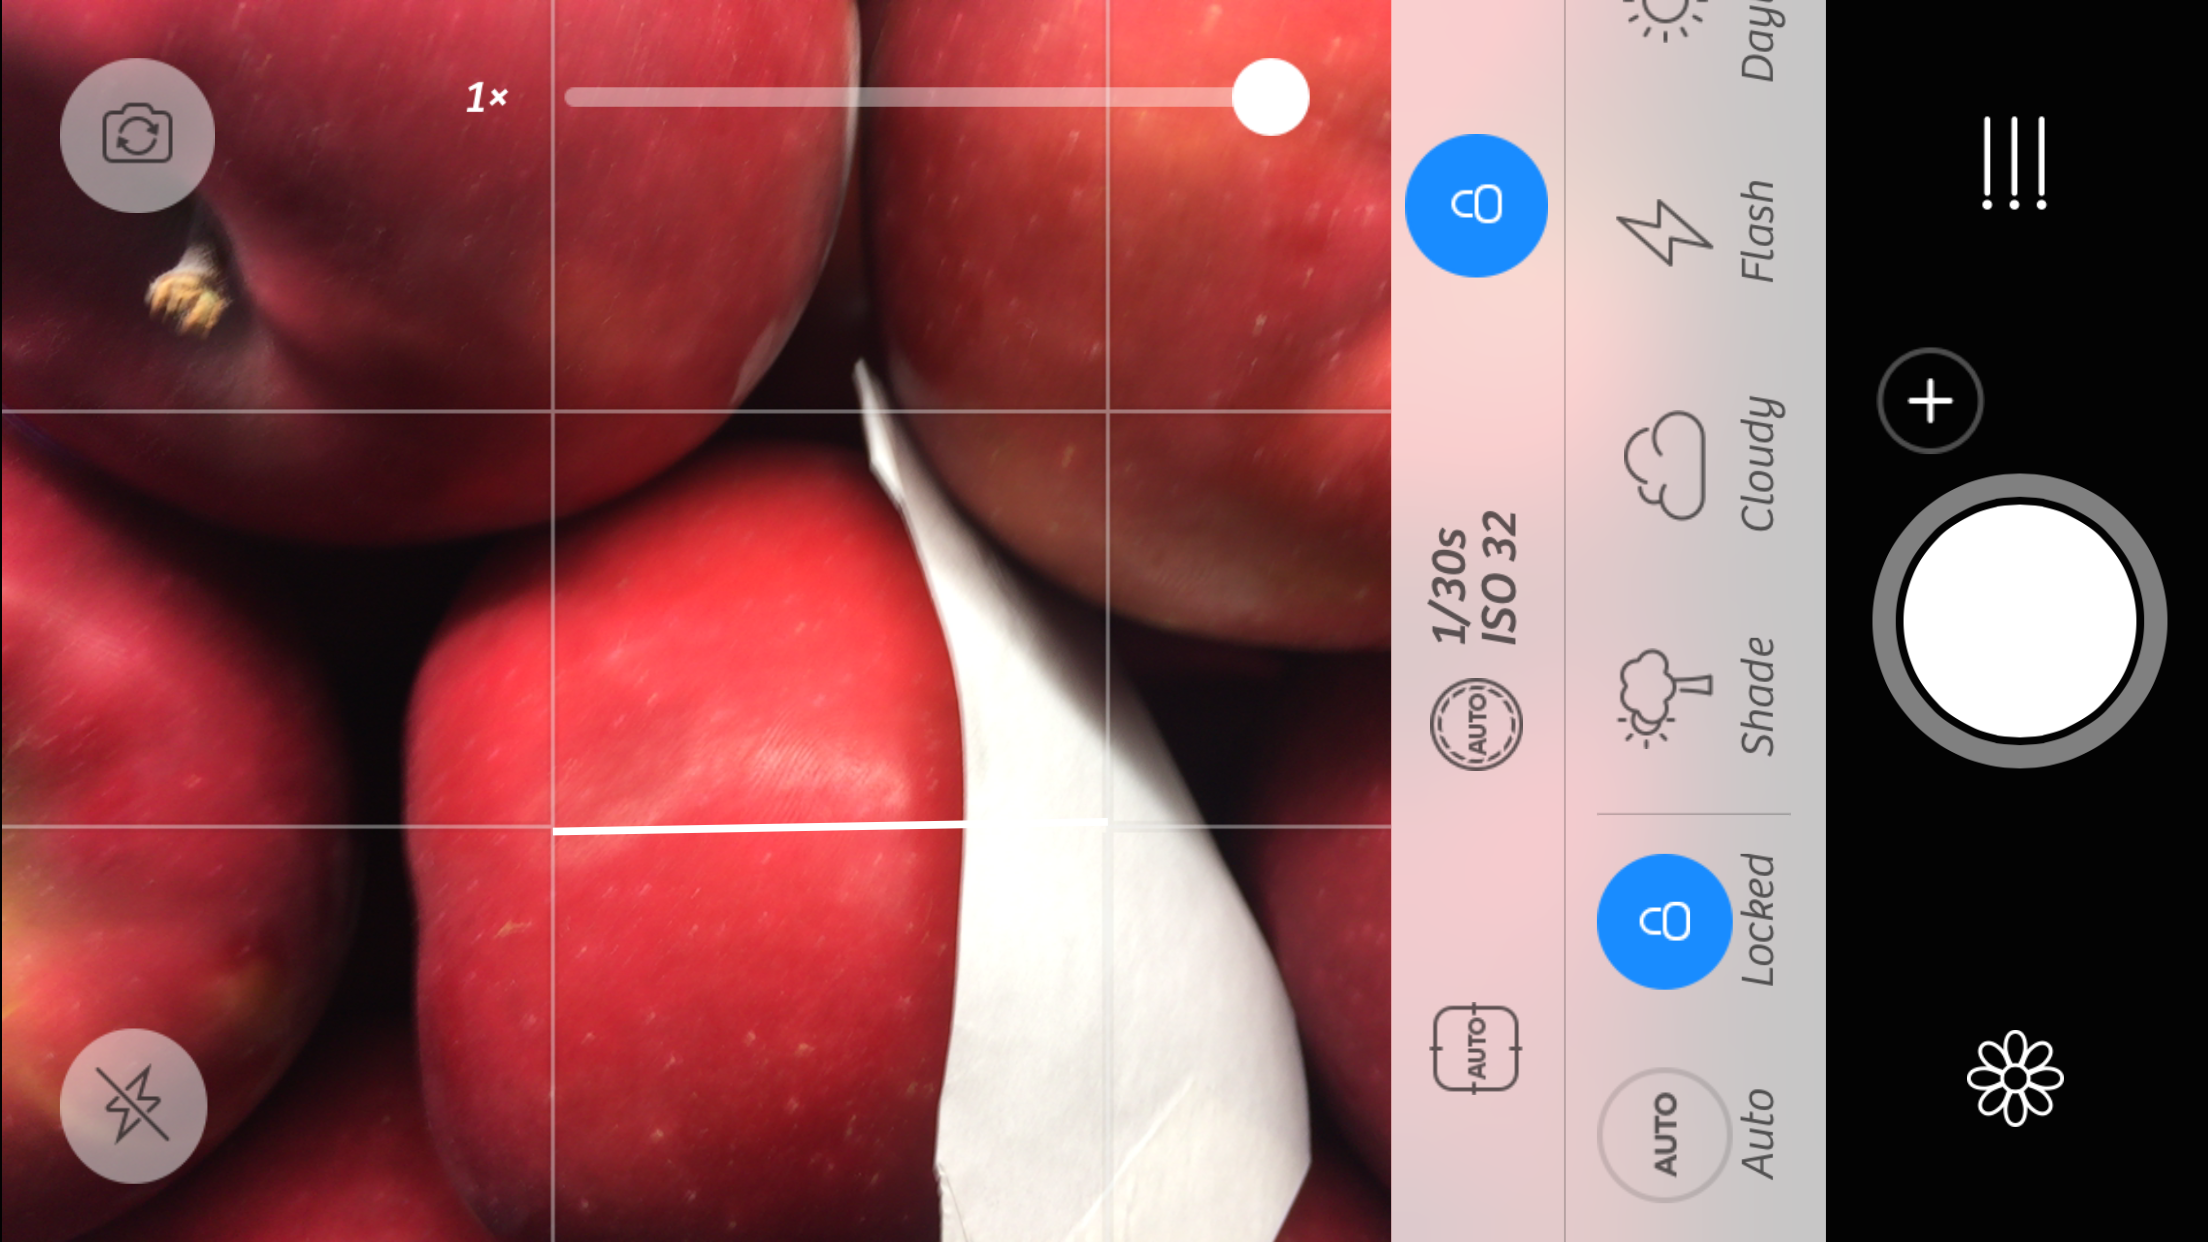
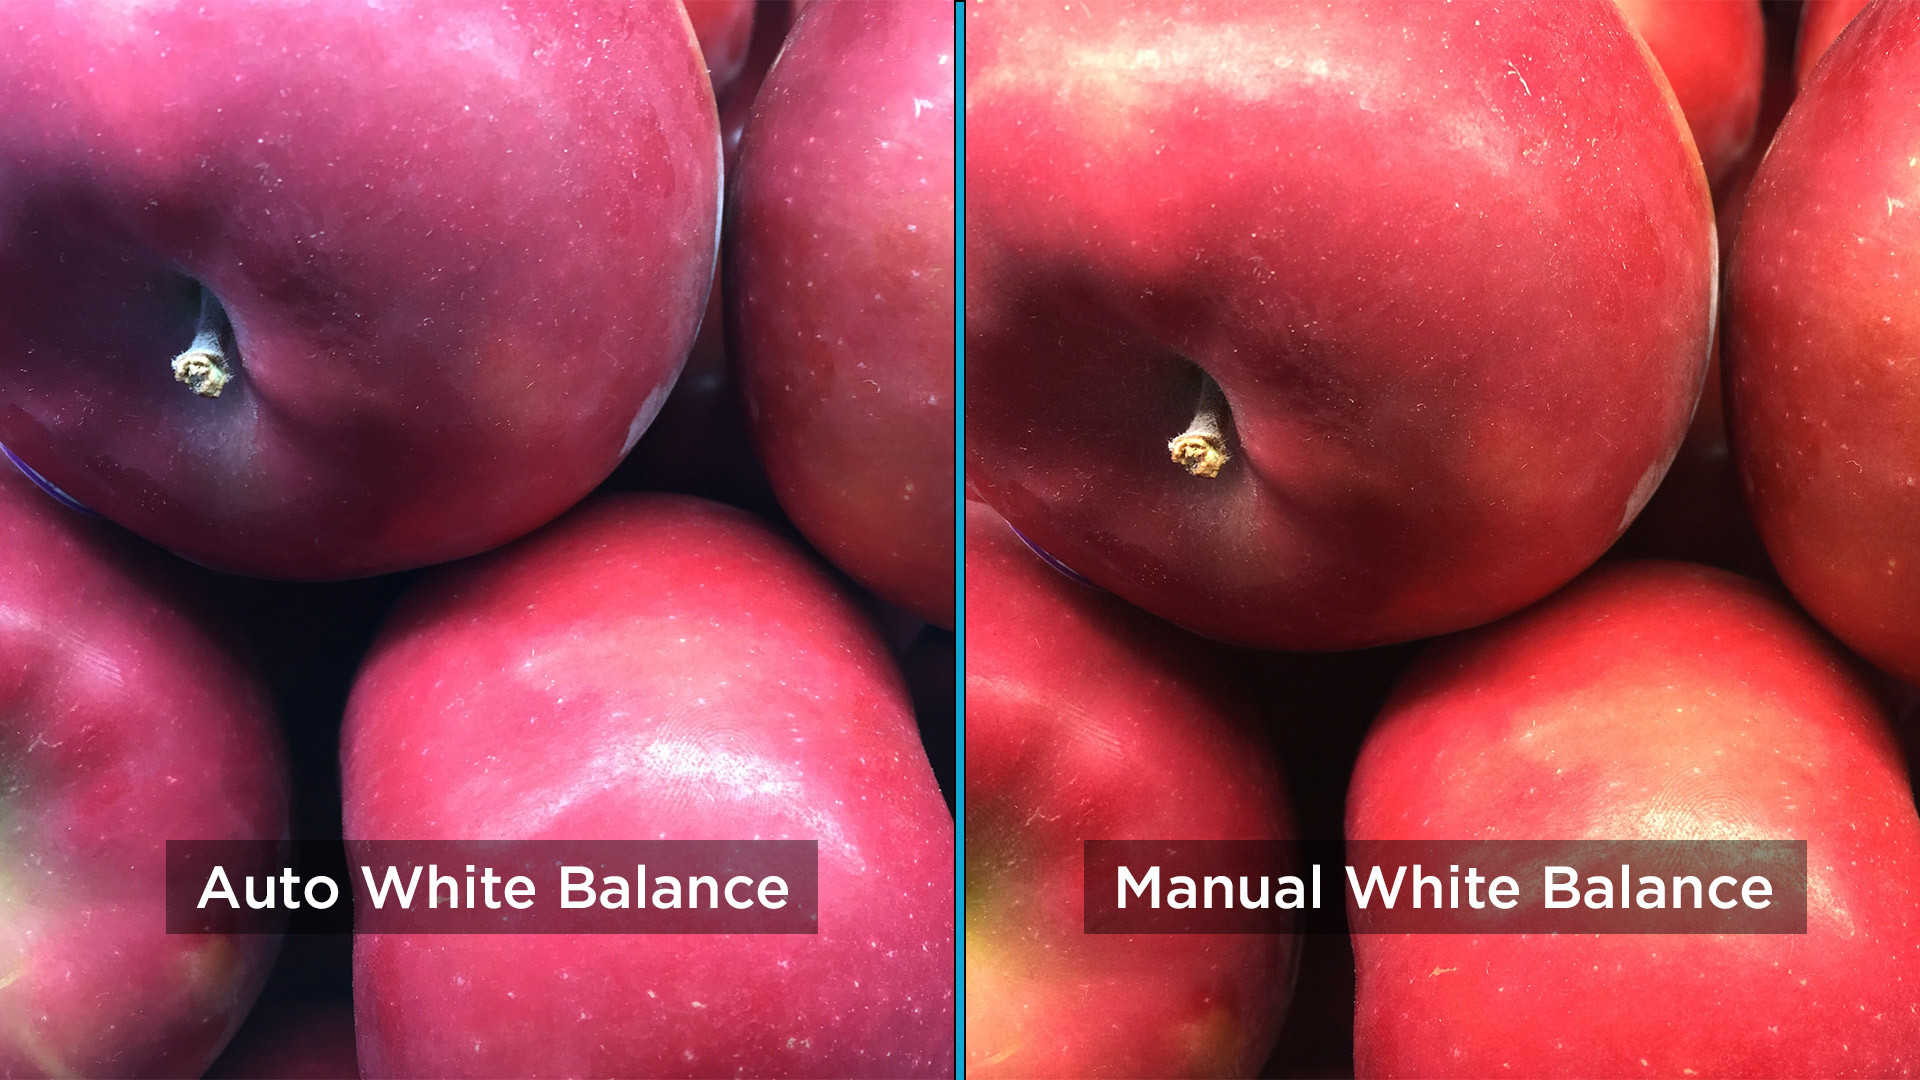
You can now remove the object, and the white balance will remain as if it were still in the photo. The images below show how the apples first looked with the iPhone 6 Plus's automatic white balance (left) and the result with manual white balance (right), which is how they looked in real life.
Quirk 2: Low-Contrast Photos
The second and third problems we encountered result from how the iPhone 6 handles high-contrast photos that exceed the camera's dynamic range. Image sensors can't capture the full range of brightness, from brilliant white to deep shadow, that we can see. The result is blown-out highlights, blacked-out detail in shadows and often both.
The iPhone 6 camera's fix is a process called tone mapping. The new A8 processor at the heart of the iPhones takes the brightness values read off the image sensor and "maps," or shifts, them to values within a narrower dynamic range. For example, the overexposed pixels are darkened slightly so they show some color rather than just white. Apple uses a sophisticated technique called local tone mapping, which tweaks the brightness of adjacent pixels to optimize details throughout the image.
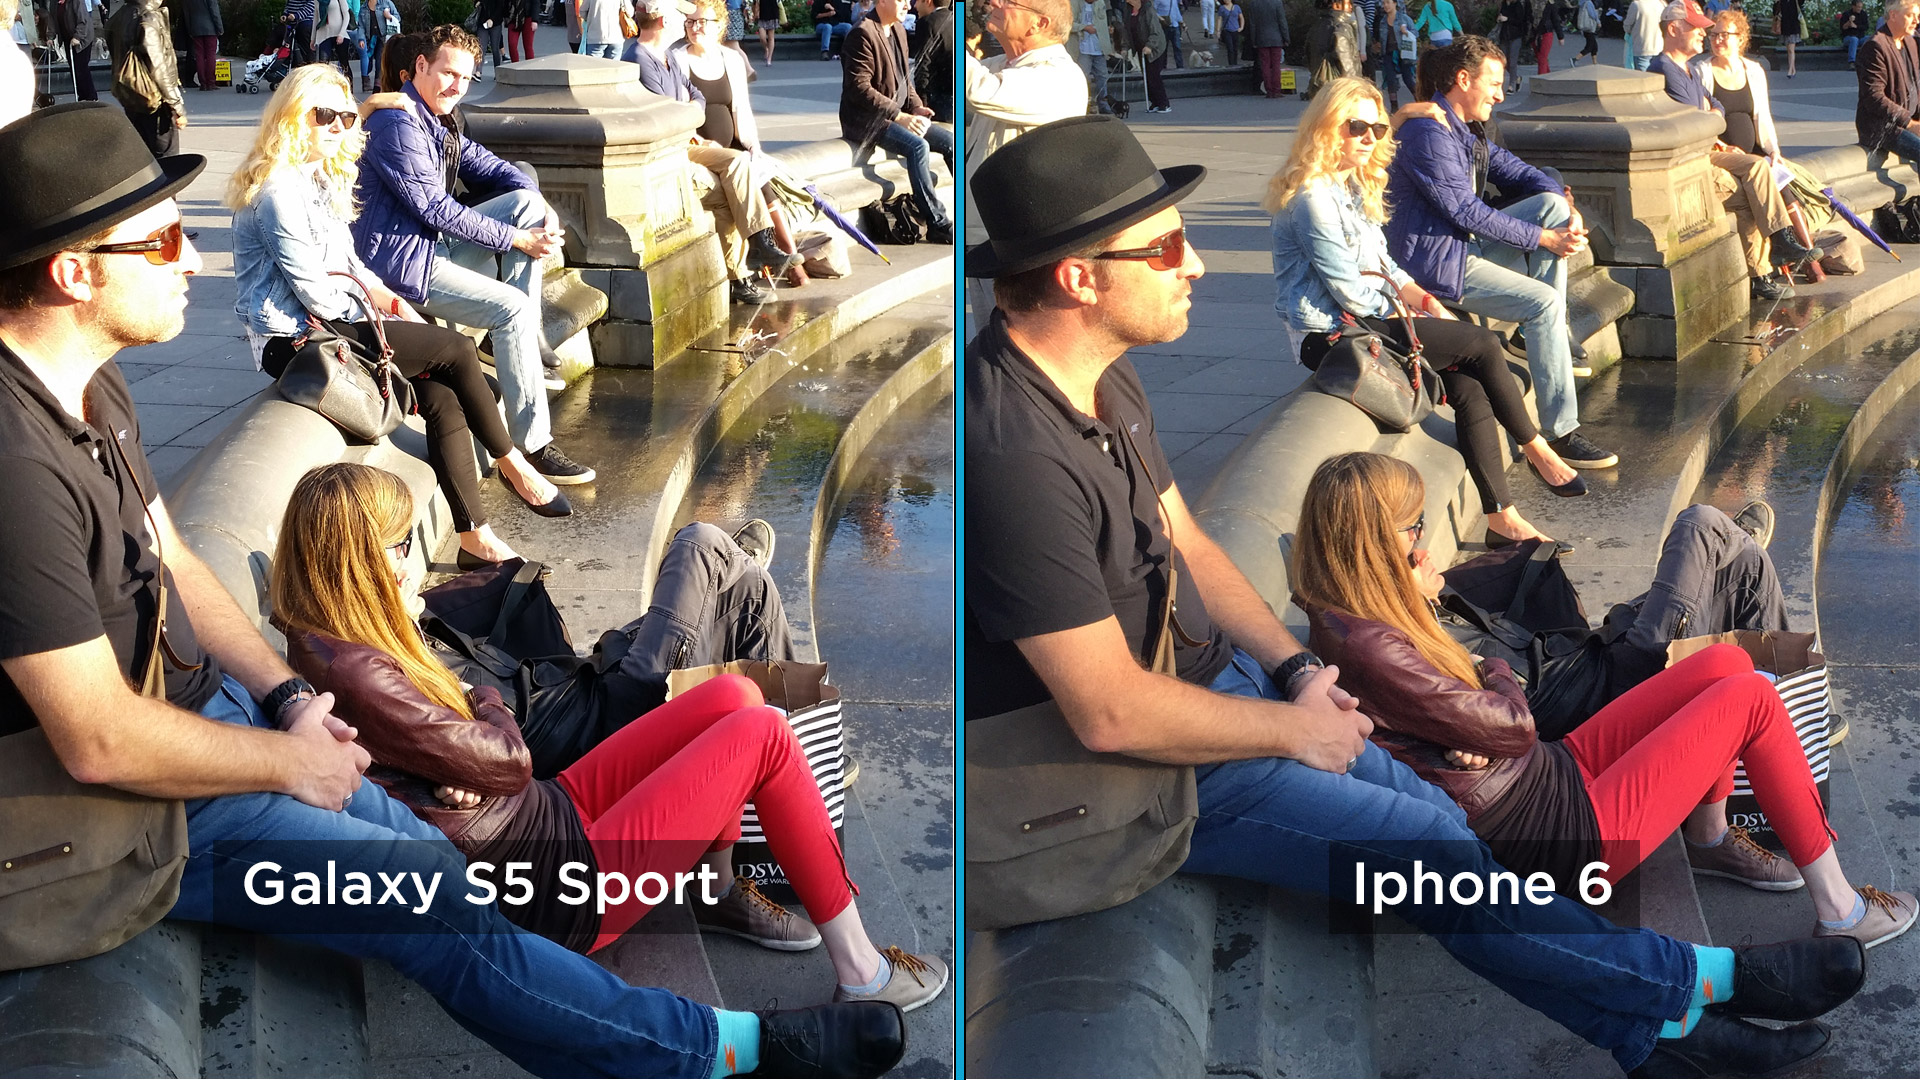
Most of the time, local tone mapping saves photos that would otherwise be hopelessly overexposed, as you can see in the two images below, taken with a Samsung Galaxy S5 Sport (left) and an iPhone 6 (right). Local tone mapping rescued features, such as the face of the man with the hat in the foreground and of the blond woman in the middle ground, that are blown out in the Samsung photo. (We're including the Galaxy S5 Sport photos merely as a point of reference.)
However, in certain conditions, such as a shaded scene with some bright sunlight breaking through, the iPhone 6 camera's tone mapping produces dull, low-contrast photos. It seems that, while darkening the overexposed parts of the image, the A8 processor also remaps the midtone shades in a way that produces a flat-looking image.
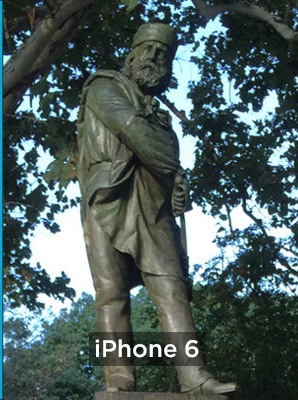
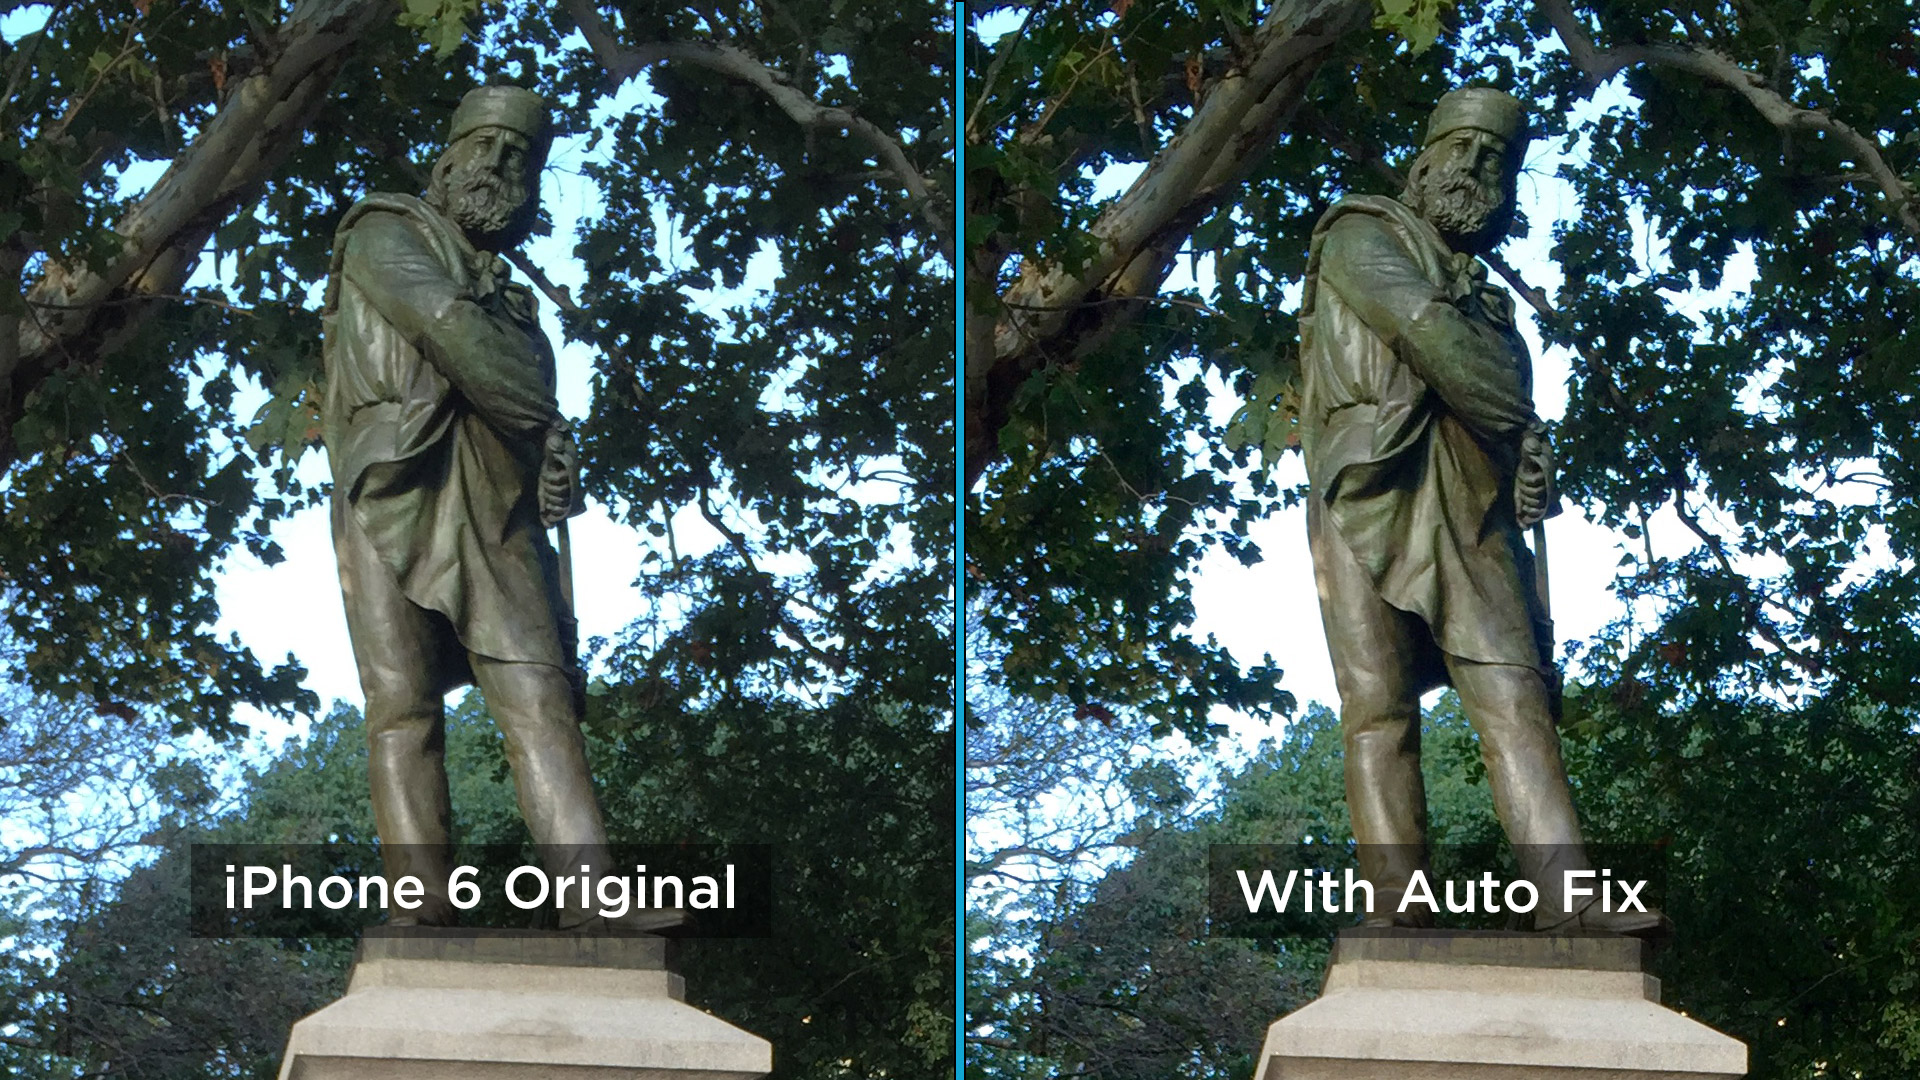
The photo of a bronze statue below at left, taken with the Galaxy S5 Sport, shows very bright spots where the metal glints in the sunlight. Technically, those areas are very close to overexposed, but the Samsung image appears much closer to how the statue really looked than the iPhone 6 photo, at right, which eliminated the glint but also flattened out the midtones. Local tone mapping preserved some of the blue sky, though with an unnatural color.
These two photos are tight crops from much larger originals. Please click on the images here to see the full subject of the photos. In the overall photo, the iPhone 6 produced a rich-looking image, but at the expense of flattening out high-gloss objects like the statue.

Simple Fix: Auto Enhance
The iOS 8 Photos app provides a rough fix with its one-touch auto enhance button, represented by a magic-wand icon in the upper left of the editing screen.
Below is the same iPhone 6 photo straight from the camera (left) and after the auto enhance fix (right). It's still a bit flat, but much better overall.
Quirk 3: False Skin Tones
The third image glitch also appears to be a result of local tone mapping. For a while, iPhone cameras have added a hint of yellow or pink to photos of people in sunlight. This often gives a pleasing glow to skin, but now the effect can be a jaundiced or sunburnt appearance instead, as these photos from a Galaxy S5 Sport (left) and an iPhone 6 show.
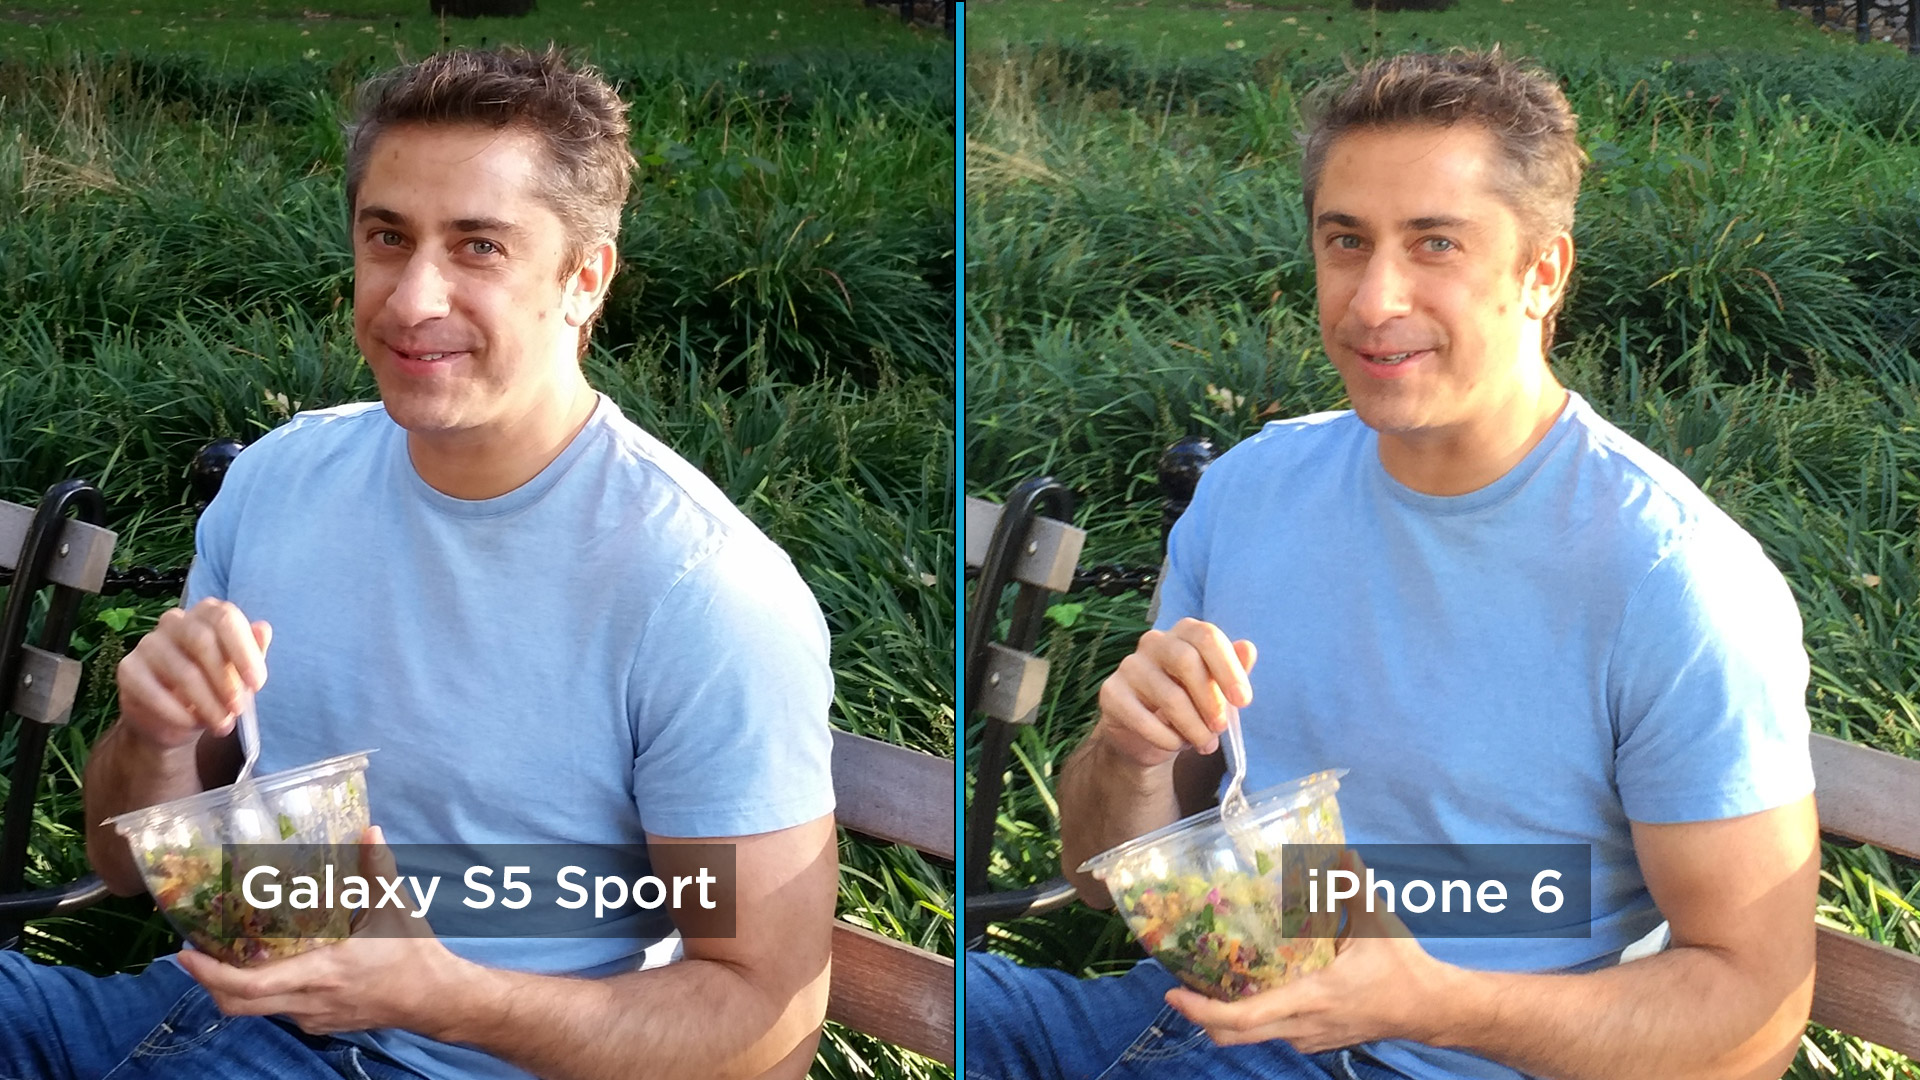
Here, the camera seems to have replaced the white that would appear in the overexposed areas on the left side of the man's face, neck and left arm with a fluorescent yellow that doesn't at all match his skin color. Even the parts of his skin that were not overexposed have a yellow cast.
MORE: iOS 8 Photos App is the Only Picture Editor You'll Need
Easy Fix: Auto Enhance
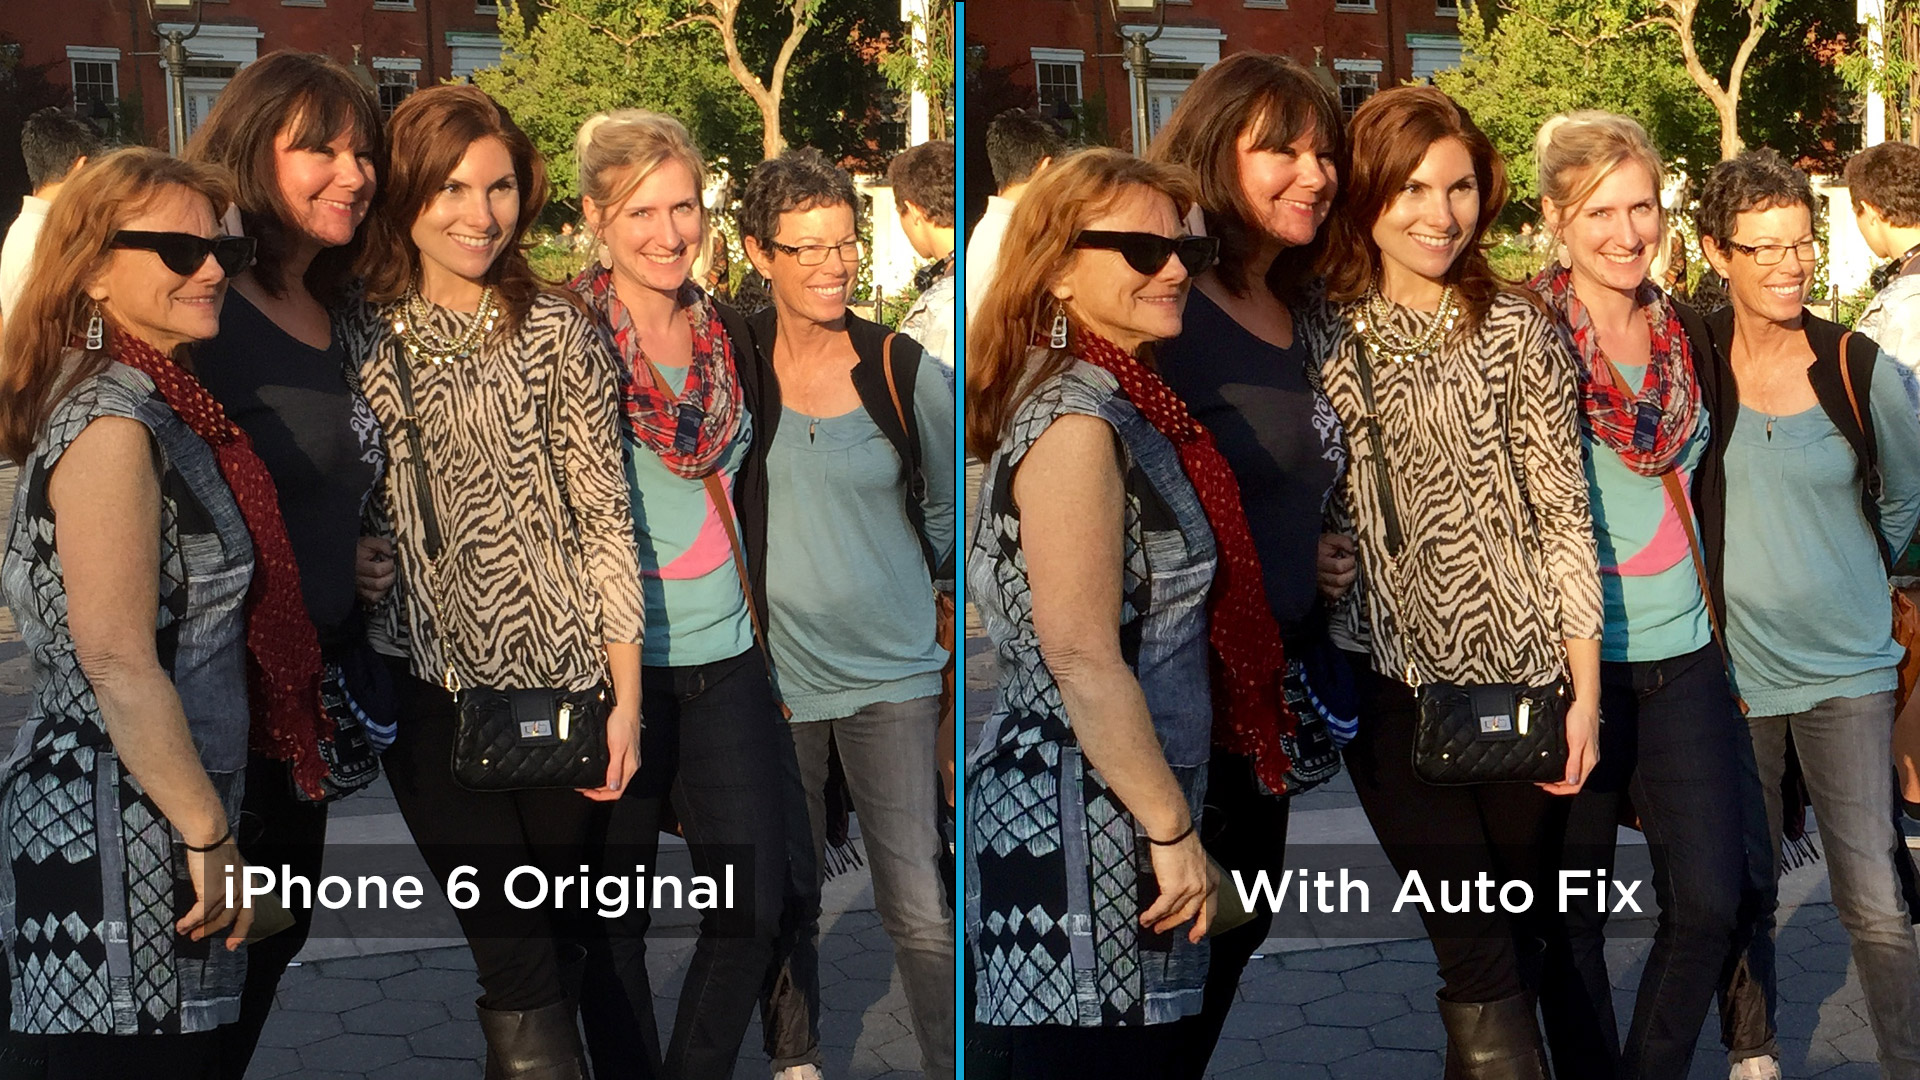
The ability to adjust false colors in skin tones depended on how bad the problem was. In the photo of the man above, it simply added an unnatural pink shade on top of the unnatural yellow. But in less severe cases, the simple auto enhance tool can make a big difference. In this picture of women posing for their friend's camera, look especially at the face of the blond woman who is turned toward our cameras as well as the woman to her immediate right. The auto enhance (magic wand) button removed much of the pink from their faces.
Advanced Fix: Exposure Compensation
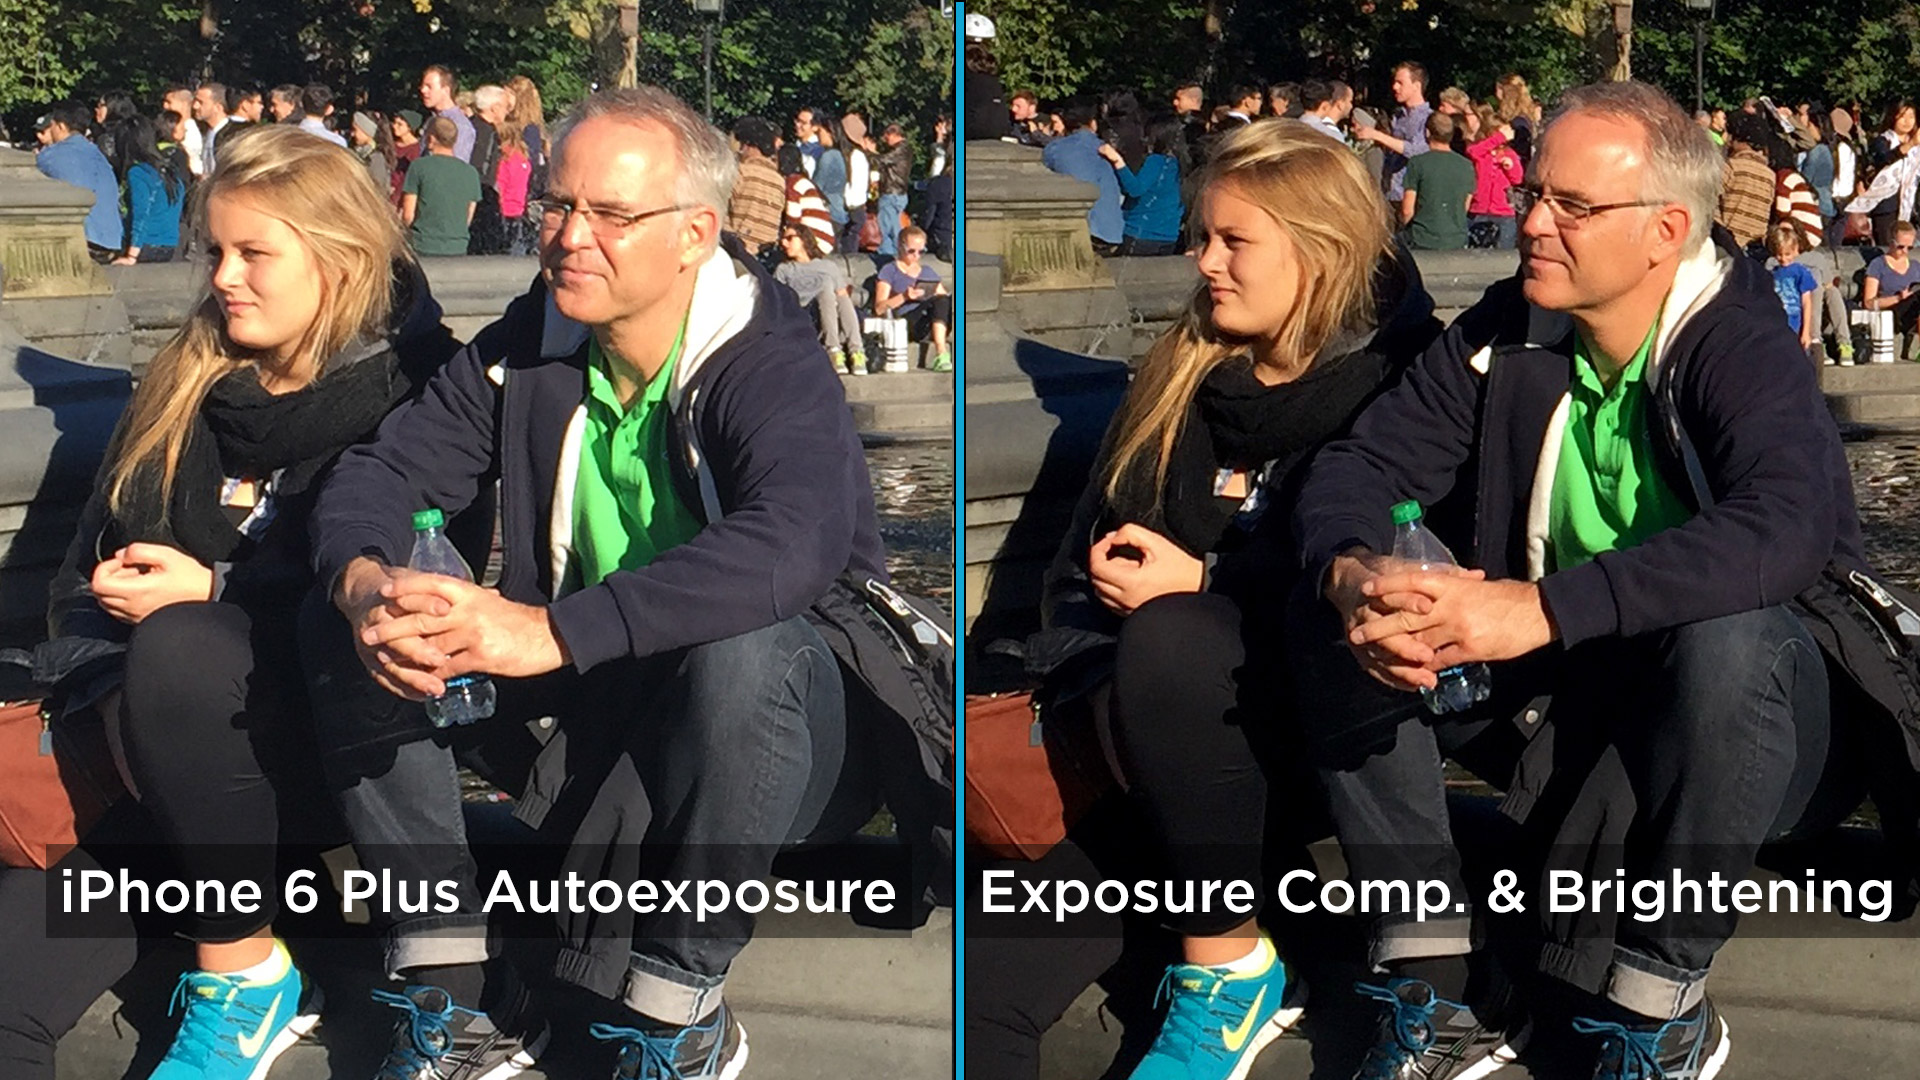
iOS 8 introduces a control called exposure compensation, which allows you to override the iPhone's built-in autoexposure to make a photo lighter or darker. Let's see how it helped this photo taken in the same park. First is the Autoexposure version.
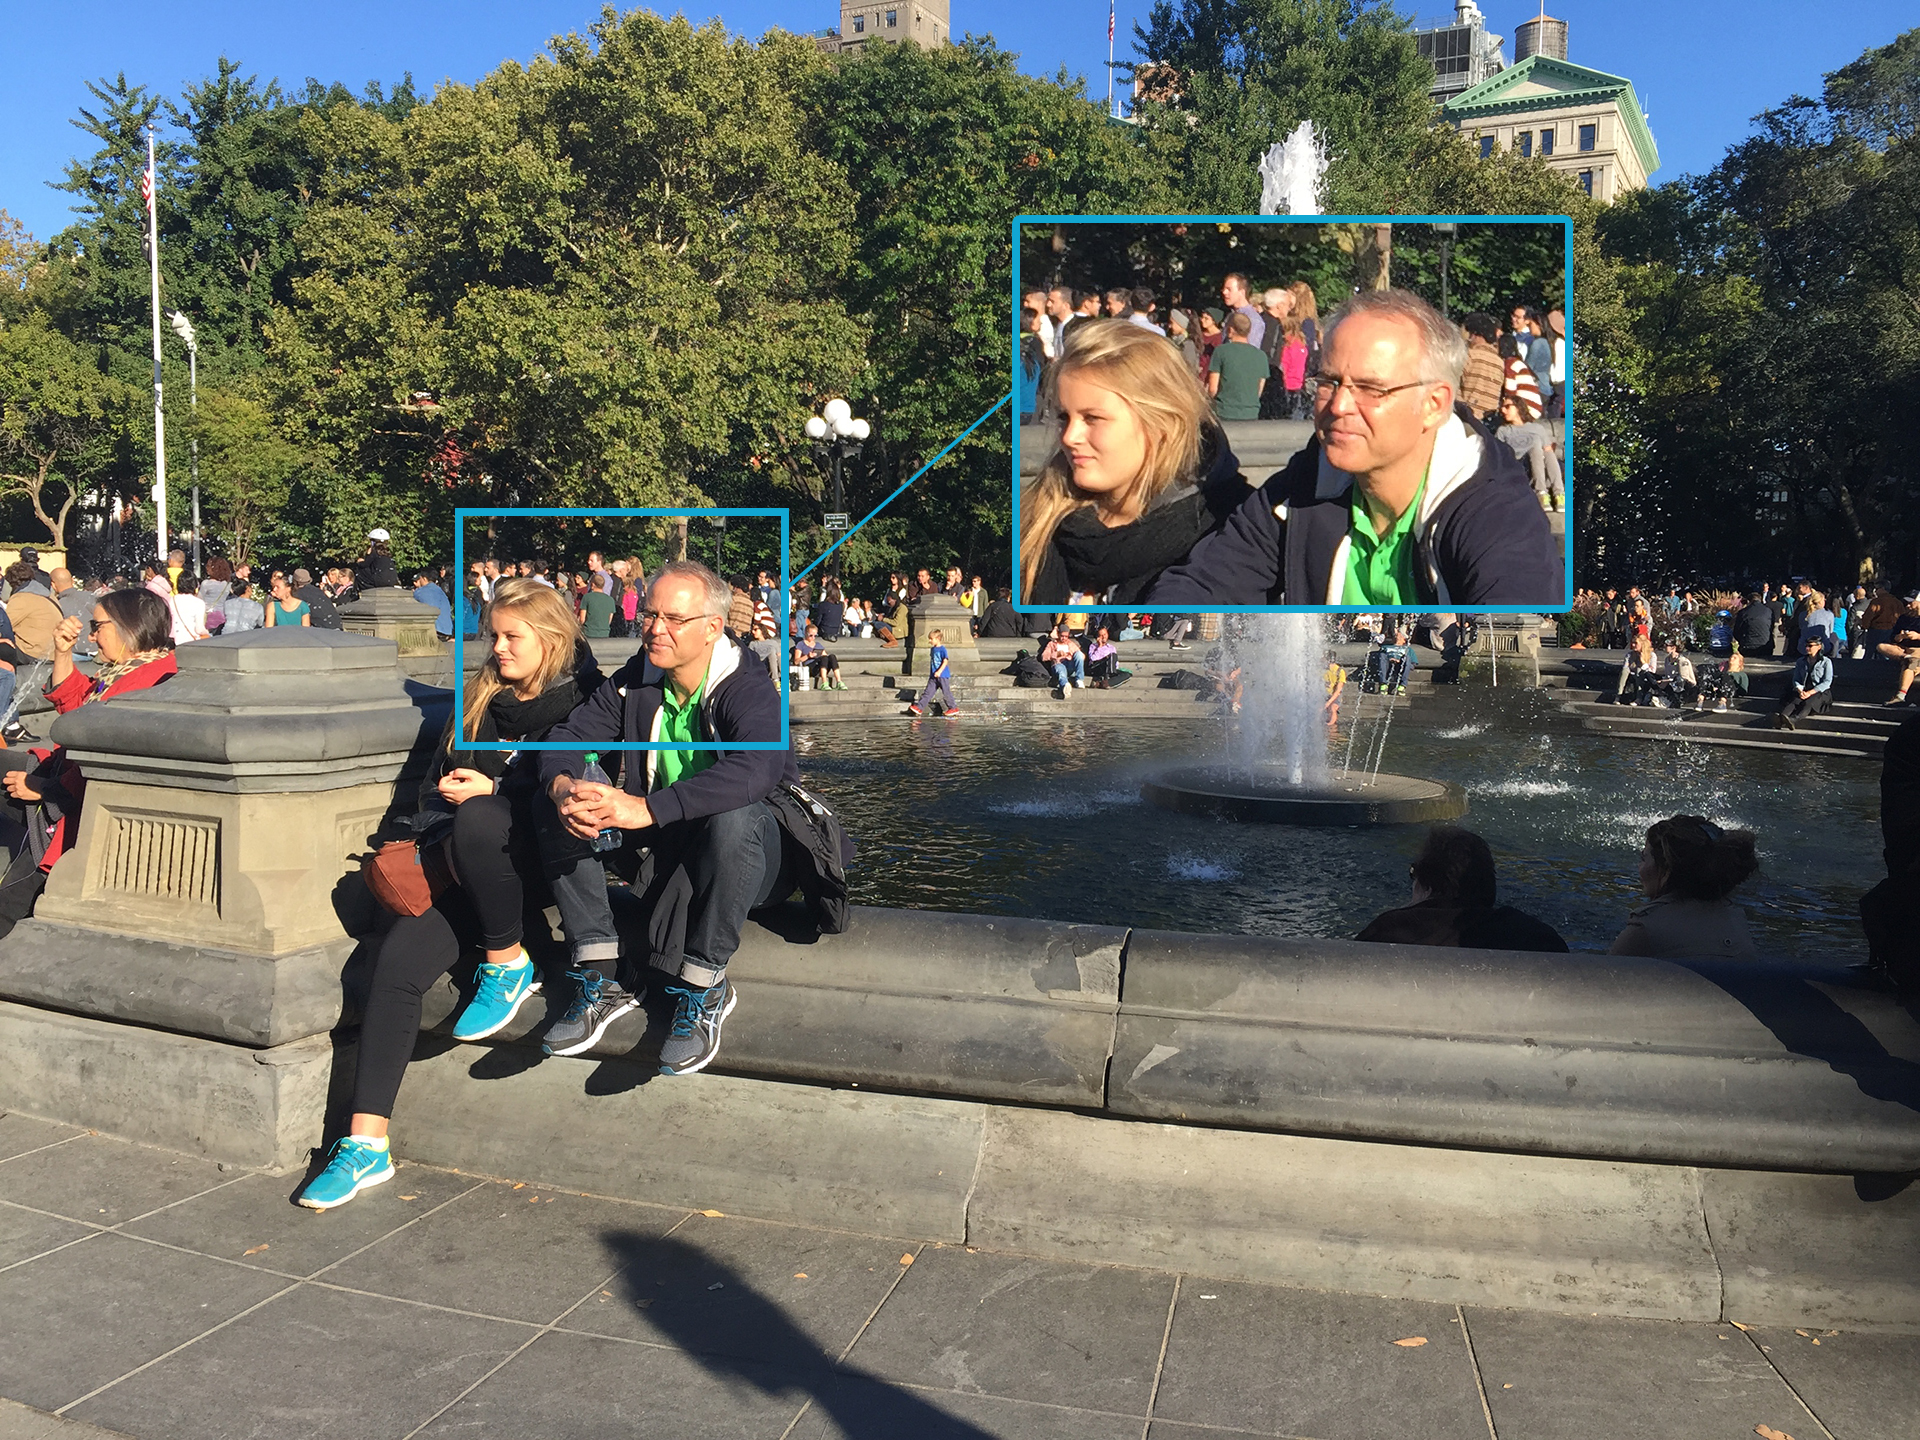
This photo shows the characteristic yellow marks on the faces of the two people at the left. To eliminate that, we'll turn down the exposure.
Press and hold the part of the image on the screen preview that you want to focus on until AE/AF Lock, a yellow square, and a sun-shaped icon appear on the screen. Sliding your finger up the screen makes a photo brighter, and sliding it down makes the image darker.
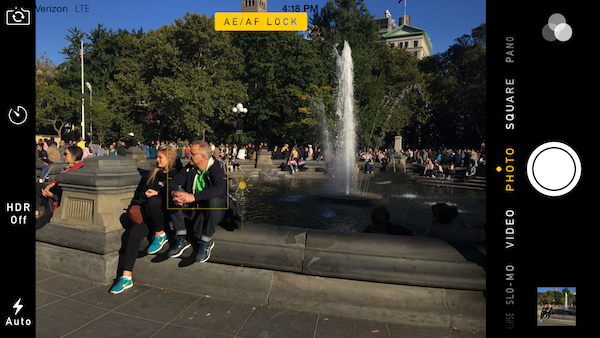
Use this control (which third-party camera apps also provide) to darken the photos a tad, so that less of the picture is overexposed. Then use the editing tools in the Photos app to brighten up the shadow detail.
This method replaces the troublesome local tone-mapping process with the old-fashioned photographic practice: Expose for the highlights and process for the shadows. In other words, darken the whole photo so that highlights aren't blown out, then lighten the darkest areas when you process (edit) the photo. iOS 8's intelligent editing tools make this lightening a one-slider affair.
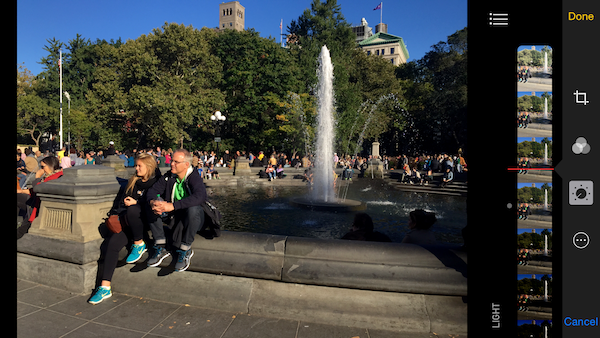
The end result has greater contrast and fewer of the false colors in highlights on people's skin, as seen in their faces and hands.
Bottom Line
These fixes can get pretty intensive, depending how far you want to go. At a minimum, it's worth recomposing shots to correct white balance that goes purple and to use the auto enhance button to improve photos that come out too flat or with unnatural skin tones.
- Selfies Go Legit: From HTC Desire Eye to DSLR
- DSLRs vs. Mirrorless Cameras: Which is Right for You?
- Best Smartphones
Senior editor Sean Captain is still on the fence about buying an iPhone 6. Follow him @seancaptain and on flicker at Sergiocapitano. Follow us @tomsguide, on Facebook and on Google+.
Sean Captain is a freelance technology and science writer, editor and photographer. At Tom's Guide, he has reviewed cameras, including most of Sony's Alpha A6000-series mirrorless cameras, as well as other photography-related content. He has also written for Fast Company, The New York Times, The Wall Street Journal, and Wired.
-
Evolution2001 This is all well and good as an "in the meantime" fix. However, if TH's original assessment of the situation is correct ("It's an issue with iOS8"), then you/we are still waiting on Apple to fix the underlying issue.Reply
With iOS 8.1 released, I didn't see anything in the fix log pertaining to algorithm corrections in the camera app. -
Quamby In this comparison, the only thing that I took away from this is just how good the S5 camera is! No fiddling around with all of these settings, just great looking shots :-)Reply -
croc One 'quirk' that is not fixable... No storage. That, for me, is a no-go. (Hear that, M$?)Reply
Looking forward to the Xperia z4, or the Galaxy S6. -
croc One 'quirk' that has no work-around - lack of storage. Without swappable storage, this ticks one of my no-go boxes. Hope that the Xperia z4 or the Galaxy s6 put out some great numbers. Or, that M$ will learn from other's mistakes and add removable storage and a good photo processing partner for some decent imaging software.Reply -
iam2thecrowe unfortunately getting lumped with one of these iphonys for my work phone, god knows why you would chose one of these for a business phone?Reply
