iOS 12 Complete Guide: Tips, Tricks and How-Tos for Your iPhone
iOS 12 is available today. Find out how to make the most of all the new features with our step-by-step advice.
How to Use Voice Memos in iOS 12
iOS 12 brings the biggest overhaul to the built-in Voice Memos app since Apple introduced the feature nine years ago. In addition to beefed-up editing tools, Voice Memos now lets you sync your recordings with iCloud.
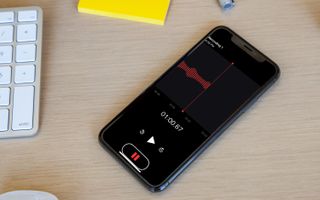
Here's an overview of everything you can do with Voice Memos, along with instructions on how to take advantage of the new features introduced by iOS 12.—Philip Michaels
How to Record a Voice Memo
One of Voice Memos' best features is the ability to quickly record your thoughts whenever inspiration strikes. In fact, if you have a 3D Touch-enabled iPhone, you can long-press on the Voice Memos icon to summon up a shortcut command that lets you start recording nearly immediately. (You can also customize iOS 12's Control Center to add a Voice Memos control that also provides a shortcut to start recording when you press and hold the icon, whether your iOS device supports 3D Touch or not.)
You can also get started from within Voice Memos itself.
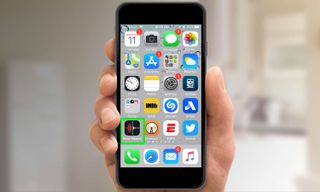
1. Tap Voice Memos to launch the app. If you've already recorded memos, you'll see them there in a scrollable list.
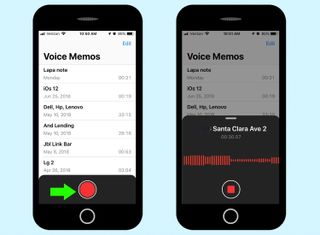
2. To record a memo, press the big red button at the bottom of the screen. You'll hear a ping (assuming your iOS device isn't in silent mode), and the recording will begin. When you're done pouring out your deepest thoughts, press the red button again to stop recording.
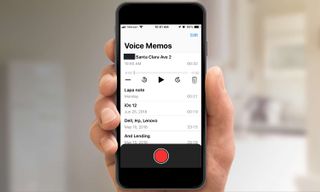
3. Once the recording stops, your new memo will appear at the top of your recordings, with playback controls that let you play, pause, skip ahead 15 seconds or rewind 15 seconds. You can also jump ahead by using your finger to drag the control forward to your preferred point in the recording, though I've found that method isn't very precise.
Sign up to get the BEST of Tom's Guide direct to your inbox.
Get instant access to breaking news, the hottest reviews, great deals and helpful tips.
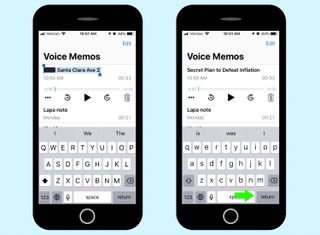
4. By default, Voice Memos saves your recording with the name of your location. If you'd prefer a more descriptive title, just tap on the name of the recording to make the on-screen keyboard appear. Tap out your new title and hit return when you're done.
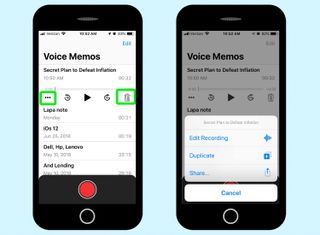
You'll notice two other controls in this view of your new recording. There's a trash can on the right that, when you tap it, will delete your recording. The three-dot icon on the left brings up other options for your recording: you can edit, duplicate or share your voice memo.
How to Edit a Voice Memo
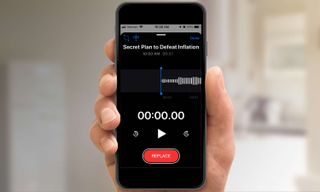
Select Edit Recording from the other options, and you'll jump to a new screen. That big red button now reads Replace, and it lets you record over your existing memo. But the real editing tools live in the menu up above — trim and insert.
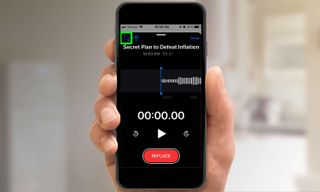
To trim your recording, tap on the square icon on the far left that looks like a cropping tool. Yellow pins will appear at the beginning and end of the recording. (You'll also see a yellow box appearing around the full view of the recording at the bottom of the screen.) Grab either pin to adjust the start and stop point of the recording.
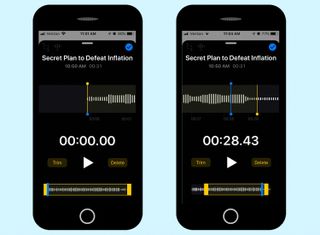
Press Trim to erase everything outside the yellow box. Press Delete to erase everything inside the yellow box. Make sure you're pressing the right button — in the iOS 12 beta at least, you're not asked if you're sure you want to trim or delete, and there seems to be no way to bring back any cut audio. (Playback controls on the trim screen are also hit and miss in the beta, something we expect to see fixed by the time iOS 12 gets its general release this fall.)
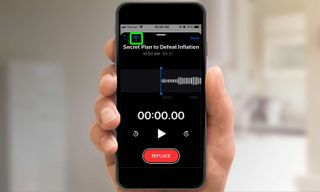
The diamond-shaped icon next to trim is the Insert tool, which you can use to fix flubs in an otherwise flawless voice recording. (This can be useful if, like me, you use Voice Memos to record audio tracks for videos.)
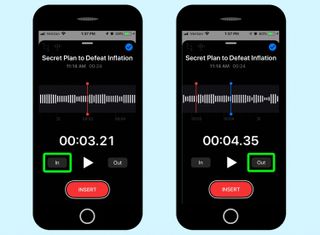
To insert audio, move the red playhead to the point where you want to fix your recording. Tap the In button. Move the blue head to where you want to end your insert and tap the Out button. The area you're re-recording will be highlighted in red.
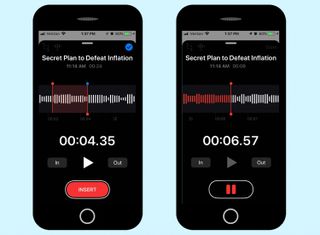
Tap insert and record your new audio, tapping the button again when you're done.
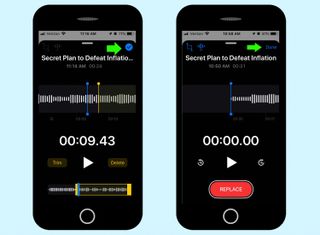
For both trimming and inserting audio, tap the blue checkmark in the upper right corner, when you're done making changes. Then tap Done on the subsequent screen to return to the main Voice Memos page.
How to Duplicate a Voice Memo
This is the easiest tool to use in Voice Memos, and one you'll want to make use of if you're planning on editing one of your recordings. A duplicate gives you a backup in case you trim or delete something you wish you hadn't.
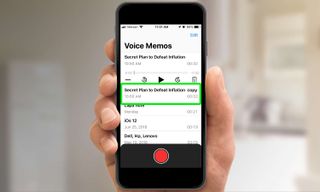
Just tap the three dots and select Duplicate from the pop-up menu that appears. A second version of your recording will appear underneath the original with a Copy label on it.
How to Share a Voice Memo
The third option that appears when you tap those three dots is Share. Select that, and you have the option of using AirDrop to share the recording with any nearby Macs or iOS devices on the same Wi-Fi network. You can also share the app with assorted built-in apps (Message, Mail and Notes, for example) or third-party apps on your phone such as Dropbox.
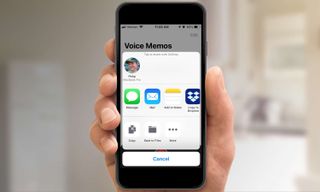
Other options in the Share sheet for Voice Memos include the ability to copy your recording or save it to the Files app.
How to Sync Voice Memos to iCloud
One of the big additions in iOS 12 is the ability to save recordings to iCloud so that you can access them from any device, not just the iPhone you recorded them on. (Voice Memos comes to the iPad in iOS 12 and to Macs with the macOS Mojave update.) To make sure you're taking advantage of the feature, though, you'll need to exit Voice Memos and head over to Settings.
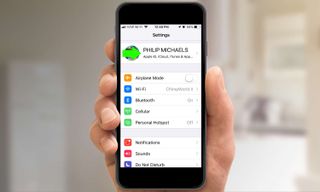
1. From within Settings, tap on your name at the top of the screen.
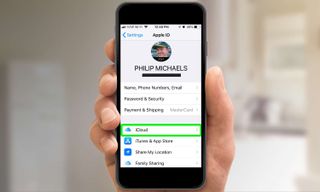
2. Tap on iCloud.
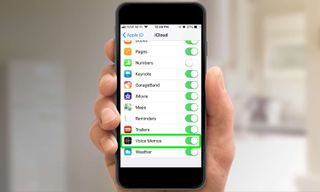
3. Scroll down to the list of apps using iCloud until you find Voice Memos and make sure the button is toggled on.
Other Voice Memos Settings
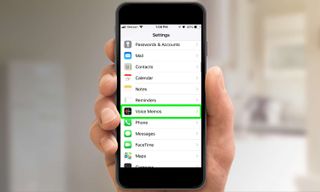
Don't leave the Settings app just yet. Scroll down to Voice Memos on the main Settings screen, and tap it to make additional adjustments to how the Voice Memo app behaves.
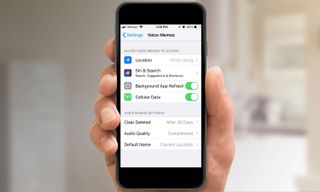
The top section of Voice Memo settings lets you turn location awareness off, manage how Siri interacts with Voice Memos (letting you access the app from the lock screen, for example) and make adjustments to whether the app refreshes in background or uses cellular data.
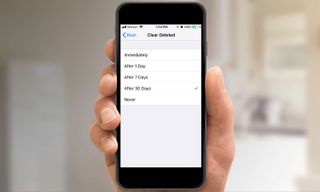
It's the settings in the lower section, though, that are particularly interesting — especially when it comes to setting when deleted voice memos are cleared. By default, when you delete a voice memo, it will hang around for 30 days. (Recently Deleted voice memos are accessible at the very bottom of your list of recordings within the Voice Memos app.) But tap on Clear Deleted, and you can change that to never, after one day, a week or immediately.
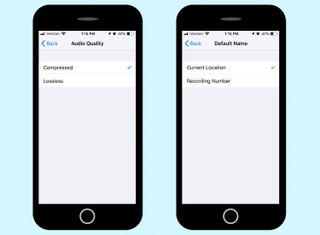
You can also adjust audio quality between compressed or lossless. (The latter option takes up more storage space.) And if you don't like using your location as the default name for a memo, you can change that to recording number instead.
Current page: How to Use Voice Memos in iOS 12
Prev Page How to Get Automatic Updates in iOS 12 Next Page How to Use Search in iOS 12's PhotosTom's Guide upgrades your life by helping you decide what products to buy, finding the best deals and showing you how to get the most out of them and solving problems as they arise. Tom's Guide is here to help you accomplish your goals, find great products without the hassle, get the best deals, discover things others don’t want you to know and save time when problems arise. Visit the About Tom's Guide page for more information and to find out how we test products.
-
cothirteen "You don’t need to do anything special to use Google Maps or Waze on CarPlay, though of course, those apps first need to be installed on your iPhone. Once they are, you will see them on the CarPlay home screen alongside all of your other CarPlay-compatible apps. "Reply
Can anyone confirm this? I have the public beta installed but regular versions of those apps and it does not show up on CarPlay. From what I am reading the betas are needed. -
cazdabear Most likely, those versions of the apps that you have... don't support Carplay. I read from a Waze Community post, that Waze has only likely released this to their own pool of Waze Beta testers.Reply -
cothirteen Makes sense and that's what I've read too. Just didn't want to miss out on information I wasn't privy to!Reply -
otisjuhl I just downloaded the new, full iOS 12 to my iPhone and connected it to my CarPlay (2017 Subaru). Neither WAZE for Google Maps showed up. Does anyone have any idea how to get it appear? (I have them both on my iPhone and opened them while connected). Thanks!Reply -
rotolosc You need to make sure to update google maps in the app store. Waze is not supported as of yet but comingReply
-
otisjuhl Very helpful - thanks! I did update Google Maps and it appeared on my cars's screen yesterday and works! As noted, WAZE isn't there yet.Reply -
ashwincampbell I’m not sure if anyone else is experiencing this but under screen time > always allow, some apps show up as only numbers with no icon. There’s no way to tell what those apps are. Any idea what is causing this?Reply -
diem2222 After half an hour recording it is not possible to stop it, just the option restart and stop.Reply -
Jason3022 While details/specifics are great, they could have made this much simpler - it is overly complex.Reply
Here's why:
I simply want to know how much 'Screen Time' I've used since I unplugged my Ipad from the wall. That information is not available - it does not coincide with 'Battery' either, which is pure lunacy.
I'm not sure what these techs. are thinking but it positively is not with the average end-user in mind.
I am not alone in this thought.
