How to Master the iPhone 6s Camera
From using 3D Touch quick actions to controlling the flash for taking selfies, we'll walk you through using the cameras on your iPhone 6s and 6s Plus.
There's plenty to like about the cameras on Apple's iPhone 6s and 6s Plus. But there's even more to like once you dig into the Camera app and see what your iPhone really is capable of.
The rear camera on the latest iPhones has a 12-megapixel sensor, doubling the number of pixels from Apple's previous smartphone and enabling 4K video recording. Paired with a five-element lens and f/2.2 aperture, the camera offers sharper images at larger sizes with enhanced low-light performance. If you’re using the 6s Plus, you also get optical image stabilization for both stills and video, which means less shaky stills and footage and even better pics in dim conditions. Meanwhile, the front camera is powered by a 5-MP sensor for sharper selfies and FaceTime calls.
MORE: Top-Rated Smartphone Cameras
As impressive as the images those cameras can produce, your finished product will look even sharper if you master a few of the features Apple's built into the software that controls your phone's cameras.
Launch Camera Mode with 3D Touch and Quick Actions
Everyone wants to get the best shot by getting to their camera quickly. But sometimes the mechanics of launching a smartphone app can get in the way, as too much fiddling, pressing and swiping means your moment is lost.
The iPhone 6s uses the phone's 3D Touch features to add a quick actions menu that lets you jump straight to the shooting mode you want, instead of forcing you to start from the Camera app's square photo default.
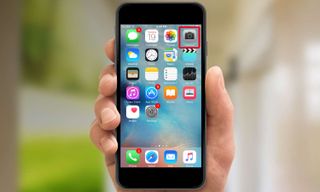
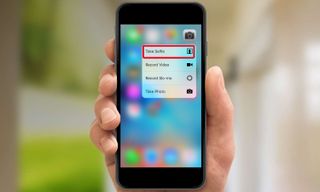
1.Press firmly on the Camera app icon. You'll feel a little bit of haptic feedback from the phone when you've pressed long enough, and a pop-up menu will appear next to the camera icon.
Sign up to get the BEST of Tom's Guide direct to your inbox.
Get instant access to breaking news, the hottest reviews, great deals and helpful tips.
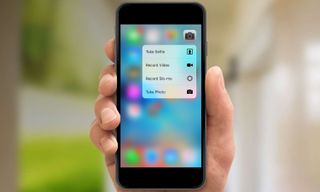
2. Choose the option you want. Your choices are Take Selfie, which automatically launches the front camera; Record Video, which launches the Camera app in video mode; Record Slo-mo, which launches the Camera app in its slo-mo setting; and Take Photo, which activates the rear facing camera.
3. Press the shutter button to take your shot or start recording video.
View Images in the Camera App As You Shoot
The Camera app makes it easy to shoot endlessly — perhaps too endlessly when you find yourself plowing through hundreds of shots at the end of day. It may help to have better control over your output by viewing the shot you just took right in that moment. Fortunately, that's easy to do without leaving the Camera app's shooting mode thanks to the peek and pop features of the iPhone 6s's 3D Touch interface.
1. Press and hold the photo icon in the lower left-hand corner of the Camera. That will give you access to your Camera Roll.
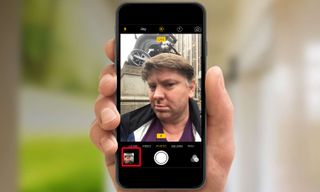
2. Drag your finger to the right to scroll through your pictures. Pause if you see one you want to take a closer look at. One swipe will let you immediately access 12 to 14 of your most recent shots.
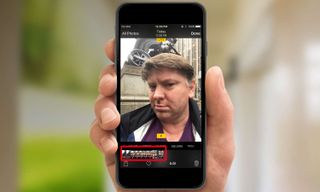
3. Lift up your finger to return to shooting mode.
Shoot 4K Video
The cameras on the latest iPhones can shoot 4K video, which carries four times the resolution of full HD. That ultra high resolution means ultra large file sizes, though that shouldn't scare you off from shooting in 4K. If you've got ample storage space on your camera — say you opted for the 64GB model or higher — and you've got access to online storage, 4K's larger files shouldn't pose a problem.
Viewing that footage is another story. TVs and computer monitors that support 4K are swiftly becoming more popular, but because of their recent arrival on the market and higher price, they are hardly ubiquitous. You can view 4K video on lower resolution monitors, but you will see only the best quality footage your monitor can display.
A 4K video can always be viewed in full resolution on the proper monitor, and over time as older full HD monitors are replaced by 4K, 5K, and above, the 4K video you shoot today will continue to be available in the highest resolution for many years to come.
By default, your iPhone's camera shoots video at 1080p resolution. Here's how to change that to 4K.
1. Go to the Settings App.

2. Tap Photos & Camera.

3. Tap Record Video.You can choose between 720p, 1080p at 30 and 60 frames per second, and 4K video. Conveniently, the settings screen lists how much approximate space a minute of video in each format will take up.

You'll know you're shooting in 4K video when a 4K logo shows up next to the shutter button. All video you shoot will now be in Ultra HD.
Brighten Up Your Selfies
The iPhone 6s takes a pretty solid self-portrait: It topped four other phones in our quest to find the best selfie-taking smartphone. But you can make sure your selfies shine even brighter, especially in low-light situations, thanks to the iPhone 6s's Retina Flash feature.
The Retina Flash analyzes ambient lighting and uses a pre-flash before selecting a customized flash tone, turning the phone into a large full-screen flare. A new chip in the 6s can illuminate the phone’s display so that it is three times brighter than usual. In addition to boosting the quality of shots taken in darker settings, this feature also serves as a fill flash for backlit photos.
1. Access the front camera on your iPhone, whether that's through the Take Selfie Quick Action, a Siri command or by tapping on the Camera app and pressing the front camera icon.
2. Tap the Flash icon in the upper left of the screen.
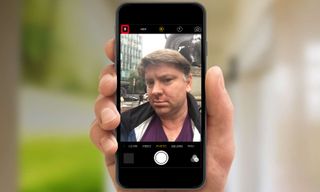
3. Select the option you want; Auto, On or Off. Auto will will activate the flash if your front camera detects low light, while On will fire off the flash no matter what.

4. Take your shot.
Bring Your Selfies to Life
Live Photos, the new iPhone 6s and 6s Plus feature that adds three seconds of sound and audio to your photos, also works for Selfies. You just need to have Live Photos turned on, and your selfies take on another dimension.
MORE: How to Shoot Live Photos on an iPhone
1. Launch the Camera app and activate the front camera.(It's the camera-with-the-circular-bullseye icon in the left corner.)

2. Tap the Live Photo button at the top center of the screen. When the icon turns yellow, that means Live Photos is active.

3. Tap the Shutter button to take your selfie.
Live Photos captures 1.5 seconds before and after you take your shot, so be sure to hold your pose. You'll know the camera has stopped recording when the word Live disappears from the screen.
Jackie is an obsessive, insomniac tech writer and editor in northern California. A wildlife advocate, cat fan, and photo app fanatic, her specialties include cross-platform hardware and software, art, design, photography, video, and a wide range of creative and productivity apps and systems. Formerly senior editor at Macworld and creativity editor at The Next Web, Jackie now writes for a variety of consumer tech publications.
