Galaxy S10: Ten Features to Enable and Disable
The Galaxy S10 is chock-full of useful features. Here are 10 you should switch on or off once you get your hands on Samsung's latest phone.
Samsung’s new Galaxy S10, S10 Plus and S10e are wonderfully advanced smartphones brimming with the latest and greatest in mobile technology, from in-display fingerprint sensors to multiple cameras working in unison to deliver the best possible photos.

However, these devices pack so much inside that setting up and personalizing your Galaxy S10 can be an intimidating process — especially if you don’t know where the pertinent settings can be found. We’ve compiled a list of 10 key features you’ll want to change on Samsung’s latest handsets, alongside in-depth directions and screenshots to help you find them as quickly as possible.
Setup fingerprint sensor — and add more fingerprints
Chances are you’ll enroll in fingerprint unlocking when setting up your shiny new Galaxy S10 for the first time. But it’s always helpful to have a few more prints saved, so you can get into your phone using another hand or finger.
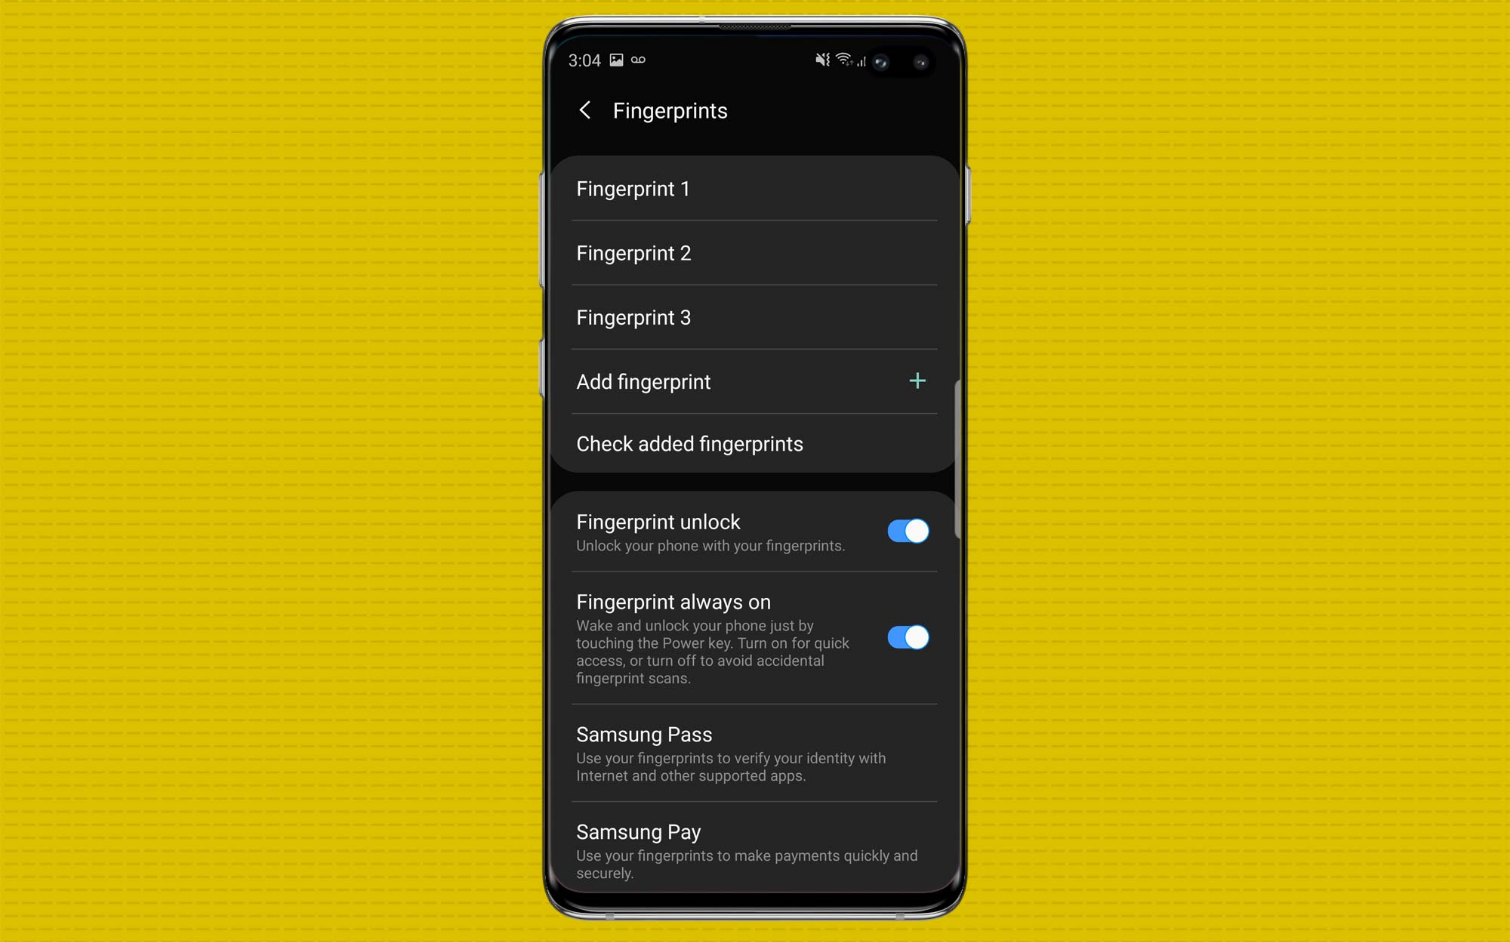
If you just added one finger print at setup, you can go to Biometrics and security within Settings, and tap Fingerprints. After inputting your passcode, you’ll be walked through the fingerprint enrollment process again. And once you’re done, you’ll be able to rename or delete the prints you provide, so you’ll always know what finger they’re attached to.
MORE: How to Set Up the Galaxy S10’s Ultrasonic Fingerprint Reader
Remap Bixby key
Sign up to get the BEST of Tom's Guide direct to your inbox.
Get instant access to breaking news, the hottest reviews, great deals and helpful tips.
Bixby critics, rejoice — Samsung is finally allowing users to remap the Bixby key within the app itself, without forcing users to turn to shady third-party apps and dangerous rooting procedures. Starting with the new Android Pie-based OneUI interface on all the S10 models (as well as the Galaxy S9 and Note 9 before them), you can head to the Bixby Voice screen to redirect the button to the app or command of their choosing.
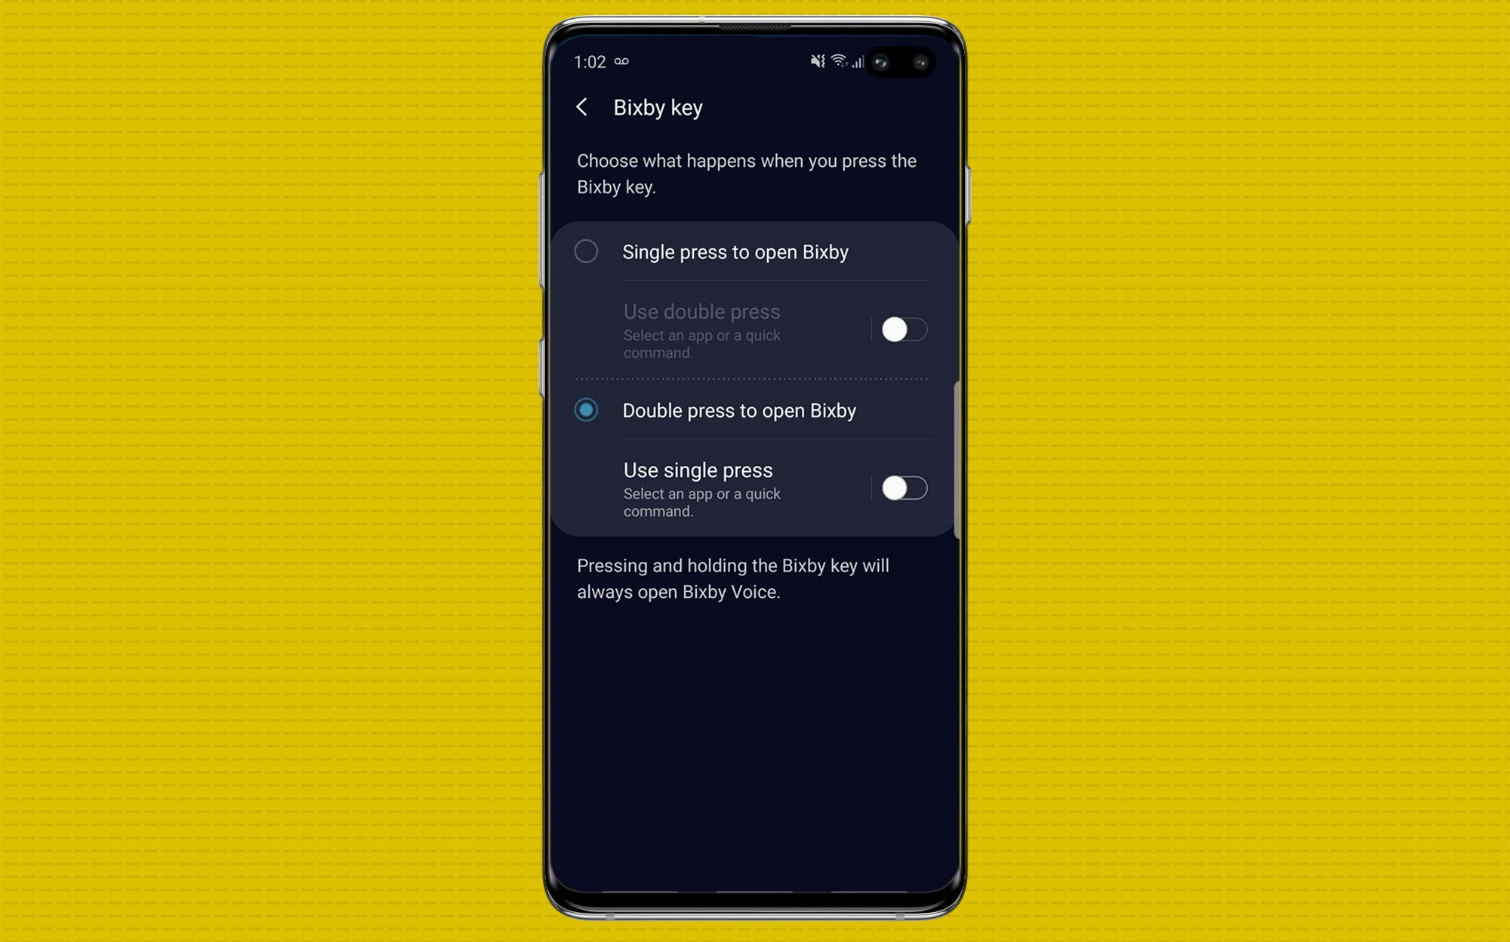
Simply press the Bixby key to call up Bixby Voice, then tap the three vertical dots on the screen that follows. Go to Settings, then scroll down to the Bixby key item.
As it stands, Samsung is only allowing users to remap the single- or double-press functions individually. Whichever trigger you don’t customize must remain a Bixby shortcut, and sorry folks — Samsung has blacklisted Google Assistant from the list of supported apps and commands. However, you can still redirect the Bixby key to the Google app, so at least there’s that.
Turn on Full Screen Gestures
Samsung isn’t really advertising it much, but the S10 series brings the option of gesture controls to Samsung’s flagship smartphones for the very first time. However, the phones don’t ship with gestures as the default navigation scheme, which means you’ll have to head into your device’s Settings menu to turn them on.
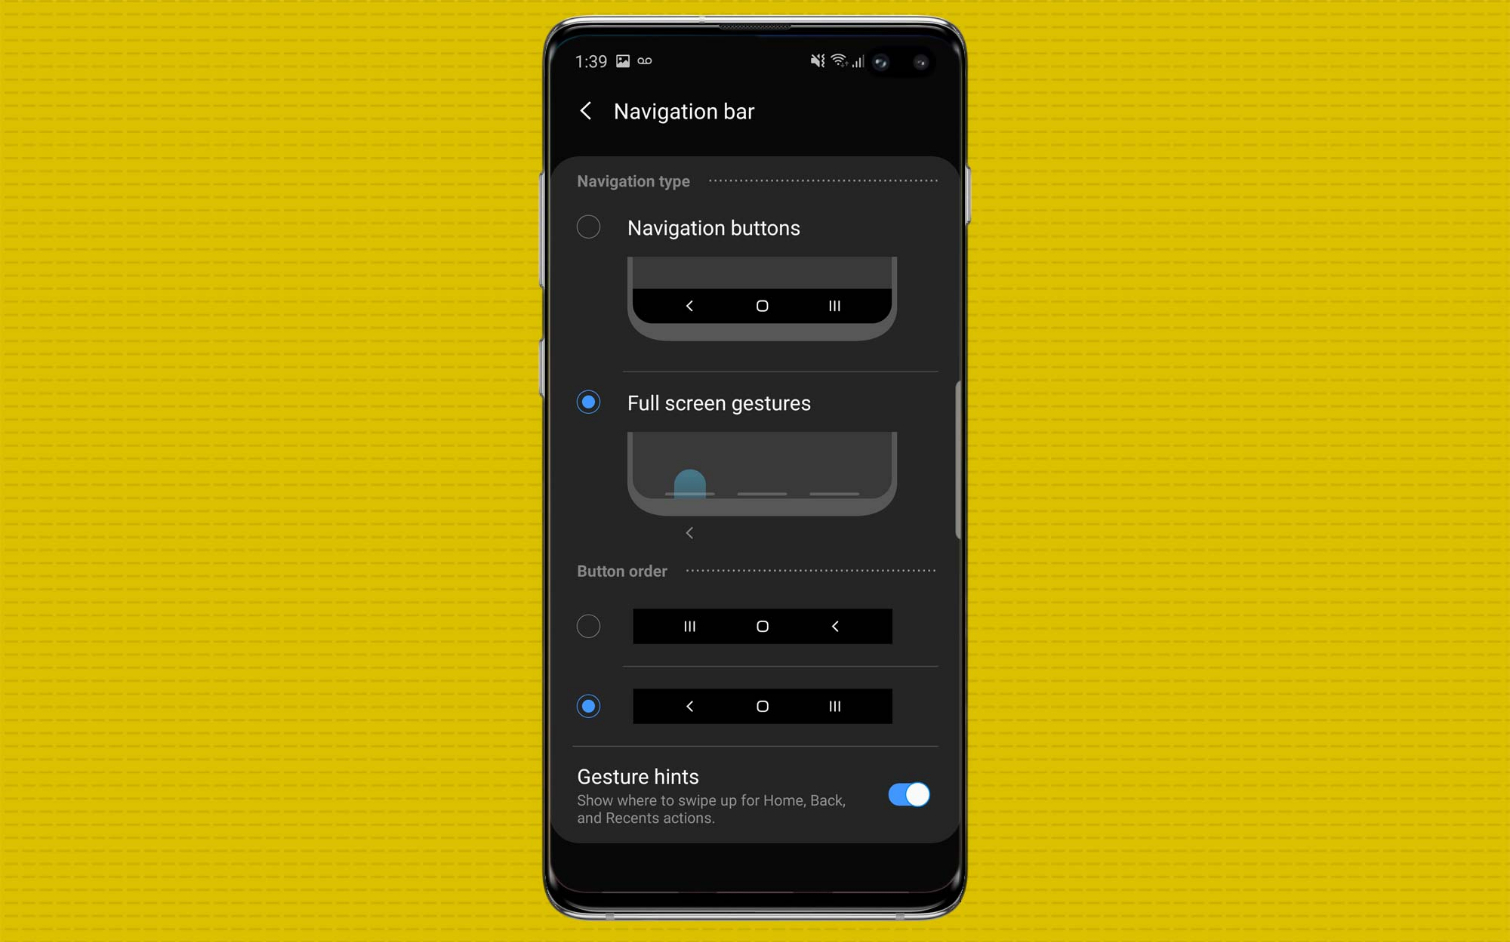
Once you’re inside Settings, head over to the Display sub-menu, then tap Navigation Bar. You’ll see multiple options that allow you to reorder the back, home and recent apps buttons or replace them entirely with three swipe-up gestures that trigger the same actions.
If you do decide to use gestures, just remember you’ll have to swipe up from the center and hold to launch Google Assistant.
Turn on Face Recognition
Samsung has replaced the Intelligent Scan authentication system introduced in the Galaxy S9 with something that’s simply called Face Recognition. It’s not much more sophisticated than Intelligent Scan, as it still relies on a 2D image rather than the depth-mapped, 3D-based Face ID authentication found in the latest iPhones. But it still gives you a swift and convenient way to unlock your Galaxy S10 without having to press anything.
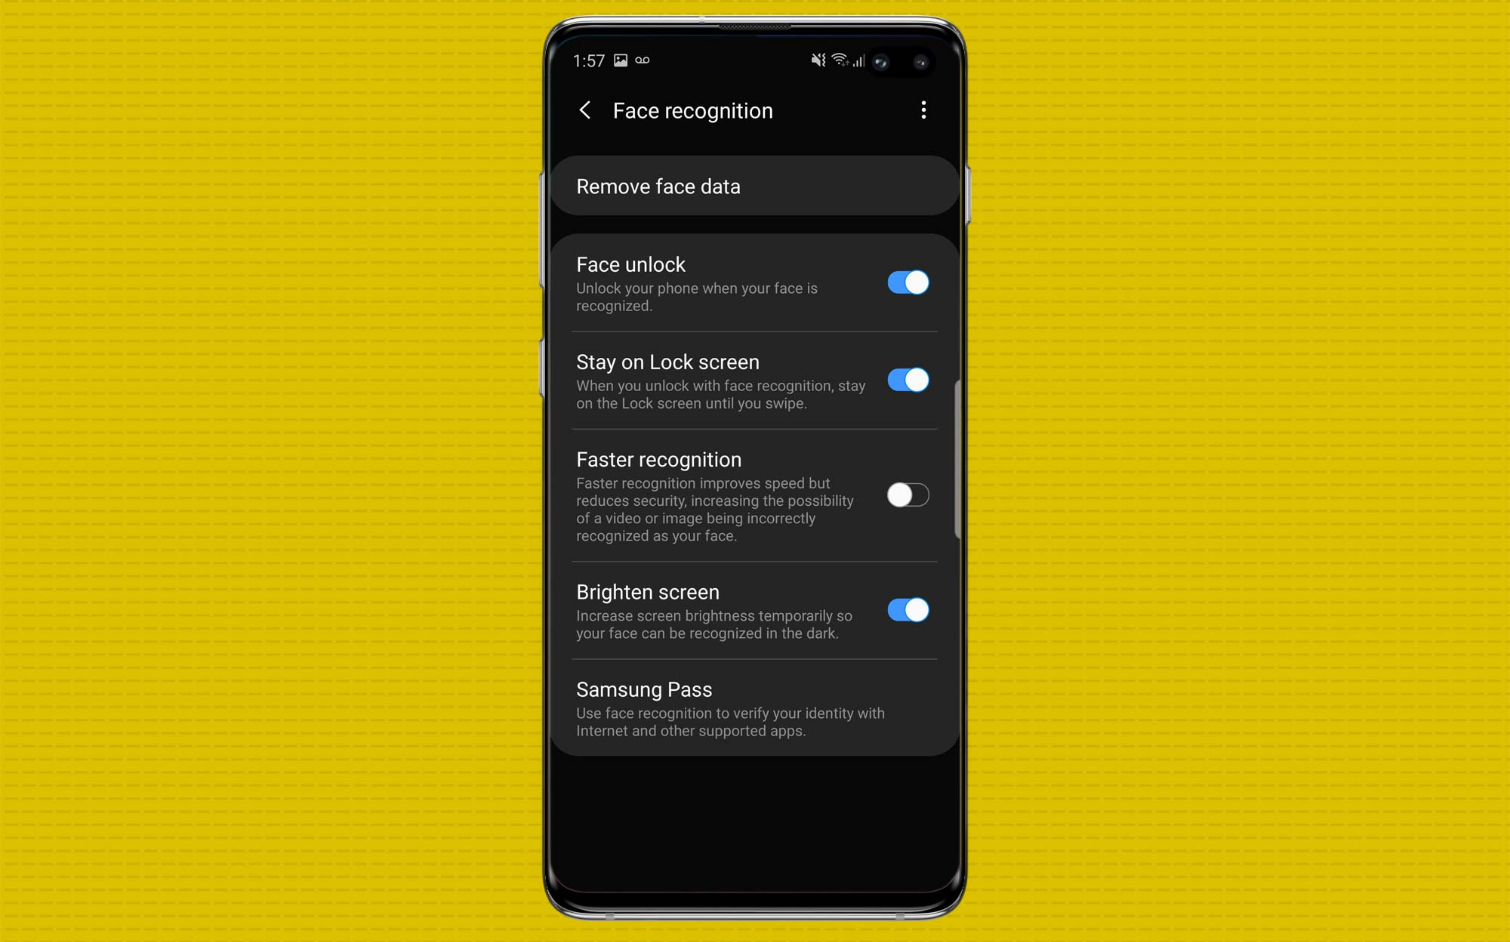
To use it, head over to the Settings app, then the Biometrics and security page. Face recognition is the top option; once you tap it, you’ll have to input your password or PIN code before starting the enrollment process. After you’ve completed it, you’ll be able to modify some settings to tailor Face recognition to your preference.
If you’re concerned about thieves spoofing your mug with photos, we recommend toggling the Faster recognition setting off, which lengthens the unlocking process by a bit but makes the feature much more secure.
Turn on Night Mode
Night mode has become an increasingly popular feature across all kinds of devices, and with AMOLED-powered devices like the Galaxy S10 it’s especially important, because black or dark images consume less energy than white or bright ones. And OneUI doubles down on this trend with a system-wide Night mode that changes everything from the color of all the phone’s stock apps to its on-screen keyboard.
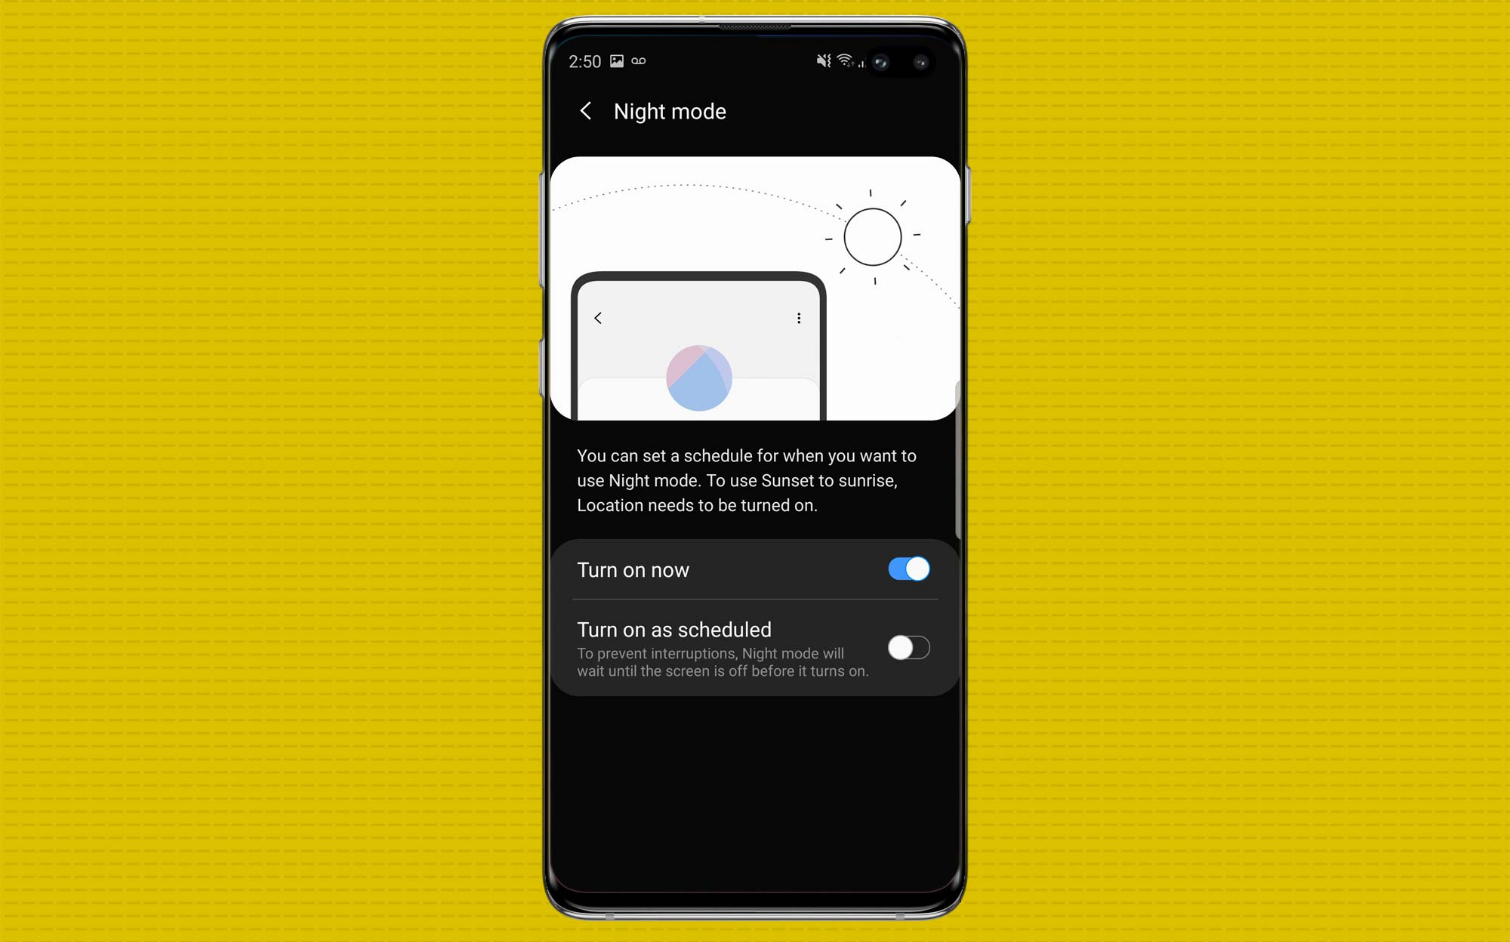
To activate it, go to the Settings app, then Display and then Night mode. You can either leave your phone on Night mode all the time, or set it to a schedule, where it will change from dark to light automatically once the sun goes down in your region.
Turn off skin tone smoothing
Skin tone smoothing — or beautification filters — are one of those things you either love or hate. However, we’re not big fans of the overly bright and smoothed-out portraits they provide. Samsung’s approach with OneUI on the Galaxy S10 turns these features on by default, but doesn’t make that especially clear within the camera interface.
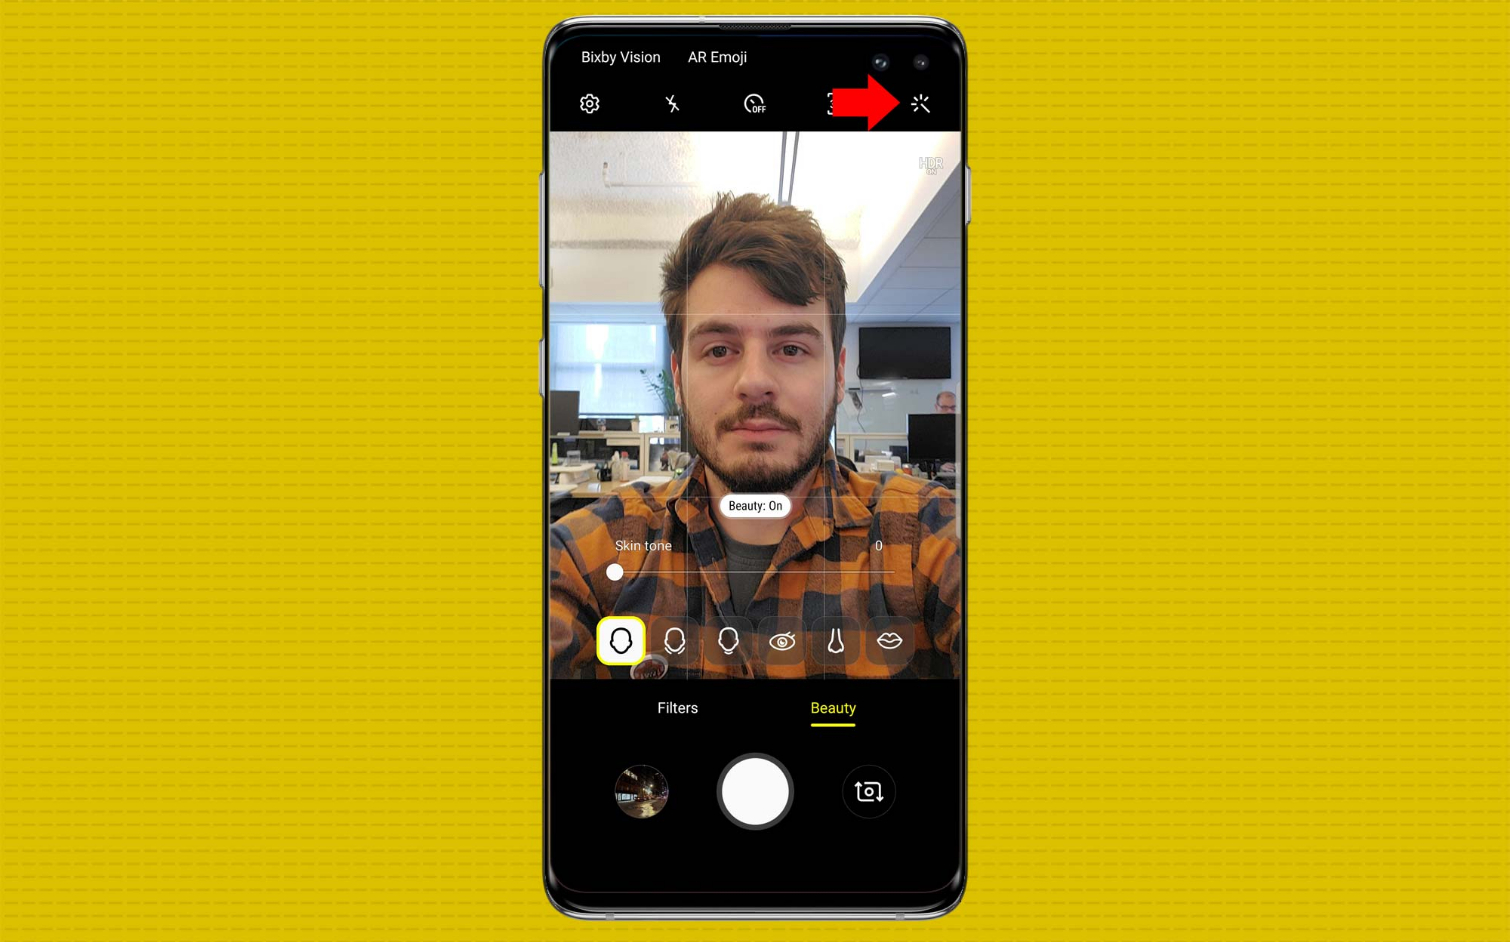
Turning skin tone smoothing off is actually quite easy, once you know where to look. However, you’ll have to do it independently for different camera modes. Whether you’re taking a standard photo or capturing a Live Focus image, you can tap the magic wand icon at the top right of the Camera app to bring up the sliders that control smoothing to modify the strength of the effect.
Activate Wireless PowerShare
Wireless PowerShare, one of the headline features available in all Galaxy S10 variants, allows you to use the phone’s battery to charge other devices wirelessly over Qi induction. And using the feature really couldn’t be any simpler: just pull down the notification bar to reveal a list of quick toggles, and tap the one labeled Wireless PowerShare to turn it on.
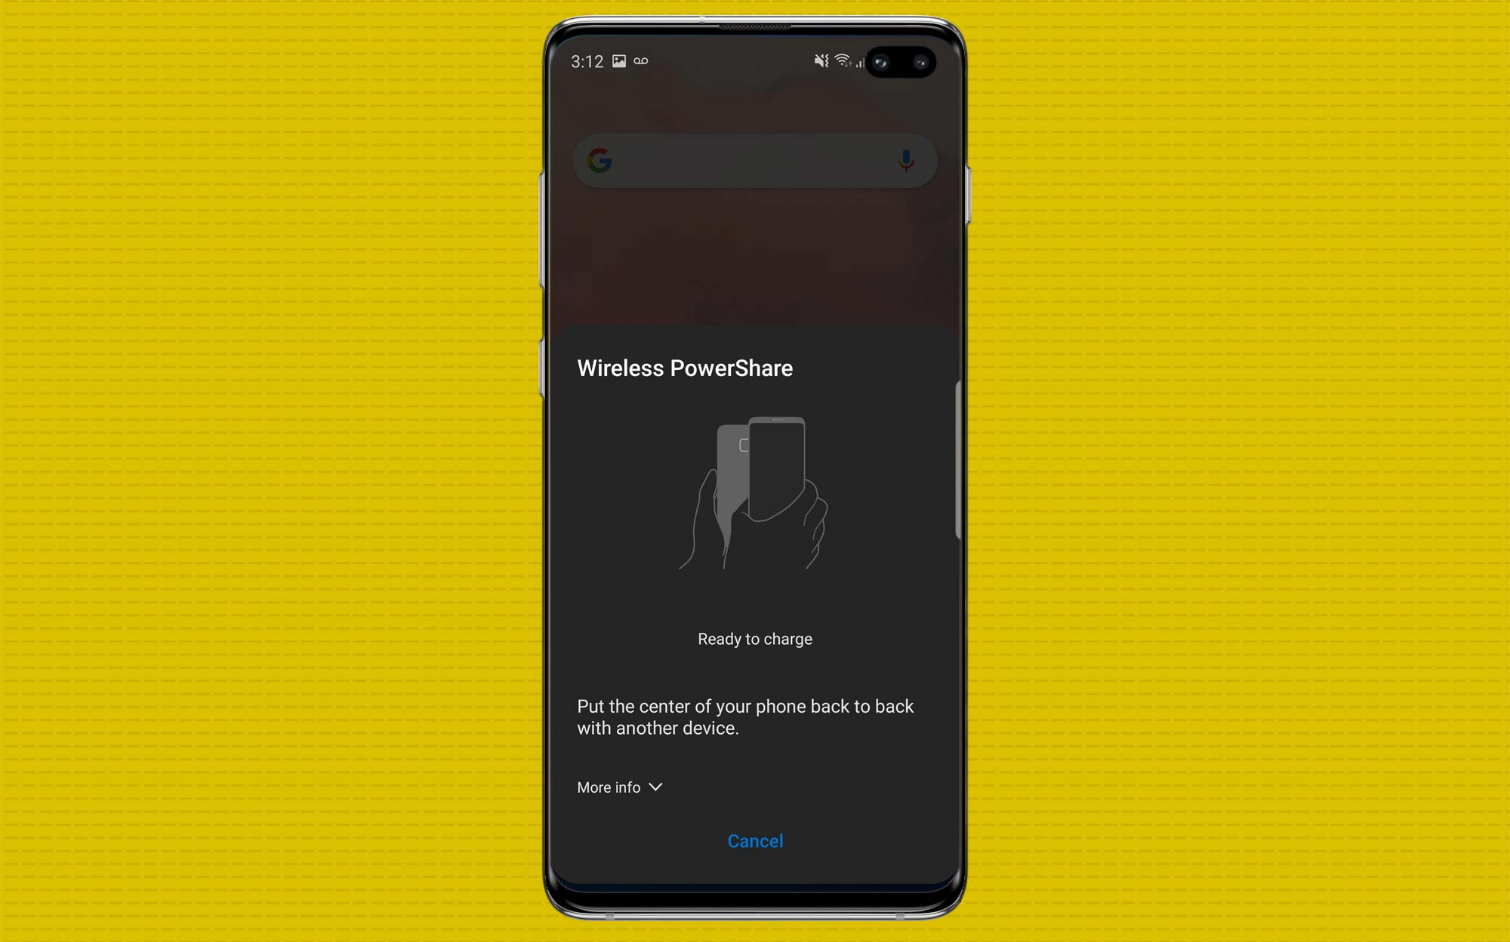
A message explaining how to use PowerShare will appear on the screen as long as that feature is in use. At this point, you can flip the device over and place something on its backside to start the flow of power.
When you want to turn PowerShare off, simply tap Cancel near the bottom of the screen.
Turn off Secure Wi-Fi notifications
Samsung’s OneUI is the most streamlined software experience the company ever baked into its smartphones, though the new interface does come with its fair share of annoyances. One of them is the incessant Secure Wi-Fi notifications users are inundated with after connecting to certain networks, that cannot be individually dismissed.
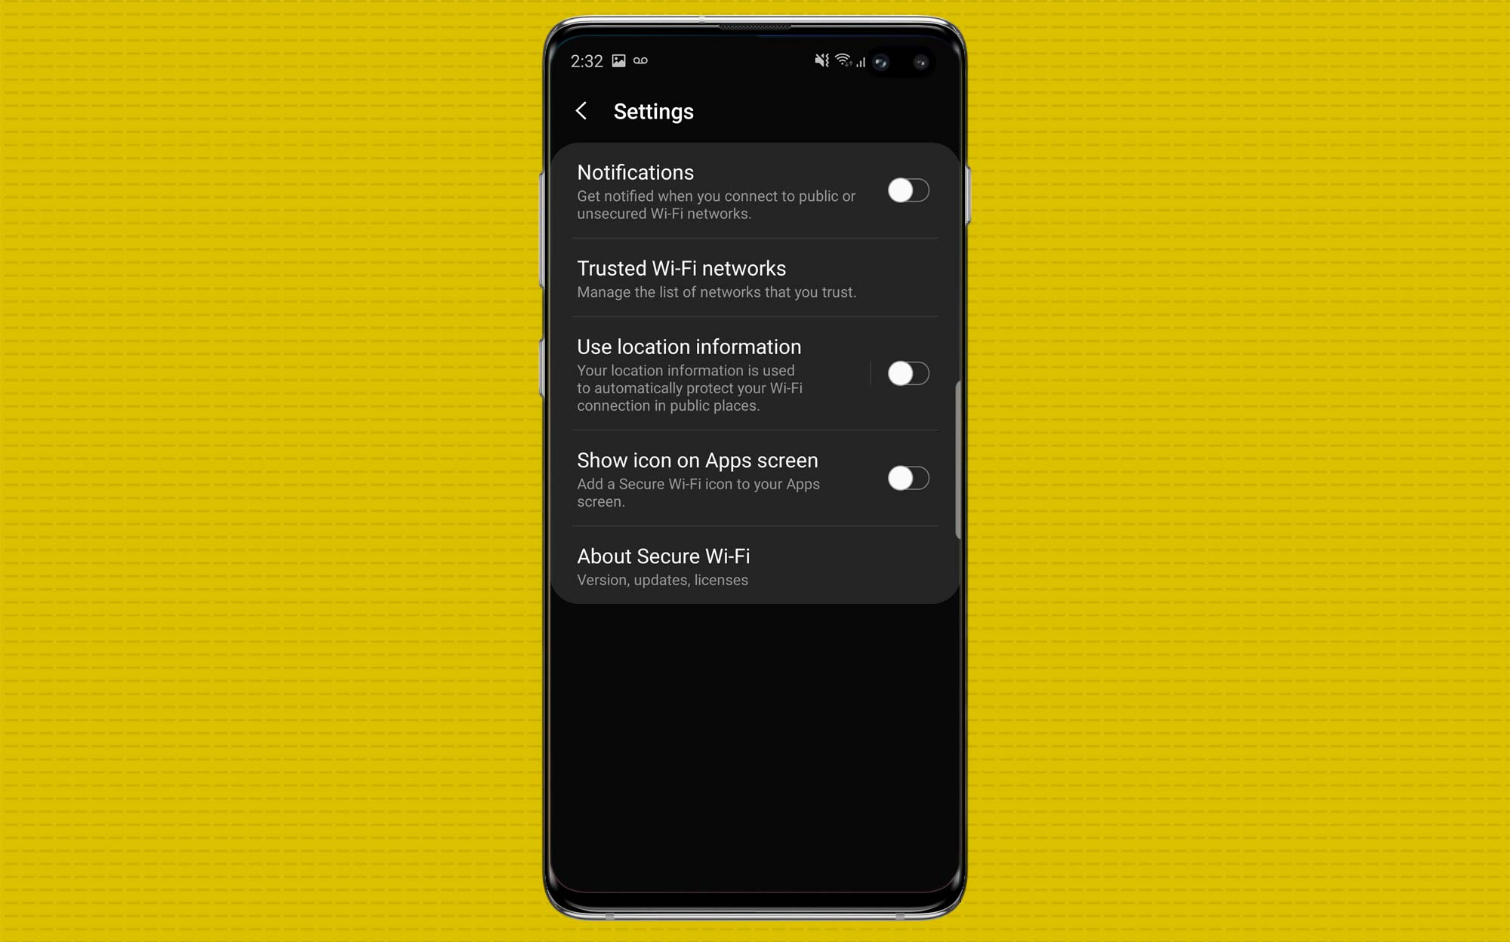
The purpose of these notifications is to get you to turn on Samsung’s Secure Wi-Fi feature, which routes your traffic through a VPN to conceal your data on suspect networks. That’s all well and good, but users only get a free 250MB of VPN access, and everything beyond that must be paid for — making those notifications extra annoying. And turning them off is almost just as frustrating a process.
To do it, head over to Connections inside your device’s Settings, then Wi-Fi, then the Advanced sub menu accessible from the top of the screen. Tap on Secure Wi-Fi, and then tap the three vertical dots in the top right to manage the feature’s settings. From this screen you can stop Secure Wi-Fi from blowing up your alerts all the time, returning some peace and order to your notifications.
Choose a screen mode
Samsung’s displays may be the best in the business, but everyone has different expectations on how their smartphone’s screen should look. To that end, the Galaxy S10 offers two basic color profile options: a default Natural look, and an optional Vivid setting that boosts saturation similarly to the Dynamic profile the Galaxy S9 launched with.
To change the intensity of your display’s colors, go to the Settings app and the Display submenu. Screen mode will appear about halfway down the page, and from this menu you’re also able to get really granular about the tuning, with sliders to adjust white balance and red, green and blue elements individually.
Schedule blue light filter
Many users prefer blue light filters to lessen eye strain when interacting with their phones. So like many other devices, the Galaxy S10 offers that option as well.
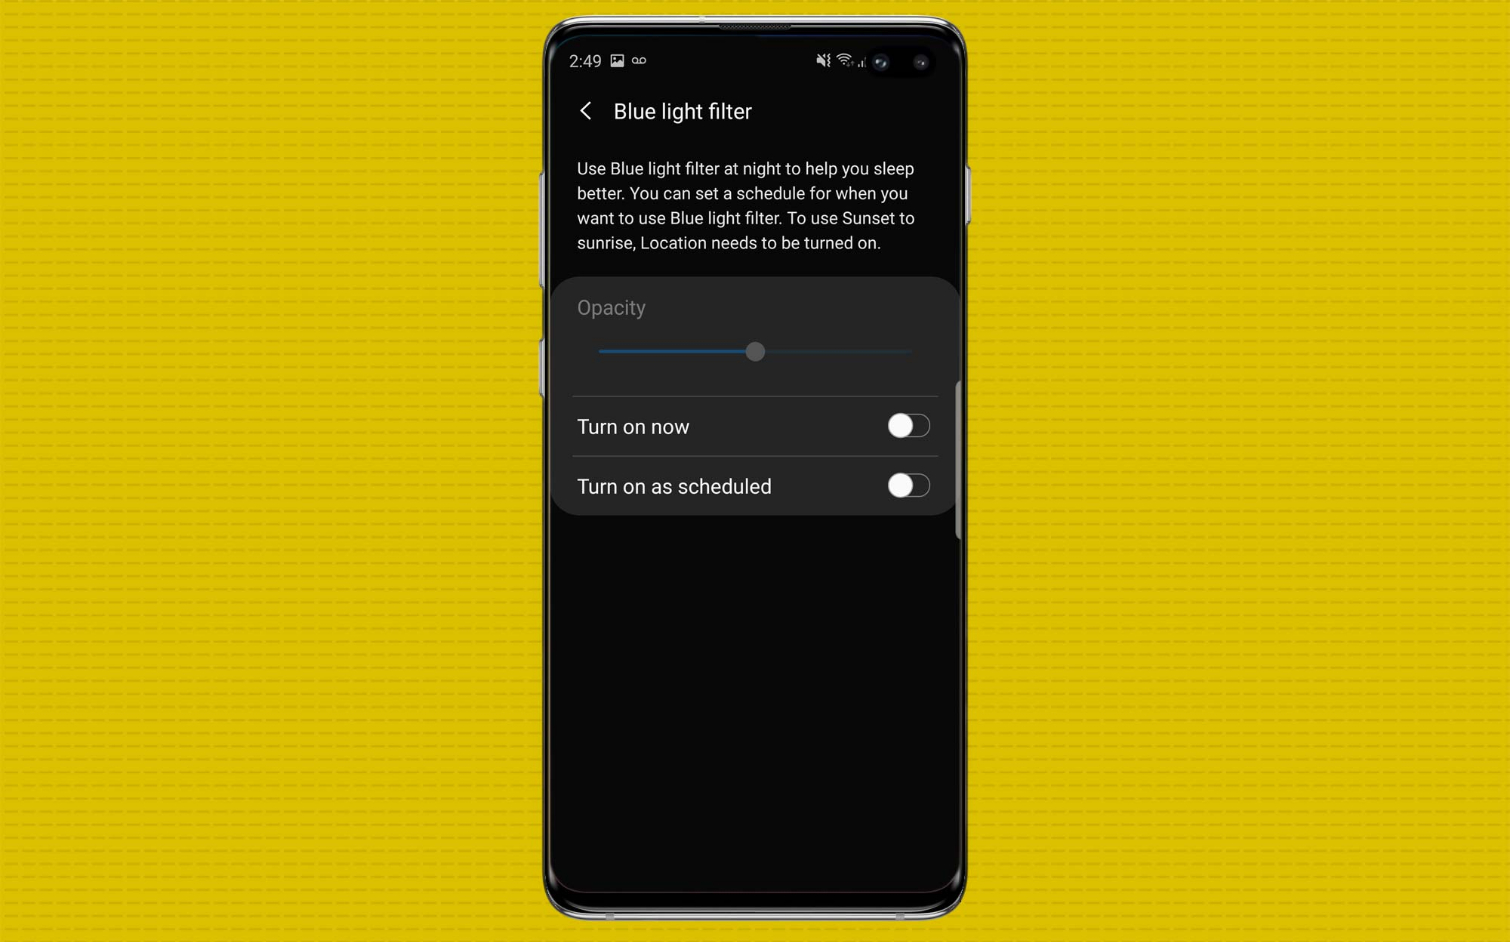
Note that Samsung says the Dynamic AMOLED technology underpinning its latest handsets reduces the emittance of blue light by more than 40 percent, without significantly affecting display quality and color balancing.
You can turn the phone’s built-in blue light filter on indefinitely, or schedule it to automatically activate at preset times of the day, like before going to bed. To do that, simply head over to the Settings app and Display submenu, then tap on the blue light filter item. A slider allows you to adjust the strength of the filter to your choosing.
Want to save some money on the Galaxy S10? Be sure to check out our Samsung discount codes for the latest deals.
Looking for more Galaxy S10 tips and advice? Visit our Galaxy S10 hub page for even more help with getting the most out of your smartphone.
More Galaxy S10 Coverage
Adam Ismail is a staff writer at Jalopnik and previously worked on Tom's Guide covering smartphones, car tech and gaming. His love for all things mobile began with the original Motorola Droid; since then he’s owned a variety of Android and iOS-powered handsets, refusing to stay loyal to one platform. His work has also appeared on Digital Trends and GTPlanet. When he’s not fiddling with the latest devices, he’s at an indie pop show, recording a podcast or playing Sega Dreamcast.
