Galaxy Note 9 User Guide: Tips, Tricks and How-Tos
Here's how you can make the most of all the new features and enhancements in Samsung's Galaxy Note 9.
Galaxy Note 9 Features to Enable and Disable
Don't be fooled when you first take your new Galaxy Note 9 out of the box. While it looks a lot like its predecessor, Samsung's phone has a slew of new hardware, software and services that set it apart.
In addition to a huge battery that you can quickly charge, the Note 9 combines Samsung’s DeX desktop experience with a powerful Bluetooth stylus that can also act as a remote control for the phone. In other words, even though it shares some features and settings with recent Samsung phones, there's a lot to learn about the Note 9.
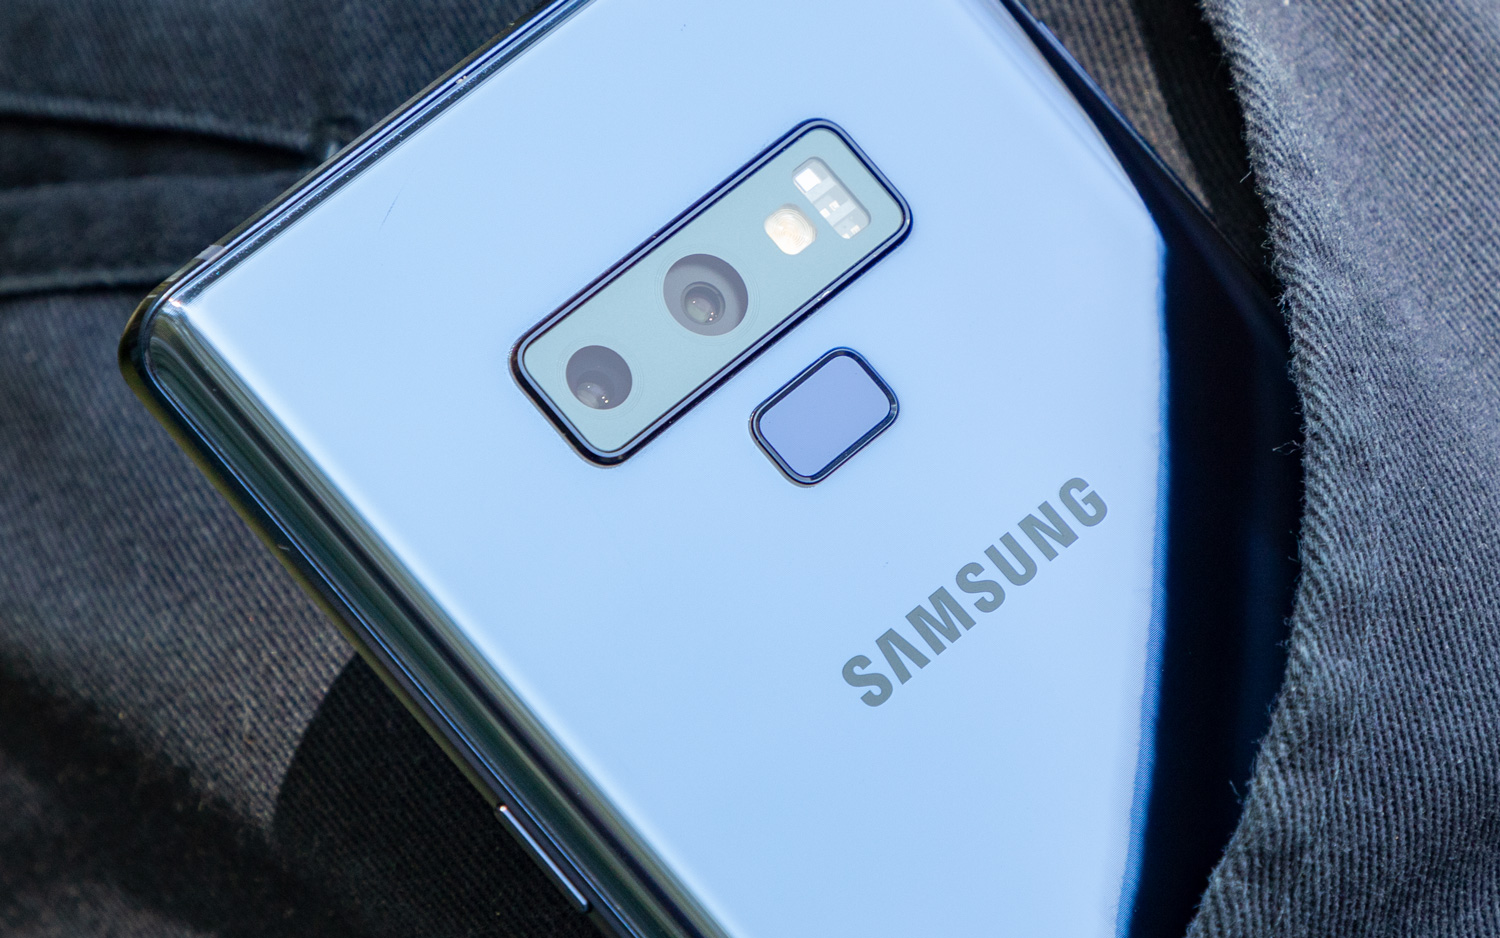
Where to get started? Here's a quick rundown of the features you should set up right away.
Secure your Note 9
After you turn the phone on for the first time, an automated sequence of screens guides you through the set up. It starts with Protect Your Phone screen, where you can choose whether to unlock the phone with a numeric PIN, a pattern, fingerprint, your facial features, your iris pattern or a combination of the last two.
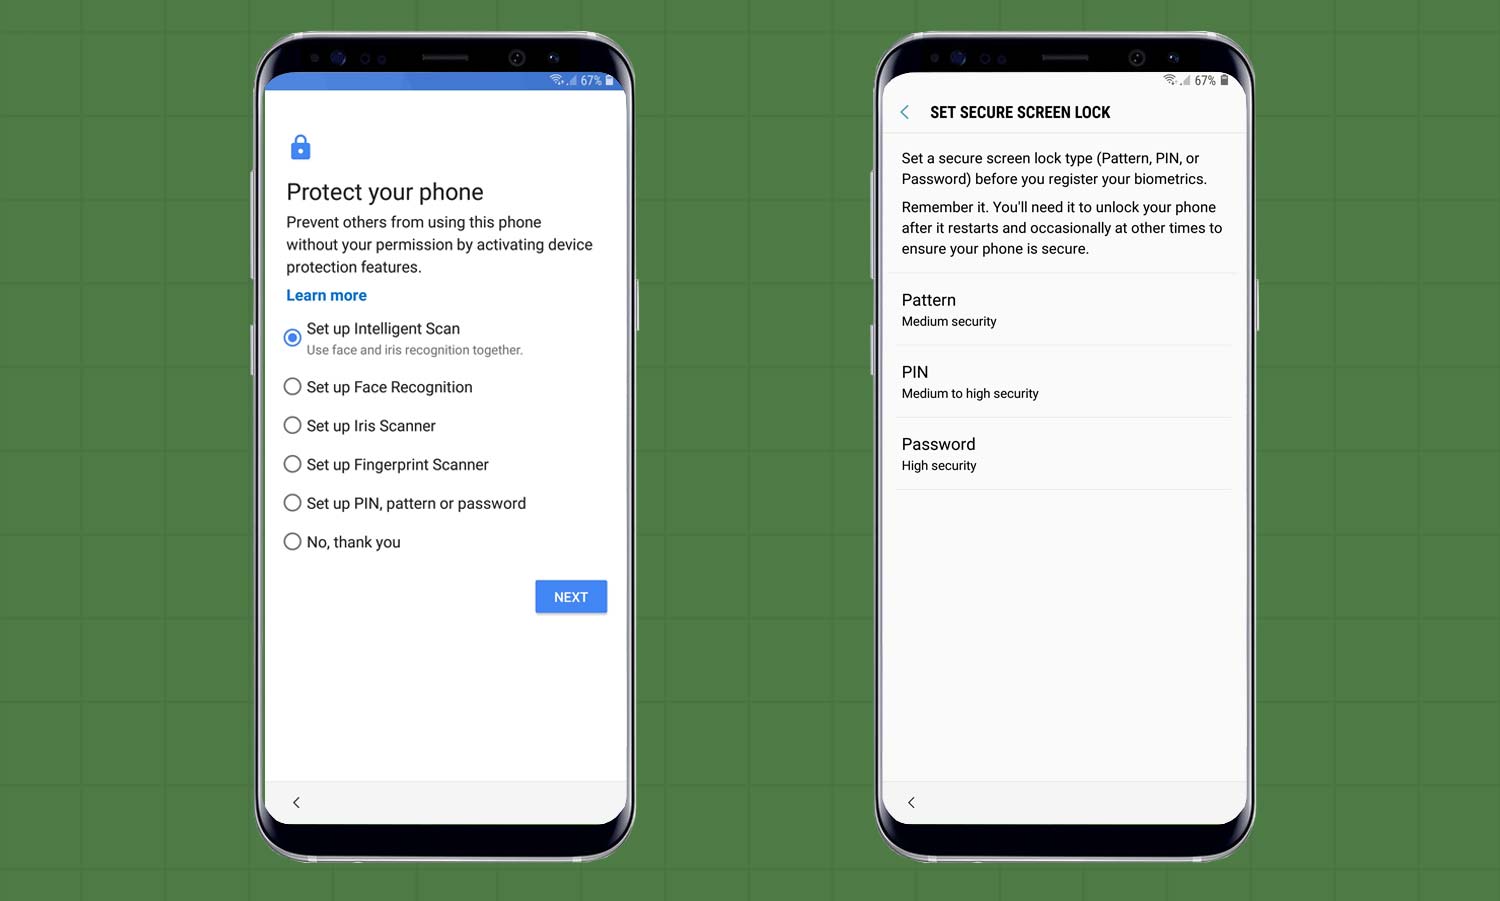
Here’s How: The Protect your phone screen makes you decide which method you want to use for opening the Lock Screen. After picking one, tap Next, and you'll be prompted to set a secure lock screen type (pattern, PIN or password) before you have your face, fingerprint or eyes scanned. You can also require that a PIN be entered before the Note 9 starts up.
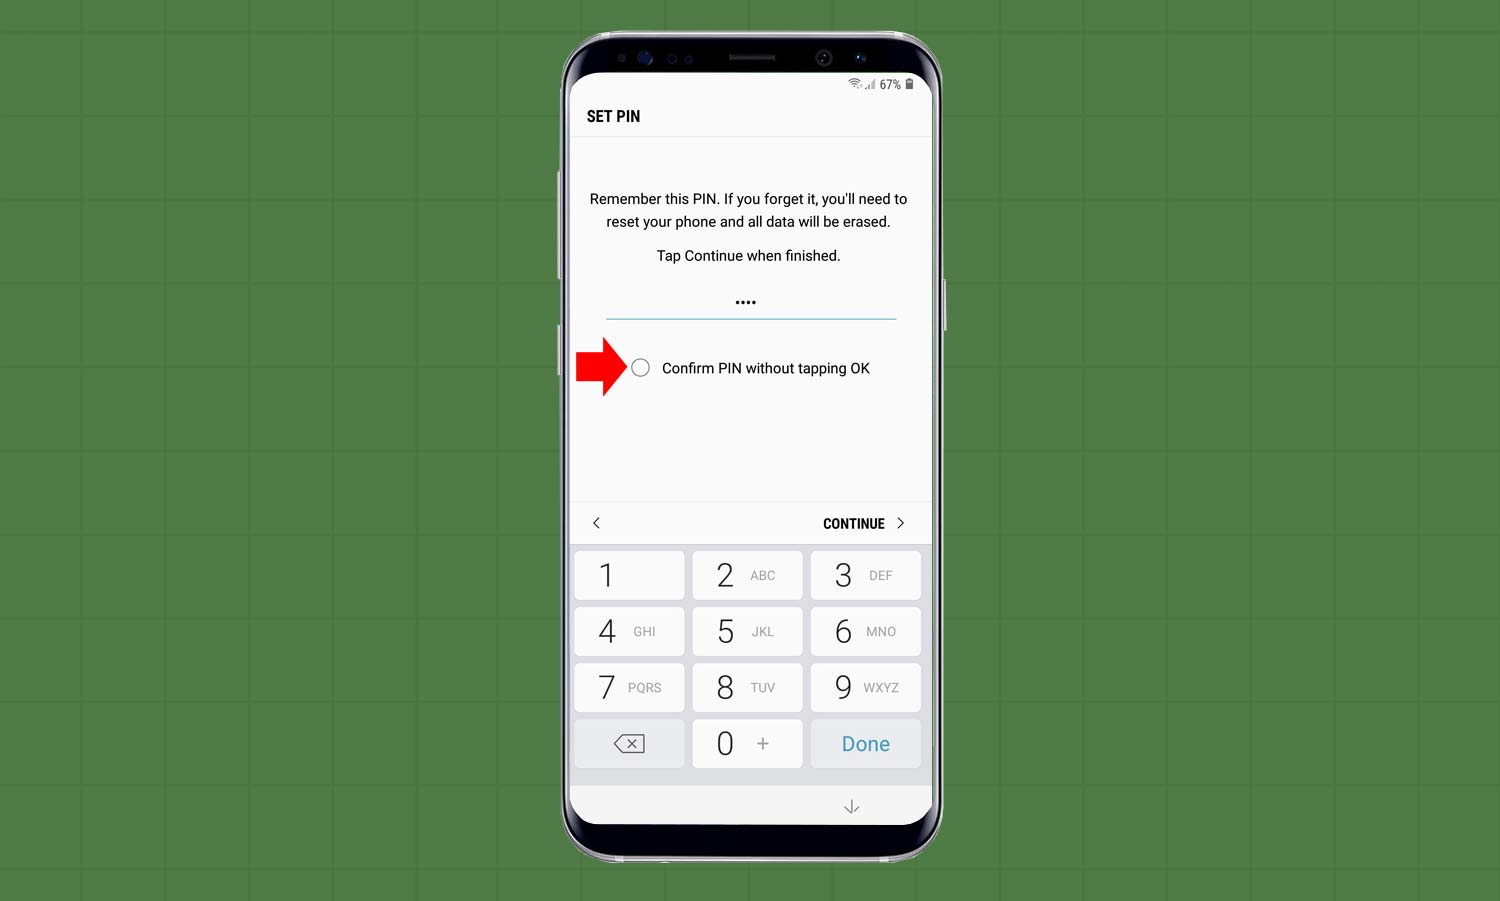
When you set a PIN, the Note 9 also lets you bypass having to tap OK whenever you enter the PIN.
Link your Note 9 with the S Pen
One of the biggest changes introduced with the Note 9 is the new S Pen, which goes beyond being a pressure sensitive stylus for activating icons, writing notes and drawing. The S Pen now connects to the phone via Bluetooth, with a range of about 30 feet. You can use the S Pen button in the middle of the stylus as a remote control for anything from playing or pausing Youtube videos to snapping pictures with the camera. But you have to enable the feature first.
Sign up to get the BEST of Tom's Guide direct to your inbox.
Get instant access to breaking news, the hottest reviews, great deals and helpful tips.
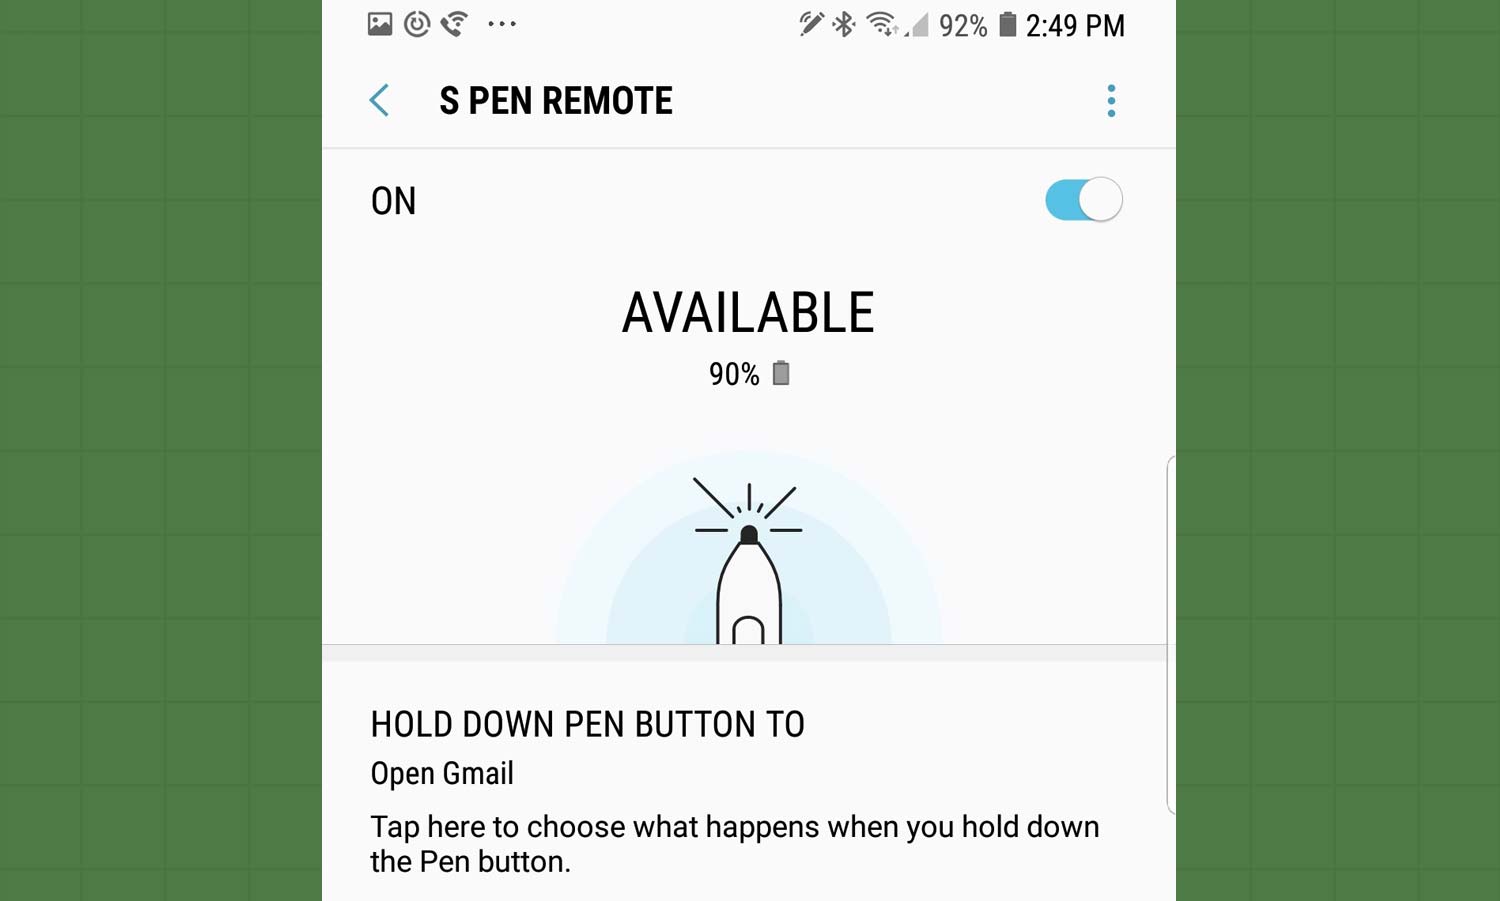
Here’s How: In the phone’s Settings, tap Advanced Features and then S Pen. On the next screen, select S Pen Remote and slide the On/Off switch to right to turn the S Pen Remote software on. When the phone and stylus are linked, light blue circles radiate from the pen on the S Pen Remote page.
Enable wireless fast charging
The Note 9’s 4,000 mAh battery can be charged with a traditional USB C cable or with a wireless Qi inductive charger. That said, if you have a high-power wireless charger, Samsung says the process can be sped up by as much as 40 percent. (The device might need to use its cooling fan to dissipate the extra heat.)
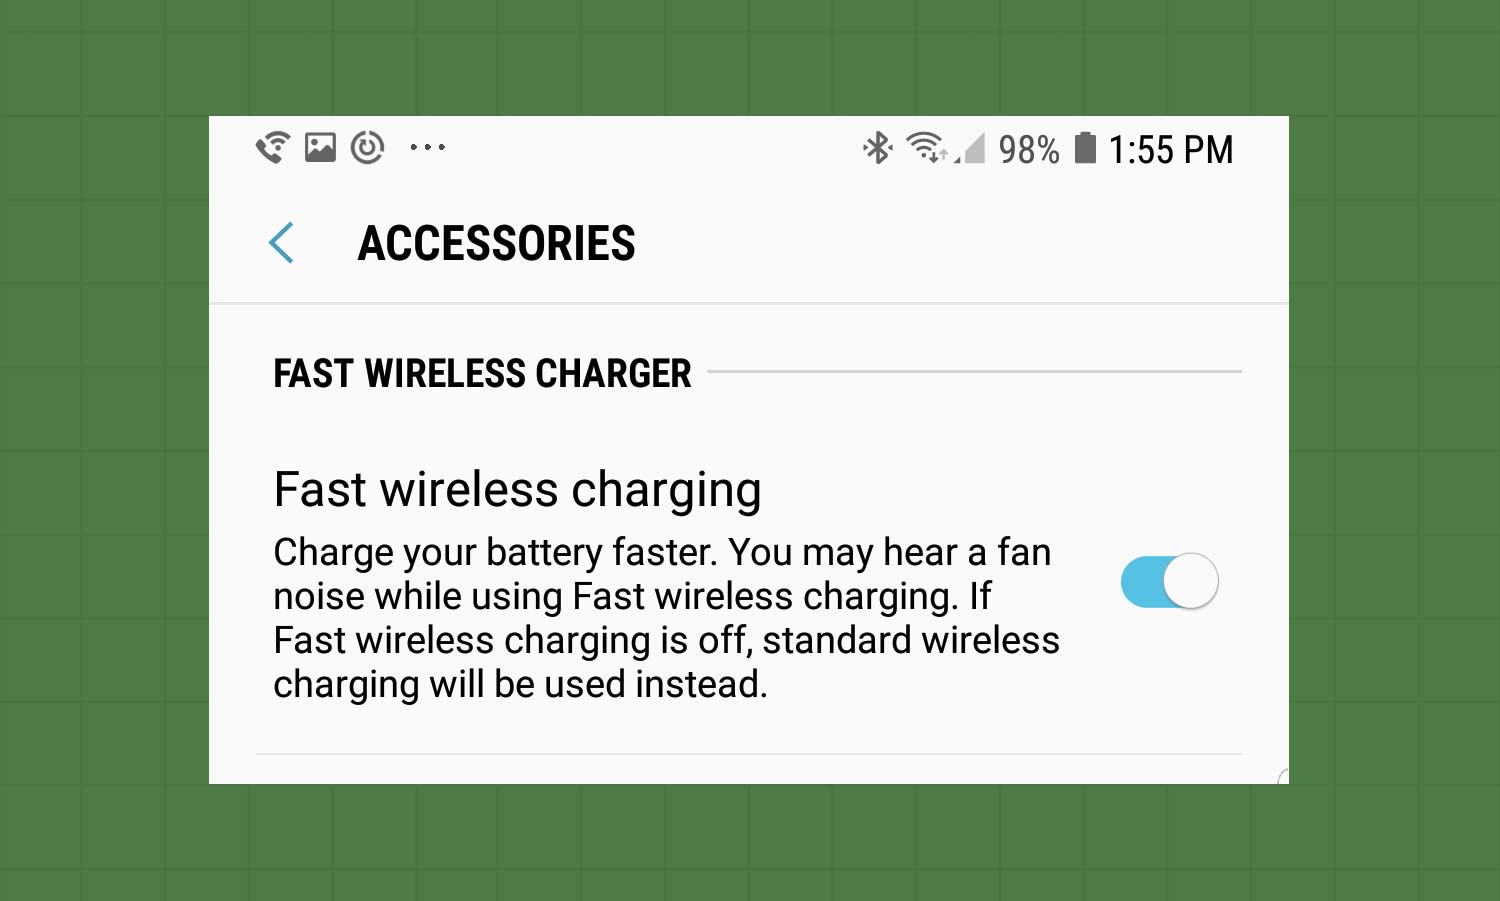
Here’s How: Go to Settings and select Advanced Features. Open the Accessories section, where you can flip On/Off switch for Fast Wireless Charging.
Configure NFC
Like recent Note versions, the Note 9’s back has a near field communications (NFC) chip below its skin that can move data wirelessly by placing it near or on an NFC receiver. It’s useful for printing and paying for things.
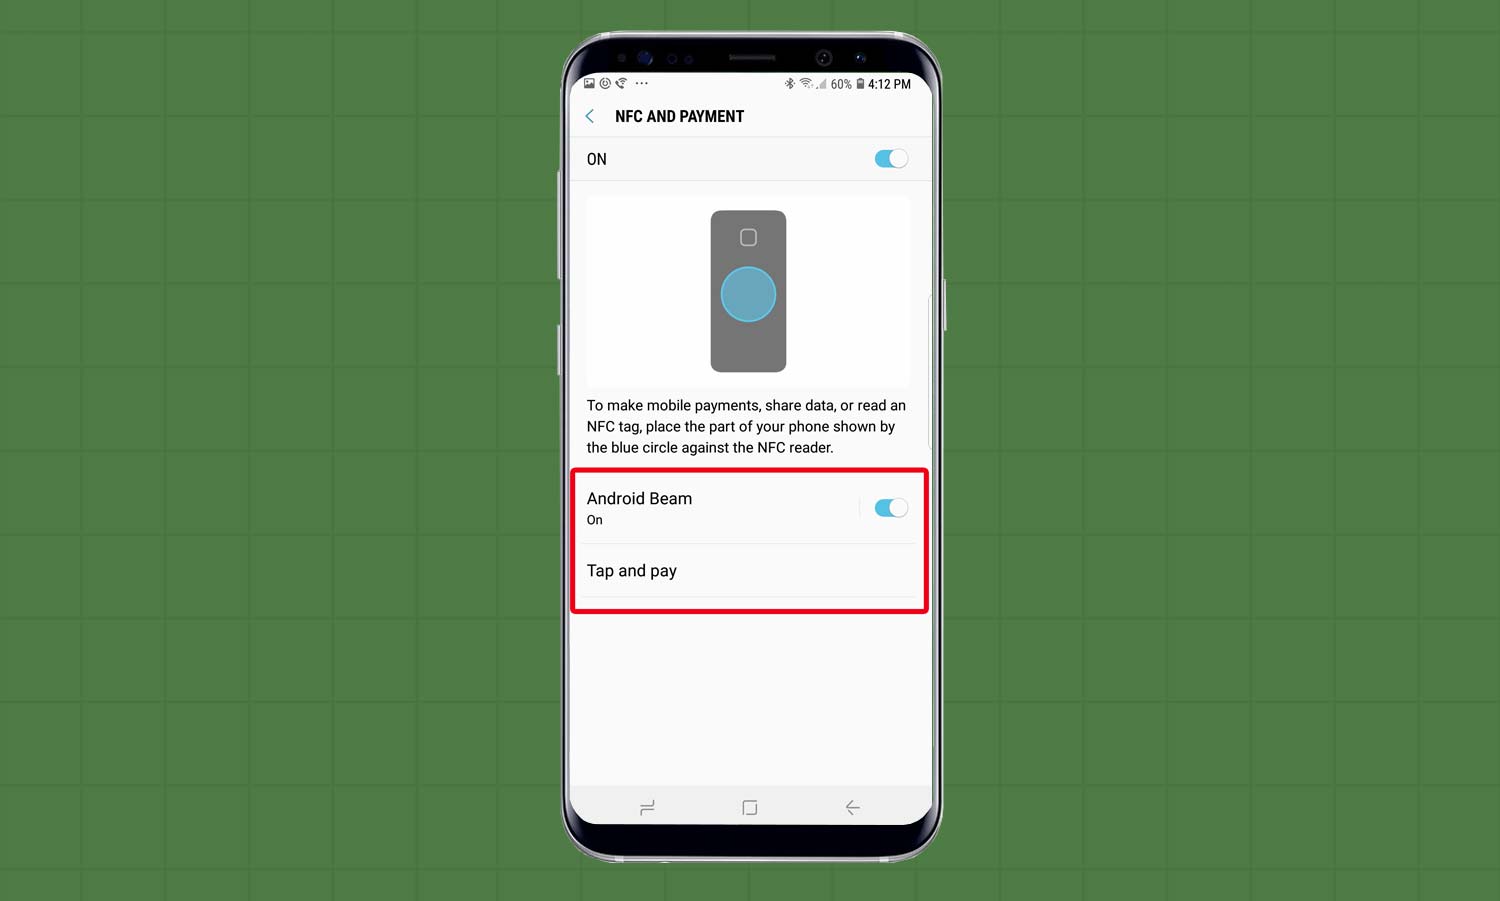
Here’s How: To set up it, go to the Connections section of the Settings and open the NFC category. Then tap on Payment. Slide the On/Off button to the right to turn it on. Next, open the Tap and Pay screen to allow the Note 9 to use Android Pay or Samsung Pay.
MORE: Apple Pay vs. Samsung Pay vs. Google Pay: Mobile Wallet Guide
Set up your mobile wallet
If you want to use your Note 9 to pay for things, you’ll need to register a credit card. The process of entering payment information hasn't changed from other recent Samsung phones. Samsung Pay is available at an increasing variety of stores and allows nearly instant payments that make credit card swipes seem slow.
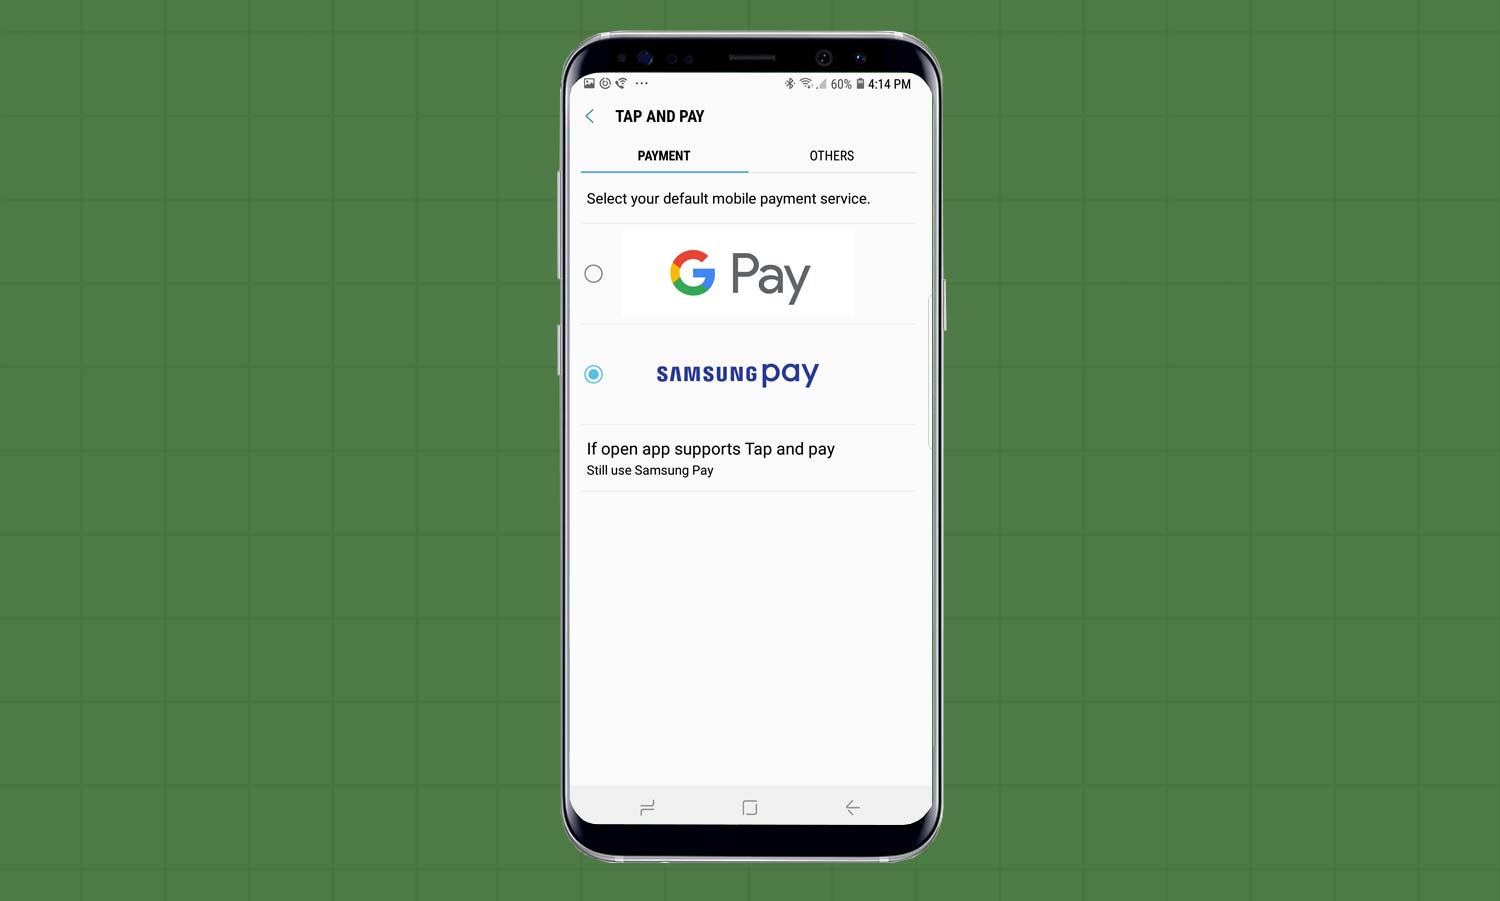
Here’s How: Open the Tap and Pay section. The default settings is for Google Pay; if that’s what you want, you’re set. Tap the Samsung Pay area if that’s what you prefer.
Pick your Screen Mode
The Note 9’s 6.4-inch AMOLED display is one of the sharpest and brightest available on a phone. It’s also one of the most adjustable. The key is Screen Mode, which can fine-tune the display.
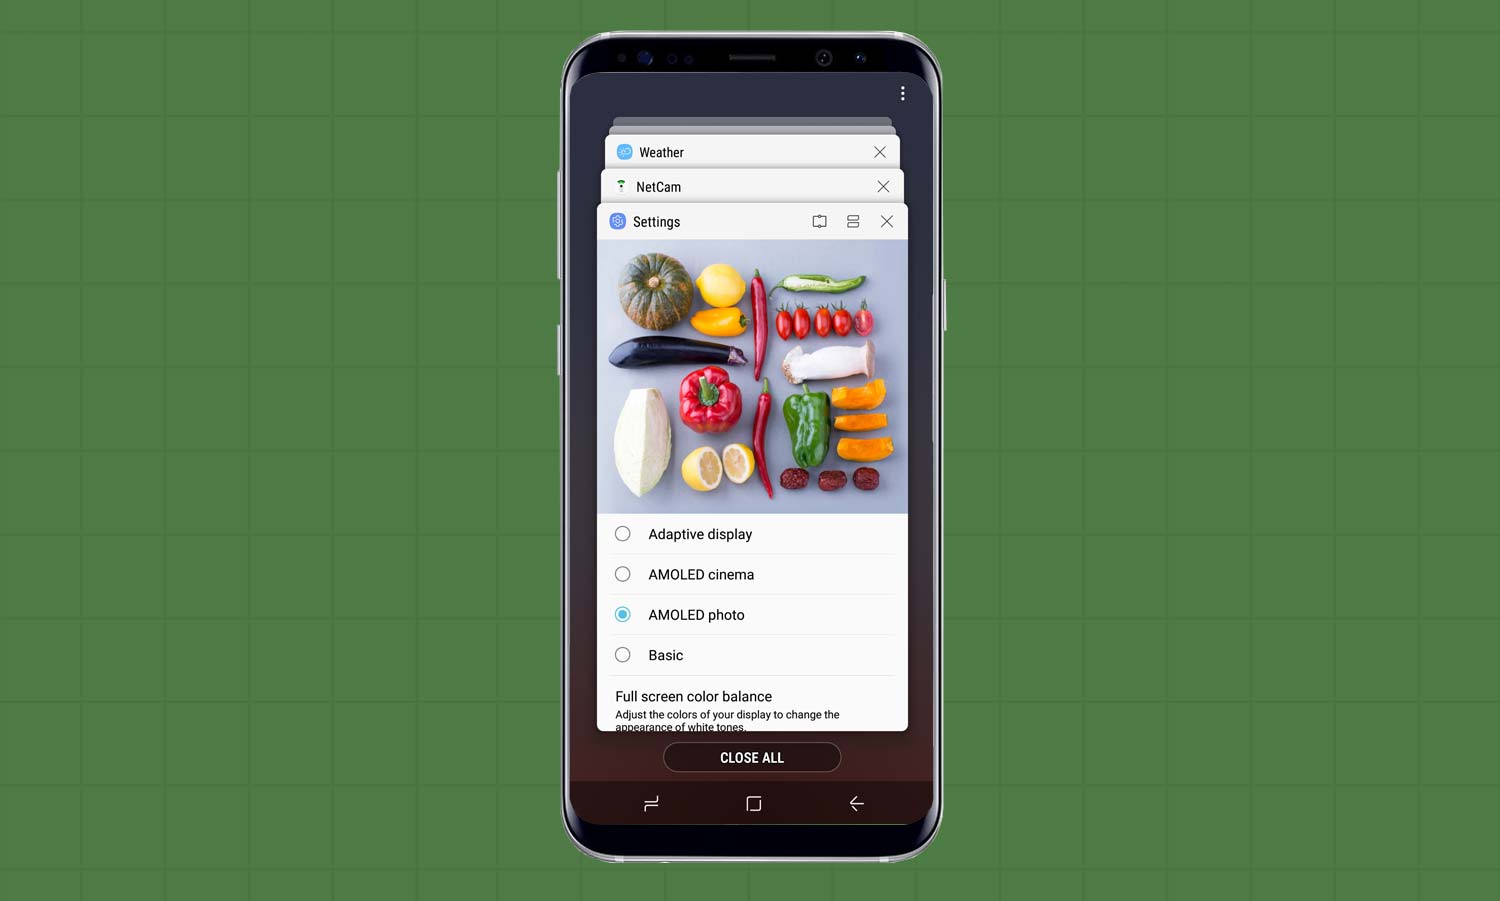
Here’s How: Start at the Settings and then tap on Display. Scroll down to Screen Mode where your options are AMOLED Cinema, AMOLED Photo or Adaptive Display, which changes its settings based on what’s being displayed.
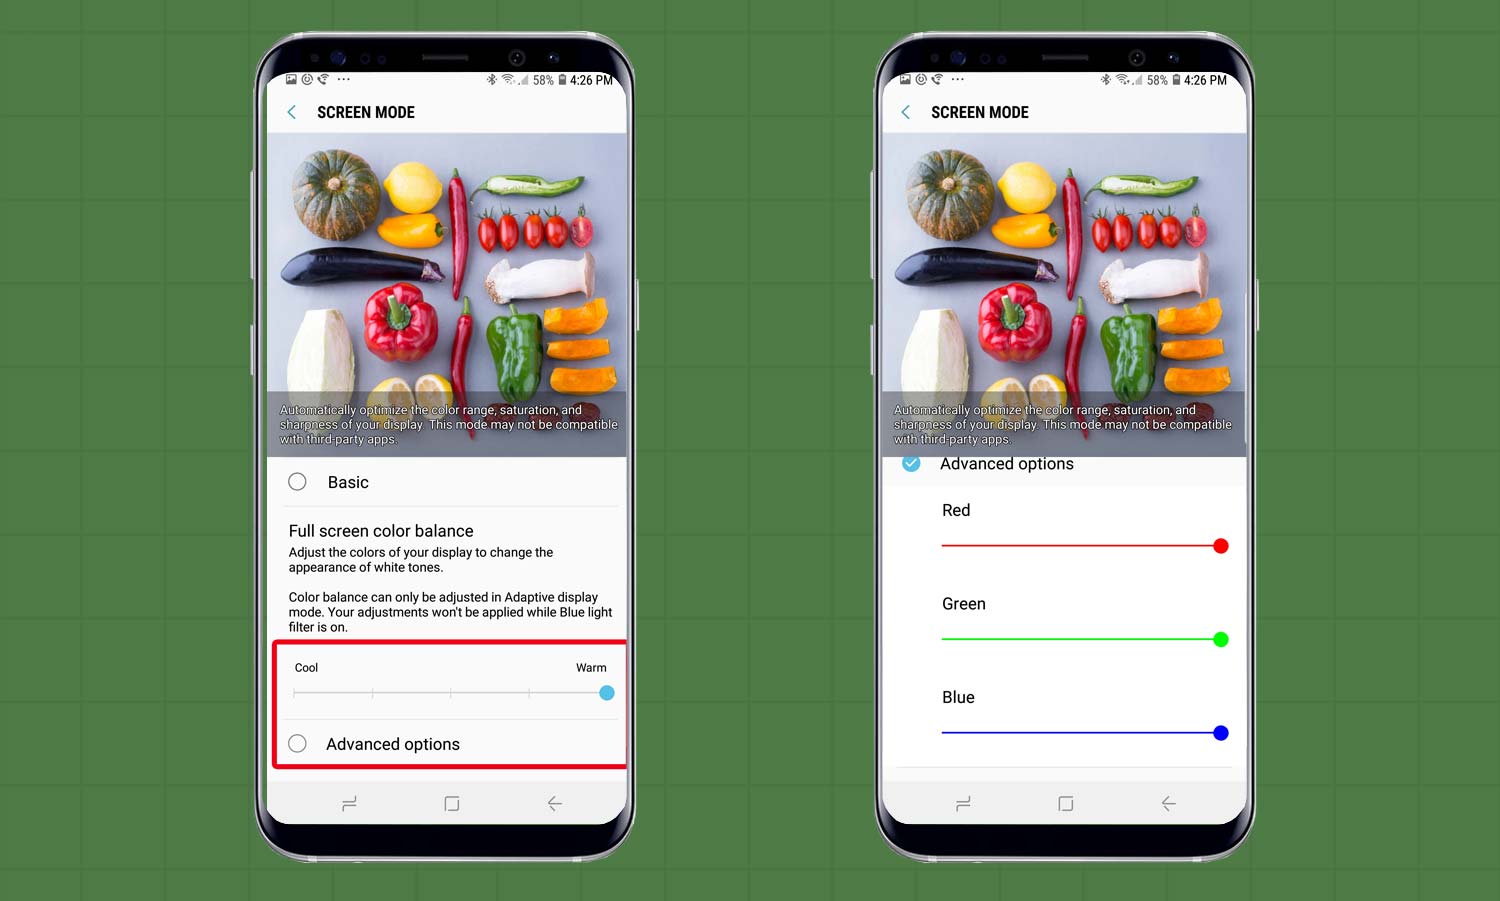
Selecting Adaptive Display lets you adjust the screen's color temperature via a slider. You can also adjust individual sliders for red, green and blue by tapping the Advanced options button to fully customize the display.
Set up the Always On Display for memos
The Always on Display is one of my favorite things about the Note 9. It’s my memo pad and pocket watch, and as the name on the label says, it's always on. To be able to write notes on the screen, regardless of whether the Note 9 is locked starts with setting it up so that when you take the S Pen out, you go right to a blank screen, ready for doodling or notes.
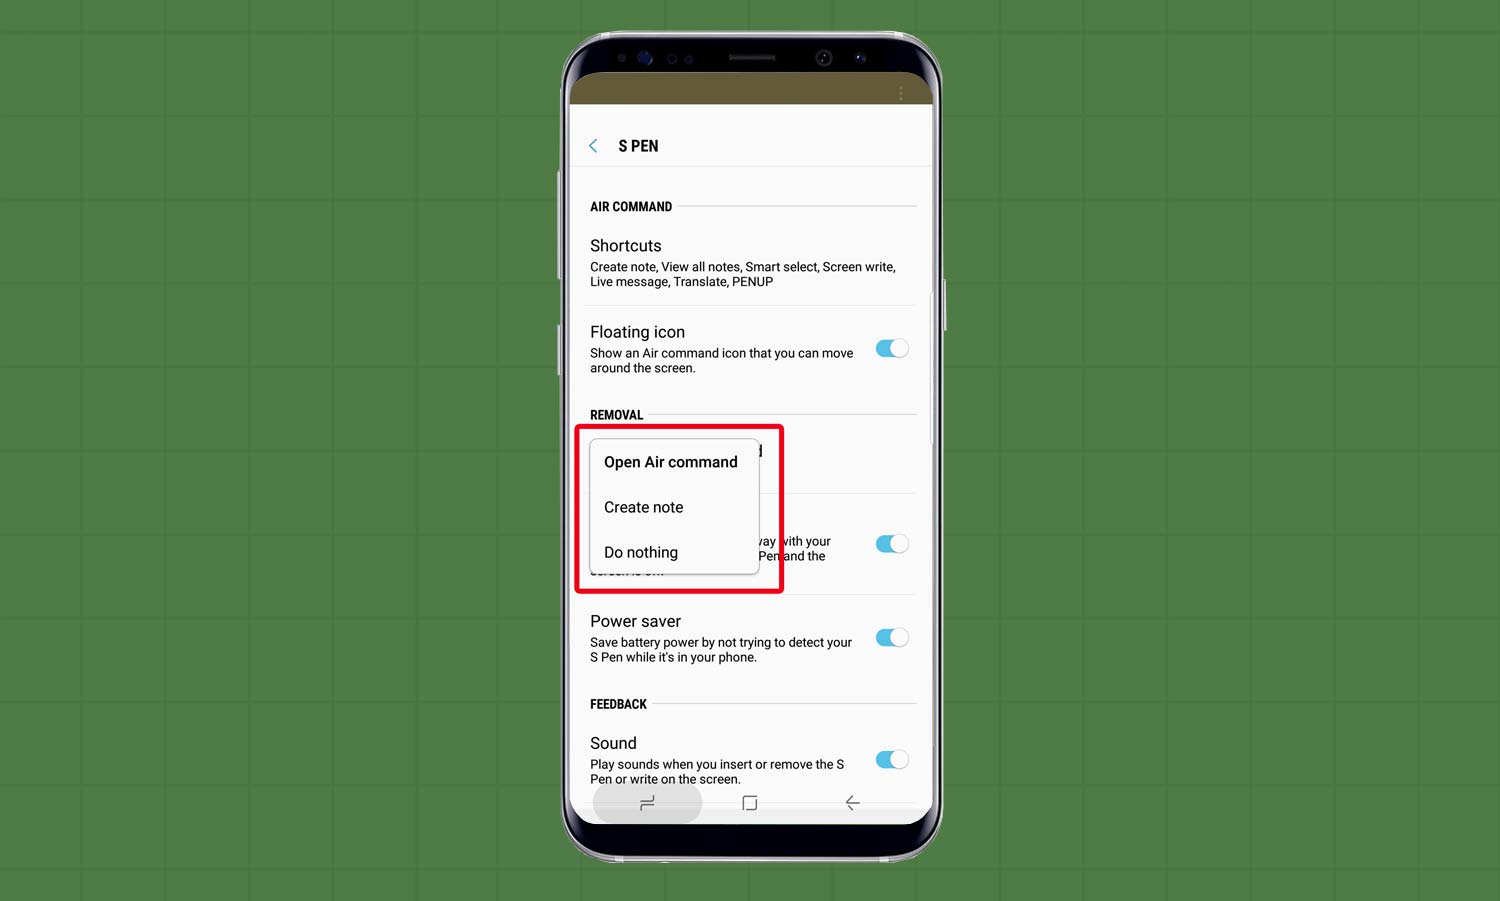
Here’s How: Start at Settings and tap on Advanced Features. In the S Pen section tap Removal. This opens a box with three choices — Open Air Command, Create Note or Do Nothing.
Change the Always on Display's look
The Note 9 can also be a watch with 16 different clock faces, including one with two time zones for world travelers.
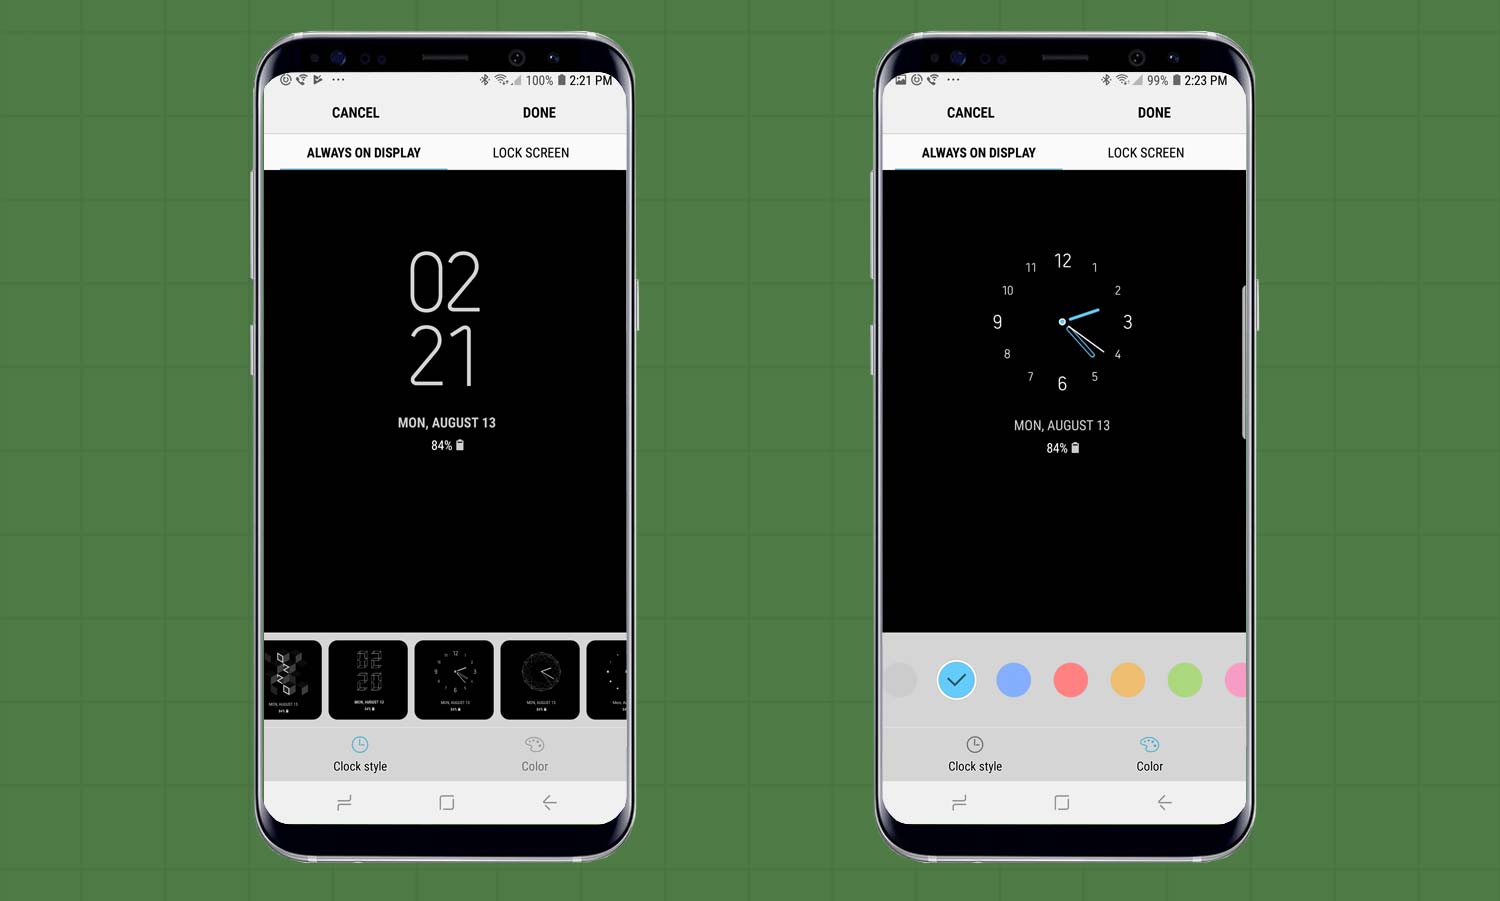
Here’s How: On the Settings page tap Lock Screen, followed by Clock Style. The top of the screen shows the current clock style. For additional adjustments, tap Color.
Set up your Note 9 to use full-screen apps
Like the Note 8, the Note 9 can use its full screen to show off apps that have been adapted for the screen’s long narrow aspect ratio. In other words, they are slightly stretched to fully fill the screen without any empty areas.
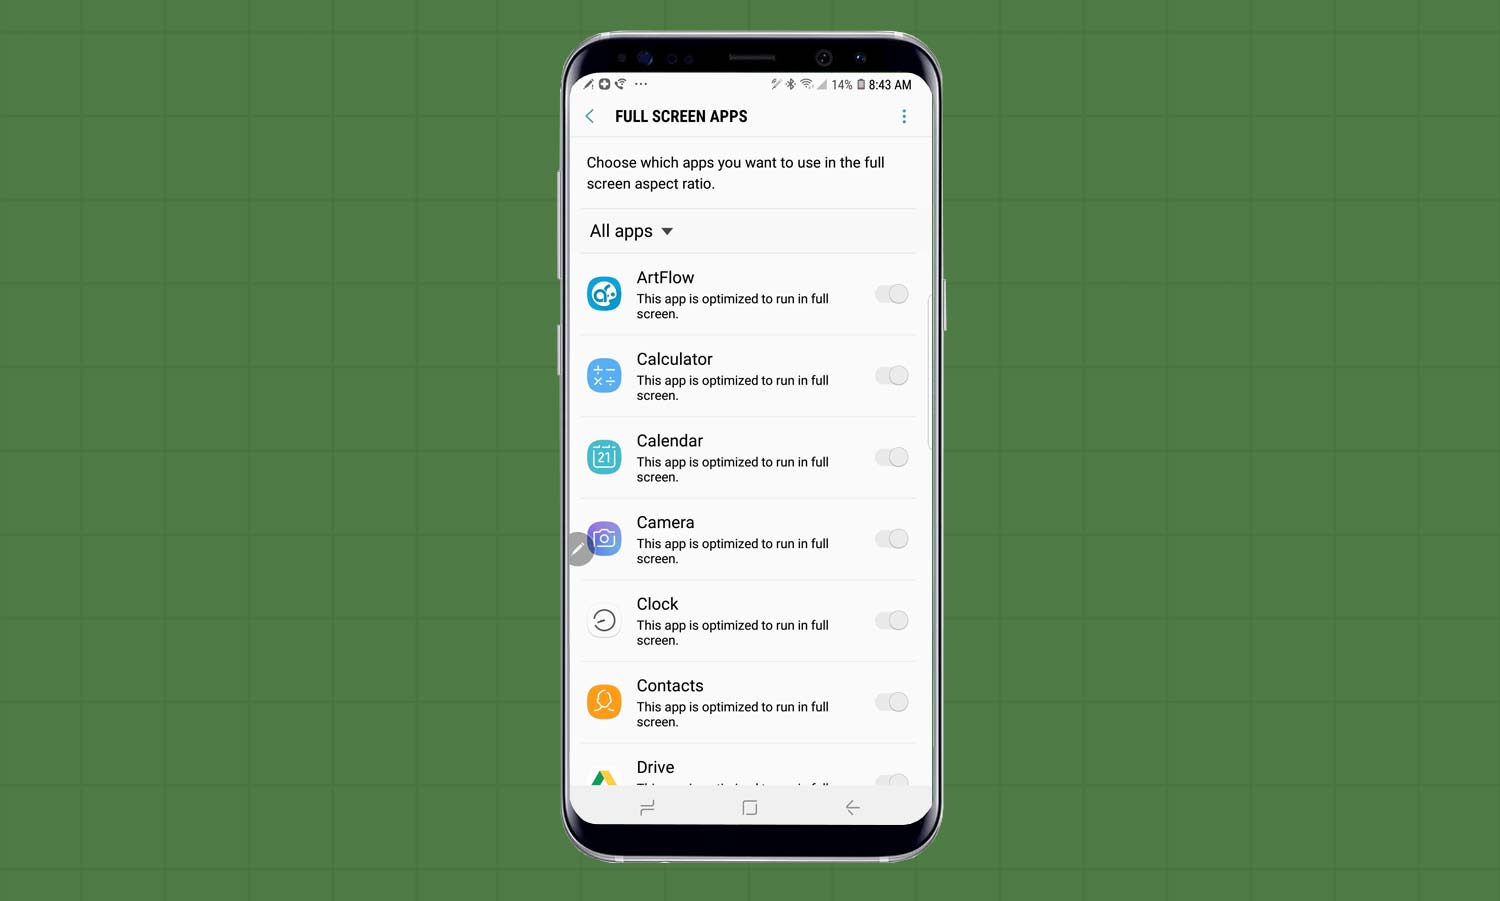
Here’s How: Start at the Settings’ Display section and tap on Full Screen Apps. Pick the apps you want to be able to run full screen on the Note 9. Note that the feature doesn’t work with all apps but can be used with many (dozens of apps on my phone, for example.)
Turn on the Note 9's Edge Panel
I really like the Note 9’s curved Infinity screen but it also has a practical use. I’m able to pull a group of apps to the main screen by swiping my finger from the right edge to the center.
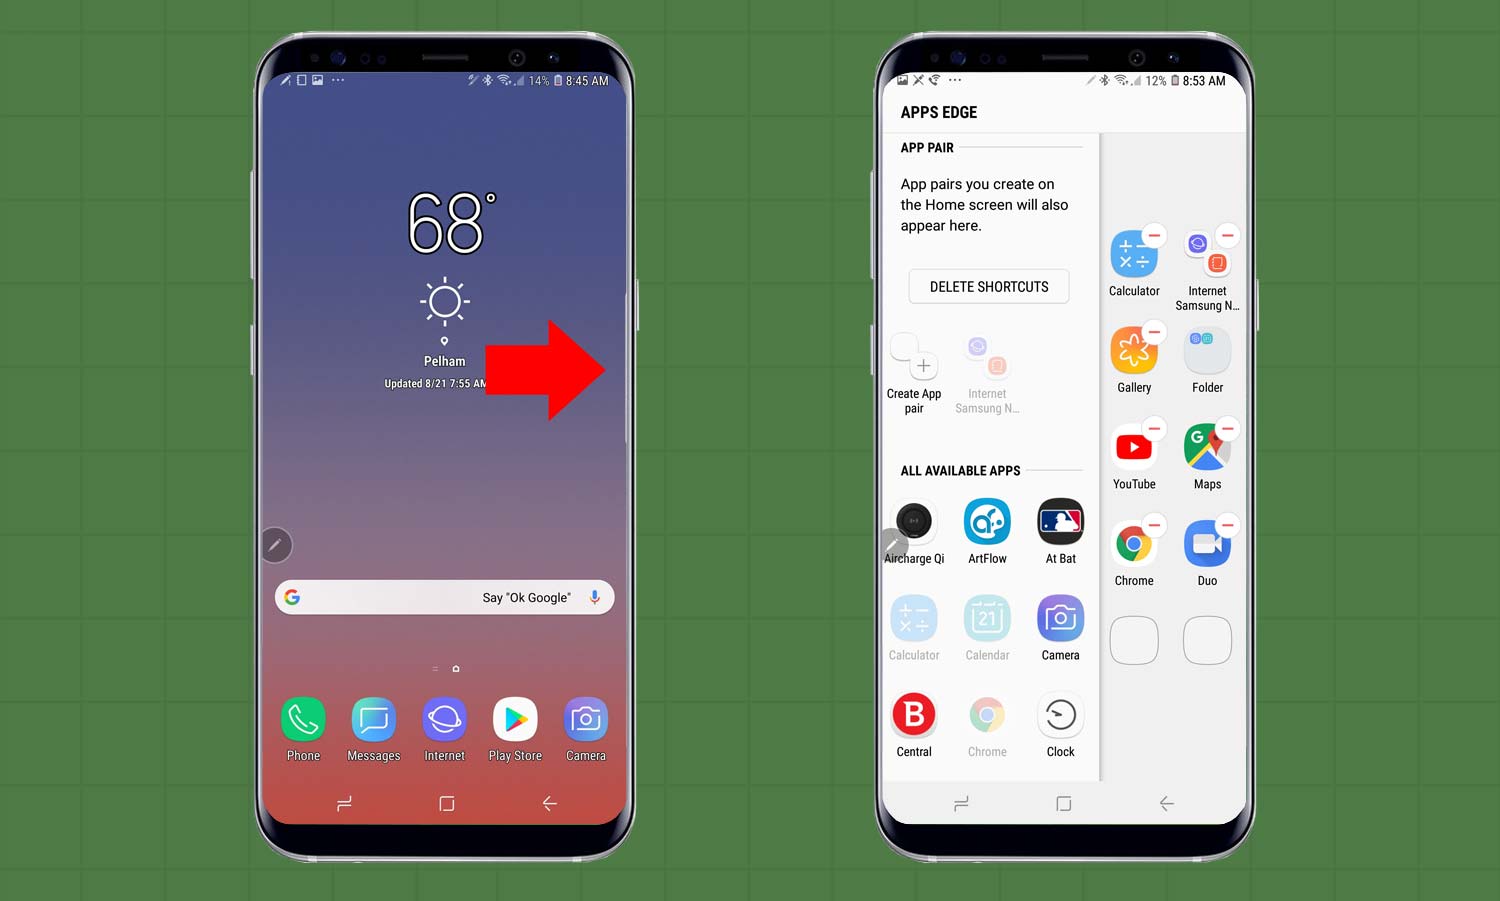
Here’s How: Look for the short white vertical bar on the right edge of the display. Drag it to the center of the screen and you’ll see a two-screen explanation of the Edge Panel feature. After swiping to get to the next page, tap Start, and you'll see two columns of apps you might want to use frequently. (There's room for 10.)
Use App Pairs
While you’re on the Edge Panel page, you can pair any two apps to be displayed in a split-screen view. For example, I pair Gmail with Gallery, as it simplifies grabbing and sending photos.
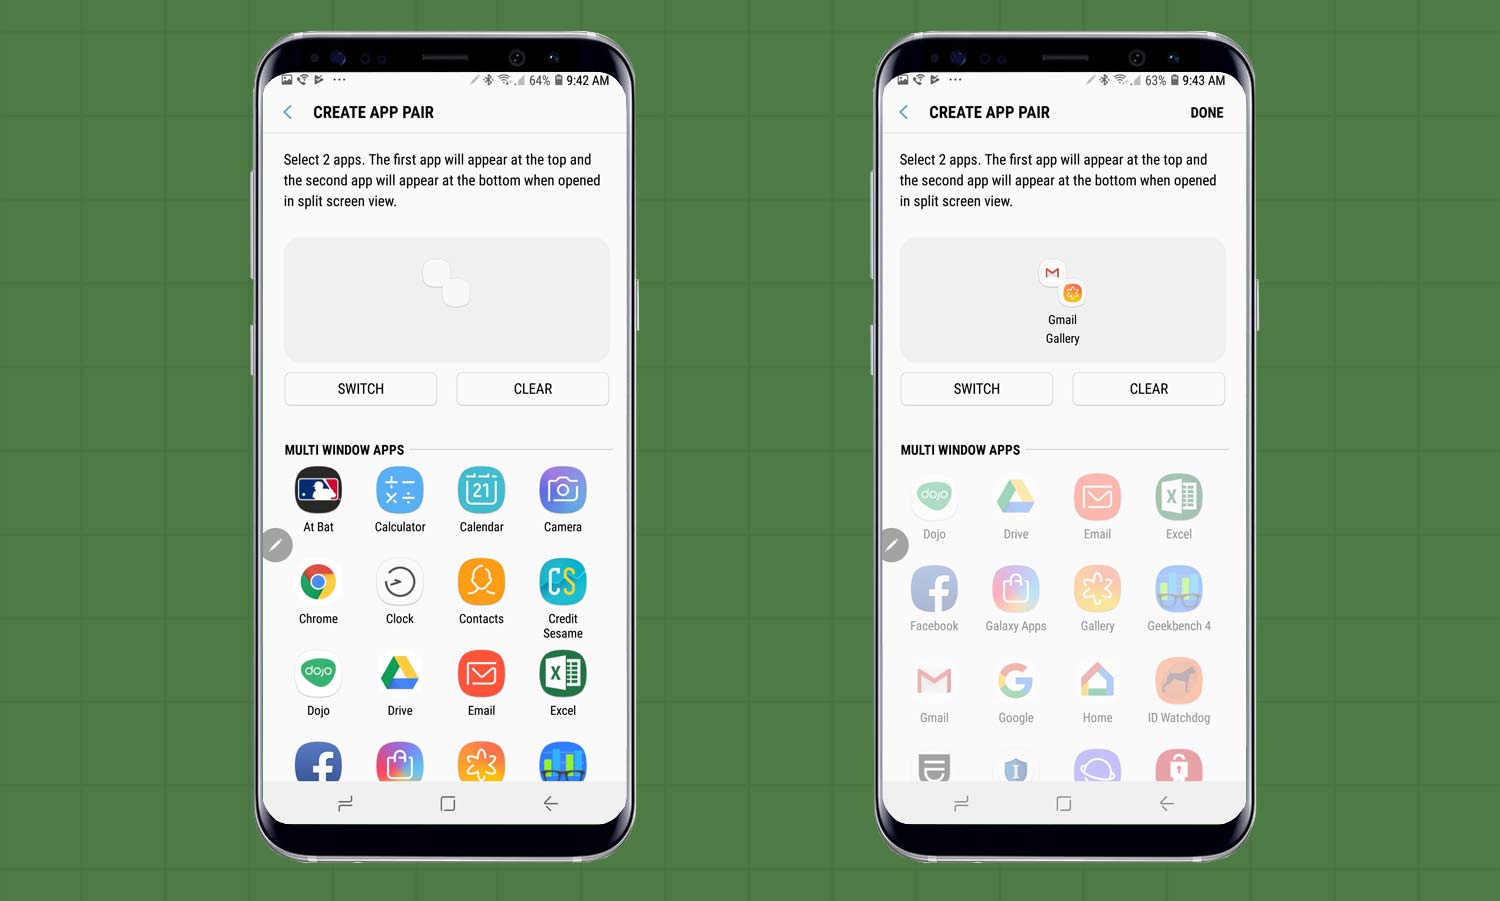
Here’s How: Begin at the Edge Panel Edit screen. Tap on the + icon below App Pair, and pick the two apps you want to pair. Tap Done. When you want the pair, drag the Edge Panel menu from the right side and tap on the new app pair icon at the bottom.
Start and train Bixby
After a year of on and off Bixby use, I have a love-hate relationship with Samsung's virtual assistant. I really like Bixby's photo translation feature when I travel, but its voice control disappoints me as often as it impresses me. Because the cloud-based AI service requires a lot of training and patience, it's best to enable Bixby from the get go.
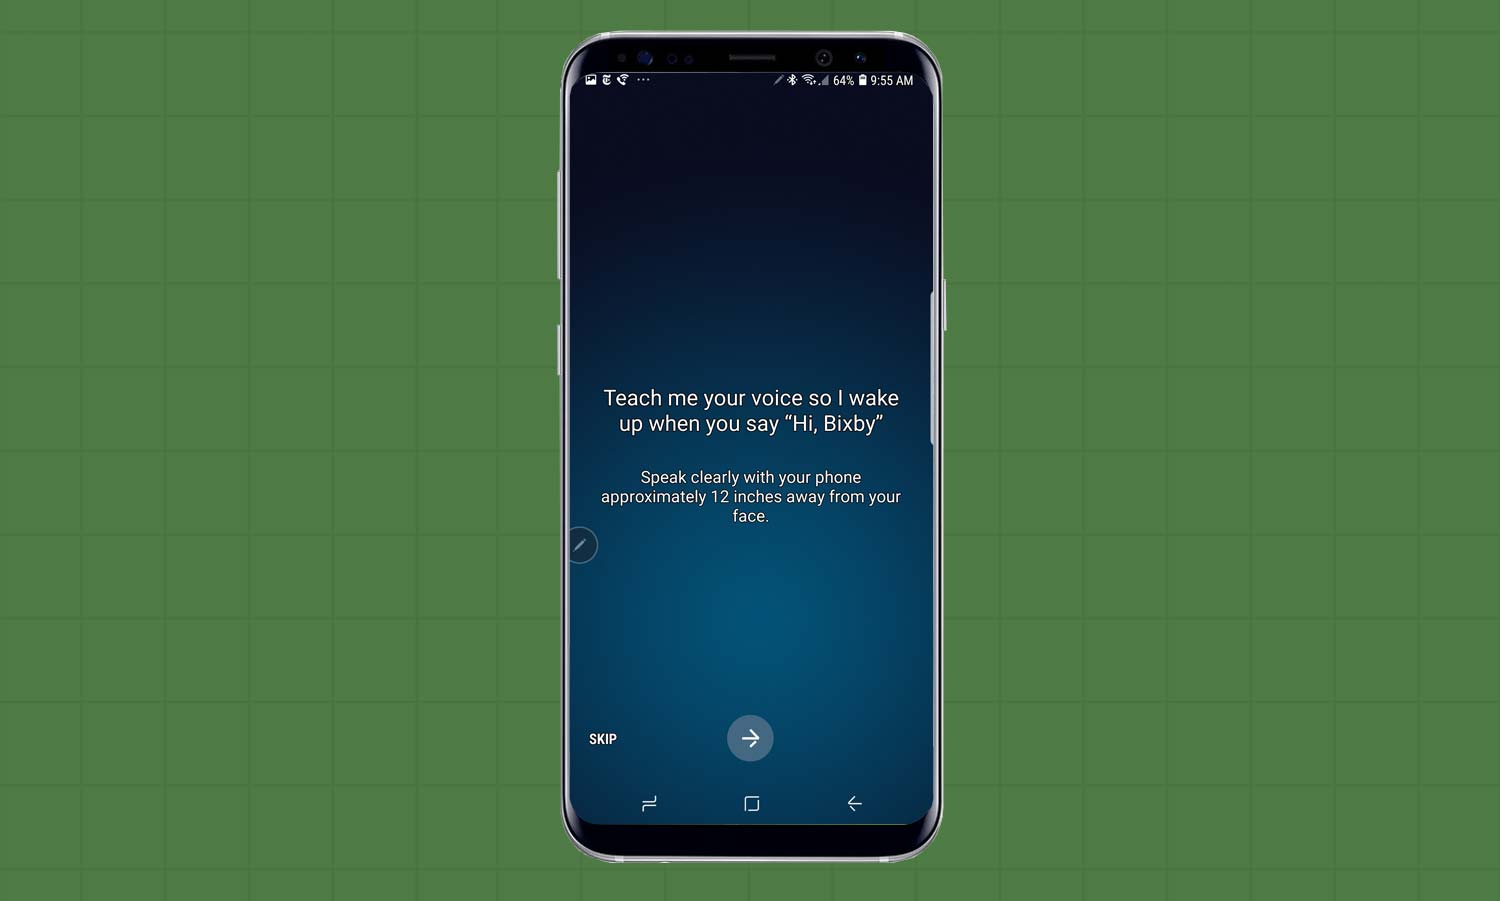
Here’s How: Press the dedicated Bixby key on the left side of the phone. After you accept Samsung’s licensing, it’s time to train Bixby to your voice. Hold the phone a foot from your face and speak “Hi Bixby.” You’ll need to keep repeating it until the service understands the nuances of your voice. It took six times with me. From there, Bixby will treat you to a slideshow depicting the things it can do.
Tweak the Note 9's audio settings
A big step forward for the Note 9 is its Dolby Atmos support, along with a variety of sound enhancement techniques that let you optimize your phone's sound.
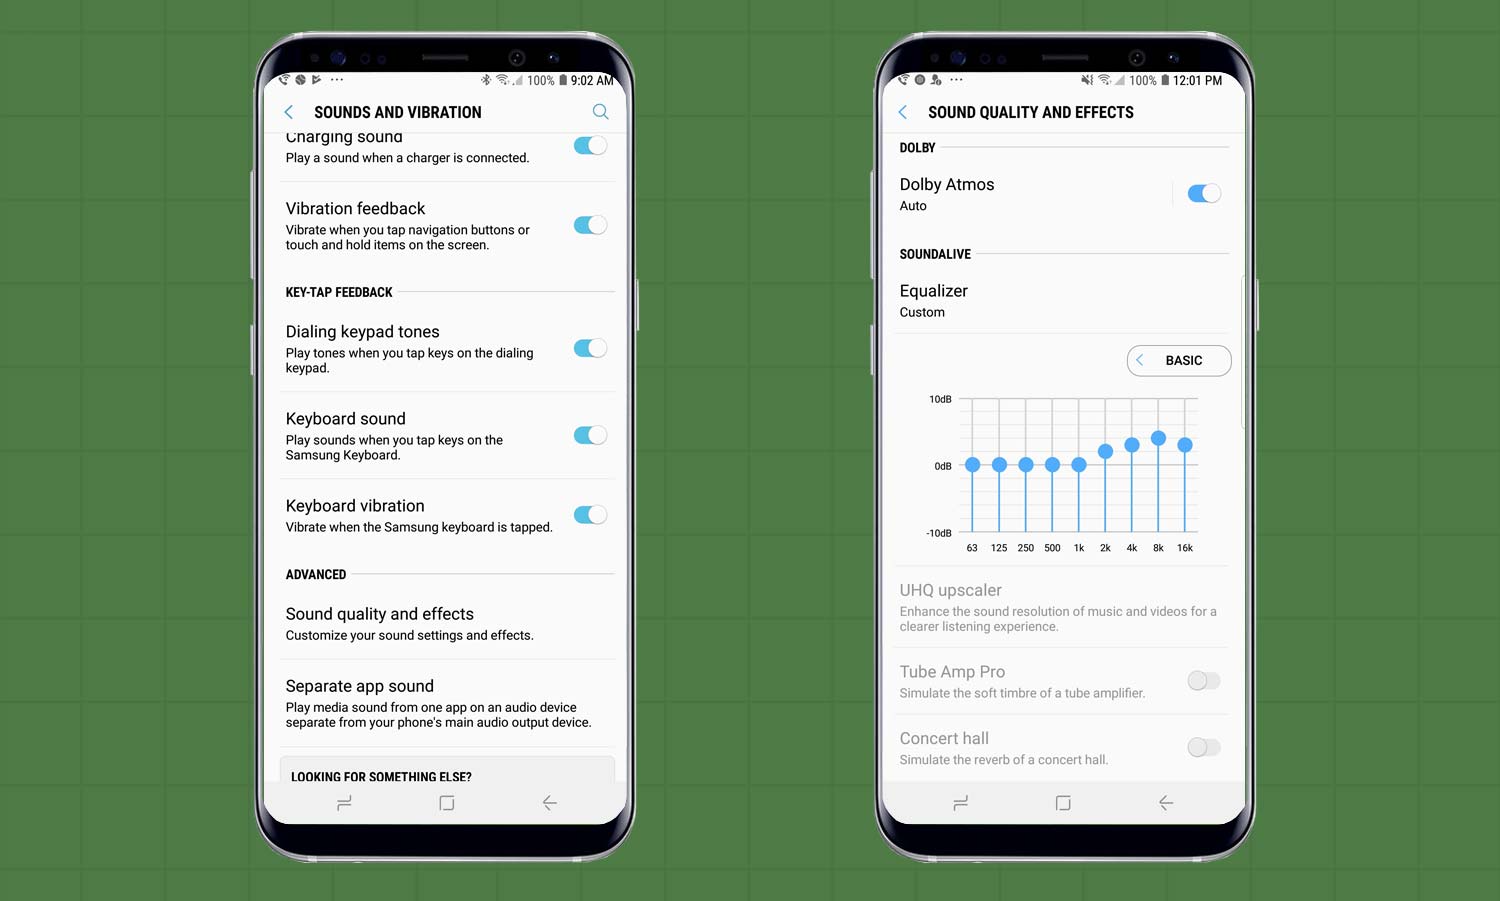
Here’s How: You can turn the digital audio effects on or off in the Settings/Sounds and Vibrations/Sound Quality and Effects pages in the Settings’ Advanced section. Tap the Dolby Atmos switch, and the audio will sound richer with enhanced midrange and high-frequency clarity.
You can also tweak the settings by tapping on Dolby Atmos where you'll have the choice of Auto (where the phone selects the settings), Movie, Music and Voice.
Use your headphones
The stereo speakers on the Note 9 are pretty good, but nothing compared to using headphones. That’s where the phone’s UHQ (Ultra-High Quality) upscaler comes in. It sharpens sound by converting it to 32-bit audio. While it can’t fix a bad audio file, it can make a good quality source sound a lot better.
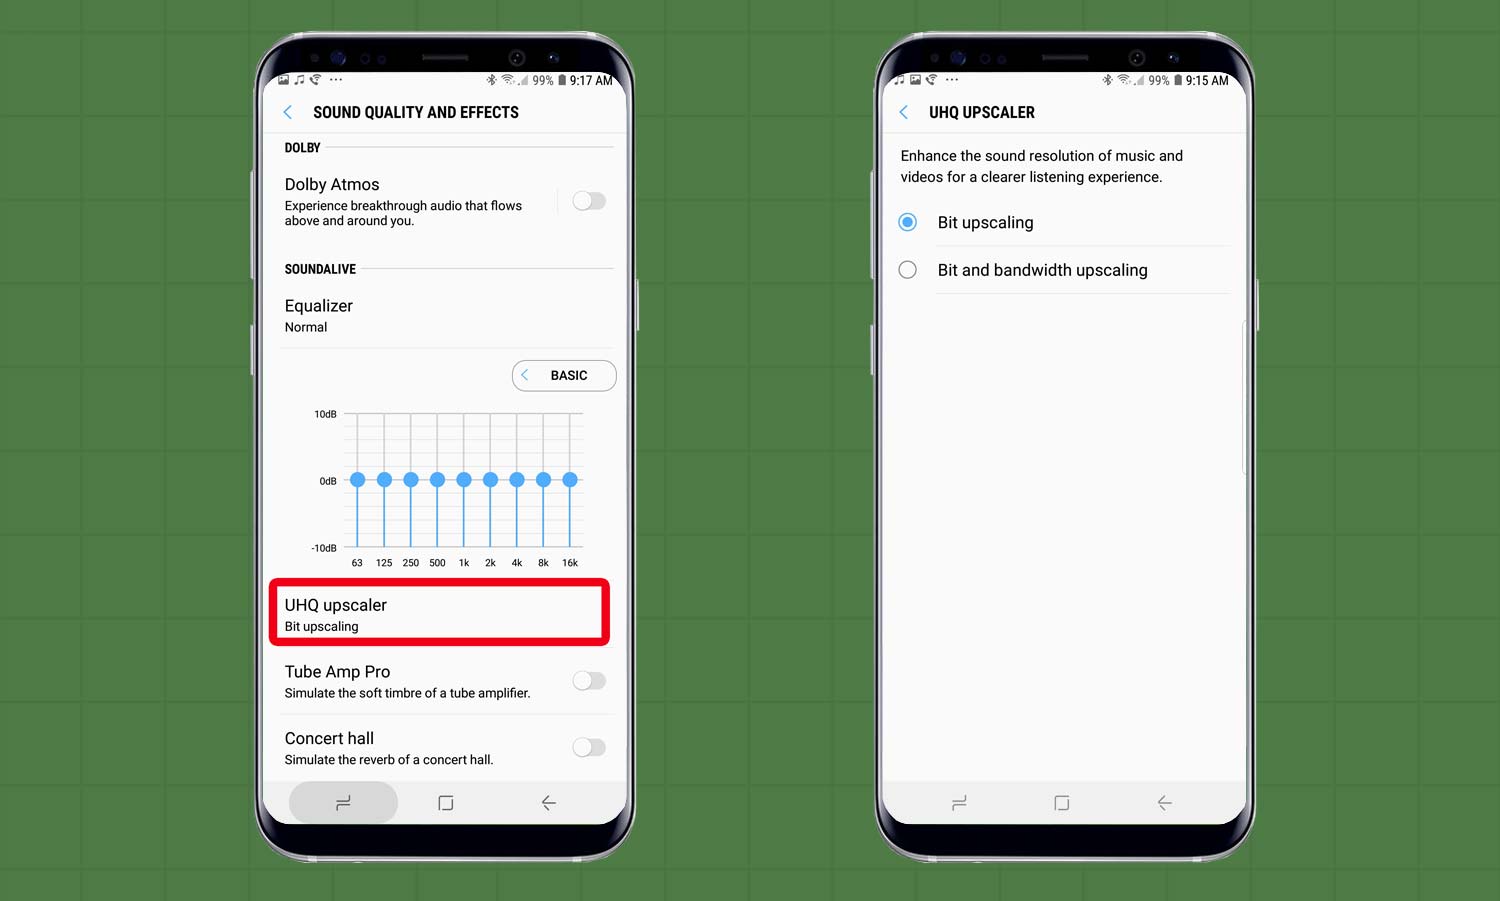
Here’s How: As soon as you plug in a headset, the UHQ Upscaler turns from gray to an active on/off switch. You have the choice of just upscaling the bitstream as well as adding bandwidth upscaling; the former option makes sound more vibrant, while the latter choice makes it a little muddier but louder.
Current page: Galaxy Note 9 User Guide: Tips, Tricks and How-Tos
Next Page How to Set Up the Fingerprint Reader on Galaxy Note 9Tom's Guide upgrades your life by helping you decide what products to buy, finding the best deals and showing you how to get the most out of them and solving problems as they arise. Tom's Guide is here to help you accomplish your goals, find great products without the hassle, get the best deals, discover things others don’t want you to know and save time when problems arise. Visit the About Tom's Guide page for more information and to find out how we test products.

