Apple Maps has a trip-planning feature tool buried inside — here's how to use it
Use this Apple Maps feature to plan your summer travel
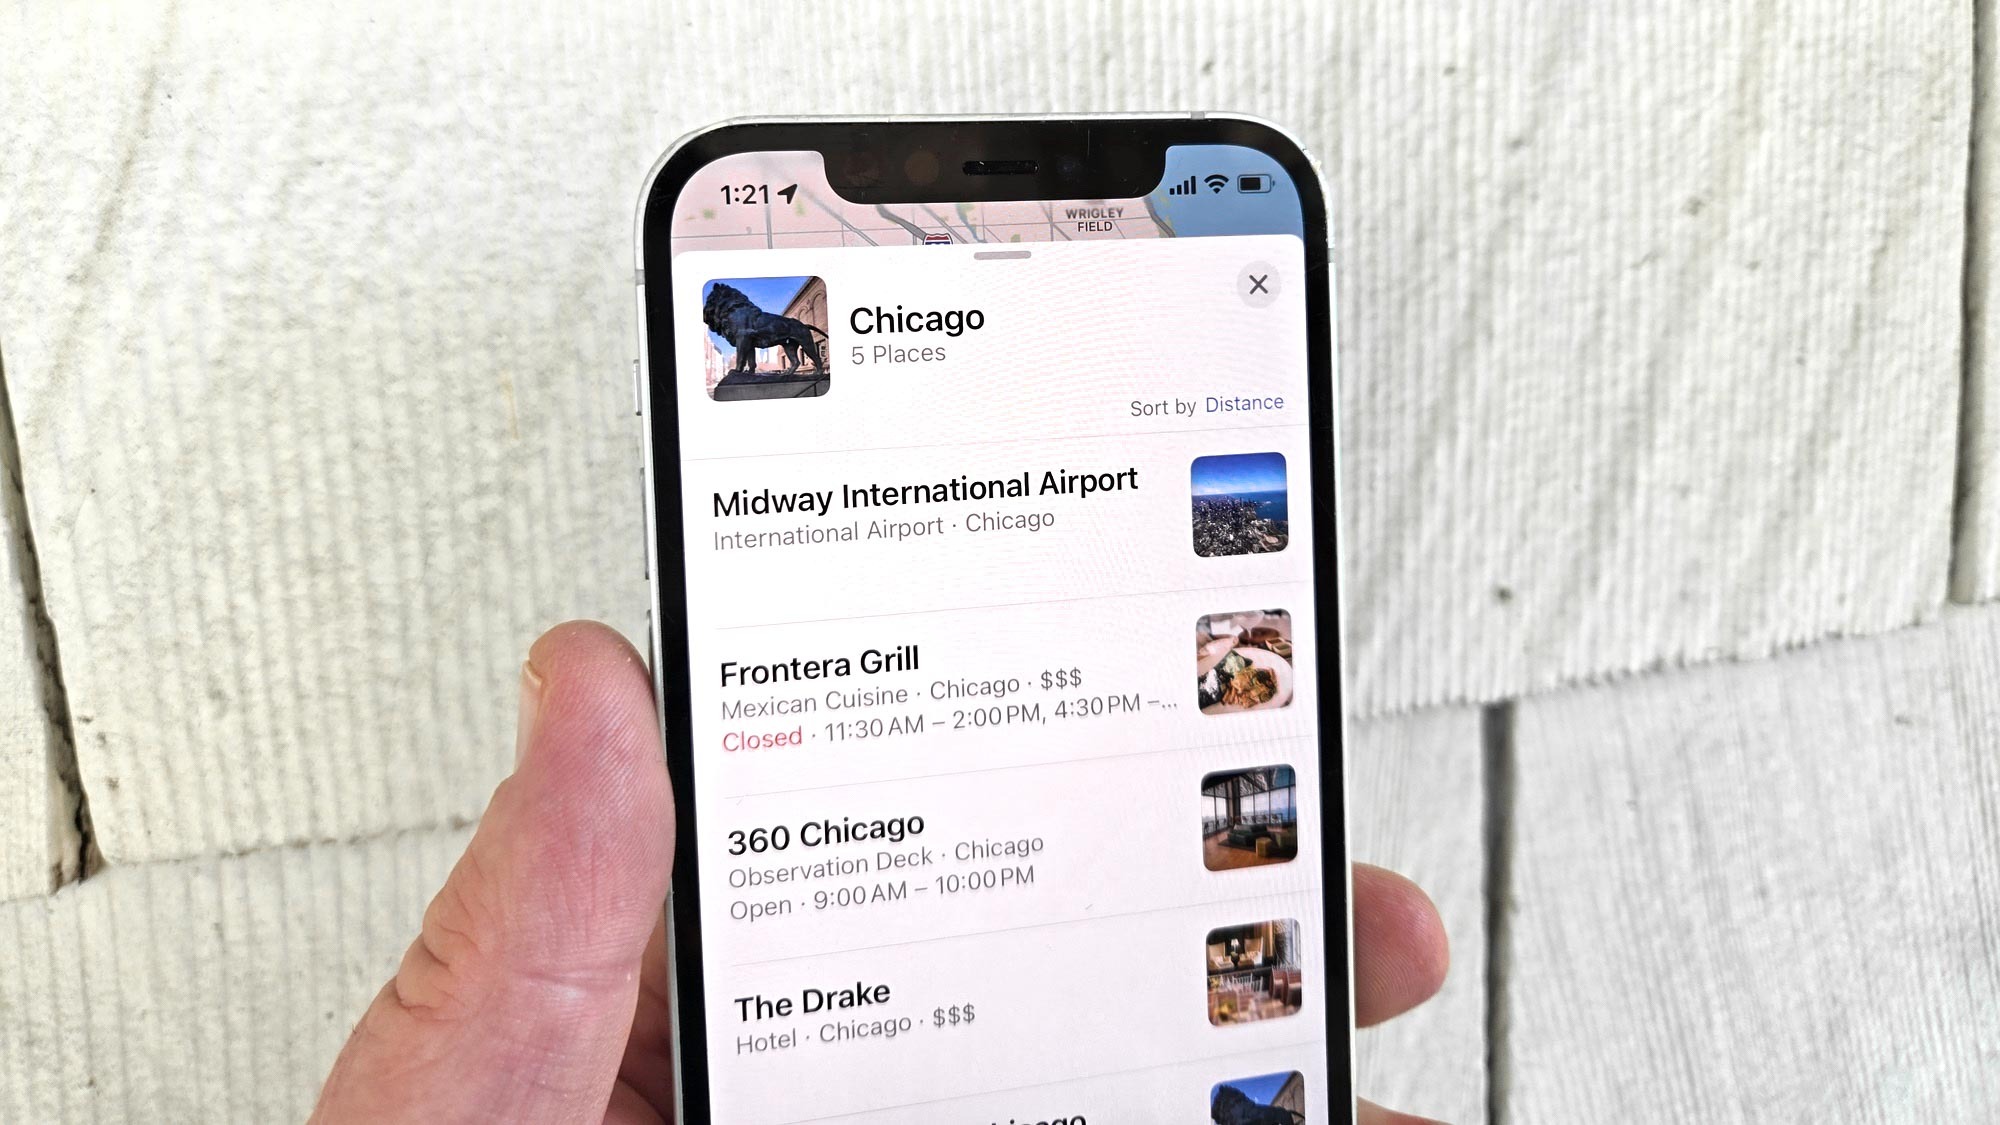
You likely already know about the navigation features in Apple Maps that help you get from Point A to Point B. But long before you need directions, you can use Apple Maps on either the Mac or your iPhone to plan out where to go, not just the best way of getting there.
Apple Maps includes built-in guides for different cities, highlighting eateries, night spots and points of interest you might want to check out when traveling. But you can also build your own guide within Maps, highlighting the places you want to visit in a single folder. I find the Guides feature in Maps to be a great tool for trip planning, and with summer travel fast approaching, maybe you'll want to check it out while prepping for your next getaway.
Why add things to a guide of your own creation? Because it gives you ready access to the information card for a particular place — its hours, cost, reviews, and yes, even quick links to directions from where you're at. It can be a handy way not only to plan out what you want to see on a trip but for finding your way there once you're actually out and about.
Consider this your guide to Guides in Apple Maps. I'll show you how to create your own guide, both on a Mac and on an iPhone. I can also show you how to share your guide with other people in your traveling party.
How to create a guide in Apple Maps on the Mac
We'll start with creating your own guide from the Mac, since most people are more likely to be doing trip planning from the comfort of a computer.
1. Create a guide
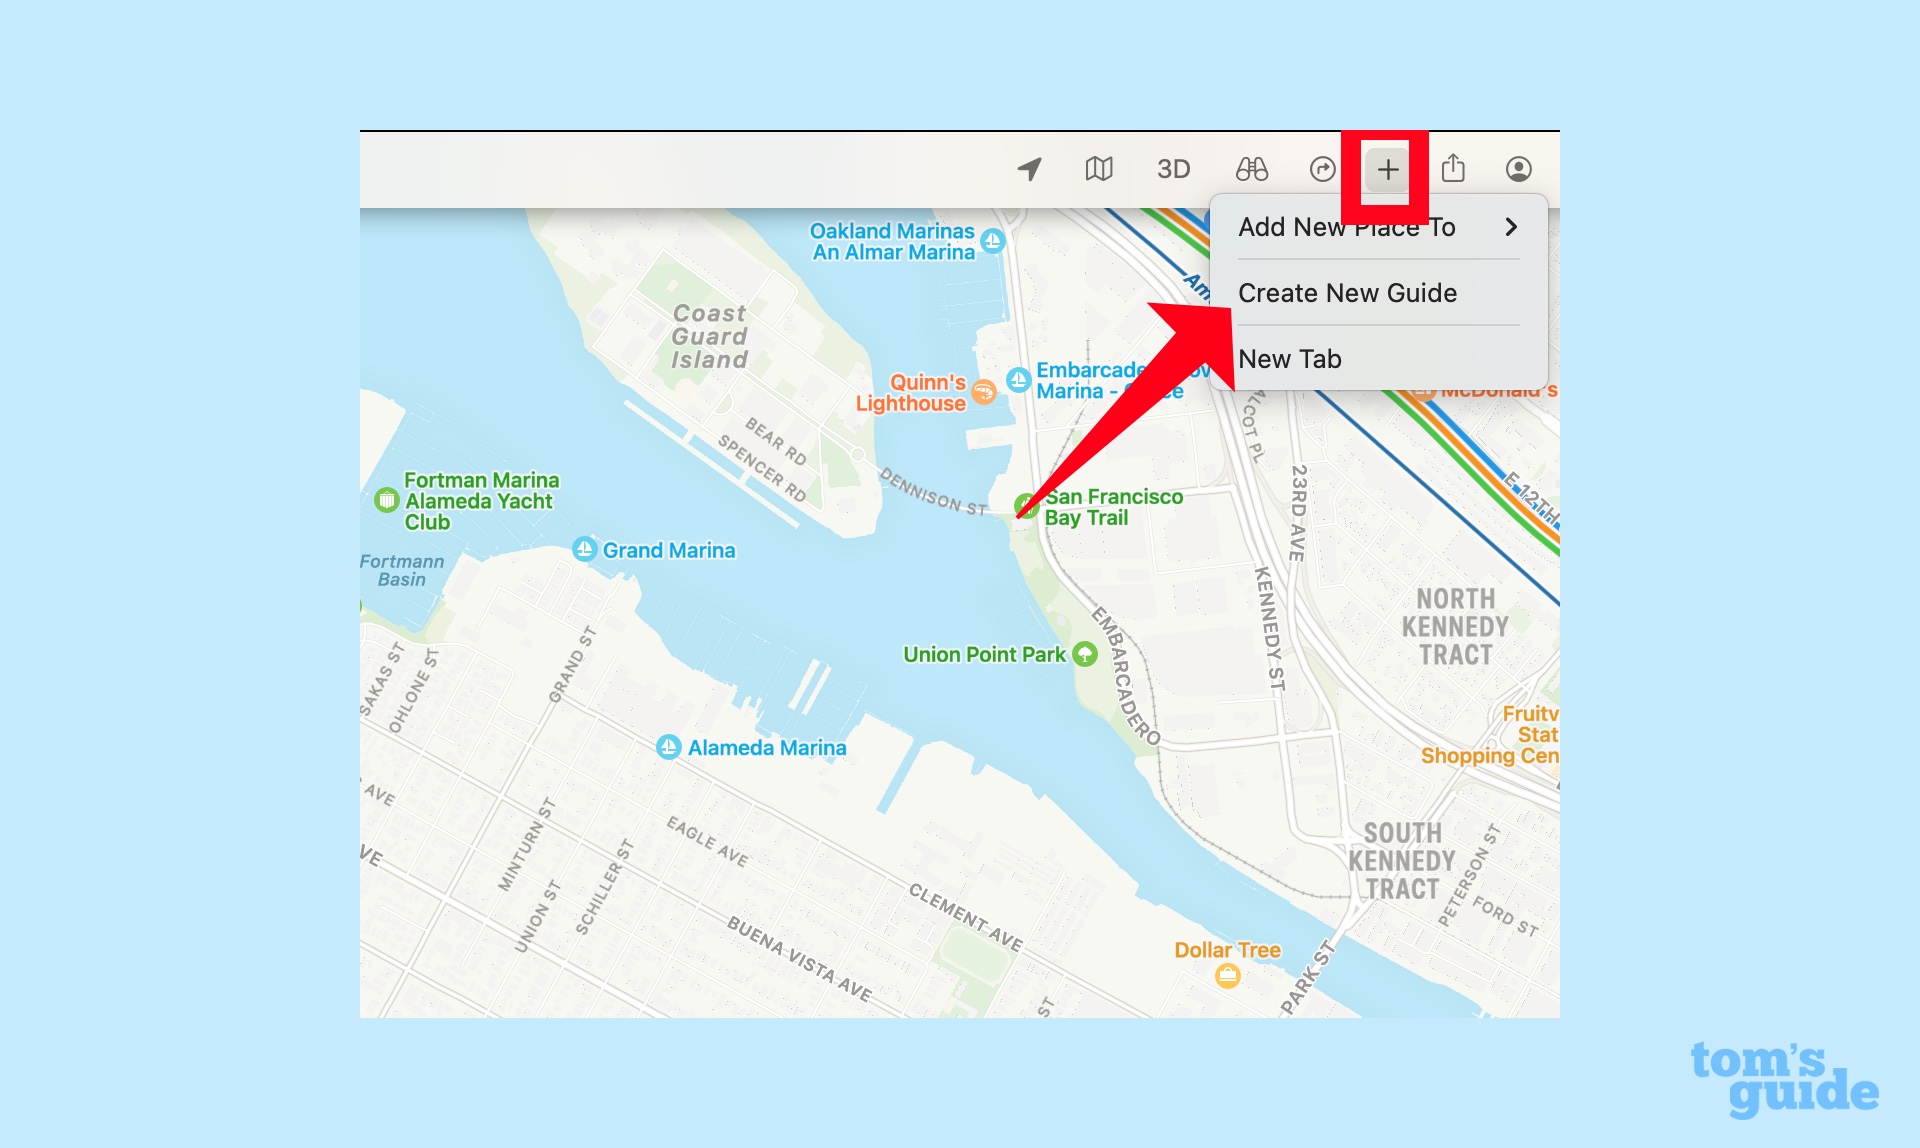
There are two ways to create a guide on the Mac. Using the navigation bar on the top of the Maps window, click on the plus (+) button near the right side of the screen, and on the drop-down menu, select Create New Guide.

Another way to create a guide in Apple Maps on your desktop is to go to the sidebar. Under the My Guide header, click the plus button next to Add Guides.
2. Title your guide
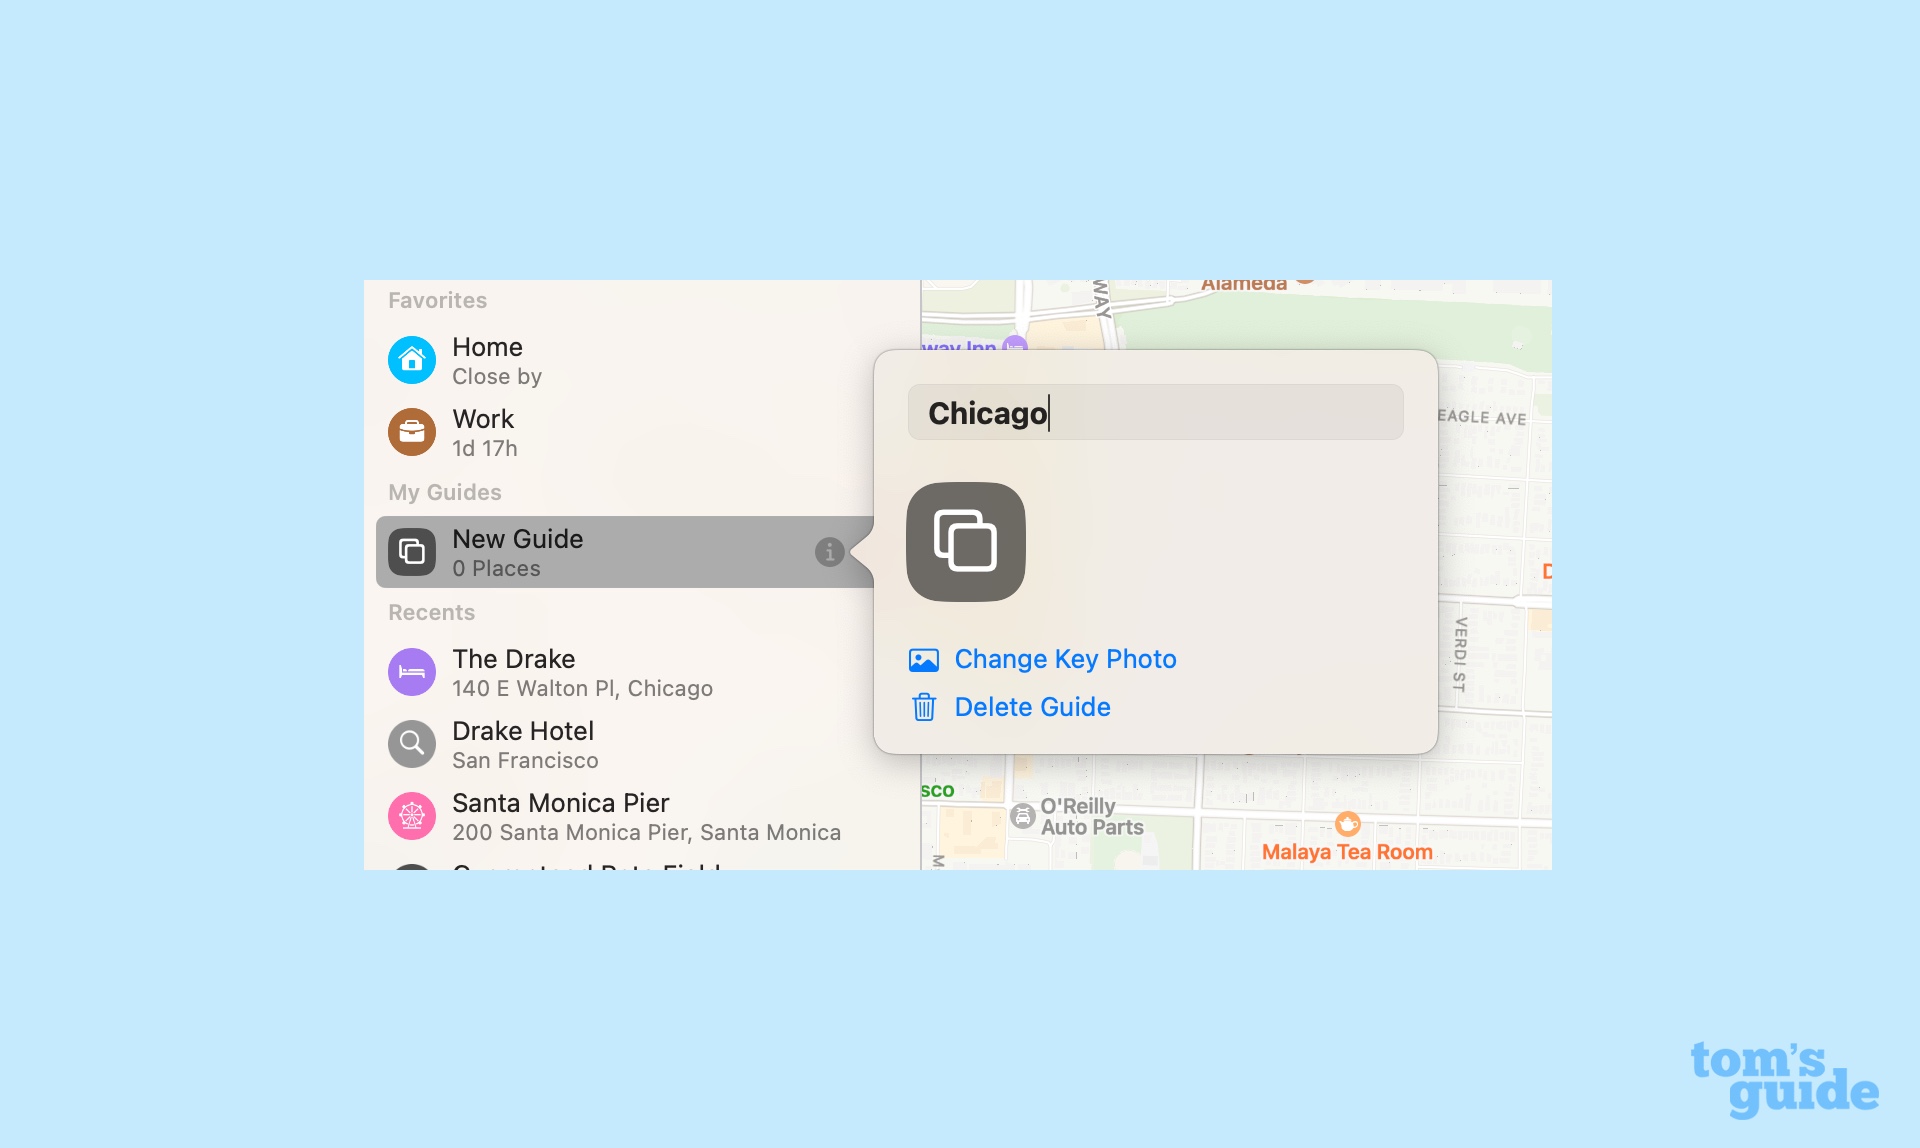
Whichever method of creating a guide that you choose, you'll now be prompted to enter a title. Type the name of your guide in the text field. If you want to add a thumbnail to the guide to make it easy to identify, click on Change Key Photo to select an image from your photo library. Hit enter when done.
3. Add places of interest to your guide
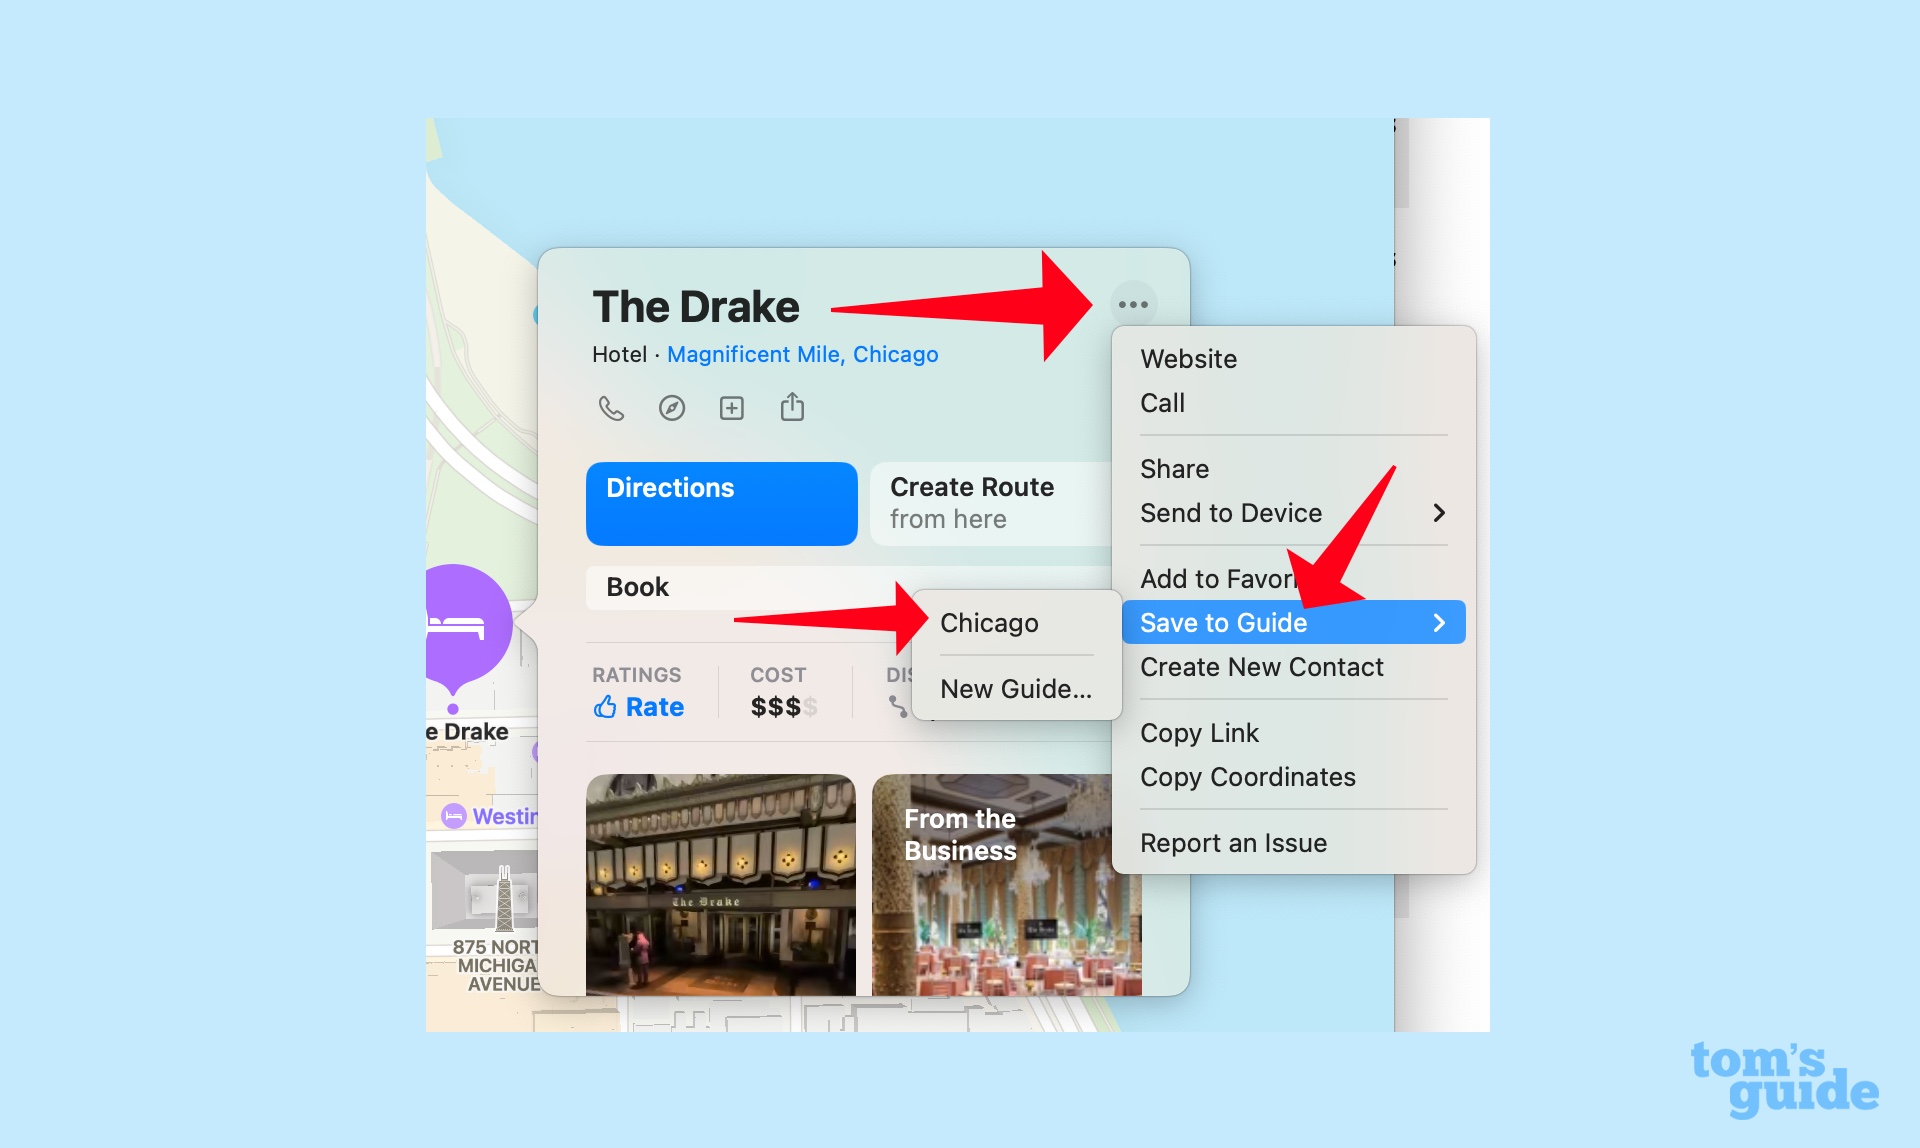
Search for a place you want to include in your guide. From the pop-up window, click on the three-dot menu and select Save to Guide from the pop-up menu that appears. You'll then select the guide you want to save the location to. (And yes, you could actually create a new guide straight from the pop-up menu, too, though, you'll need to go back to step 2 to title your guide.)
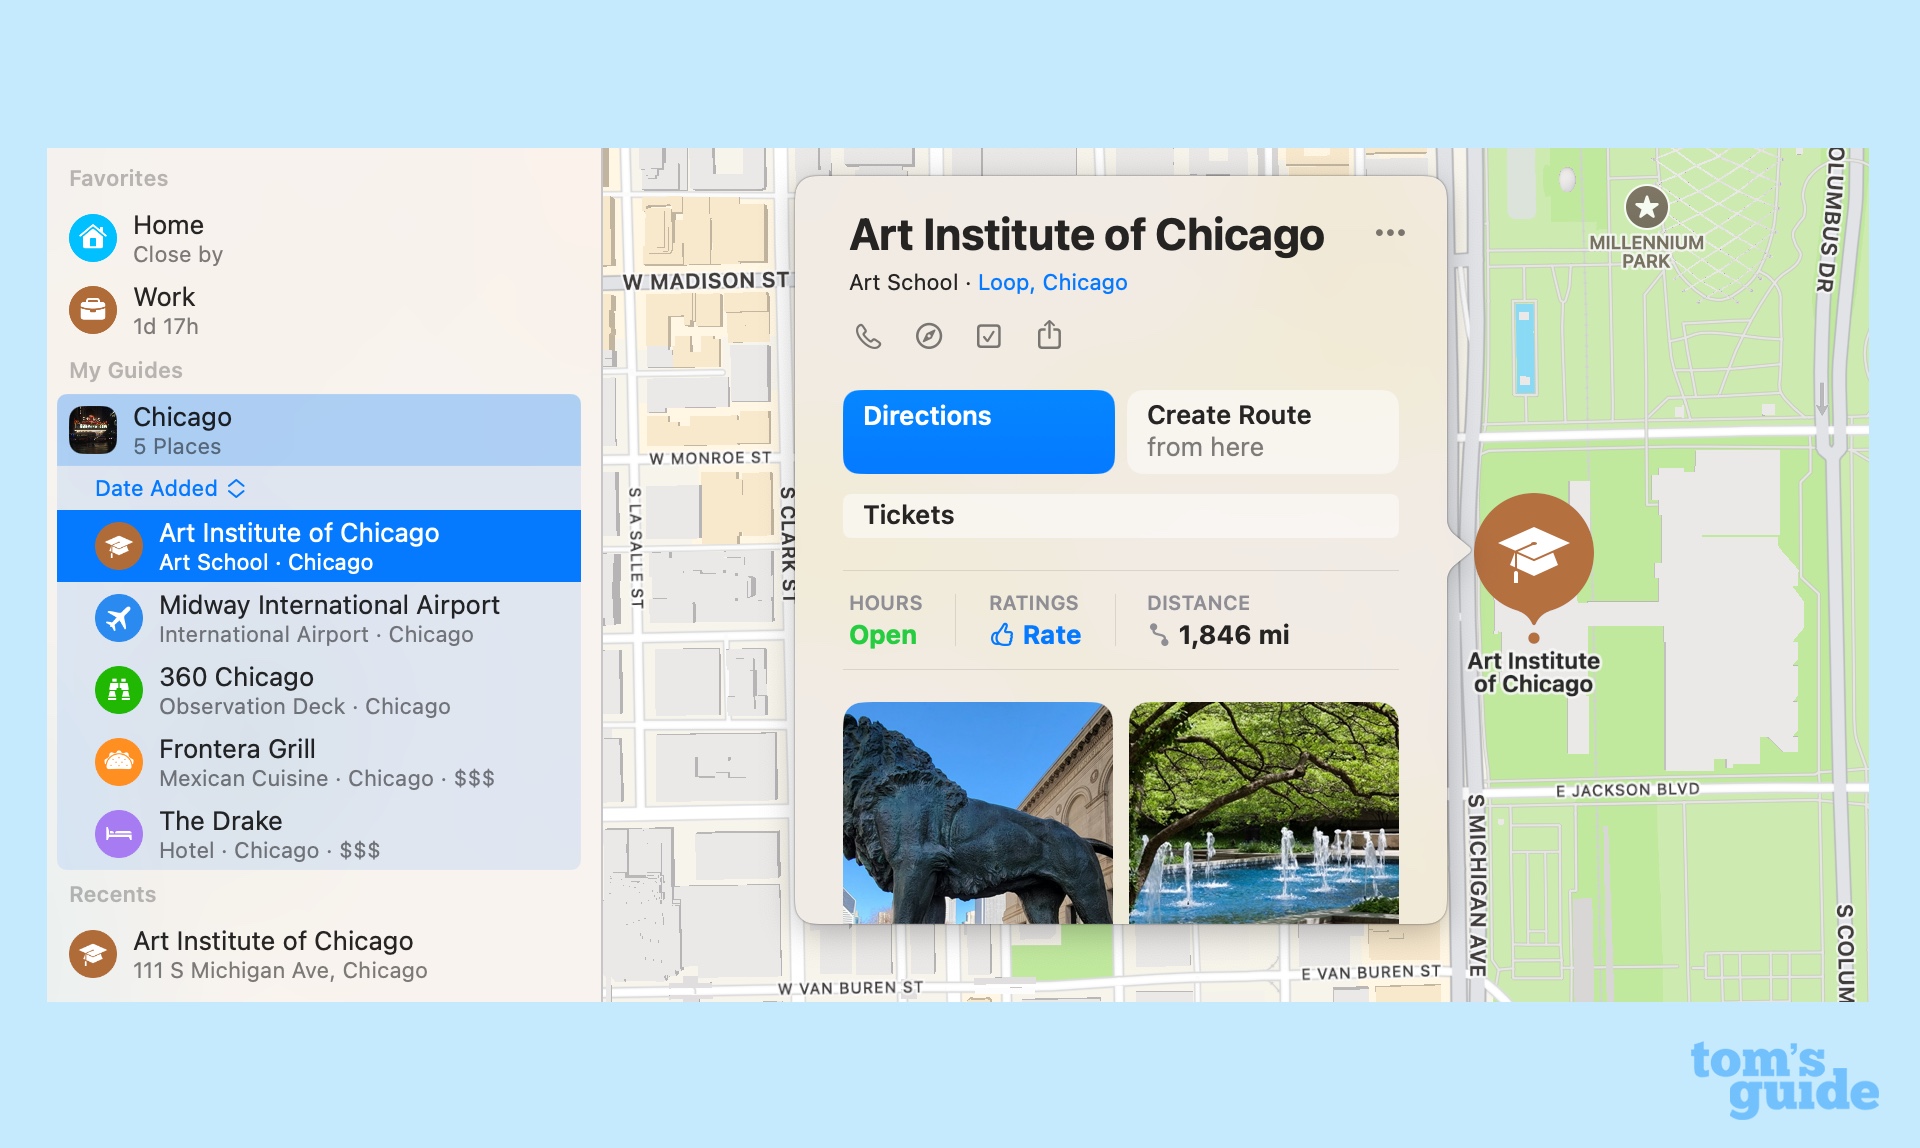
Repeat Step 3 for each place you want to include in your guide, and you'll wind up with a folder fille with multiple entries.
Sign up to get the BEST of Tom's Guide direct to your inbox.
Get instant access to breaking news, the hottest reviews, great deals and helpful tips.
How to create a guide in Apple Maps on the iPhone
The process of creating a guide in the iOS version of Maps is pretty much the same as it is on the Mac, though you'll find the menus in different places thanks to the different iOS and macOS interfaces.
1. Create a guide
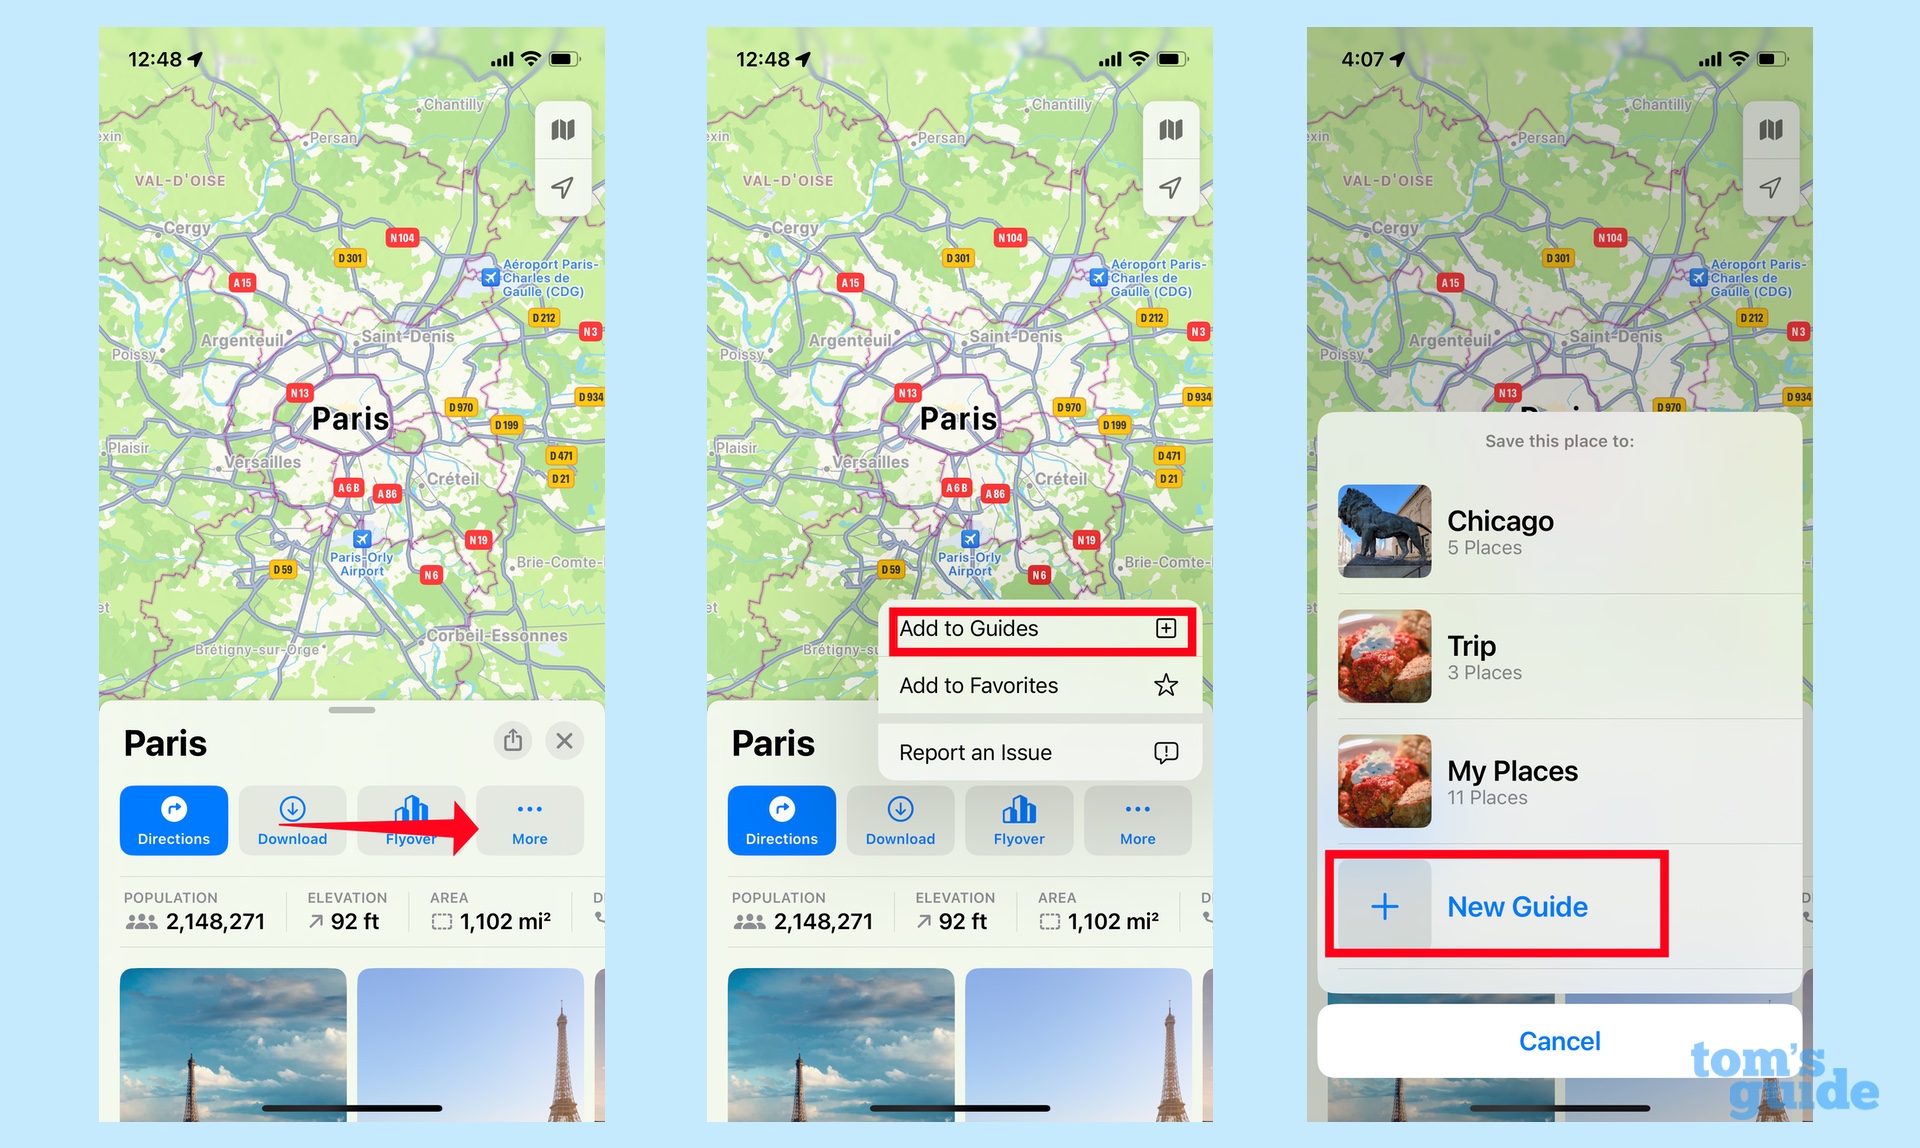
When you've looked up a place in Maps, tap the More button. On the menu that appears, select Add to Guide. Select New Guide on the menu that slide up.
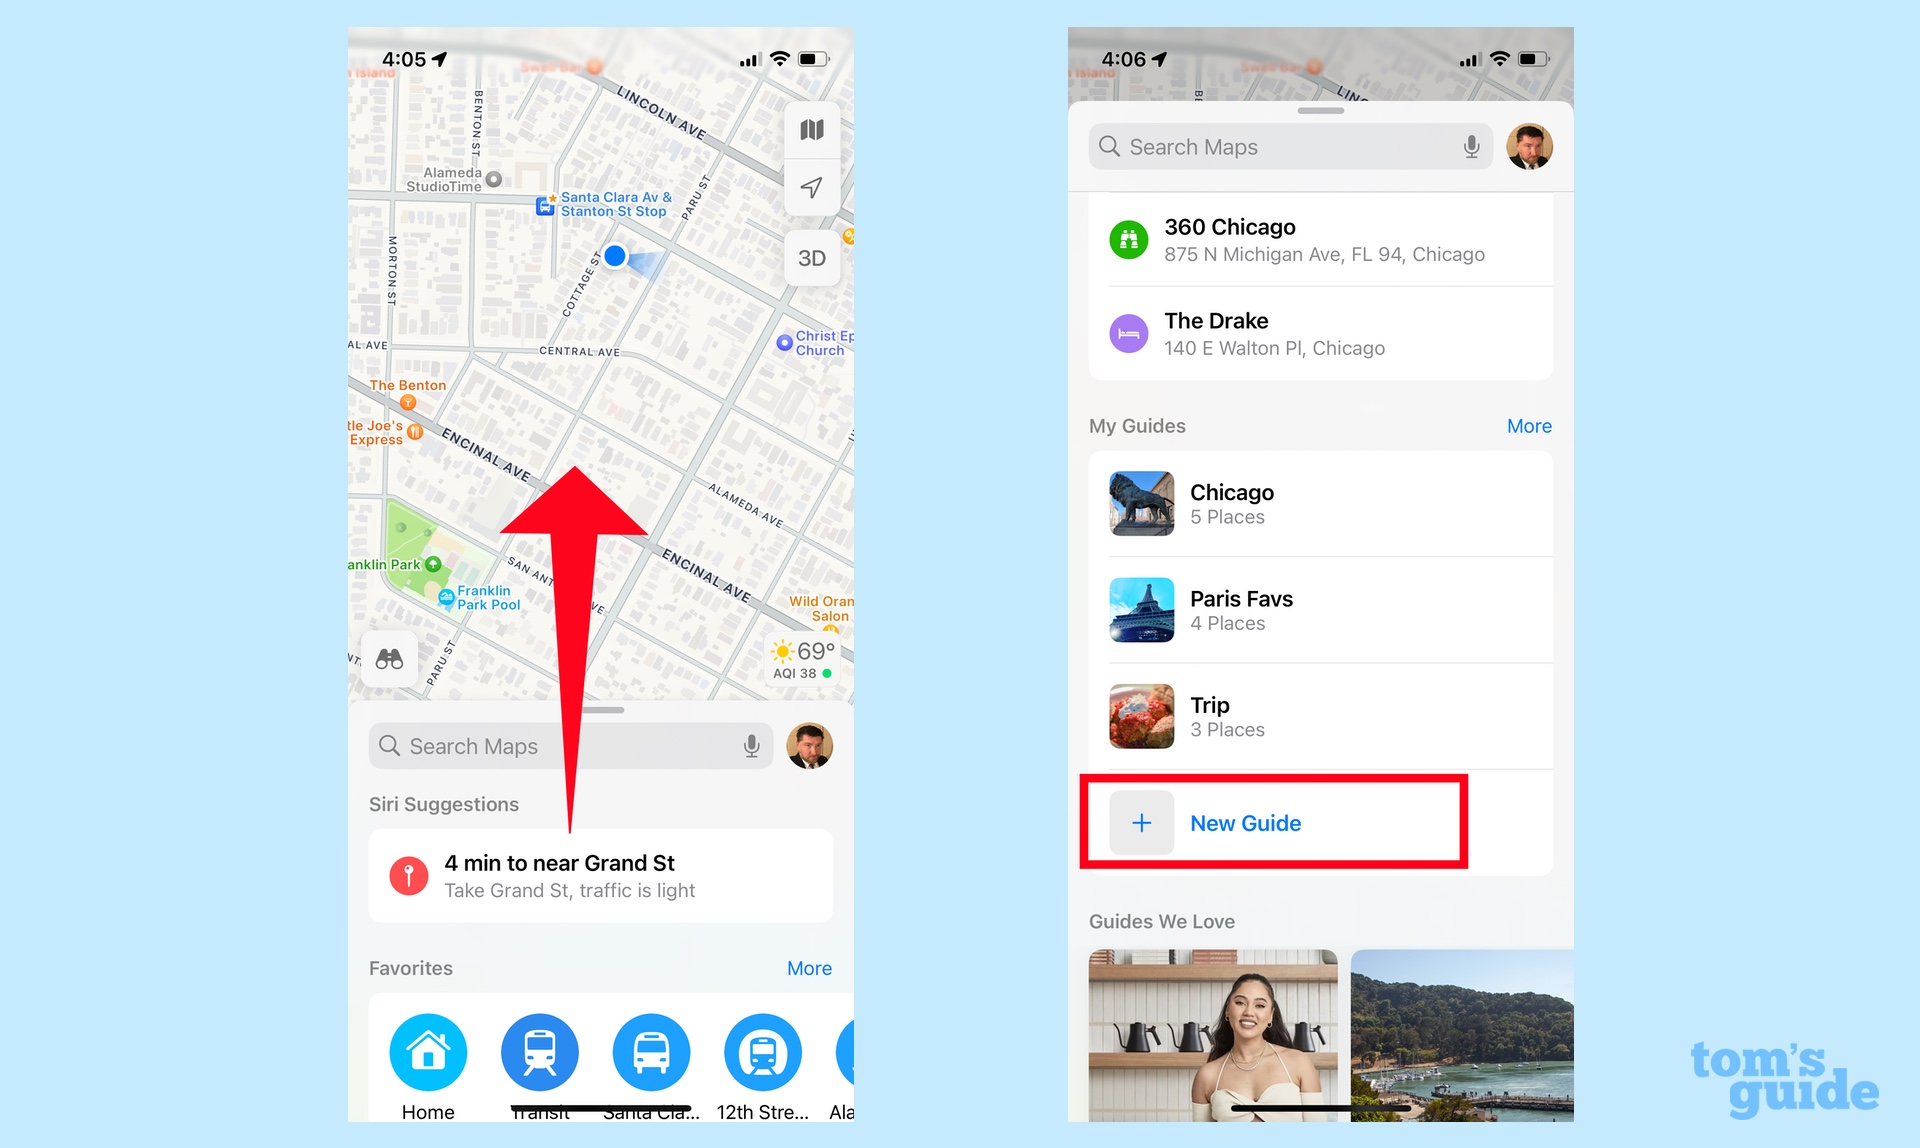
You can also create a guide on your iPhone by sliding up the search screen so that the My Guides section appears. Tap on New Guide to create a guide.
2. Title your guide
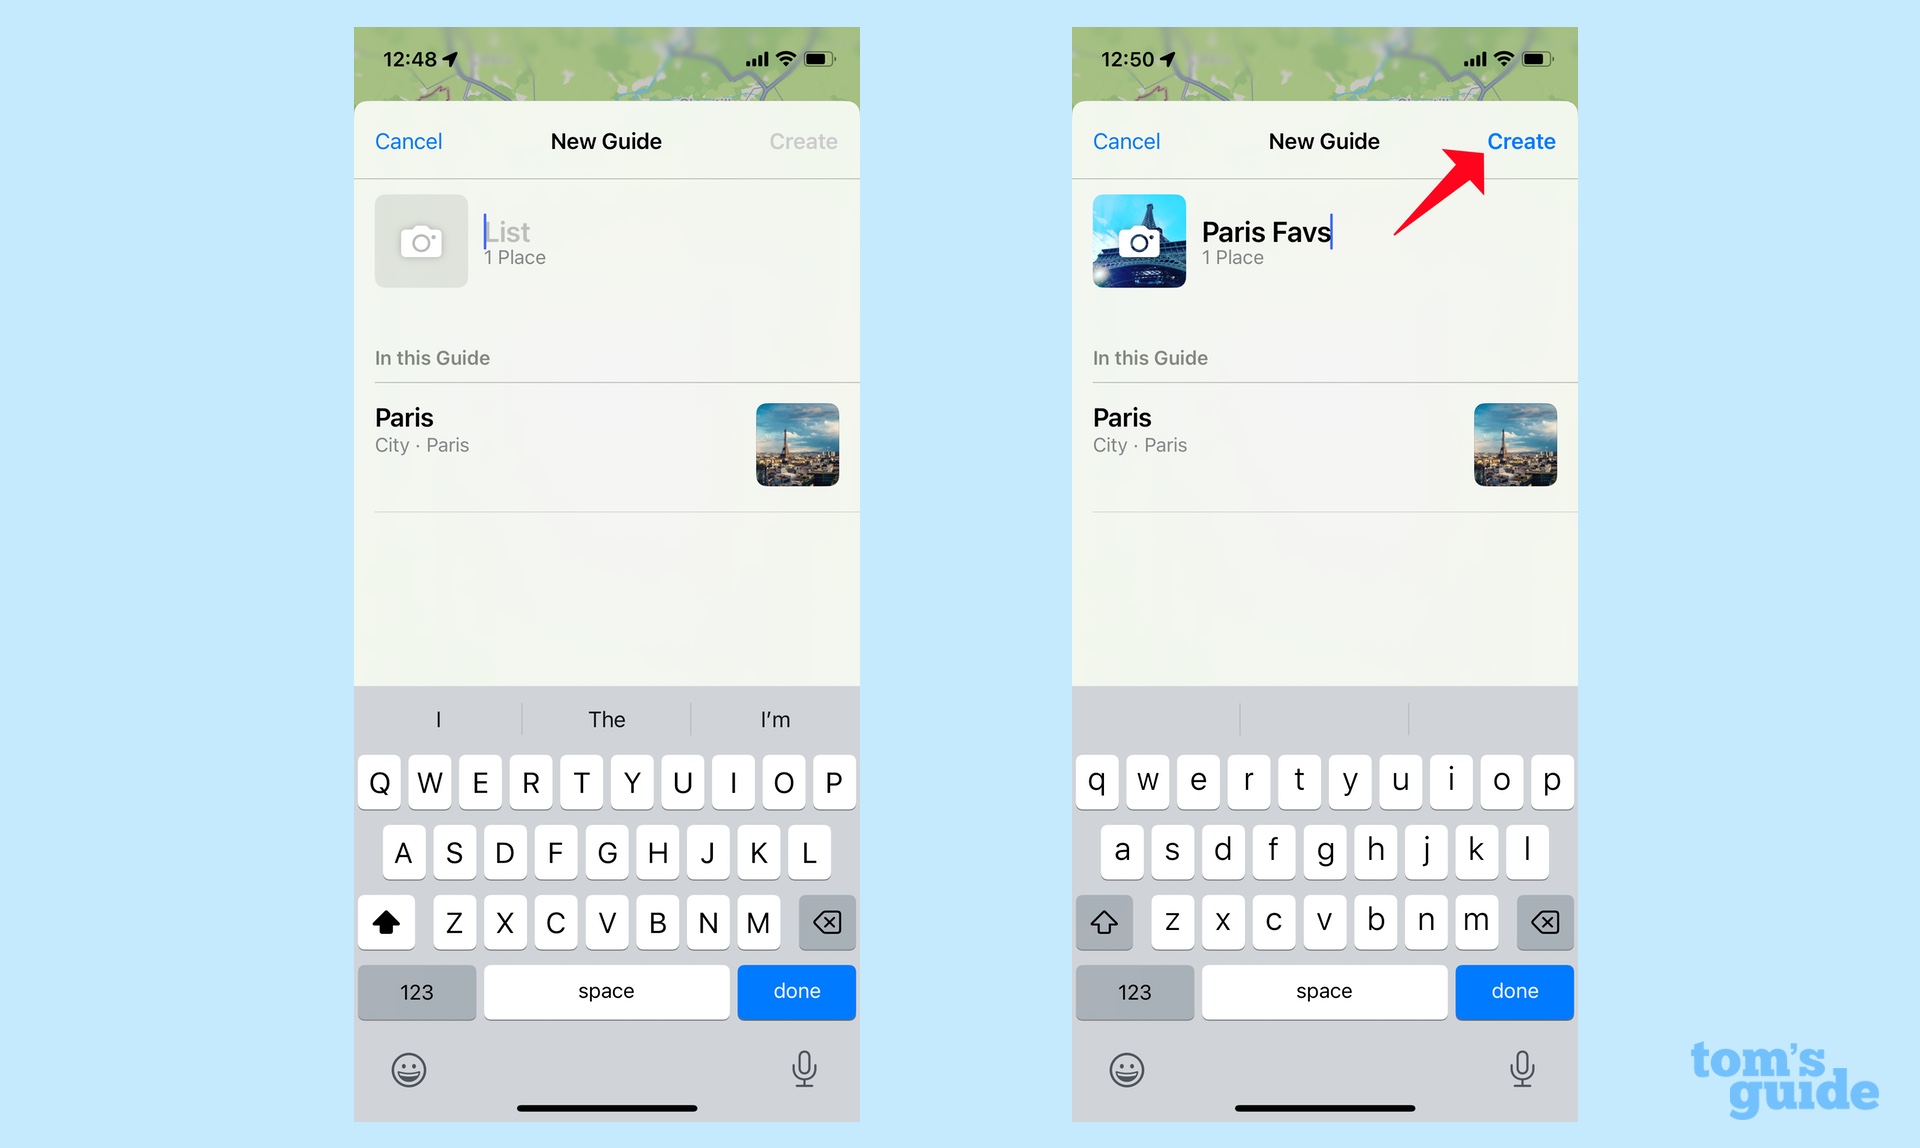
When you create a new guide, you'll be prompted to enter a title in the text field. You can also tap on the camera icon to add a thumbnail image from your photo library. Tap Create when ready.
3. Add places of interest to your guide.
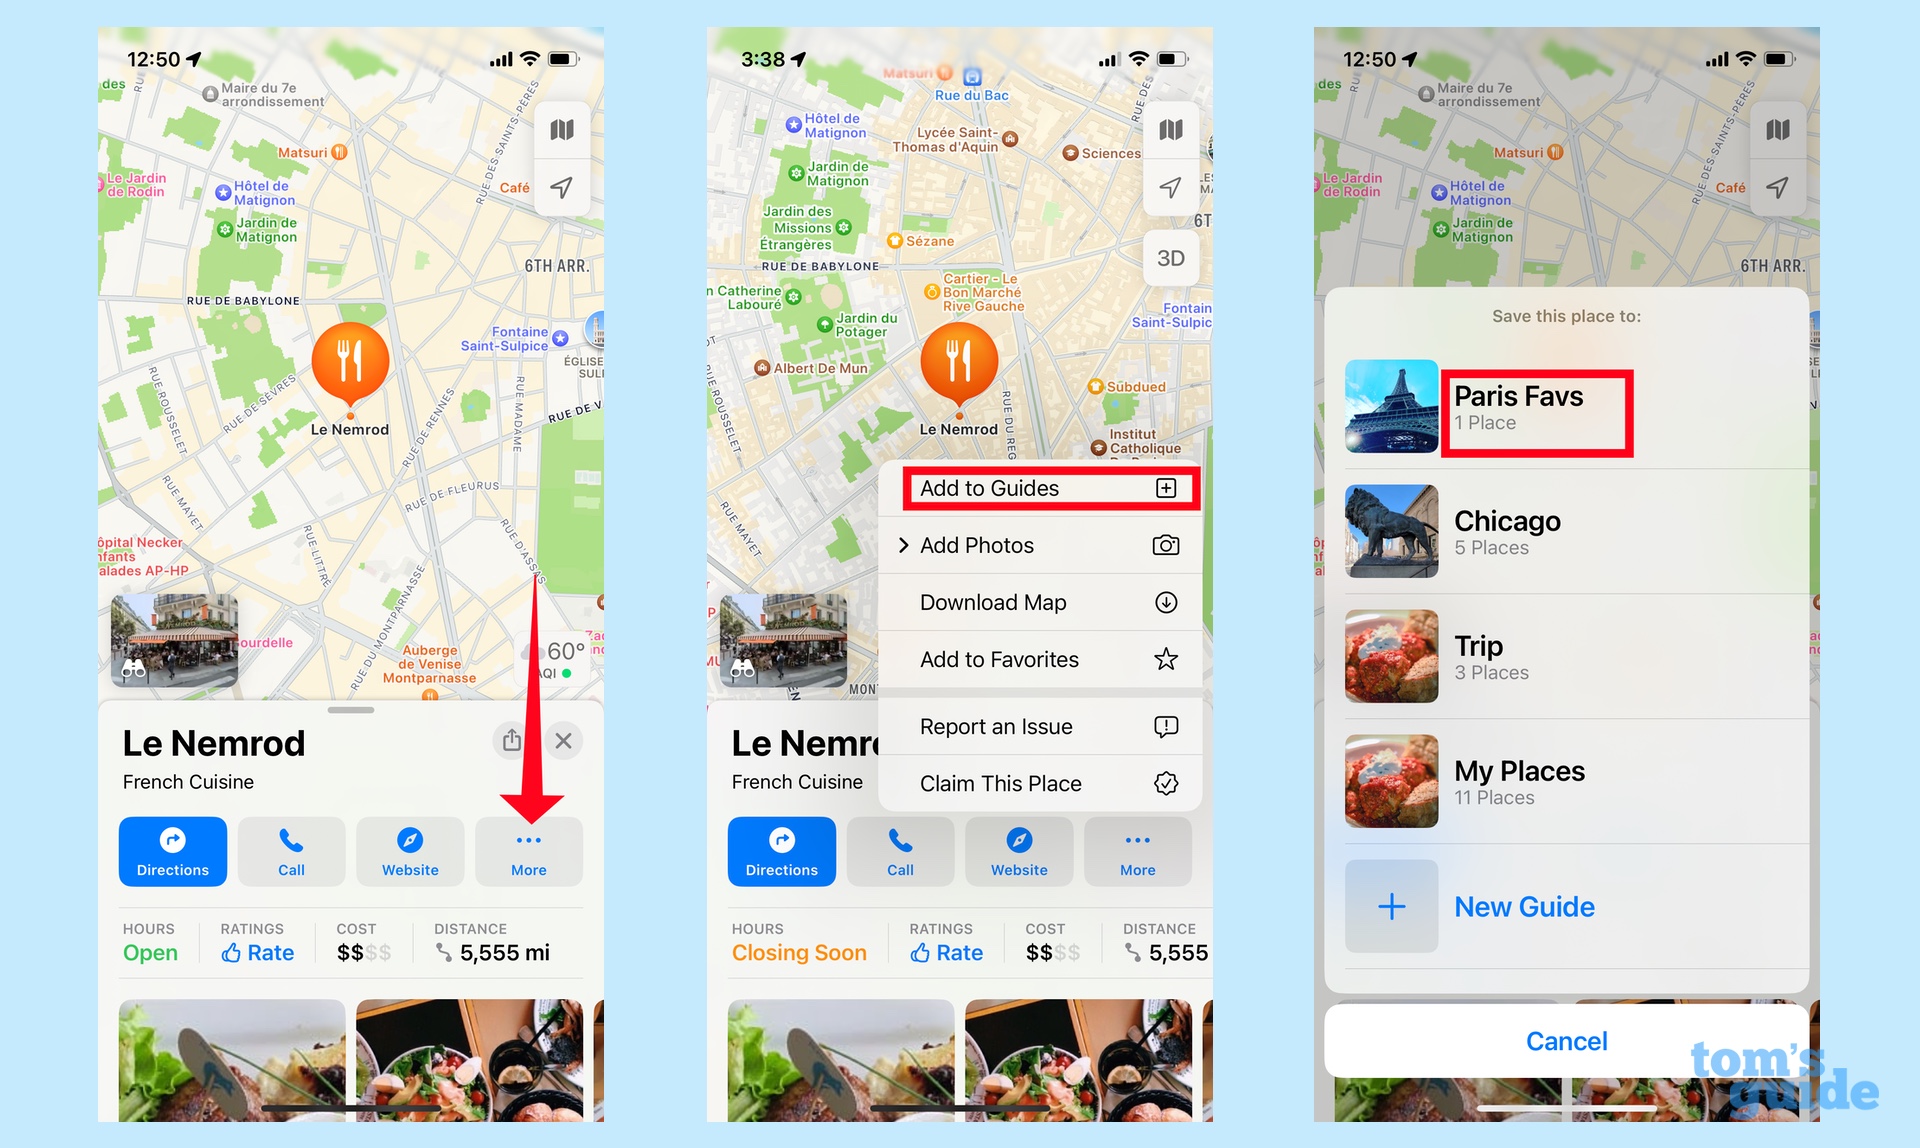
After you've searched for a place, tap the More button, and on the pop-up menu, select Add to Guides. Tap on the guide you wish to add the location to.
How to share Apple Maps guides with other people.
Whether on your Mac or your iPhone, sharing your Guide works the same.
1. Share your guide from your Mac
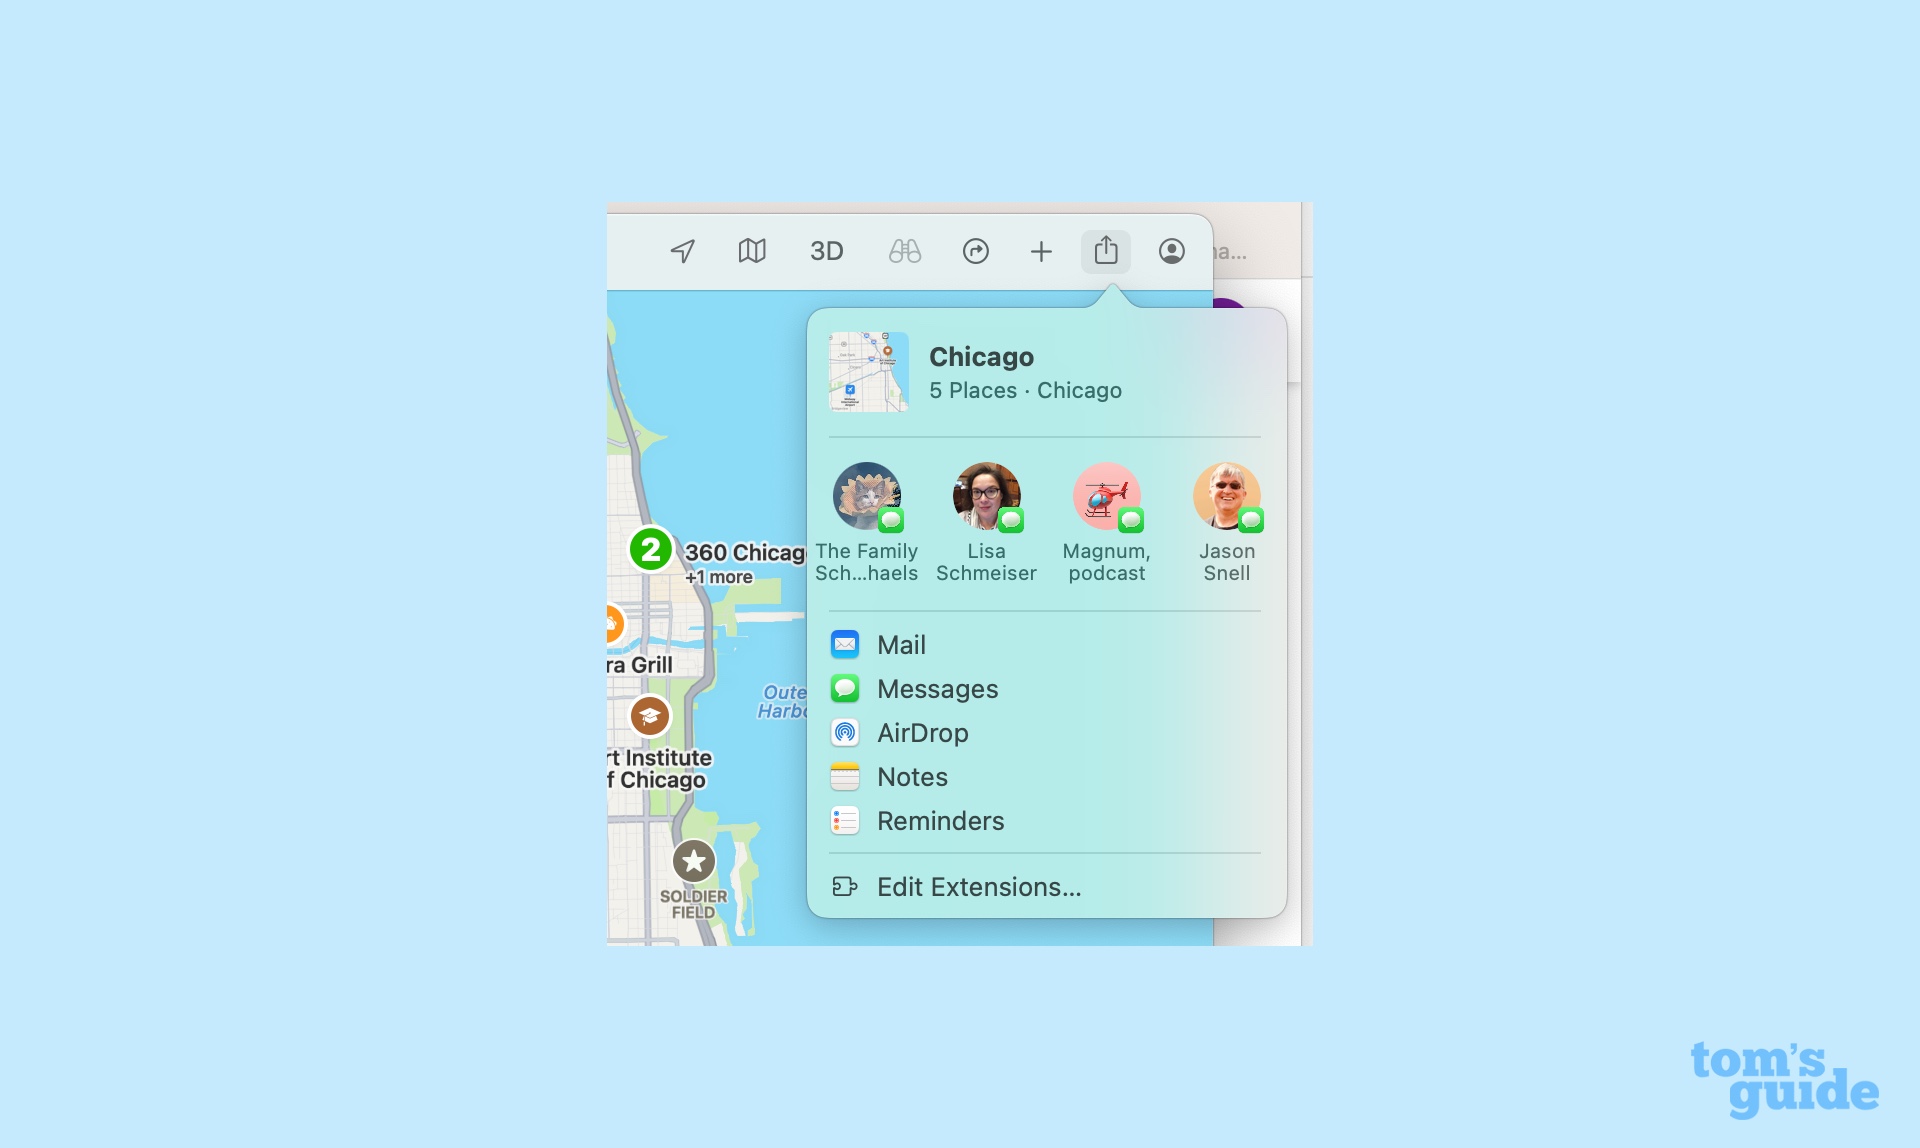
From the Maps app on your Mac, tap the Share button on the right side of the screen, and then select the person or app you want to share your guide with.
2. Share your guide from your iPhone
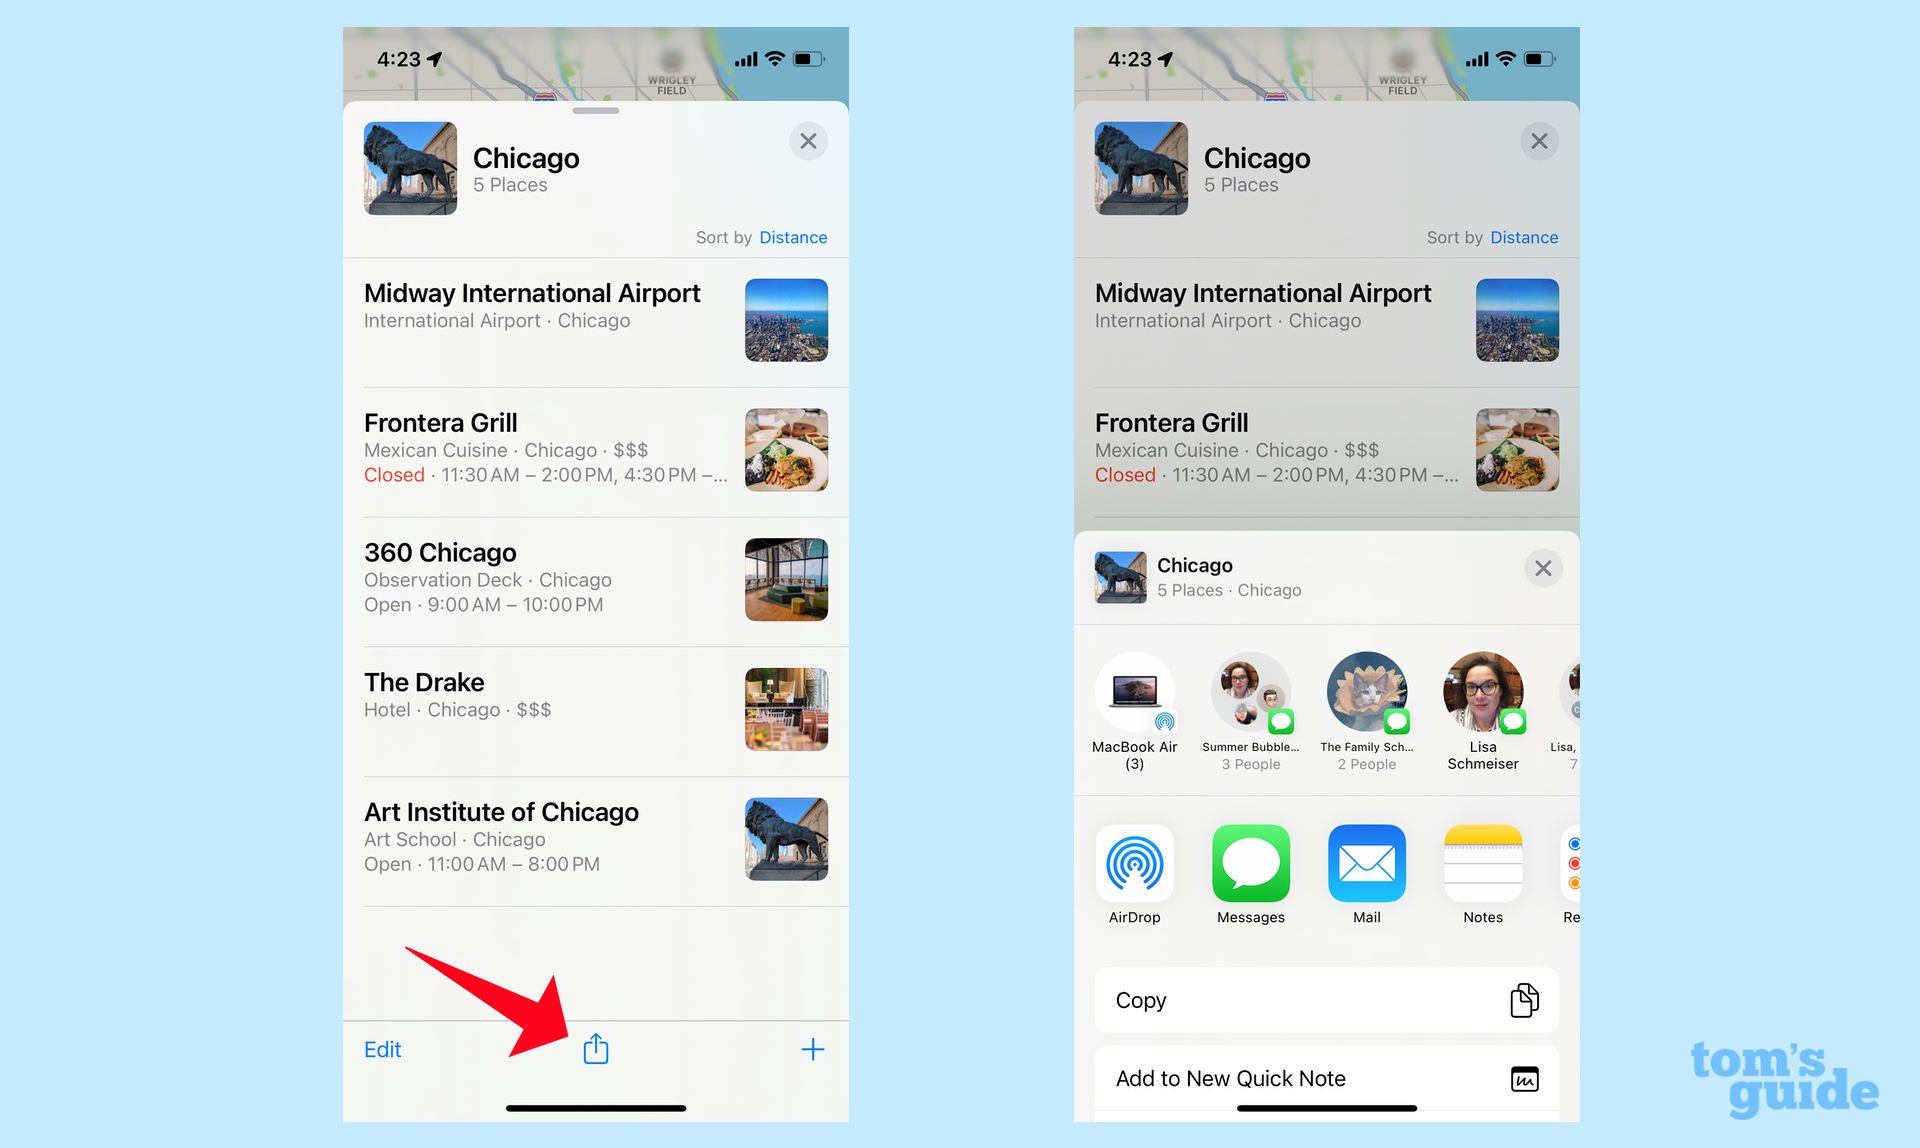
From the bottom of your guide, tap the share button. The first time you share a guide, you may be prompted to confirm that you want to share your guide. On the ensuing screen, select the person or app you wish to share the guide with; you can also send your guide to a nearby device using AirDrop.
And that's all there is to using the Guides feature in Apple Maps for vacation planning. For other Apple Maps tips, see our guide on how to download offline Apple Maps, a new feature added to iOS 17. We've also got 17 Apple Maps tips and tricks to share with you, plus a look at mapping routes with multiple stops.
Philip Michaels is a Managing Editor at Tom's Guide. He's been covering personal technology since 1999 and was in the building when Steve Jobs showed off the iPhone for the first time. He's been evaluating smartphones since that first iPhone debuted in 2007, and he's been following phone carriers and smartphone plans since 2015. He has strong opinions about Apple, the Oakland Athletics, old movies and proper butchery techniques. Follow him at @PhilipMichaels.


