How to set up Gmail two-factor authentication
Learn how to set up Gmail two-factor authentication and make it harder for hackers to attack your account
Knowing how to set up Gmail two-factor authentication (or 2-Step Verification as Google calls it) means you don’t have to rely on a single password to protect your email account. Instead you’ll have the added safety net of a security code — one that needs to be obtained via a text message, phone call, security key or mobile authentication app.
The idea is that hackers would need that code to log into your Gmail account, so they’d not only need access to your password but a physical device such as your mobile phone in order to force their way in. As you can imagine, 2-Step Verification helps to keep your account safe and secure and we’d urge you to at least consider it (or better, go through the steps below).
In this guide, we look at how to set up Gmail two-factor authentication on a computer and how to set up Gmail two-factor authentication on a mobile device. We also look at using Google’s Authenticator app to generate 2FA codes. All of these will help protect you against a data breach which, sadly, are becoming more and more common.
How to set up Gmail two-factor authentication on a computer
First of all, let’s look at how you can set up 2FA on a PC or Mac.
1. Visit the 2-Step Verification webpage
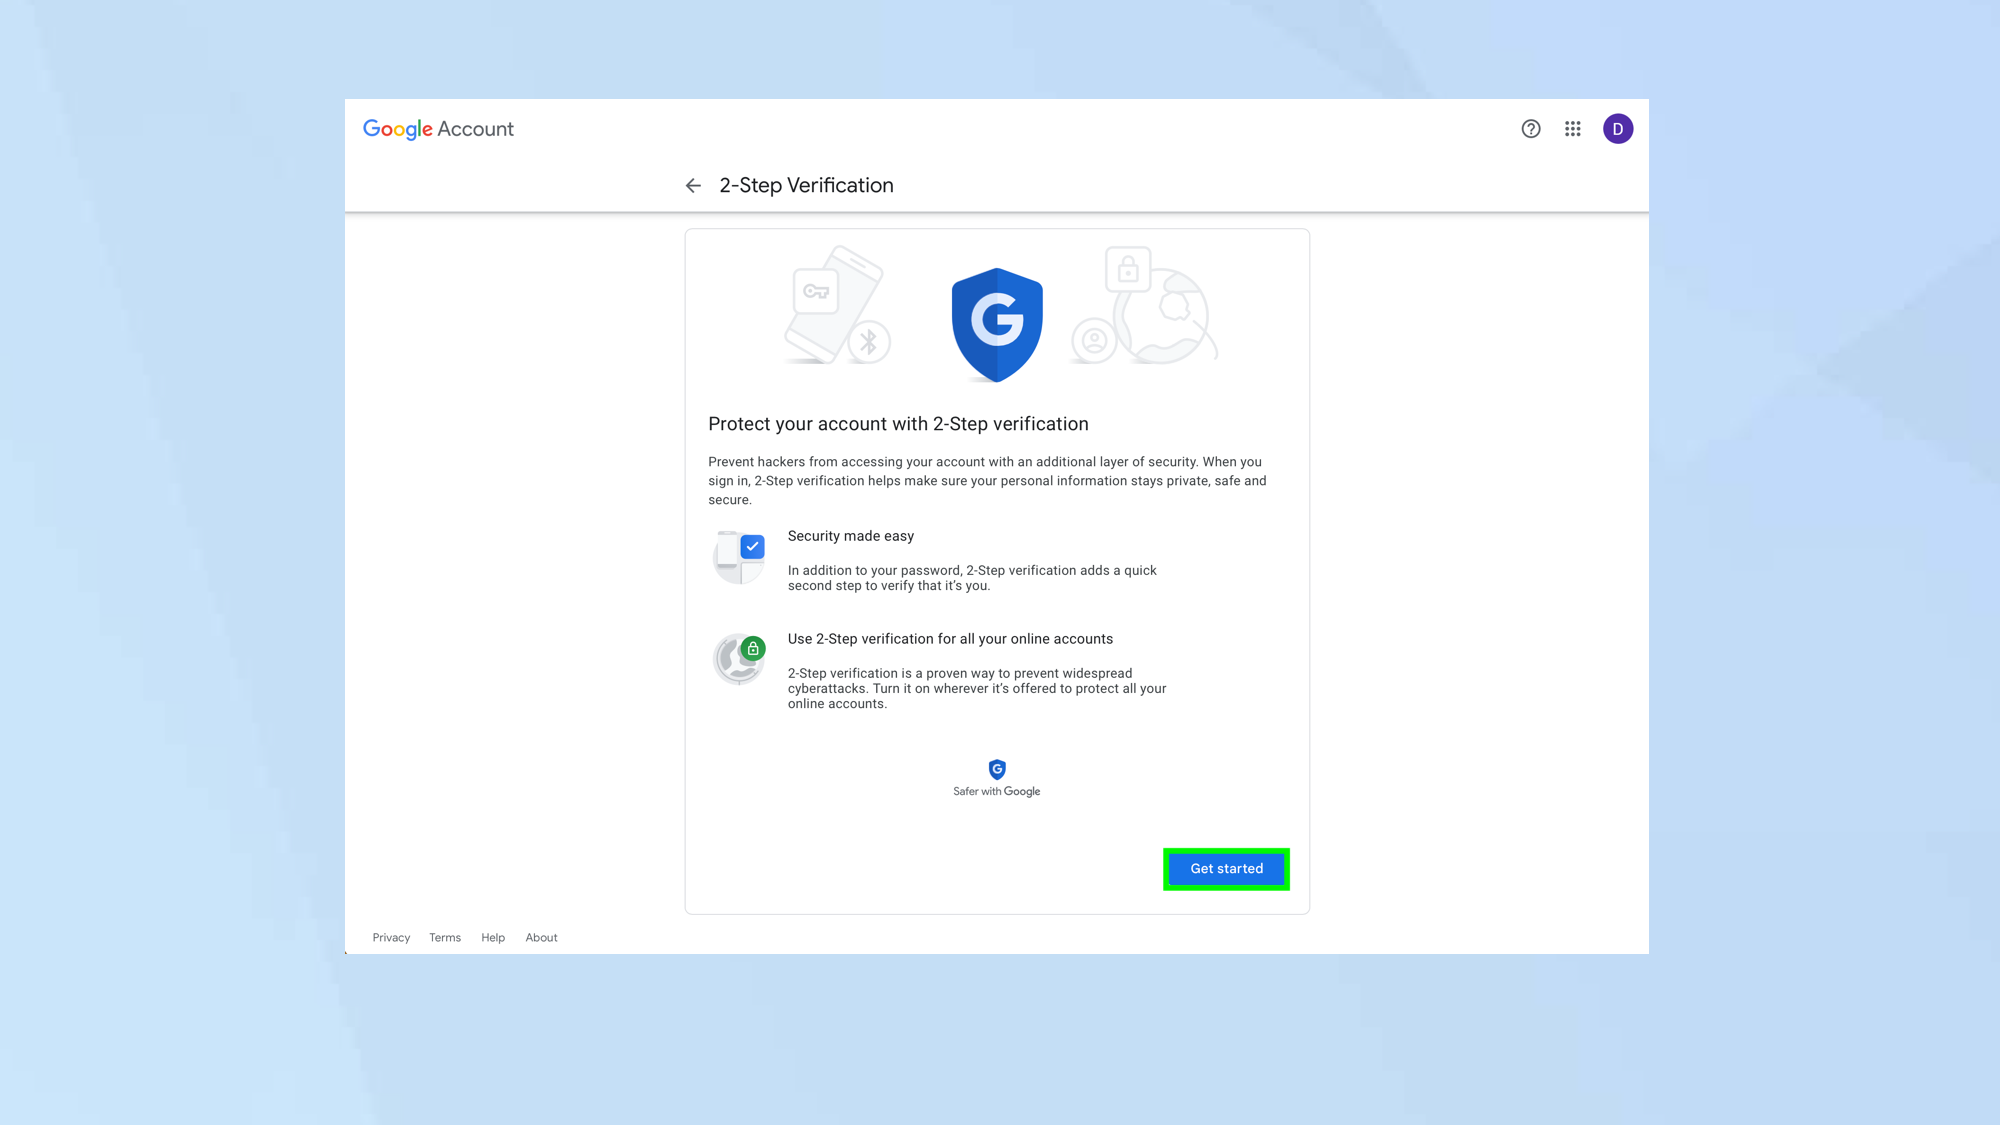
Launch a browser on your computer and go to the 2-Step Verification webpage (you may be prompted to sign in to your Gmail account if you haven’t already). Read the information on the screen if you wish, and click Get Started when you’re ready.
2. Choose a method
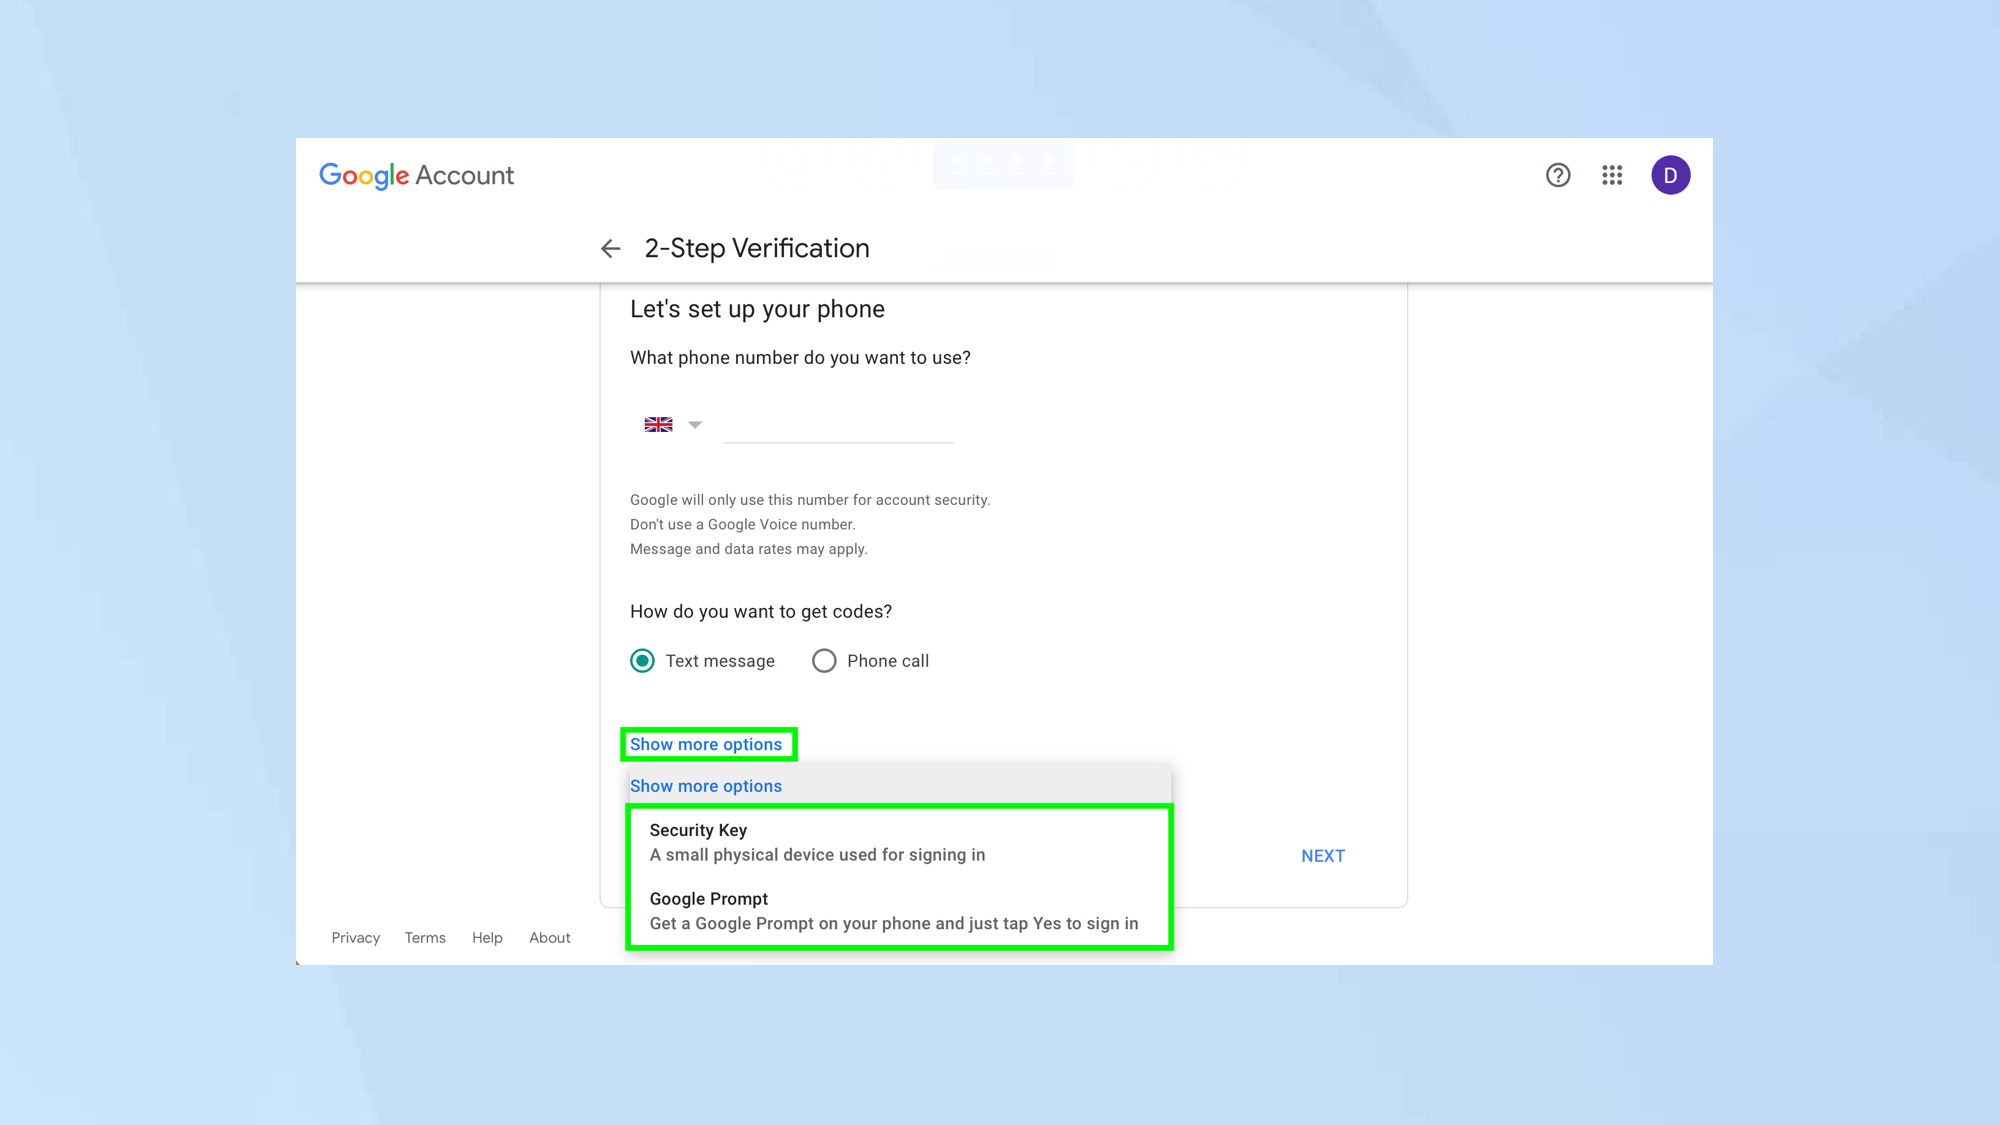
There are three ways of setting up 2-Step Verification in Gmail: a text message/phone call, Google Prompts or a physical key. By default, you’re shown the page for setting up text message/phone call as the way to verify your account. If you click Show more options, however, you will be able to select one of the other two. Jump to step 6 for Google prompts and go to step 7 for a security key.
3. Set up a phone
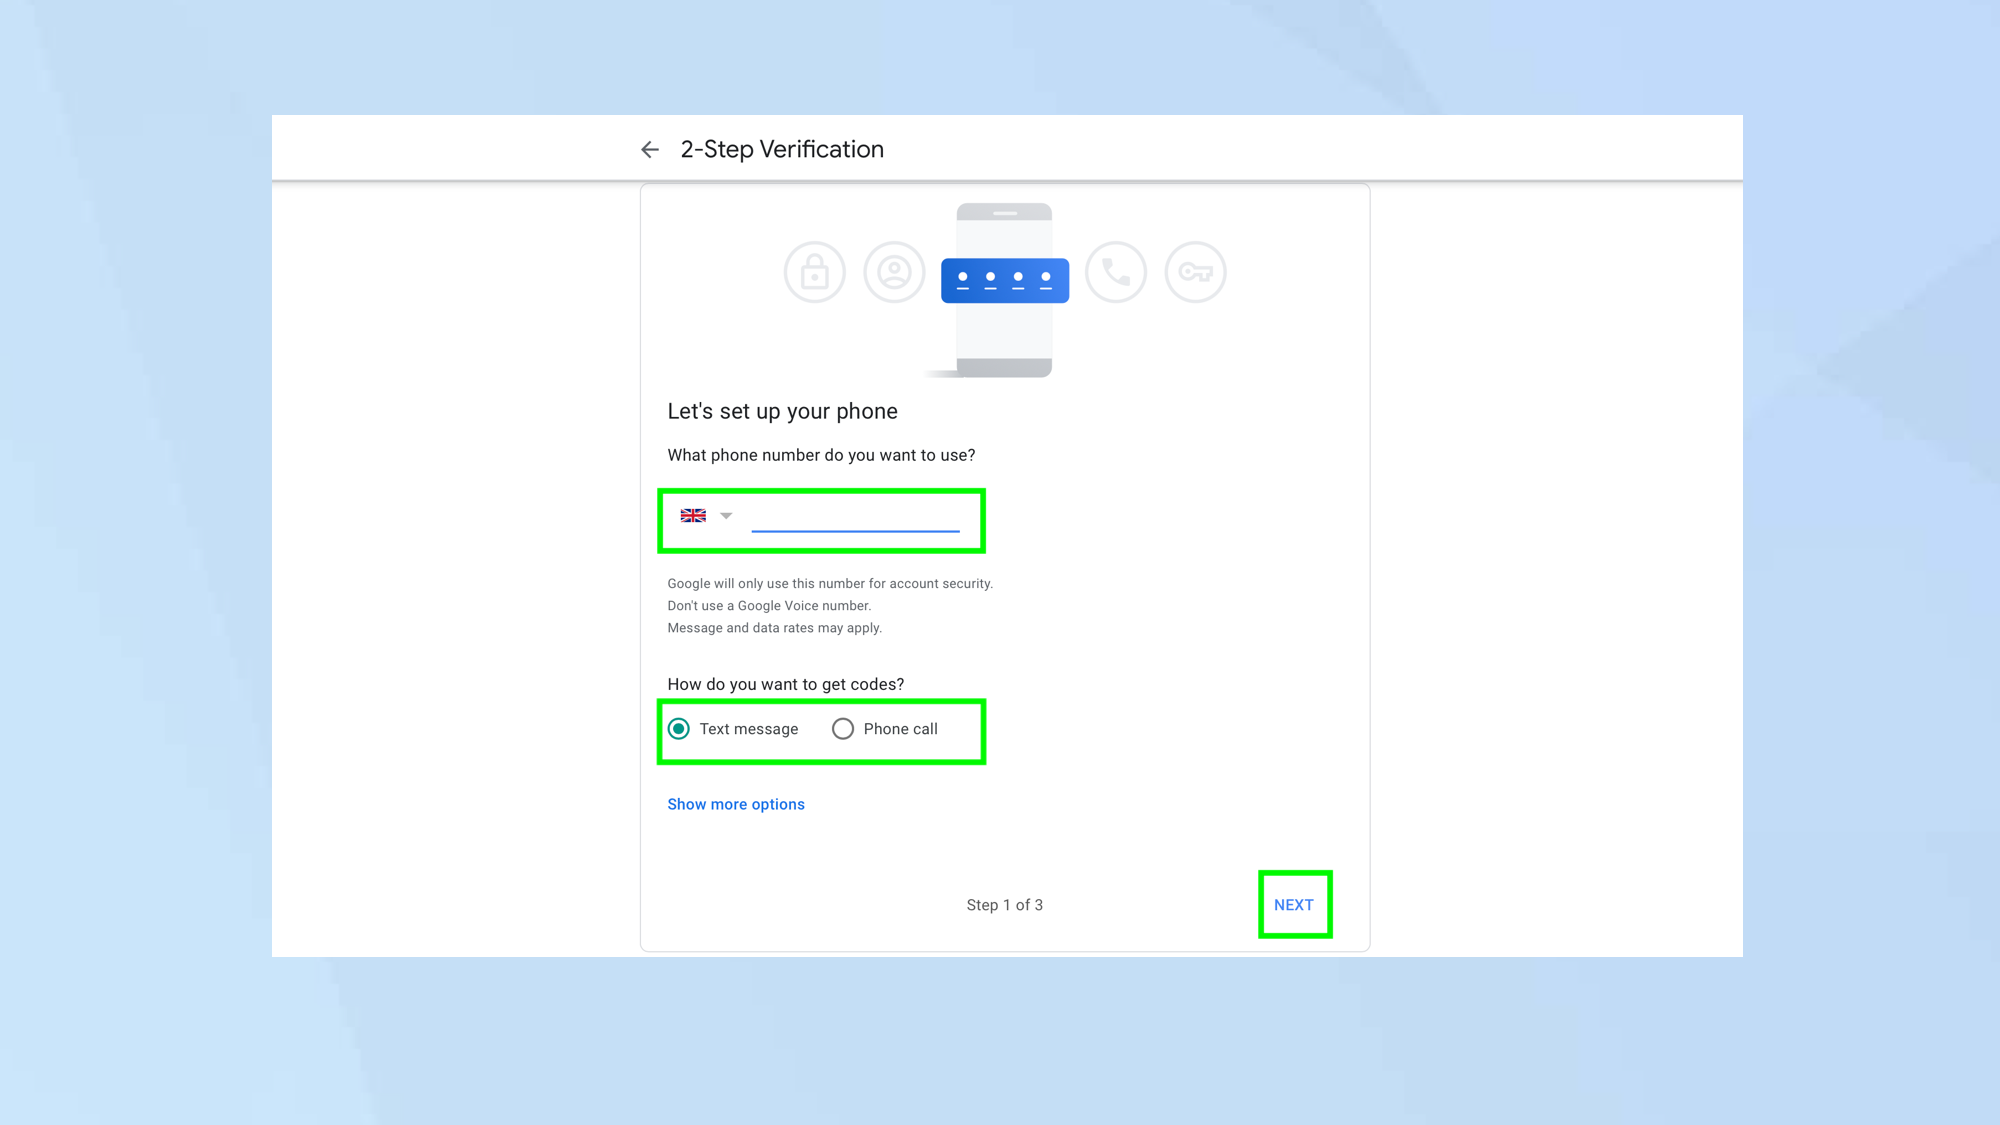
When using your phone for 2-Step Verification, a six-digit code will be sent to you via text message or a phone call whenever you log in to Gmail. You will then be prompted to enter that code — the idea is that a hacker would need your phone to hand in order to gain access, making logins more secure.
If you are happy to use your phone for 2-Step Verification, enter your mobile phone number (select a country code if the one shown is incorrect) then click Next.
4. Verify your device
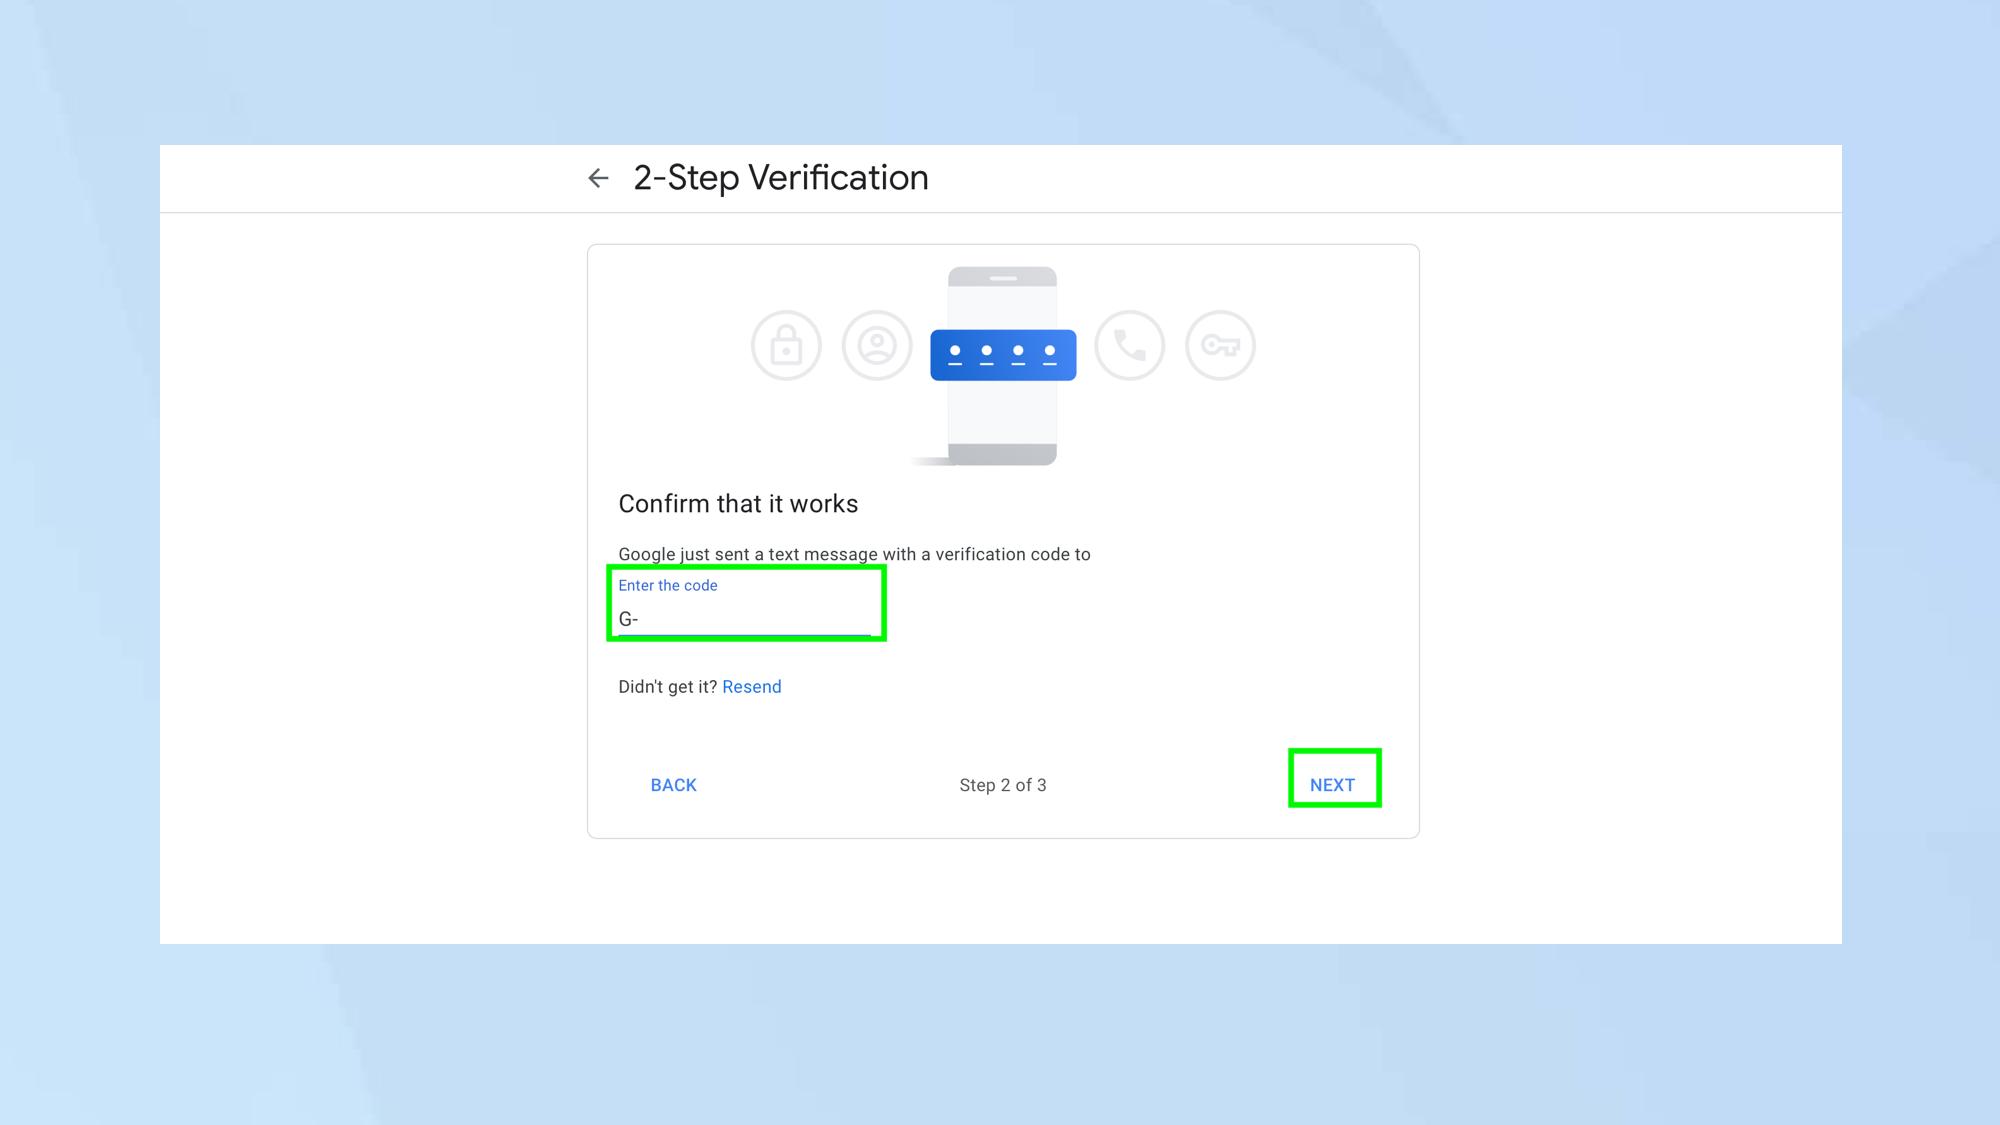
A PIN number will be sent to your phone via text message or you will receive a call. Enter the PIN number and click Next.
5. Turn on 2-Step Verification
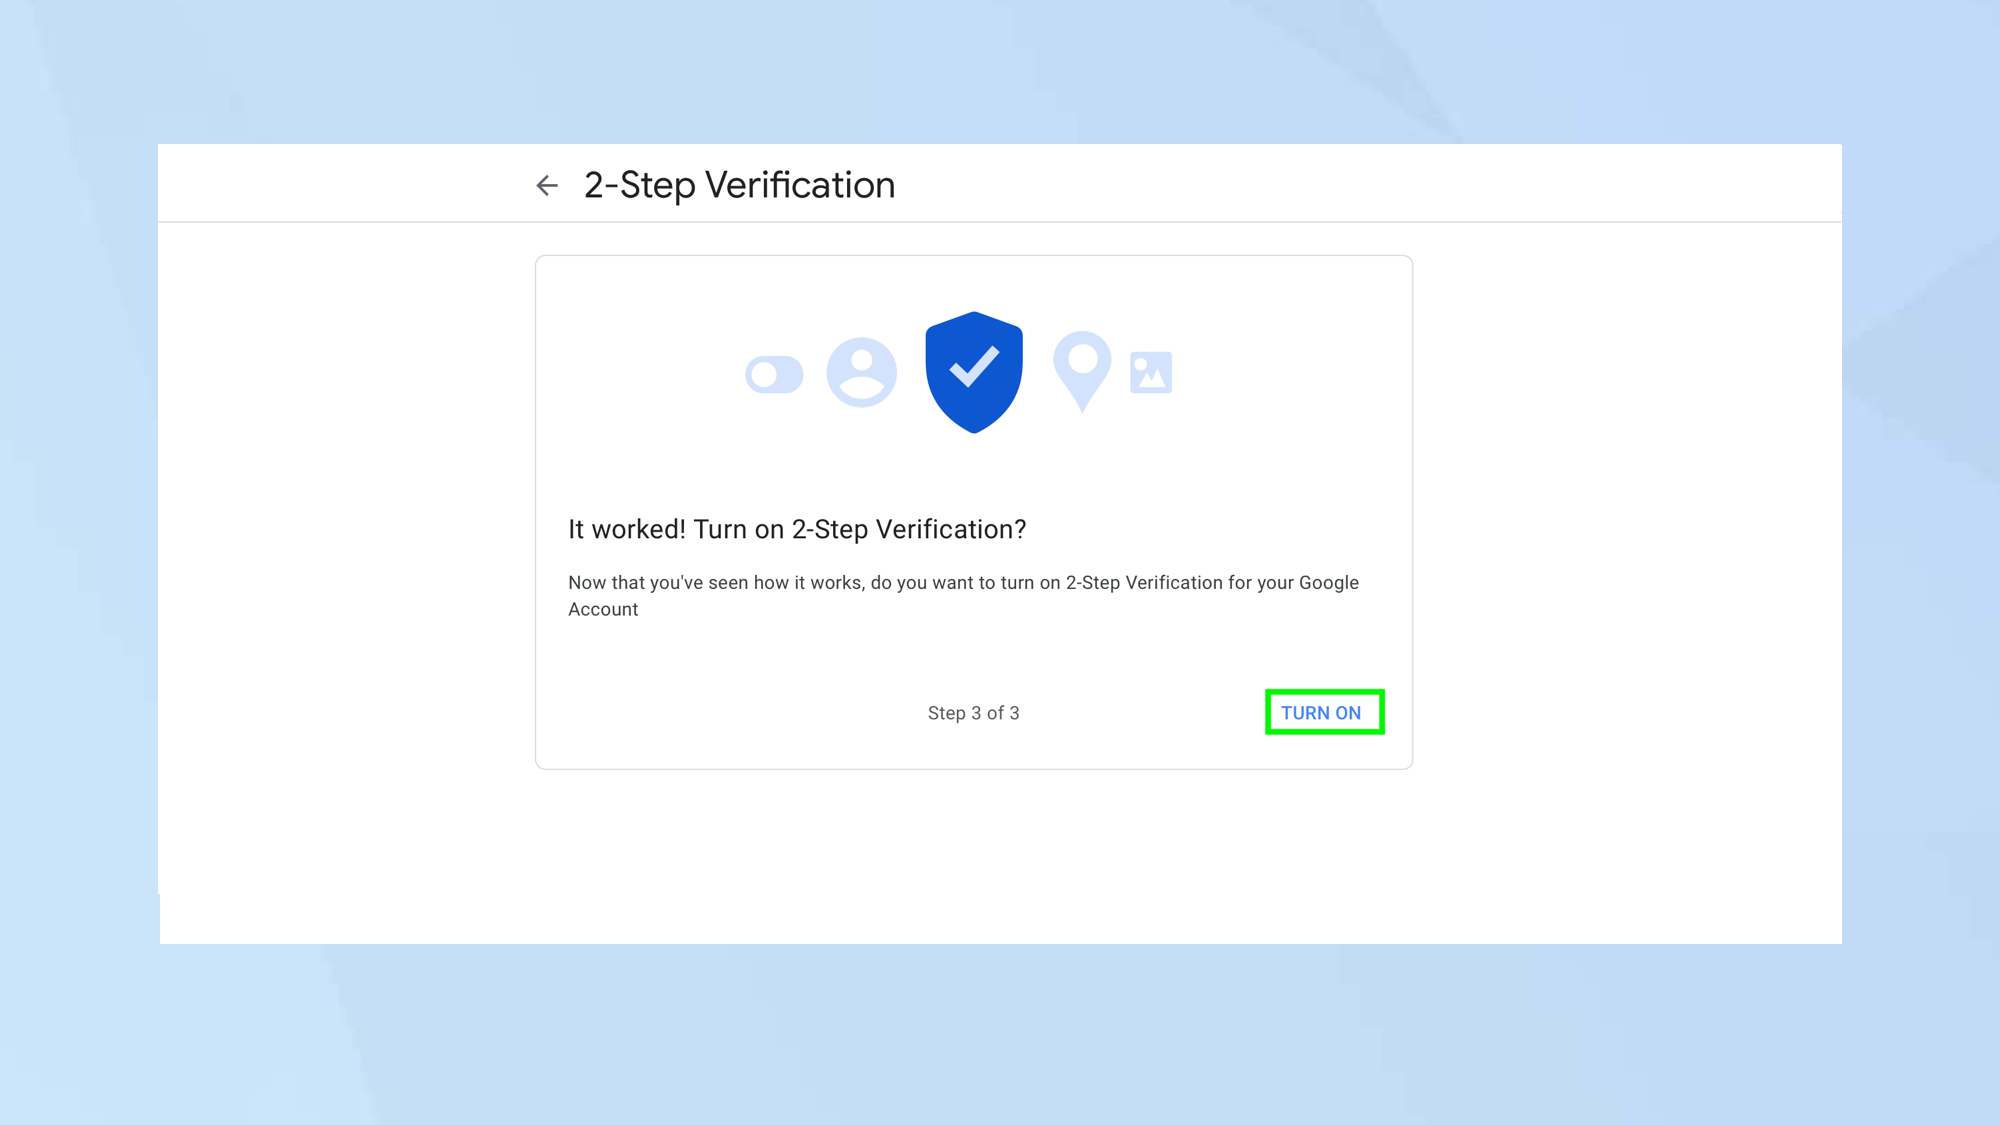
Once your PIN has been accepted and validated, you will be asked if you want to turn on 2-Step Verification. We’re assuming you do, so click Turn on.
6. Use Google prompts
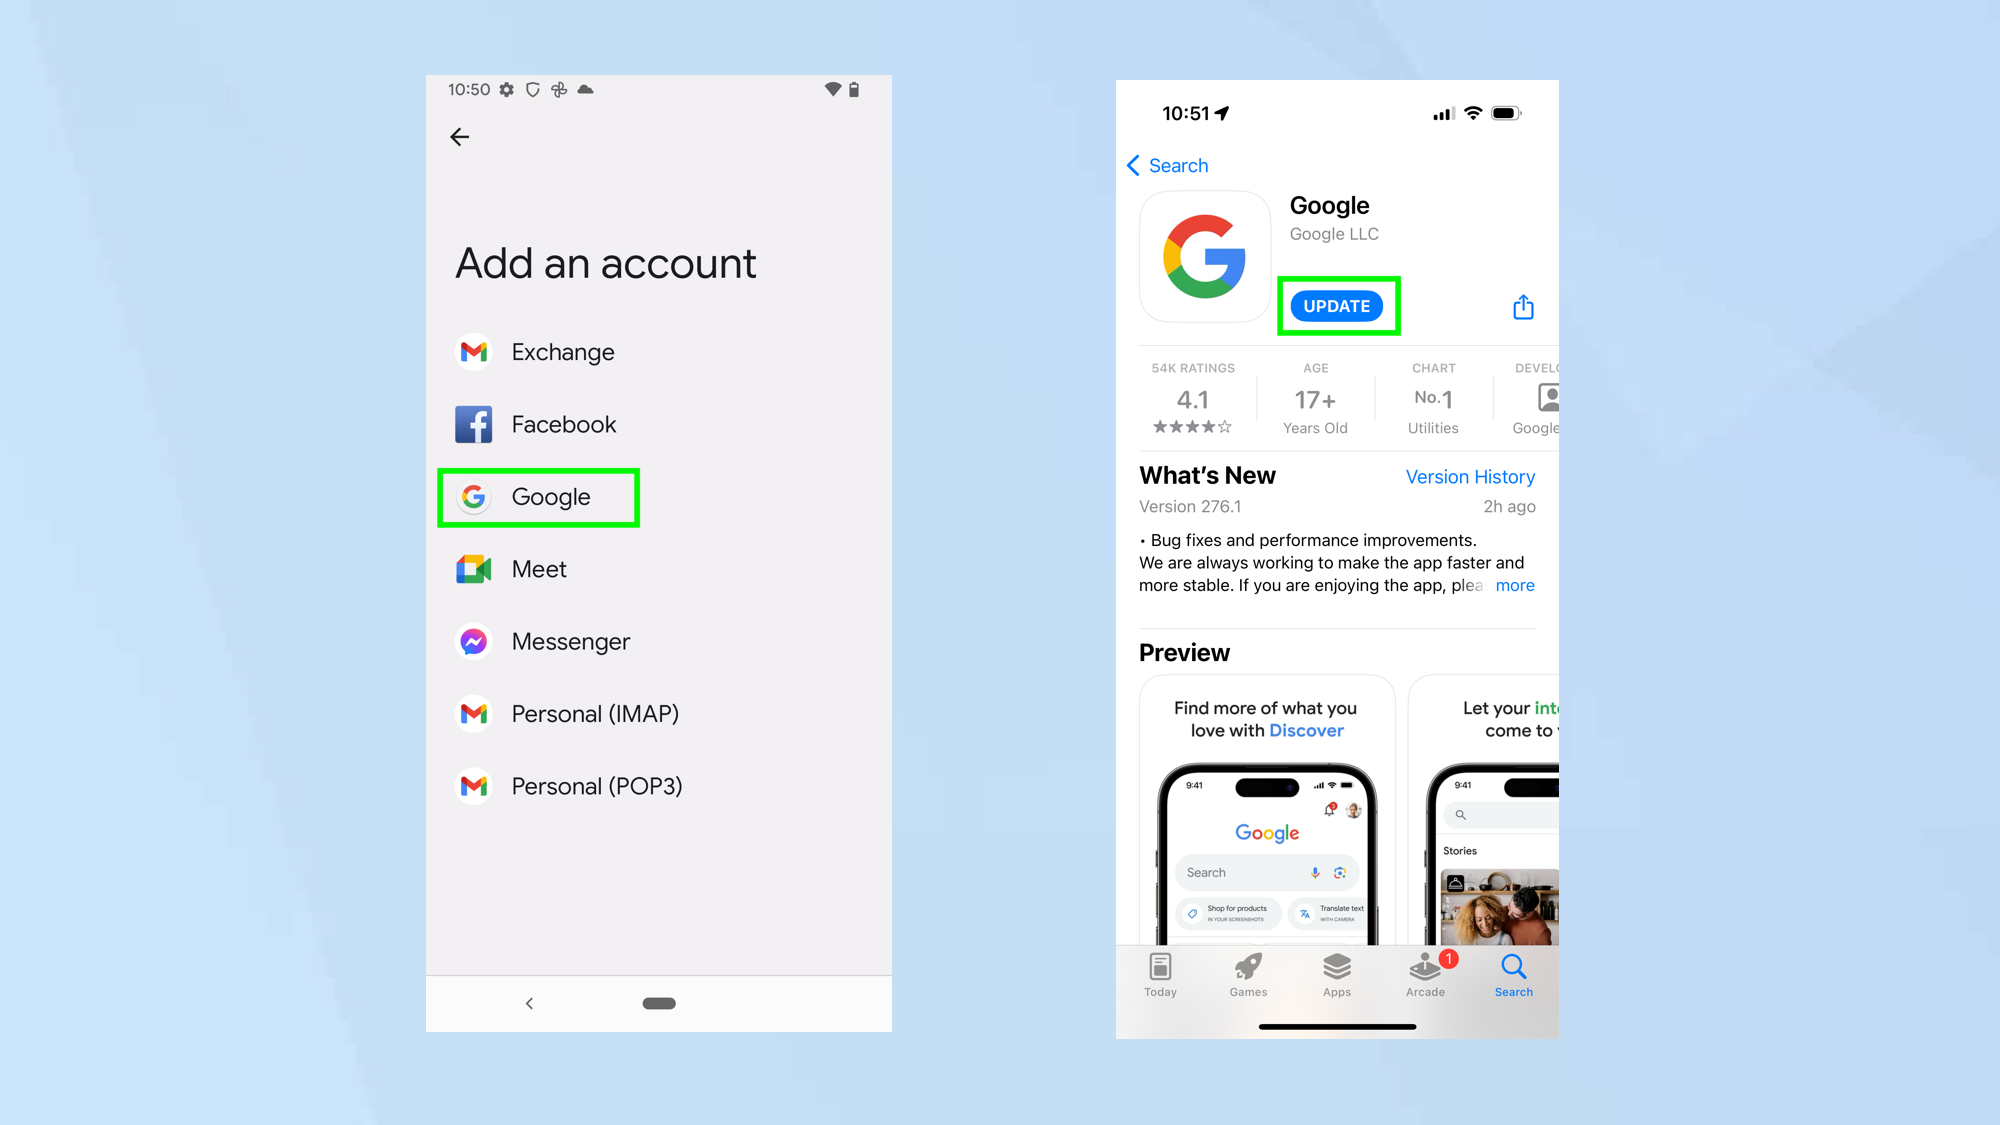
Google Prompts is an alternative option which shows an approval screen on your phone when you try to sign in to a Google account on a new device. It will display automatically on an Android device linked to your Gmail account and in the Google app downloaded to an iPhone or iPad.
To use this, select Show more options and choose Google Prompt. You will just need to log into an Android phone (open the Settings app, tap Accounts, select Add Account, choose Google and sign in) or, in iOS, download the Google app and sign in with your Google Account.
7. Use a security key
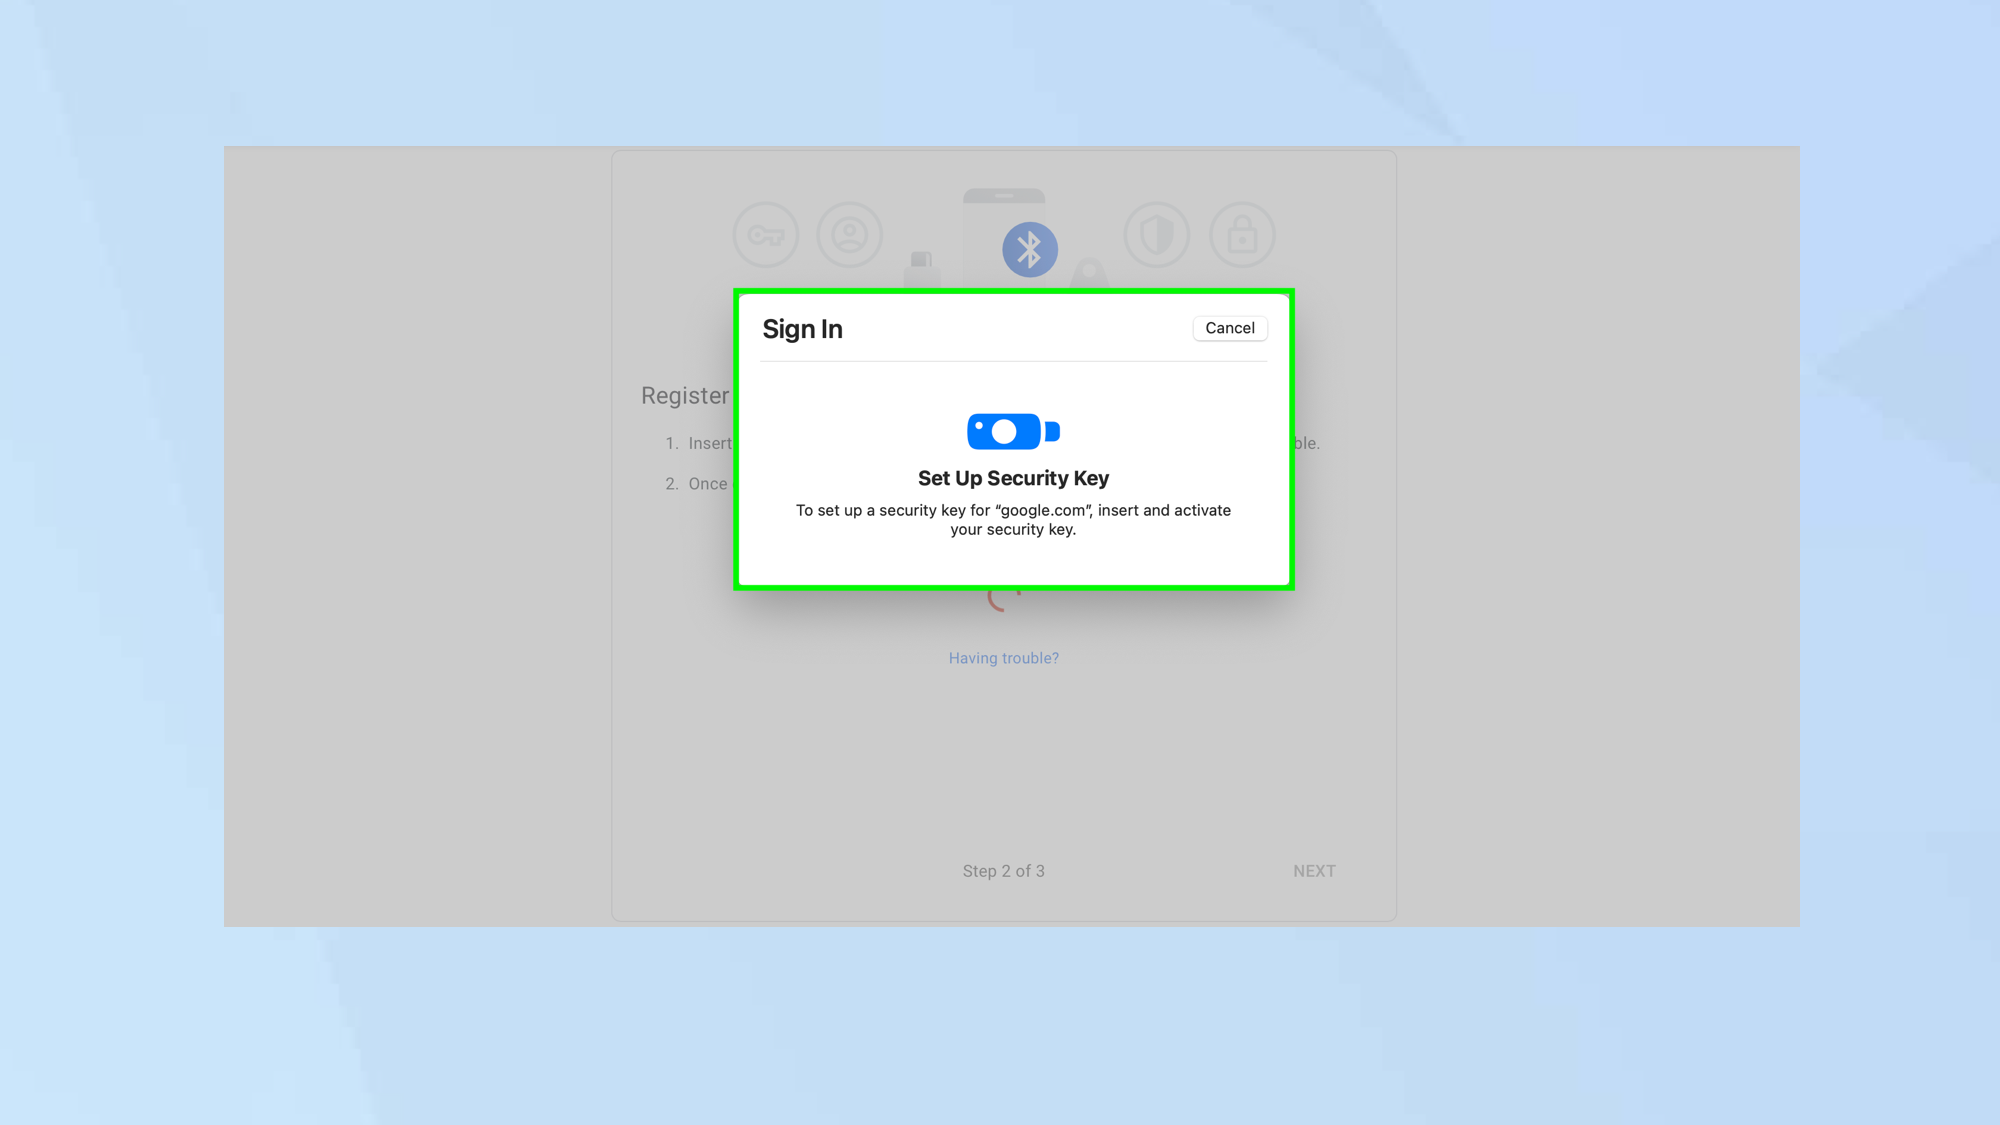
This option requires you to have a physical security key which is plugged into a computer’s USB port or has a button which you tap in the proximity of your smartphone. An encrypted handshake is communicated.
This will likely be the least used option but select Show more options and choose Add Security key. Click Next when ready.
Insert and add your security key into your computer to set it up. If it has a button, then be sure to tap the button.
How to set up Gmail two-factor authentication on a mobile device
Let’s look at how you can set up 2FA on an Android or iOS device.
1. Launch the Gmail app
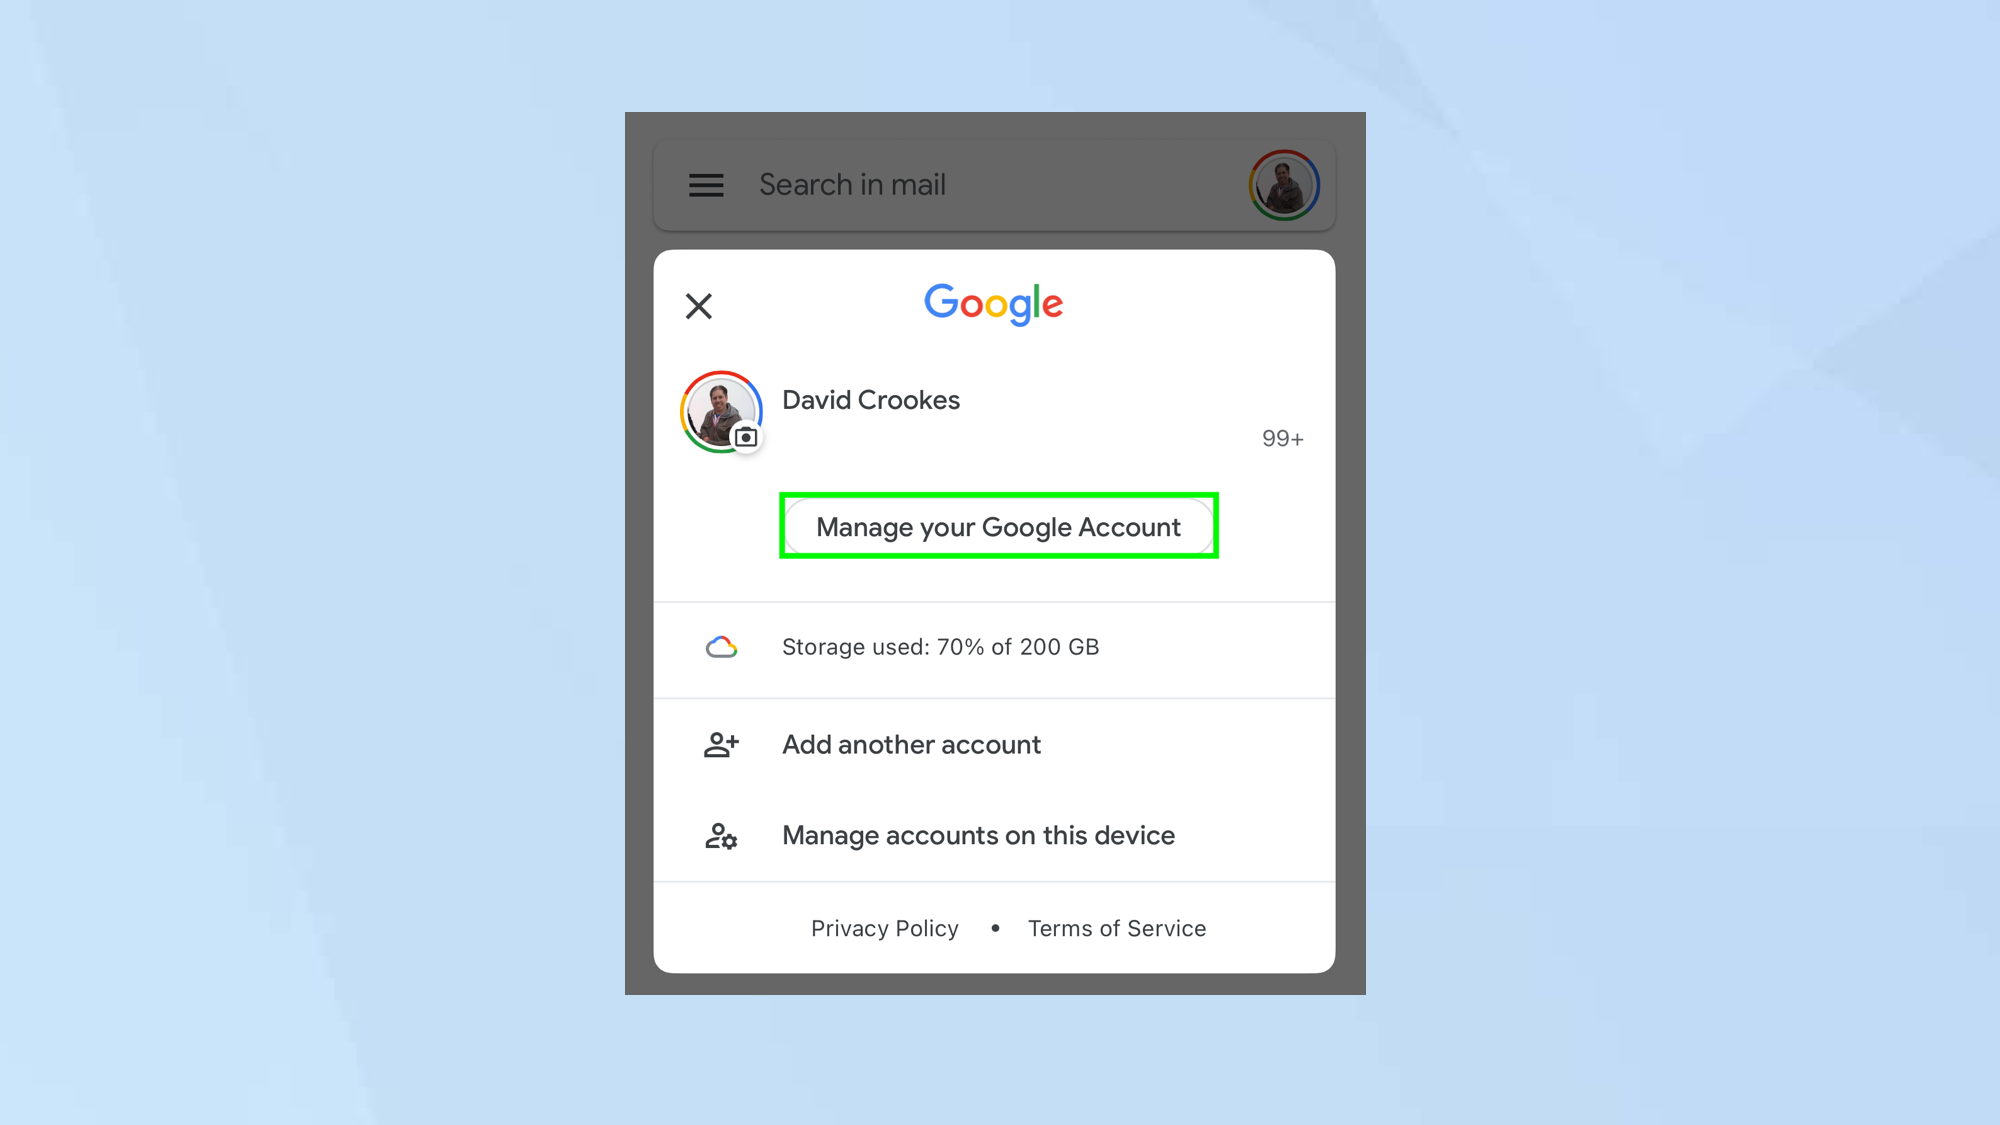
Open your Gmail app, select your profile image or initials in the top-right corner and tap Manage Your Google Account.
2. Select Security
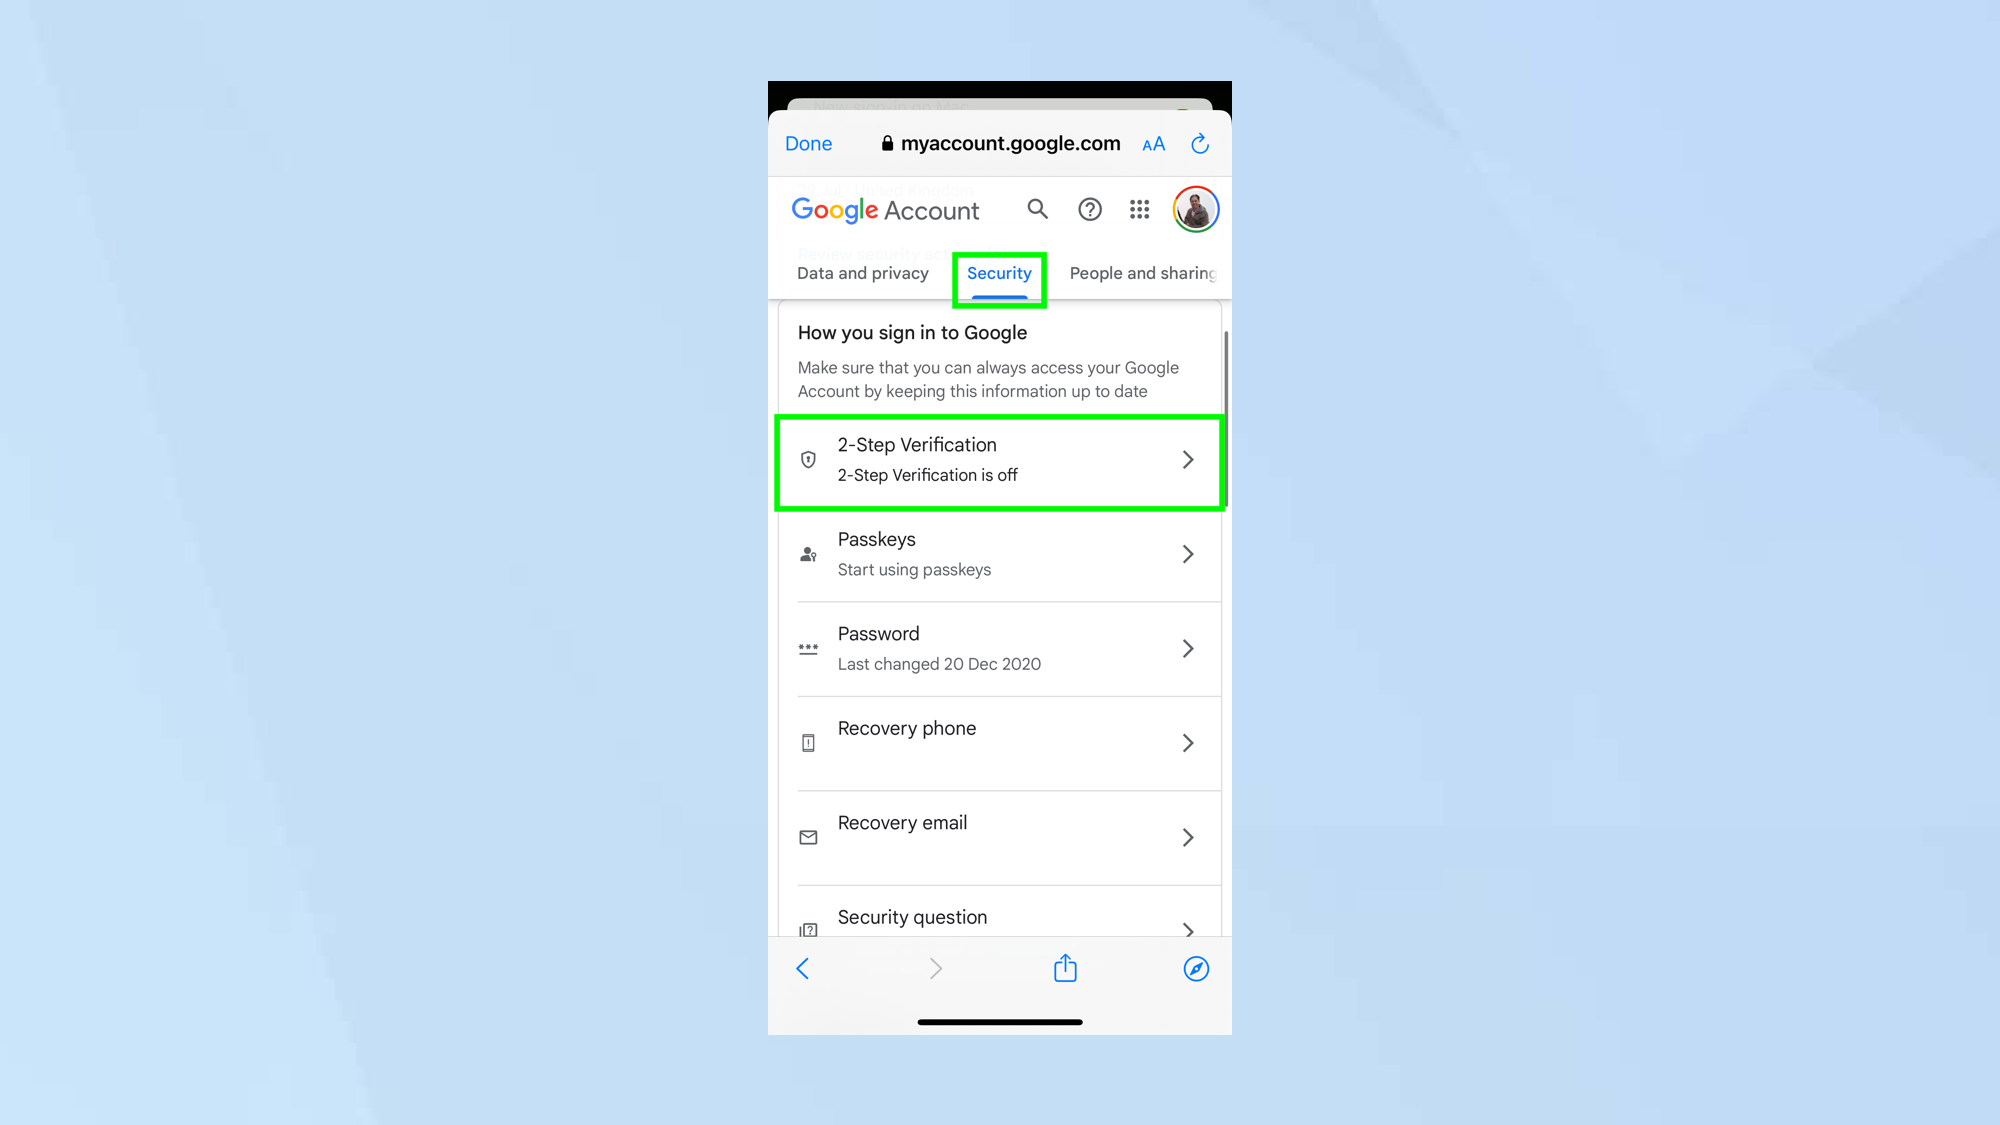
Now select the Security tab and scroll down to How you sign-in to Google. Now tap 2-Step Verification.
3. Tap Get Started
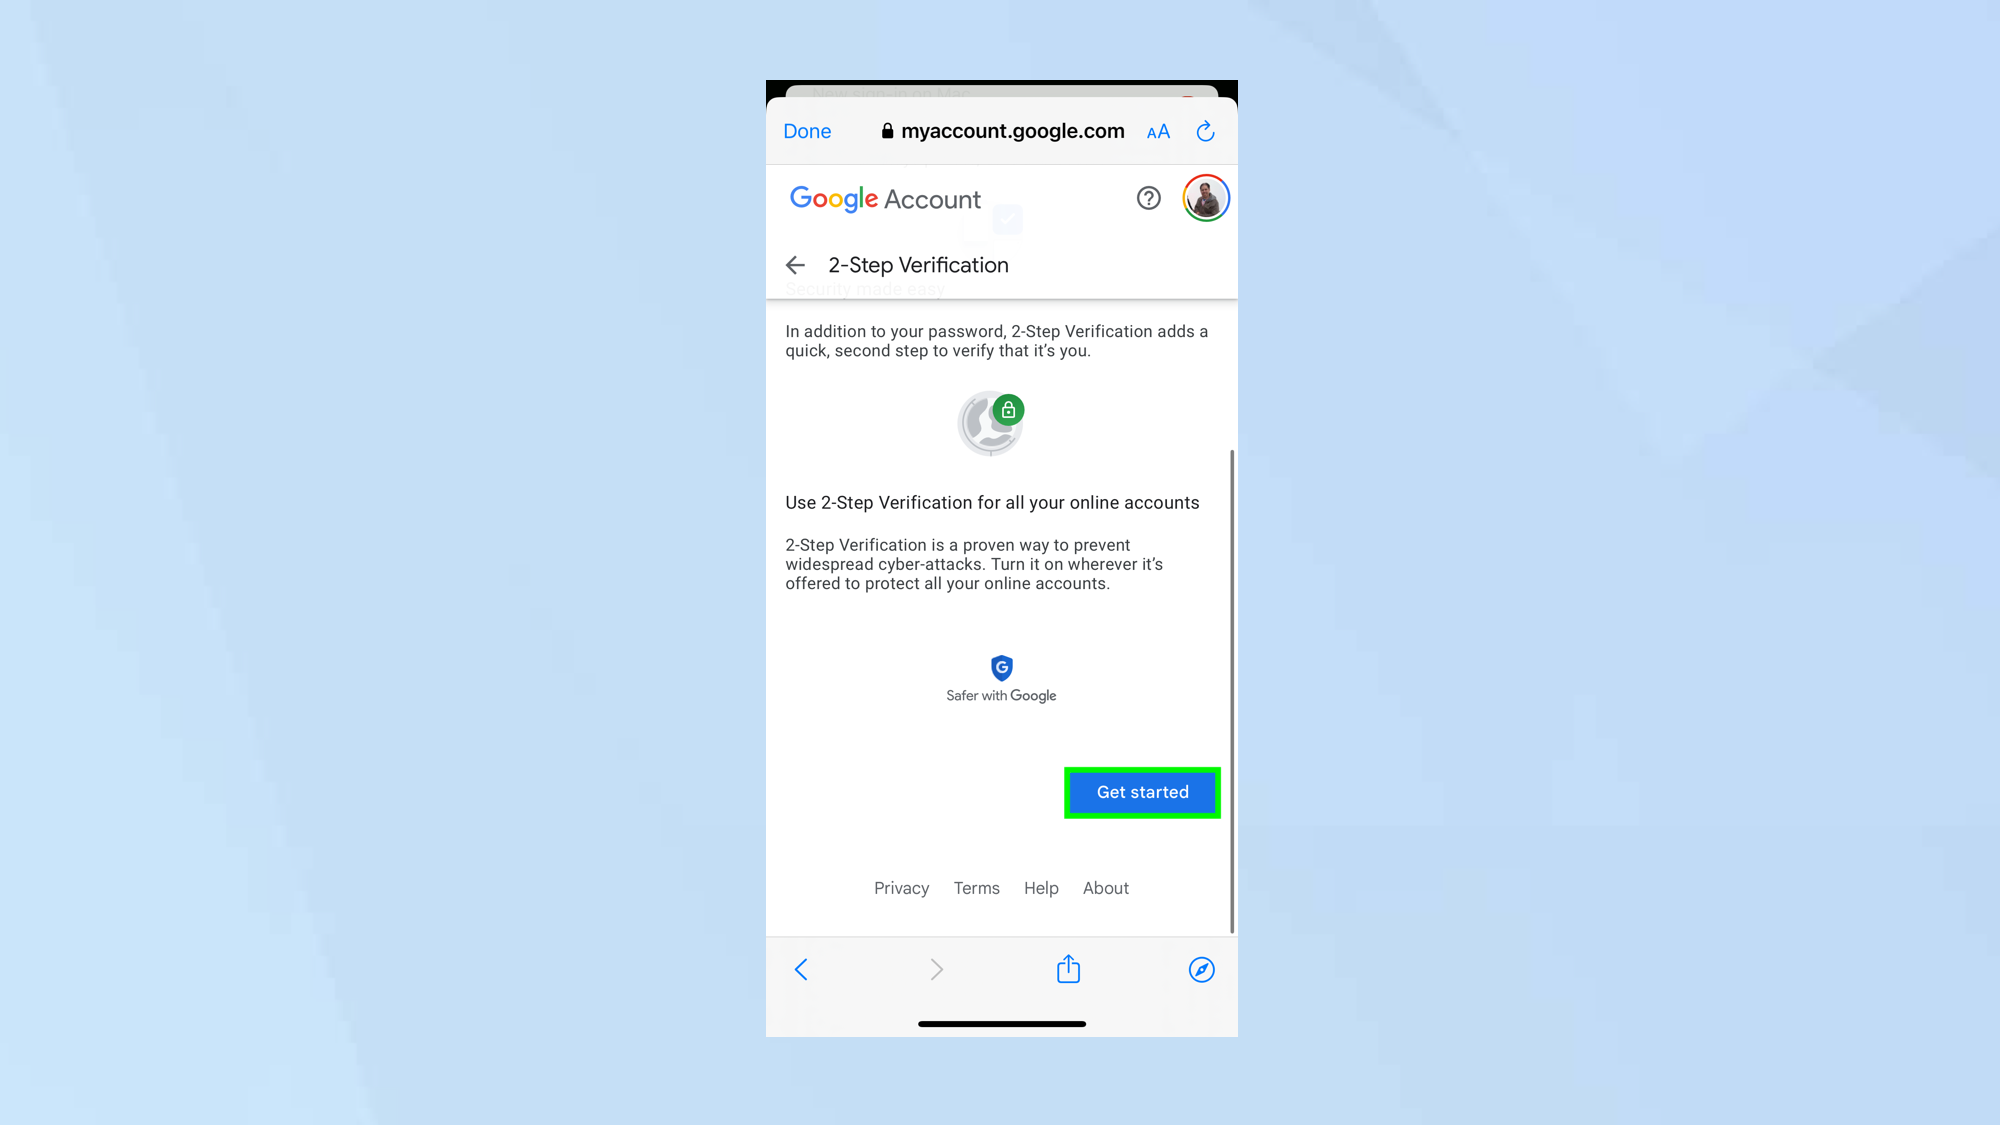
Now tap get Started.
4. Select a device
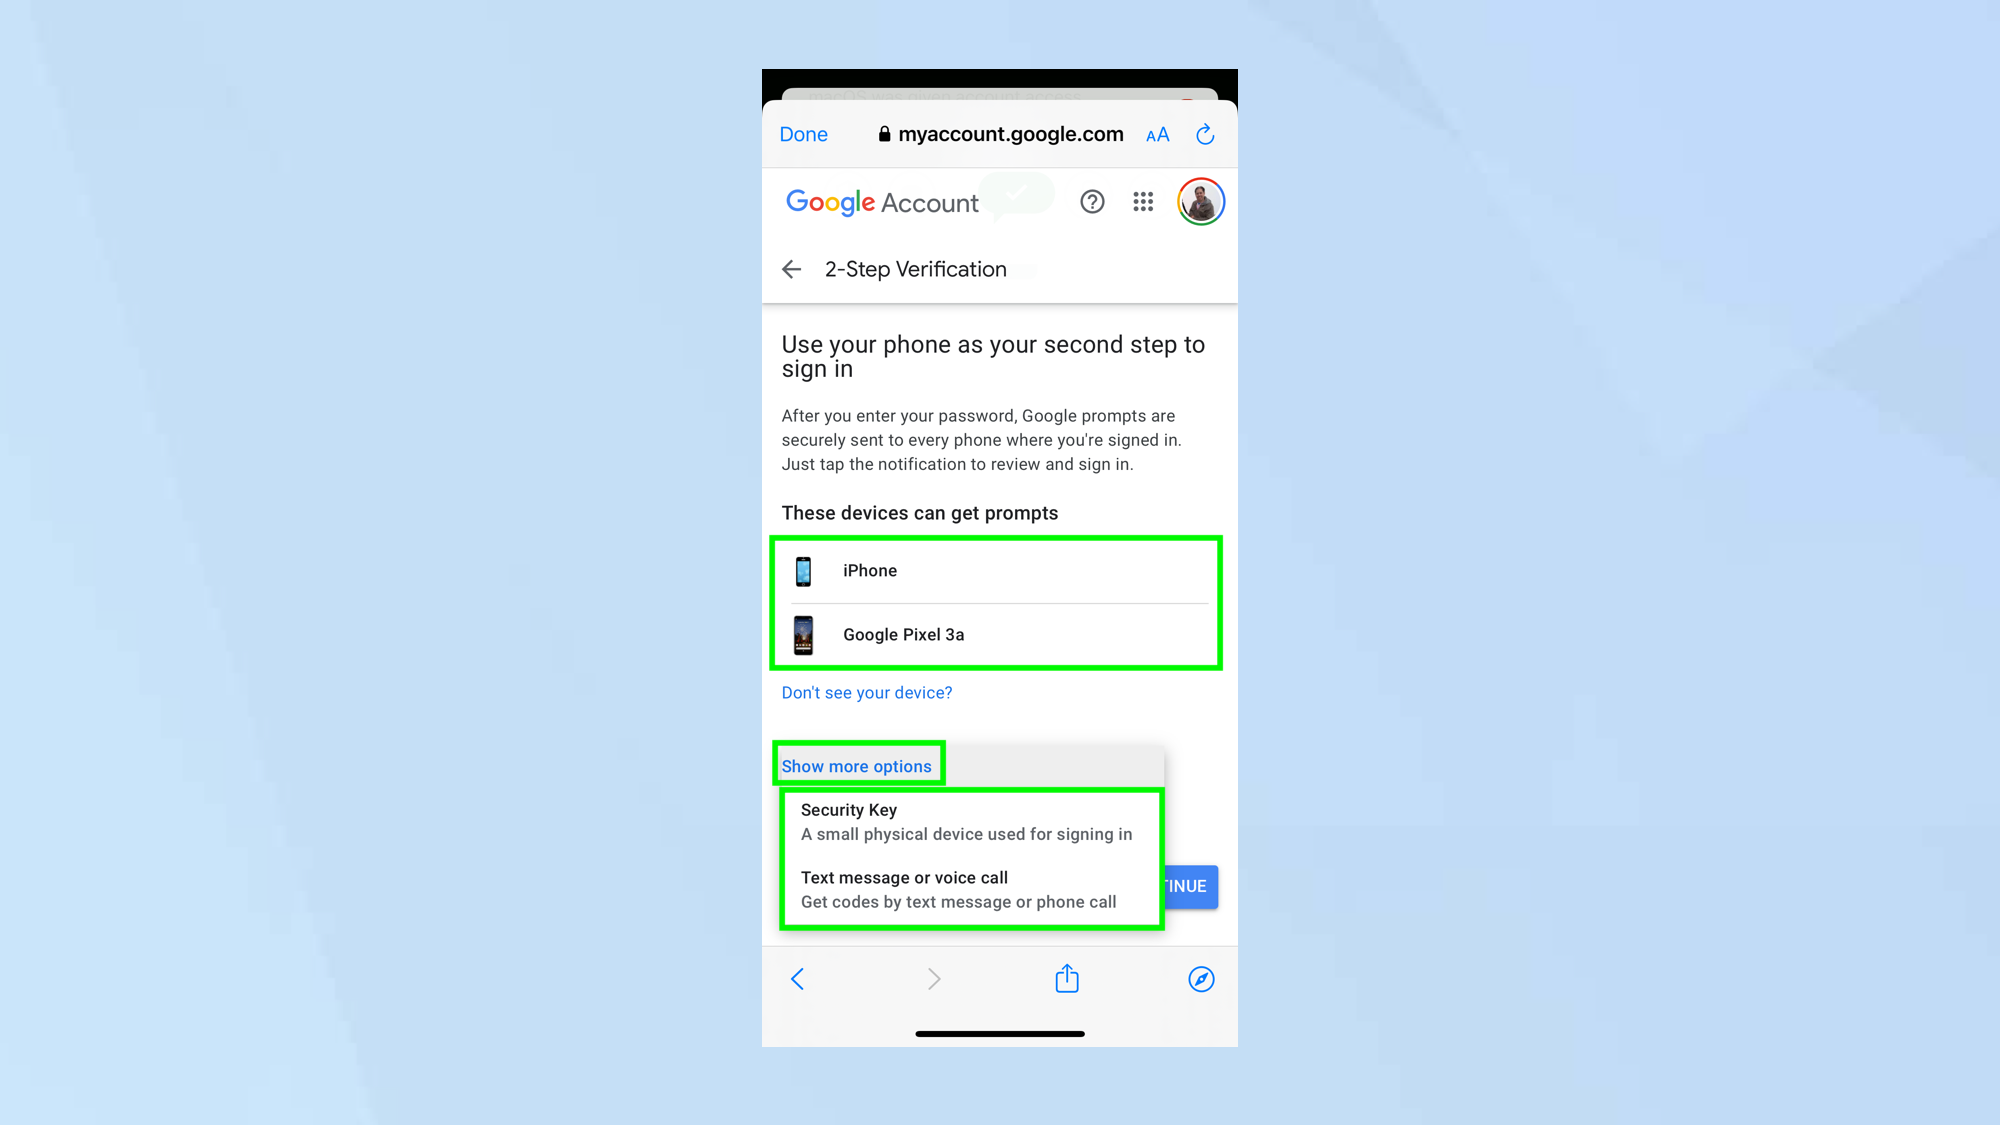
You can set up 2-Step Verification on an Android or iPhone device. Just select the device that you want to use. The idea is that you will see a prompt on your device which you will need to approve when you log into Gmail.
If you would prefer not to have prompts sent to your device, tap Show more options. You can select Security Key or tap text message or voice call. For the security key option go to step 7.
5. Add a backup option
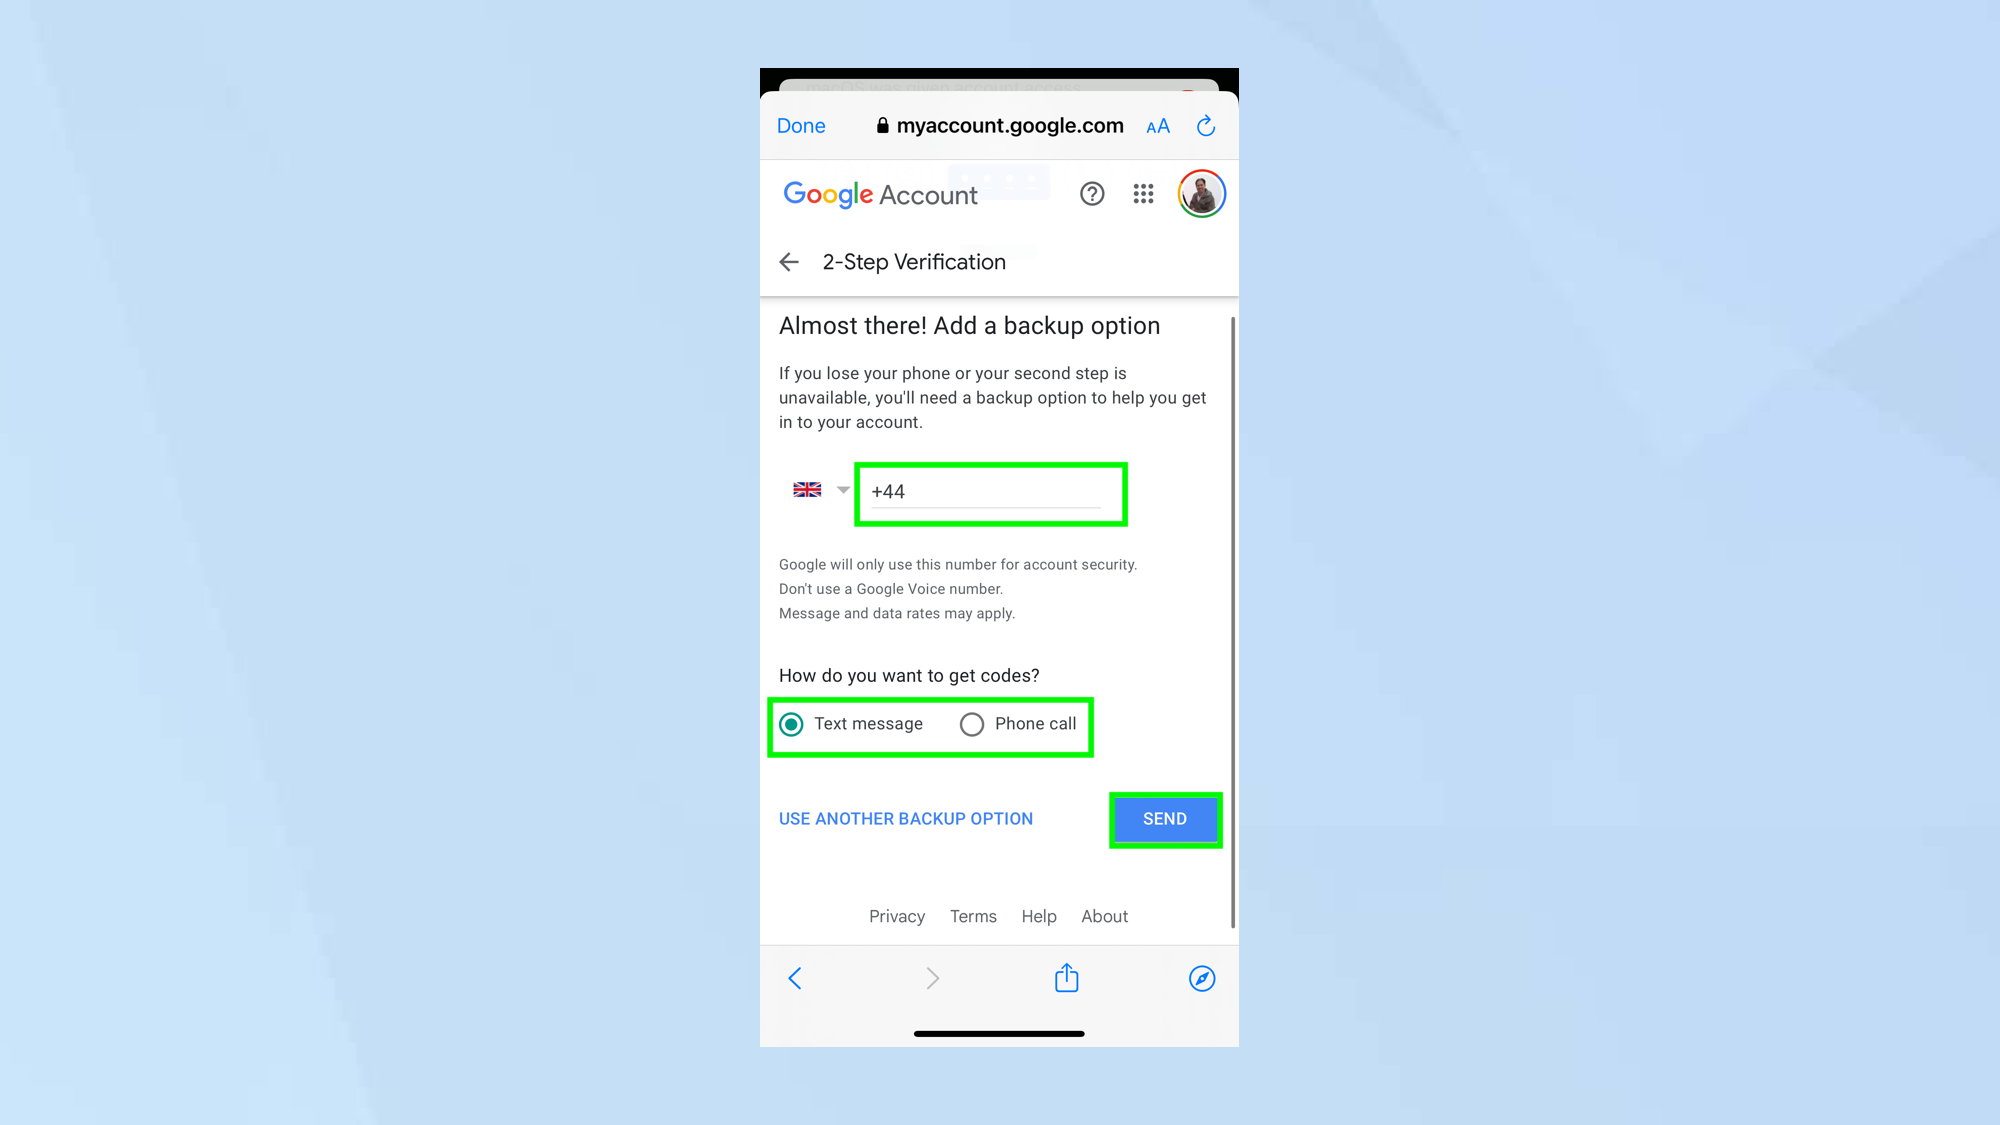
You will be asked to enter your mobile number. This will be used if the first method of 2-Step Verification fails. Choose whether you would prefer to receive a PIN by text or call: just tap Text message or tap Phone call. Then tap Send.
6. Enter the code
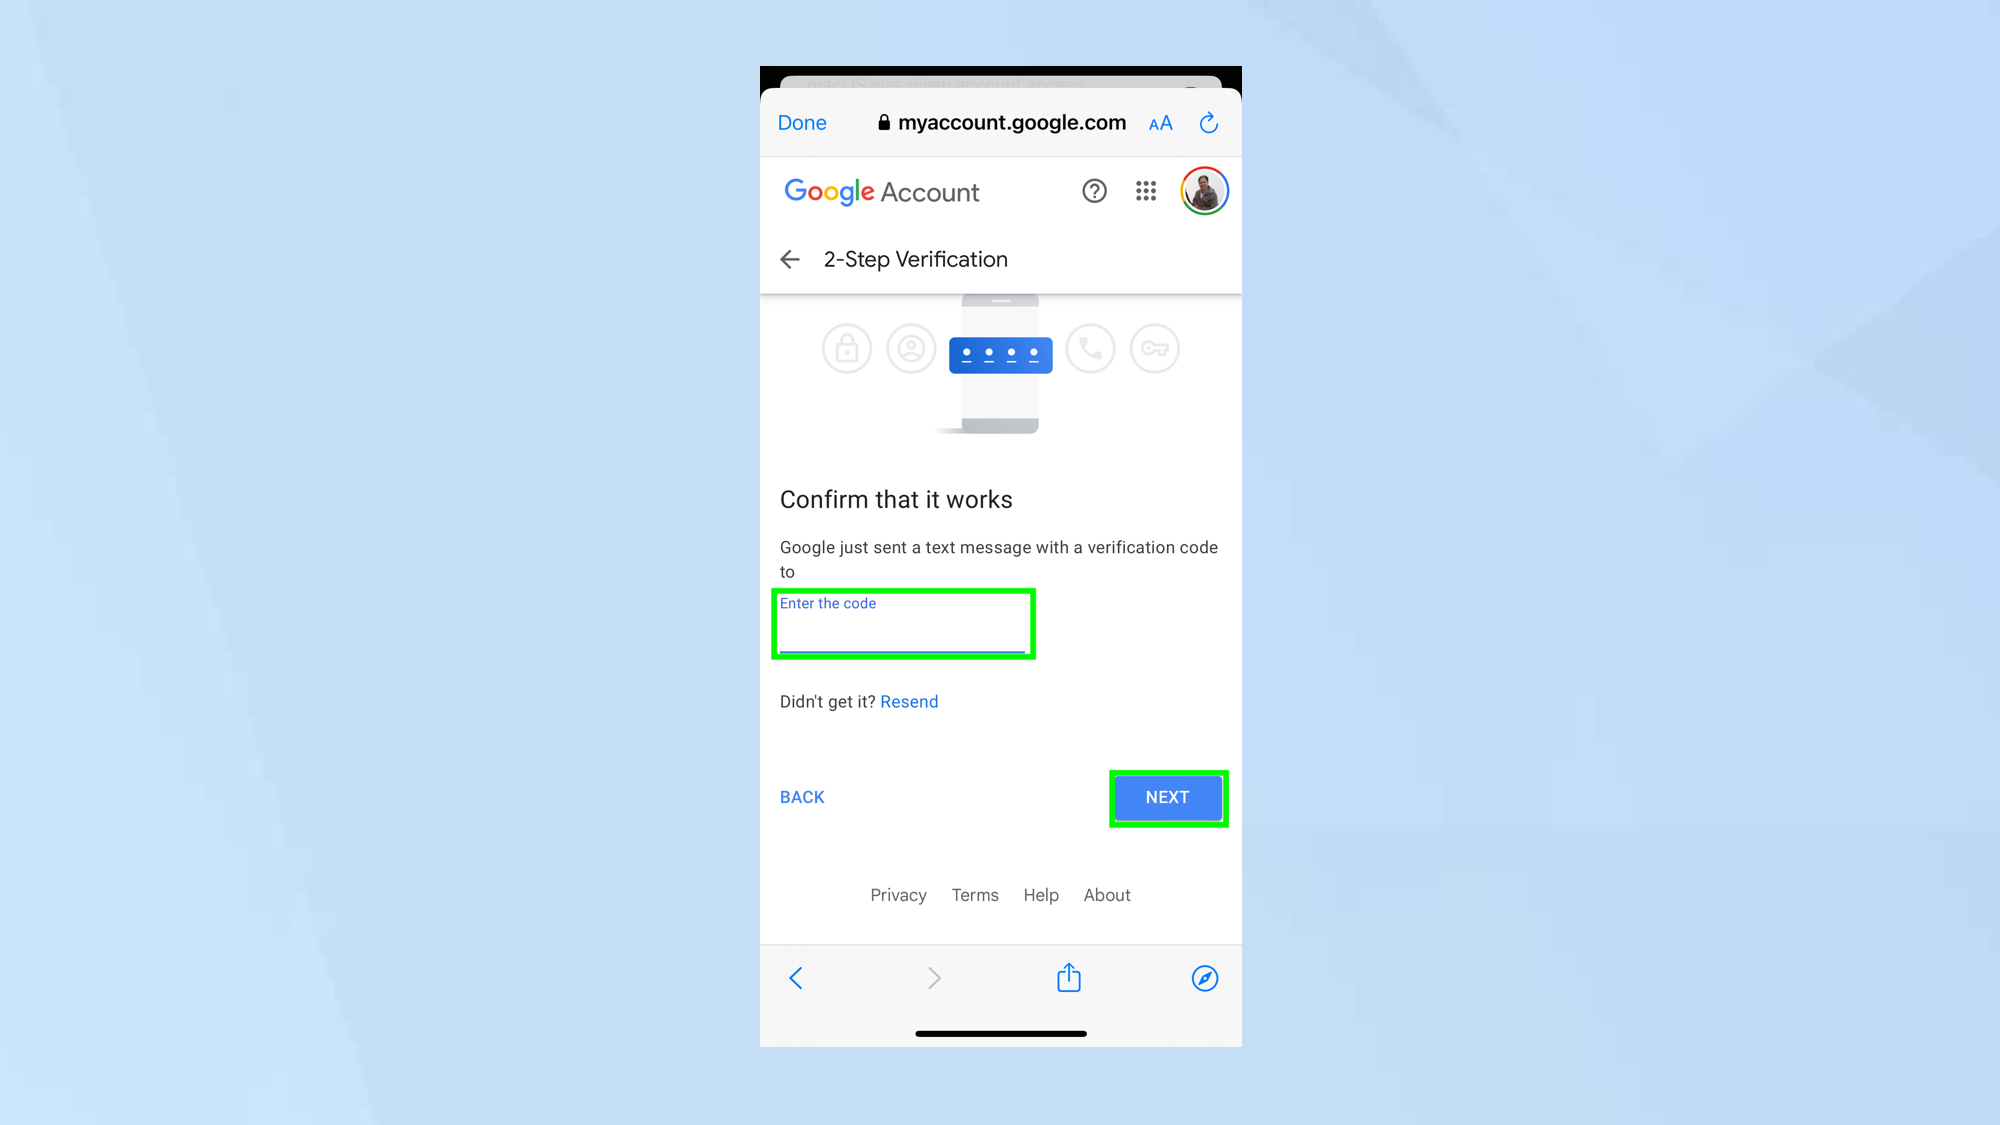
A one-time code will be sent to your device. Enter the code and tap Next.
7. Turn it on
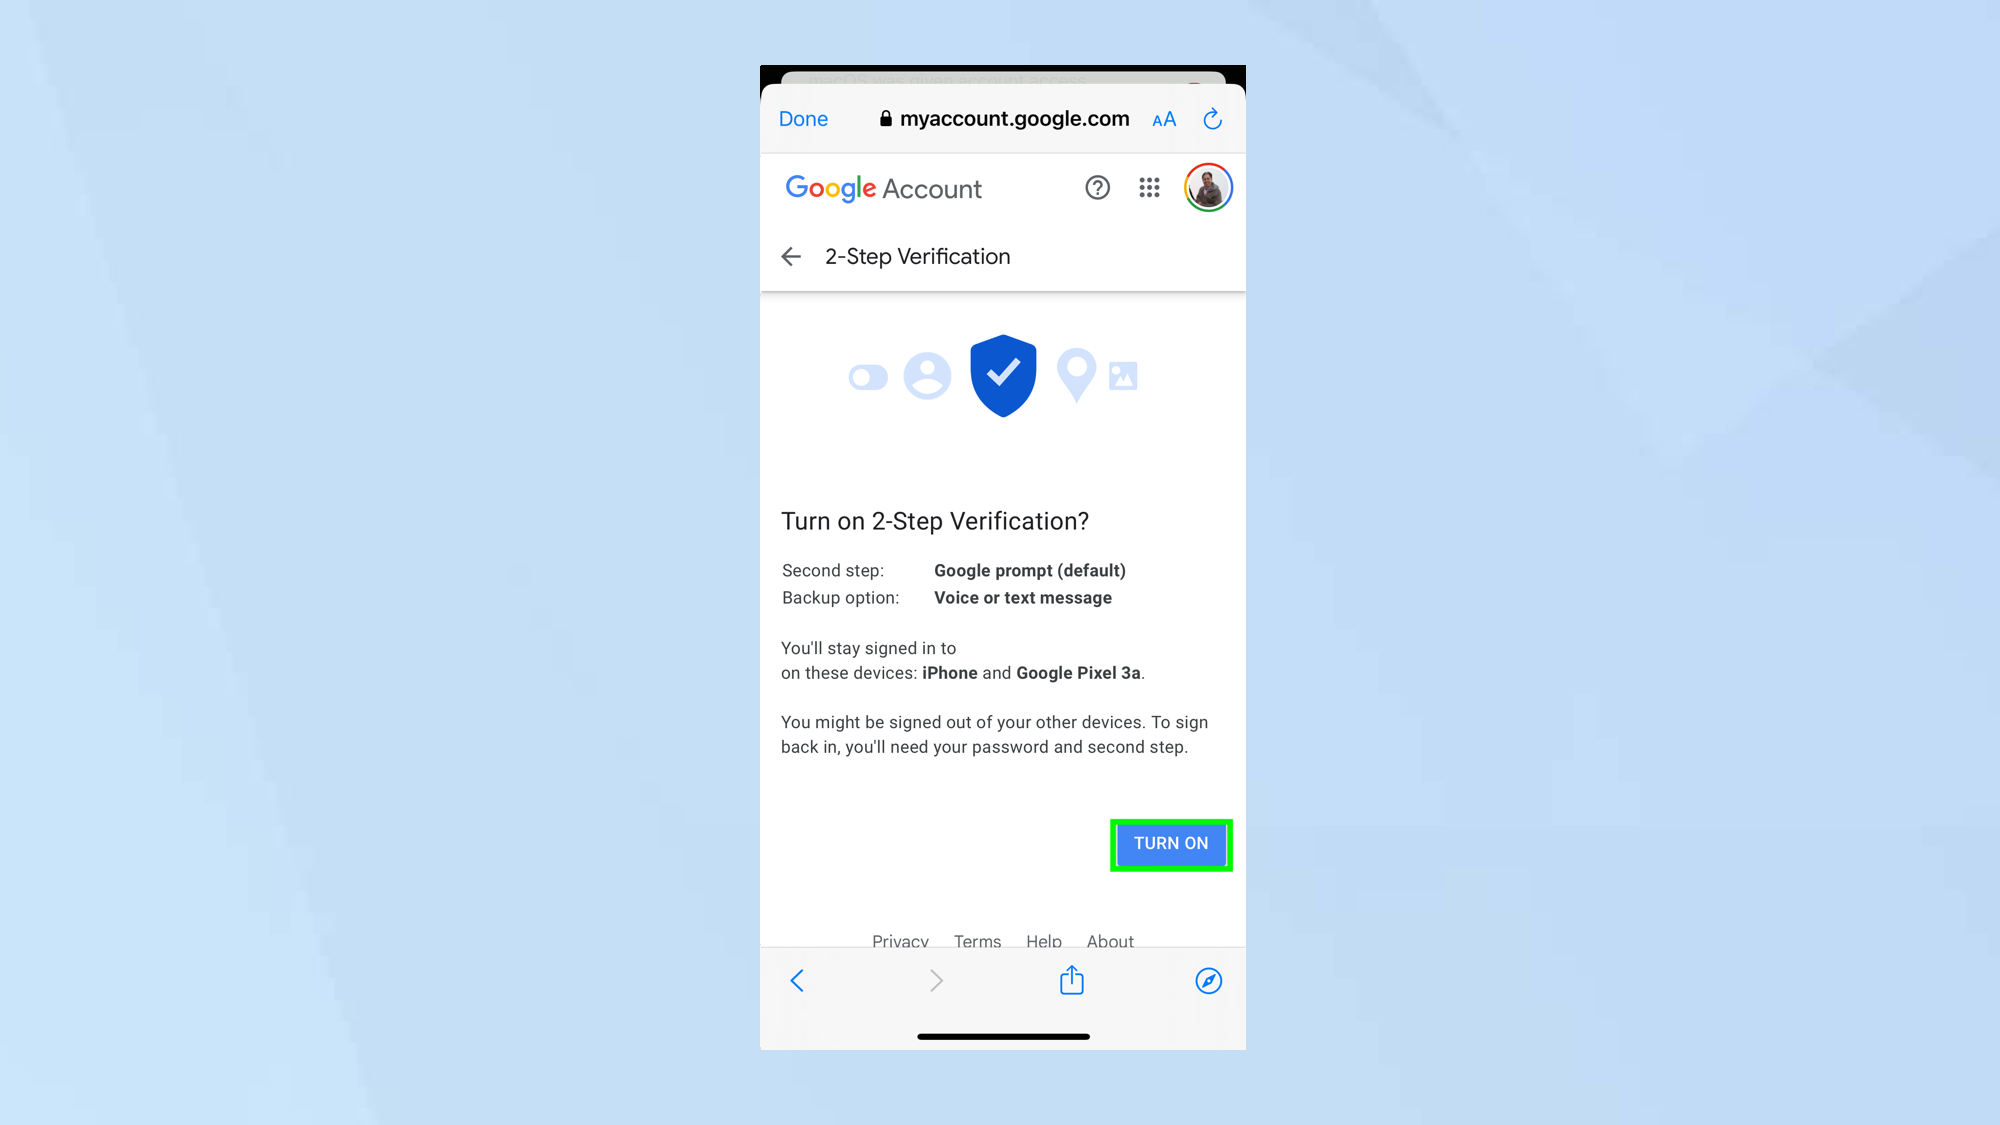
You have now set up 2-Step Verification and you can tap Turn on to activate the feature.
8. Use a security key
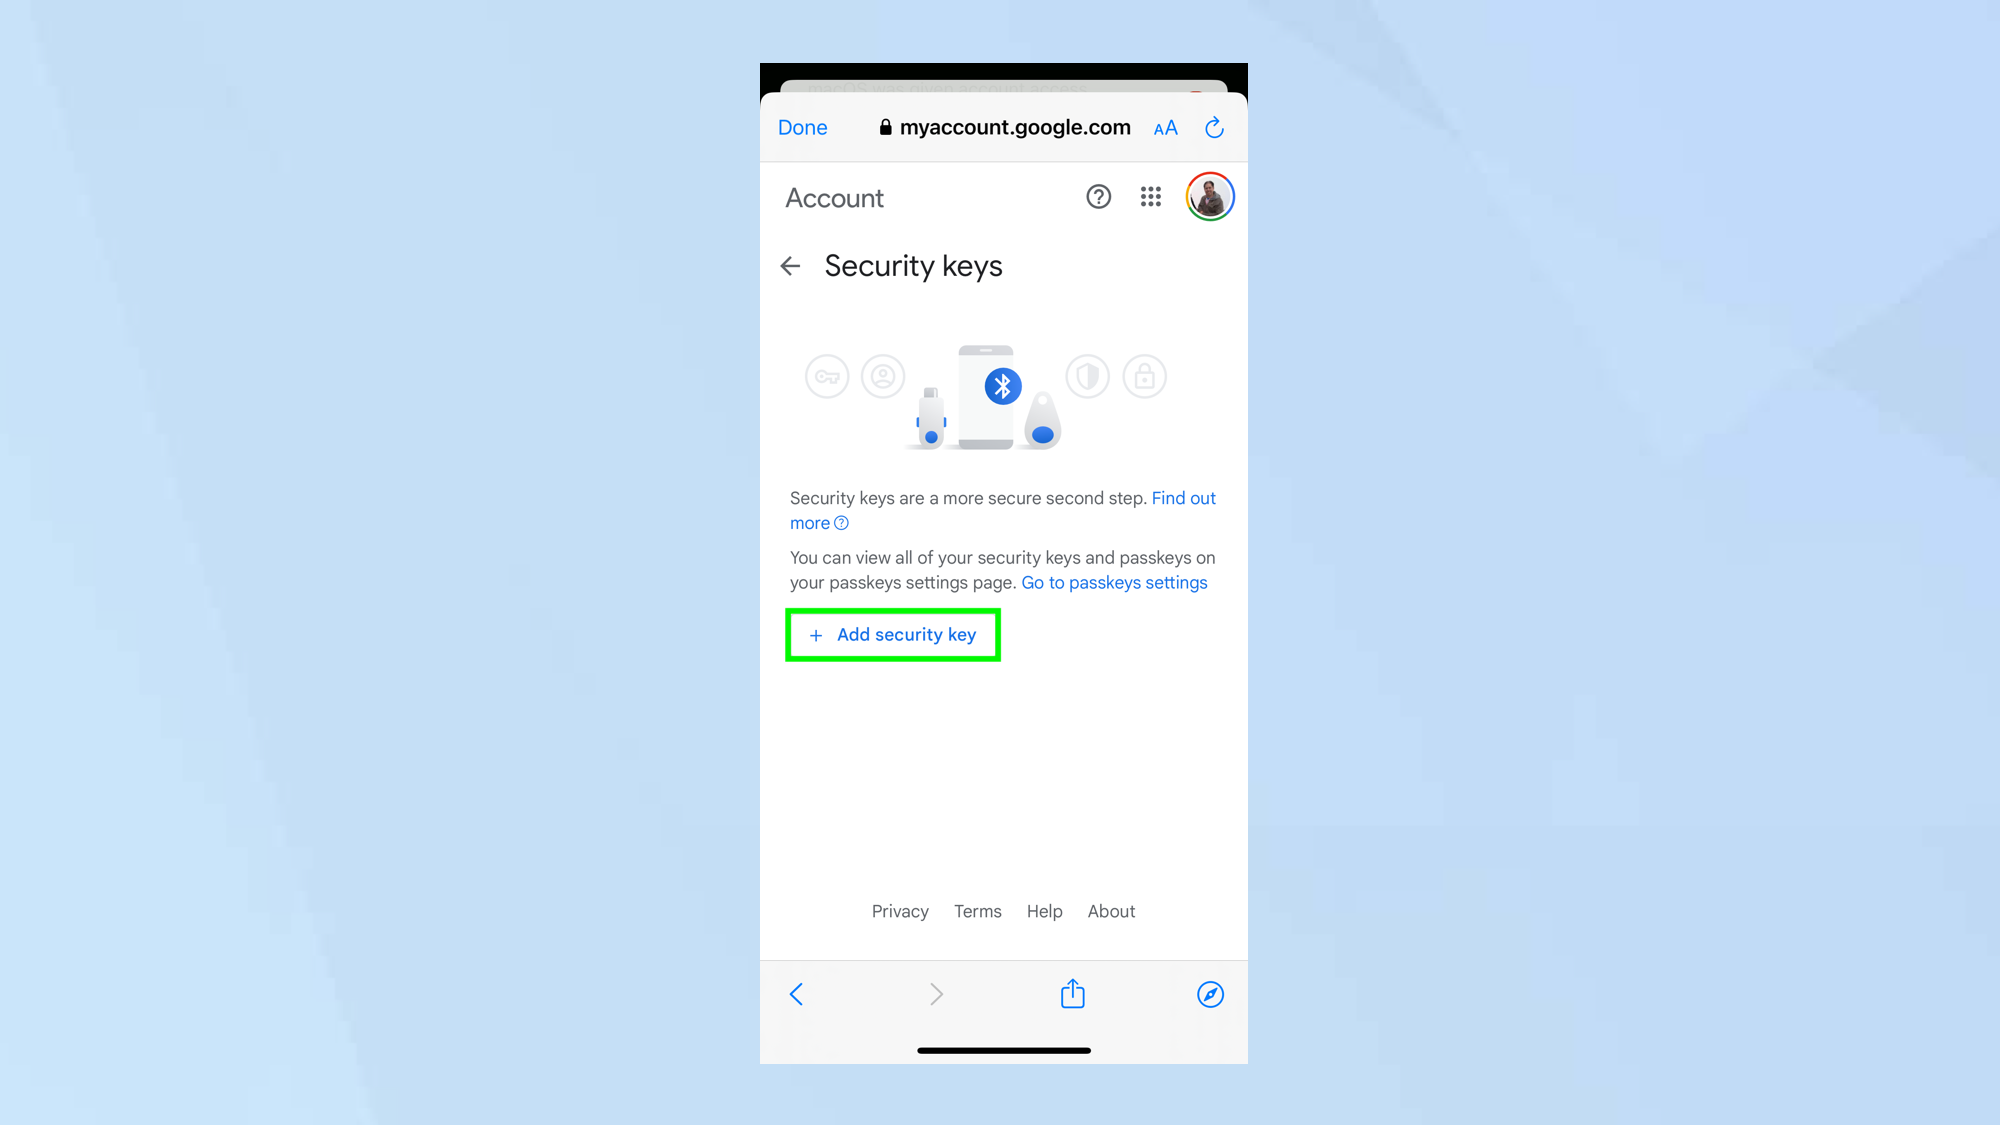
This option requires you to have a physical security key which is plugged into a computer’s USB port or has a button which you tap in the proximity of your smartphone. An encrypted handshake is communicated.
This will likely be the least used option but select Show more options and choose Add Security key. Click Next when ready.
Insert your security key into your computer to set it up. If it has a button, then be sure to tap the button.
Set up backup codes and Google Authenticator
You can also opt for two additional methods: a series of backup codes and the Google Authenticator app. We recommend setting up both.
1. Manage your Google Account

After setting up 2-Step Verification, open your Gmail app, select your profile image or initials in the top-right corner and tap Manage Your Google Account.
2. Select Security
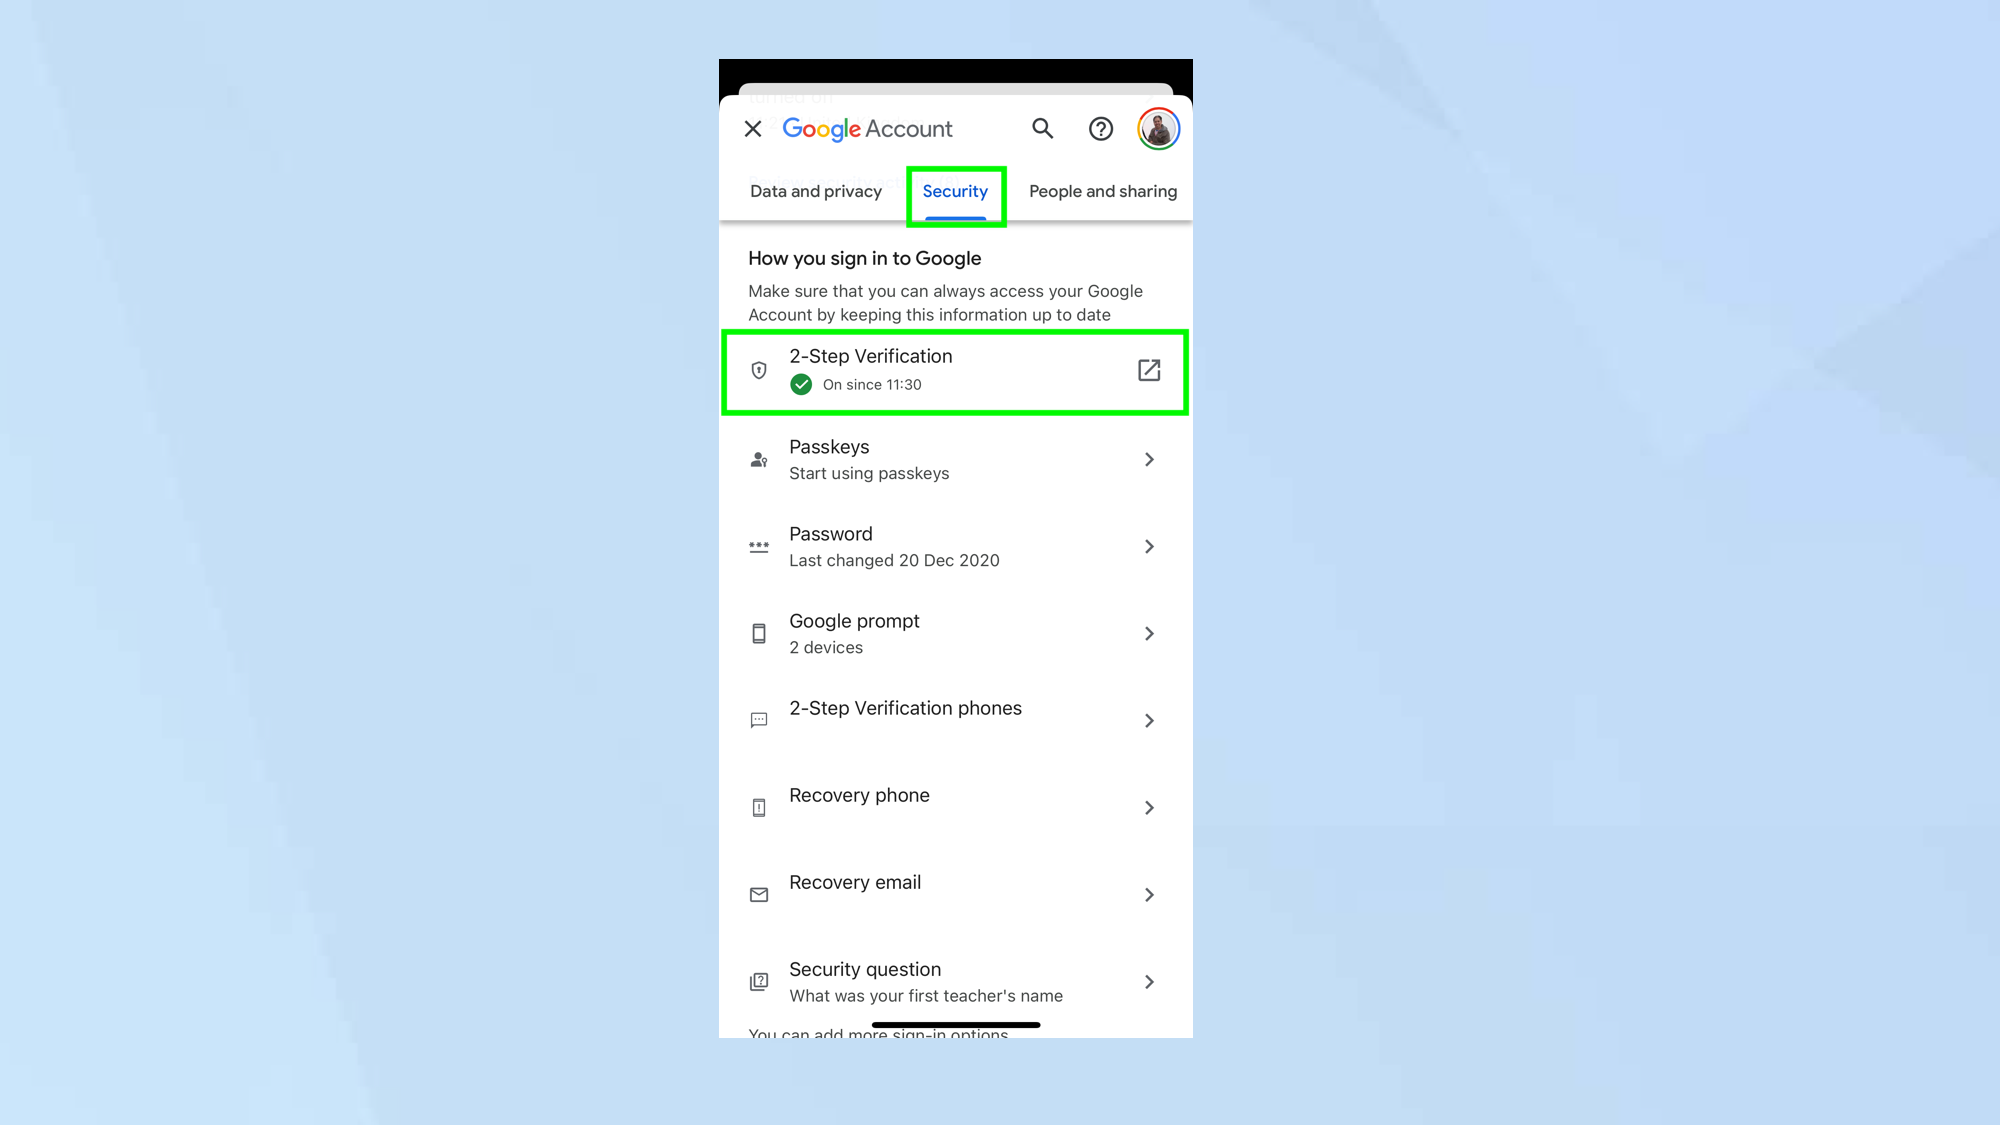
Now select the Security tab and scroll down to How you sign-in to Google, then tap 2-Step Verification. You may be prompted to sign in.
3. Select backup codes
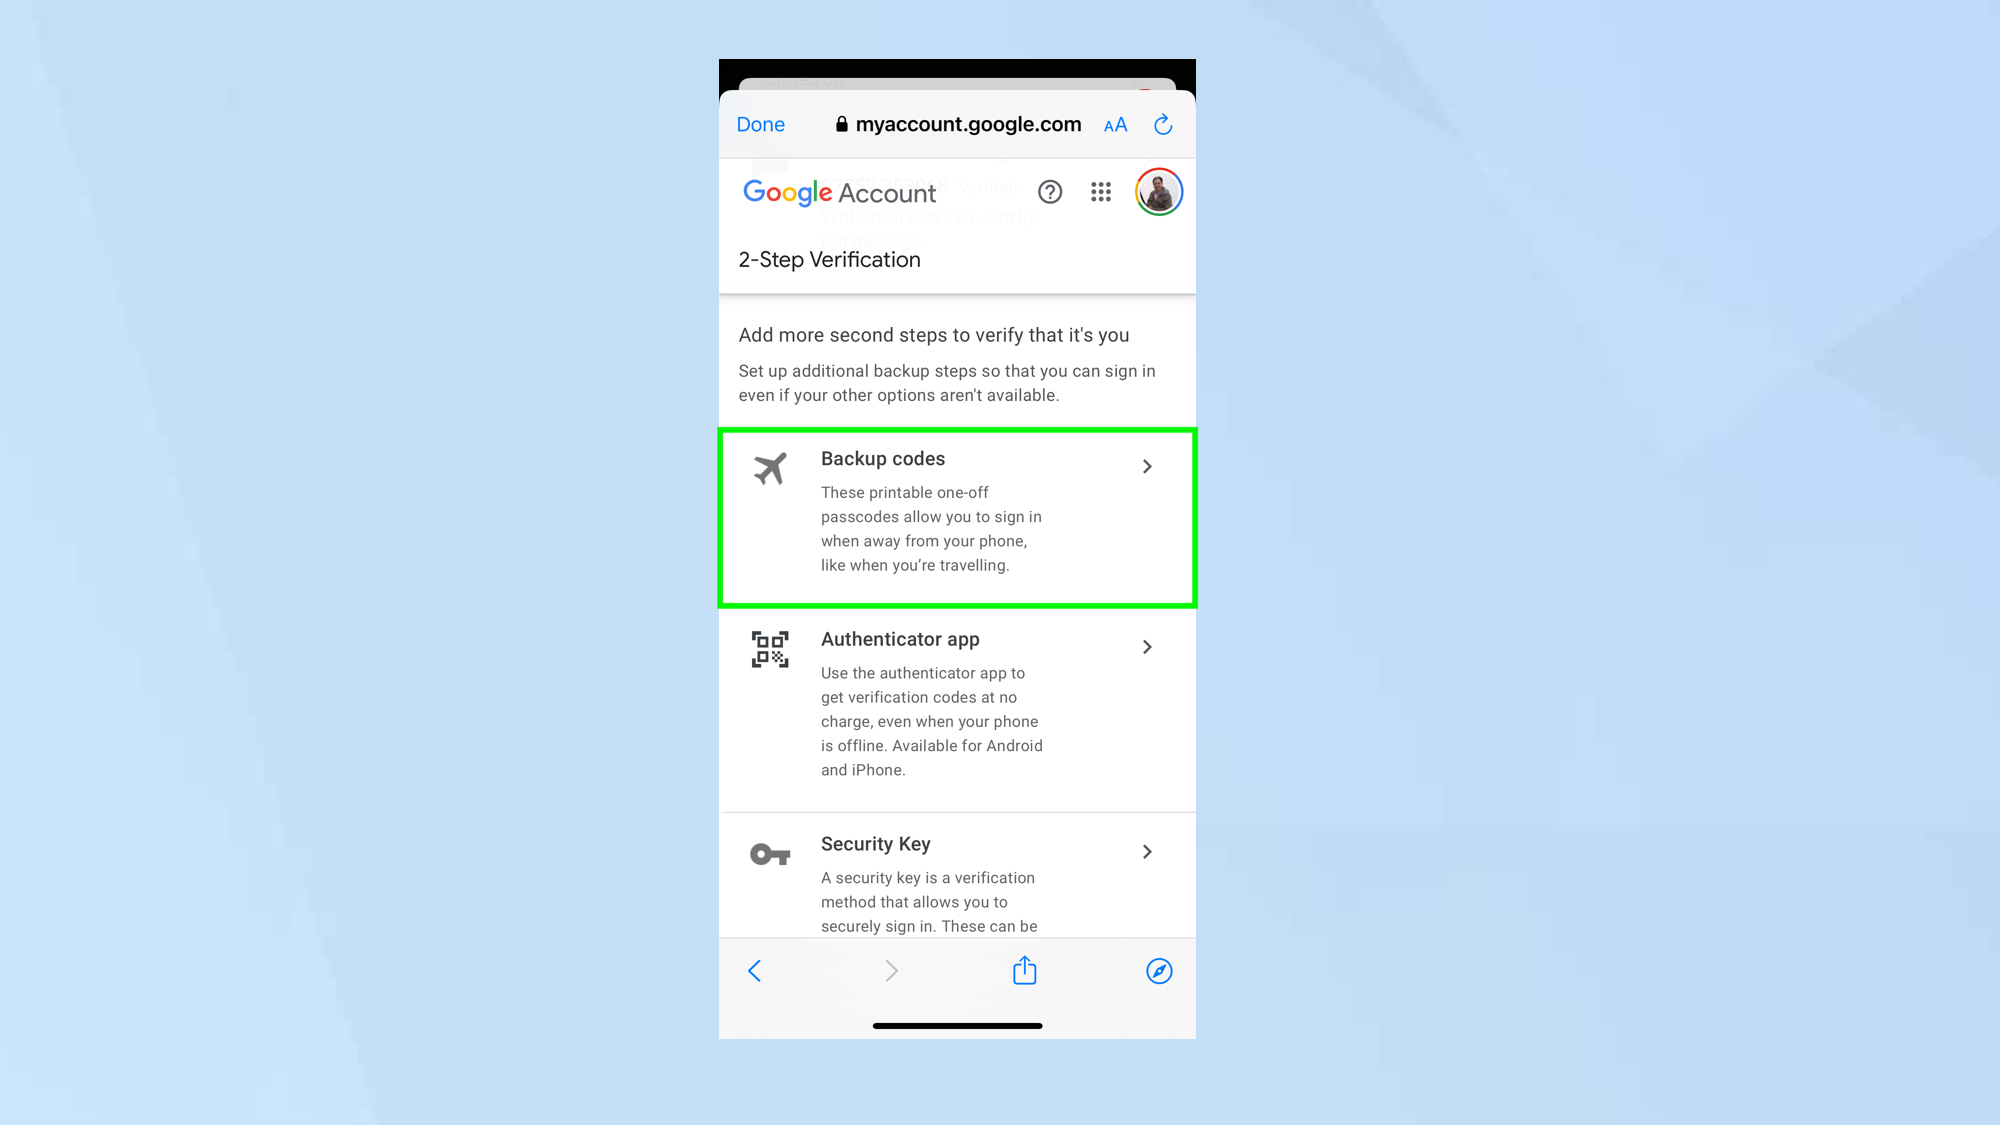
Scroll down the screen and tap Backup codes. The idea is that you will be provided with 10 backup codes that you can each use once to login to your Gmail account in case your phone is out-of-reach.
4. Tap Get backup codes
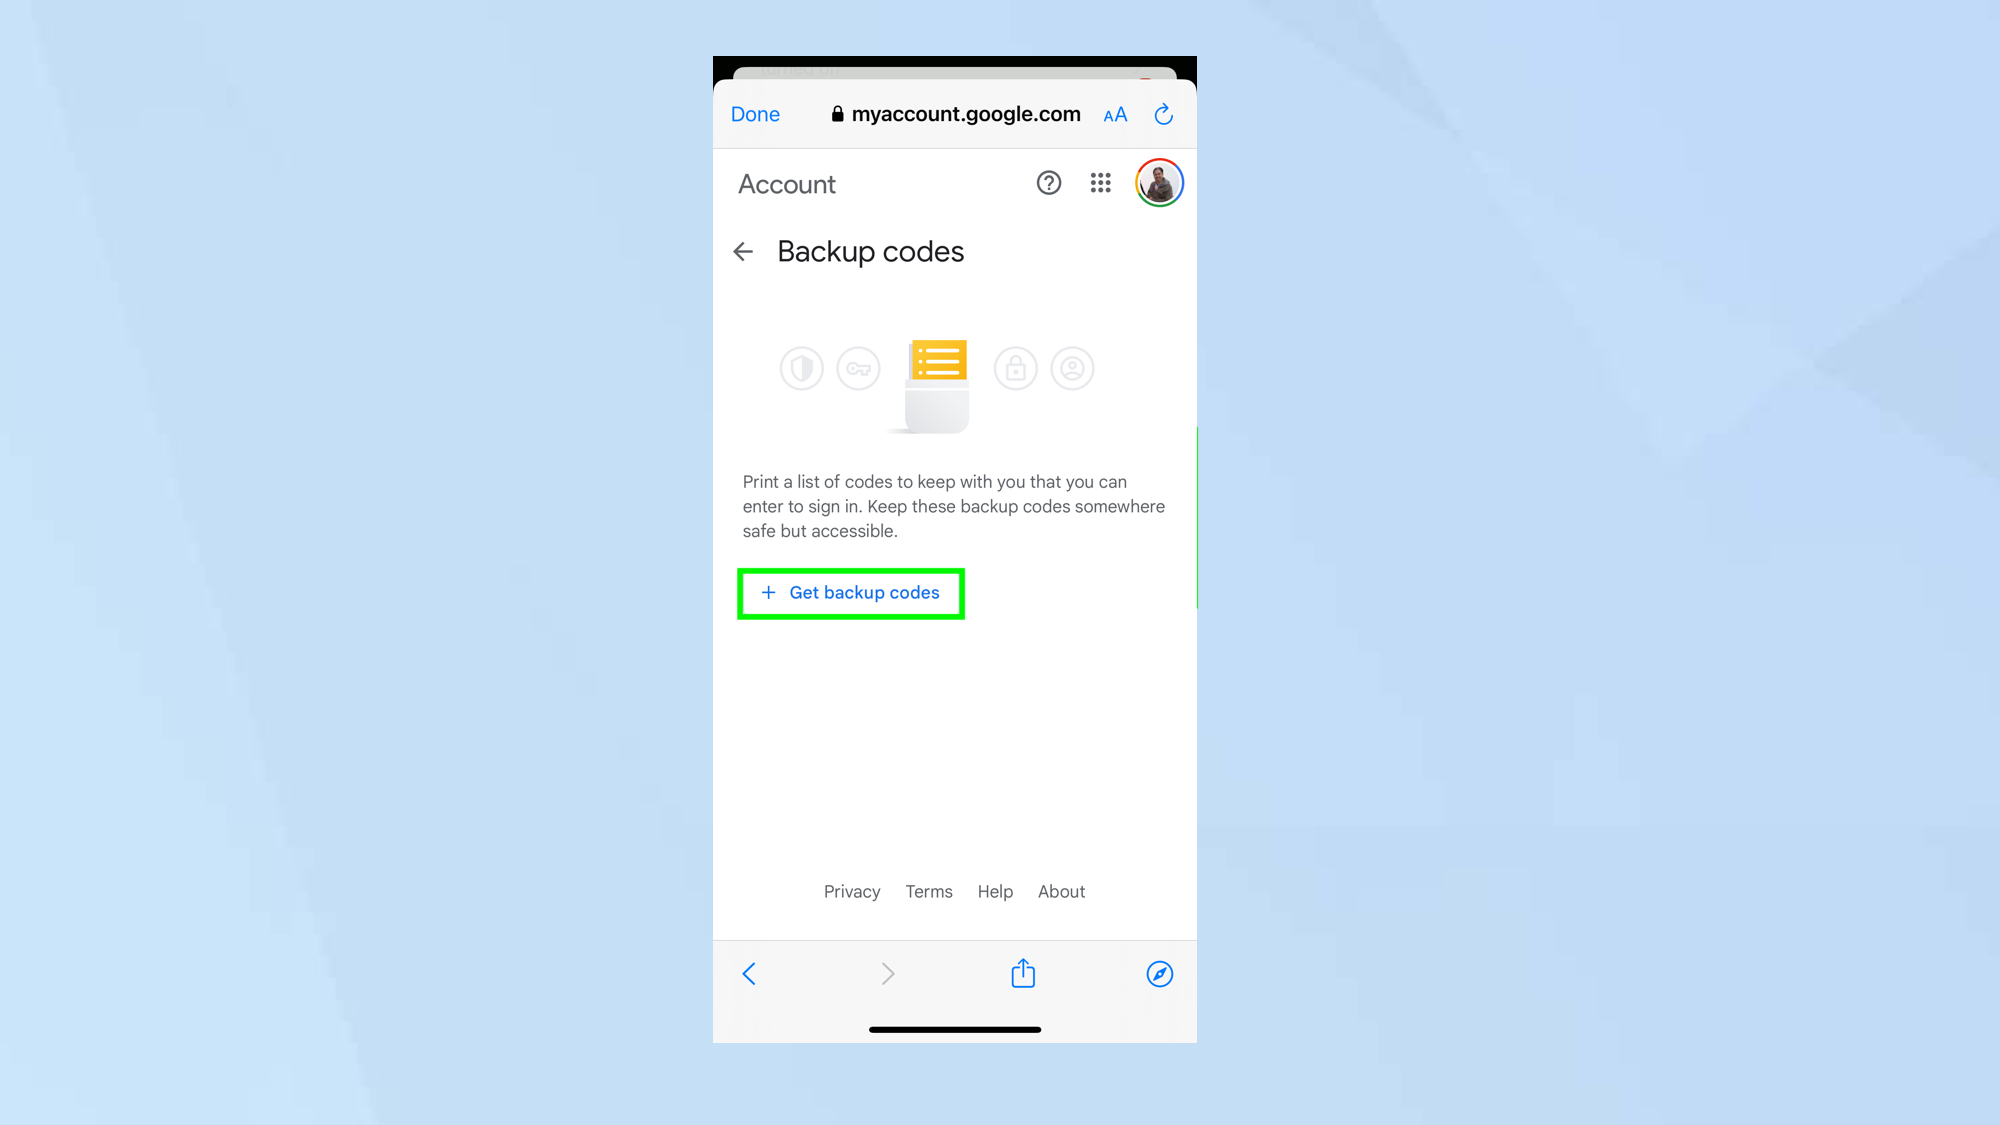
When you tap Get backup codes, the list will be generated. Write down or print the backup codes and store them in a safe and accessible place.
5. Use Google Authenticator
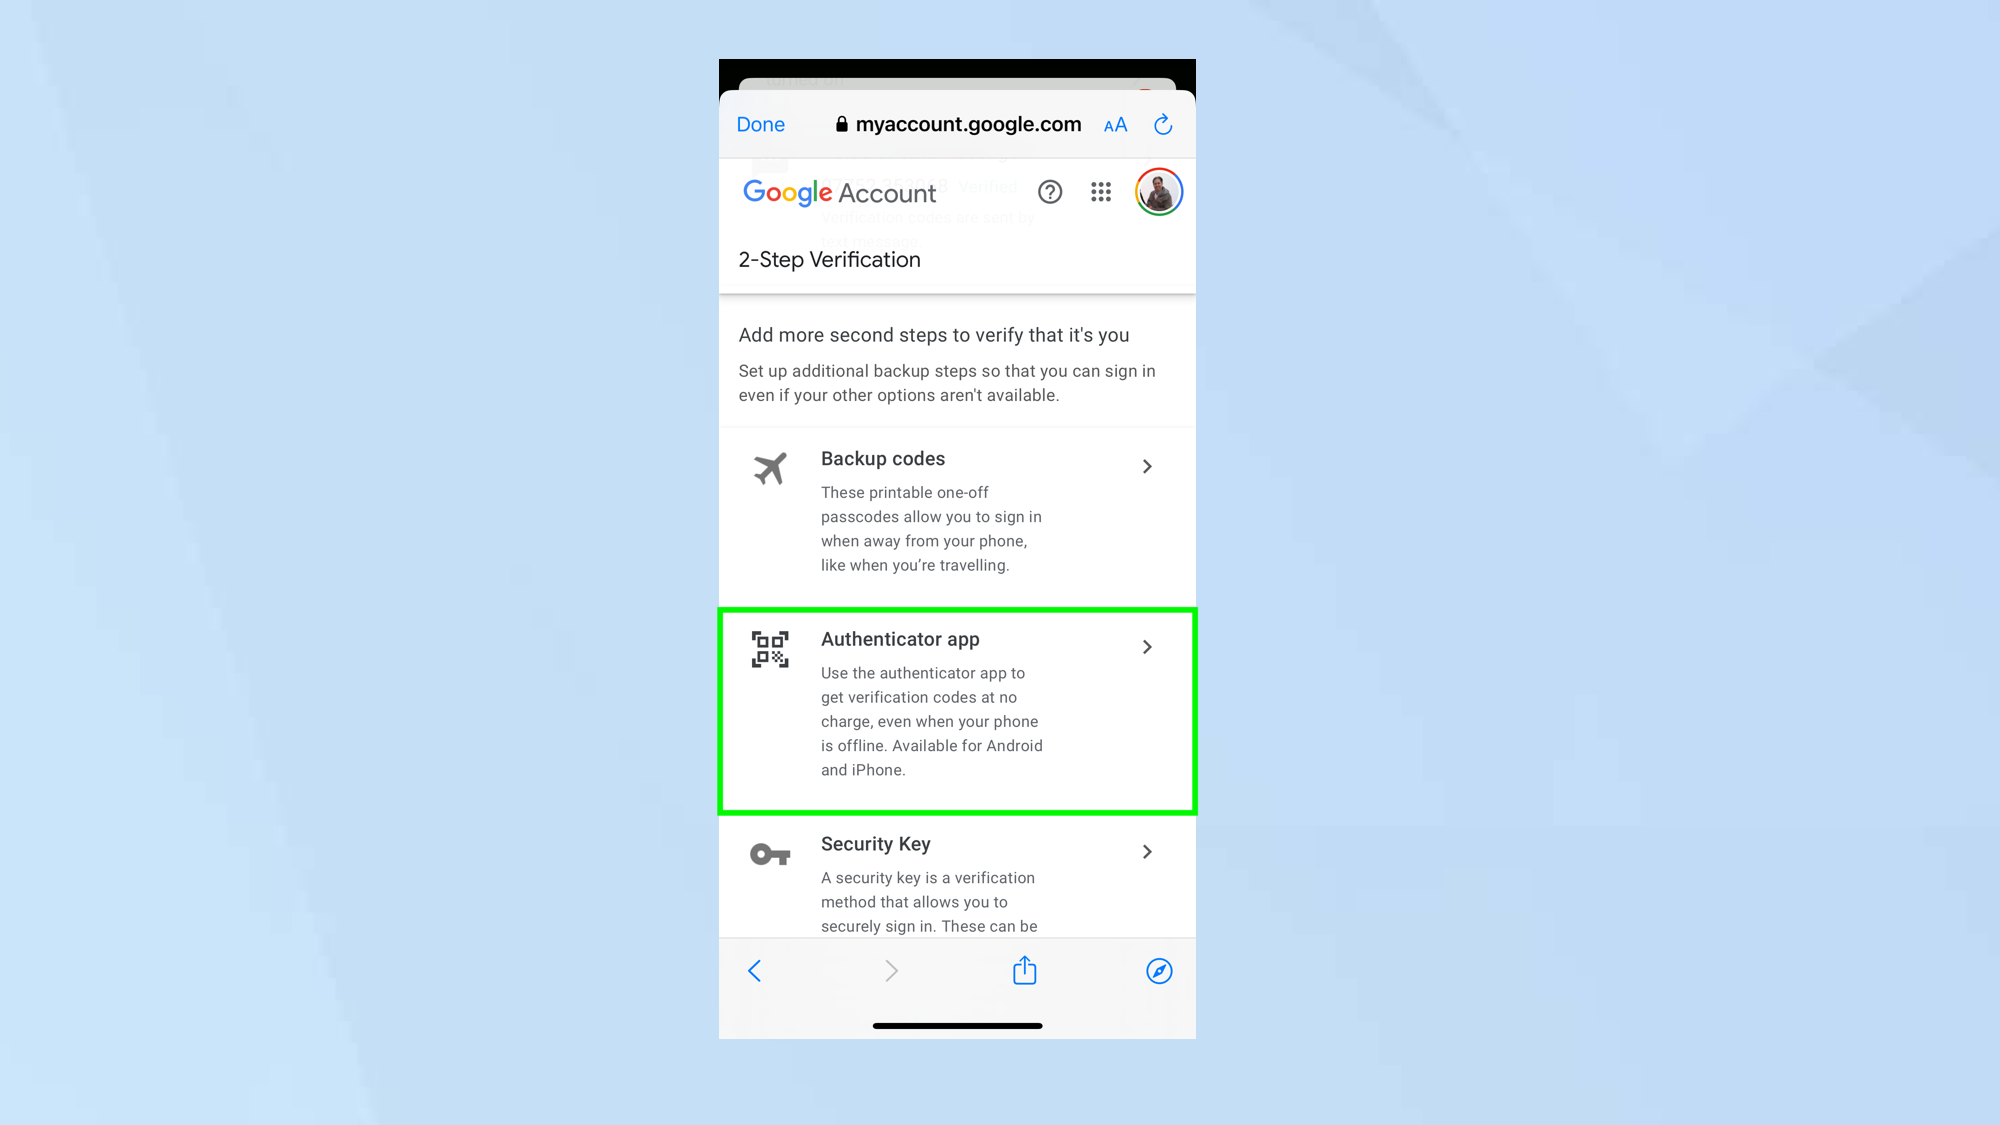
You can also use the Google Authenticator app to generate 2FA verification codes. This will work when your phone is offline, but it's one of the best ways to do 2FA overall and is safer than getting codes texted to you. Choose Authenticator app.
6. Set up authenticator
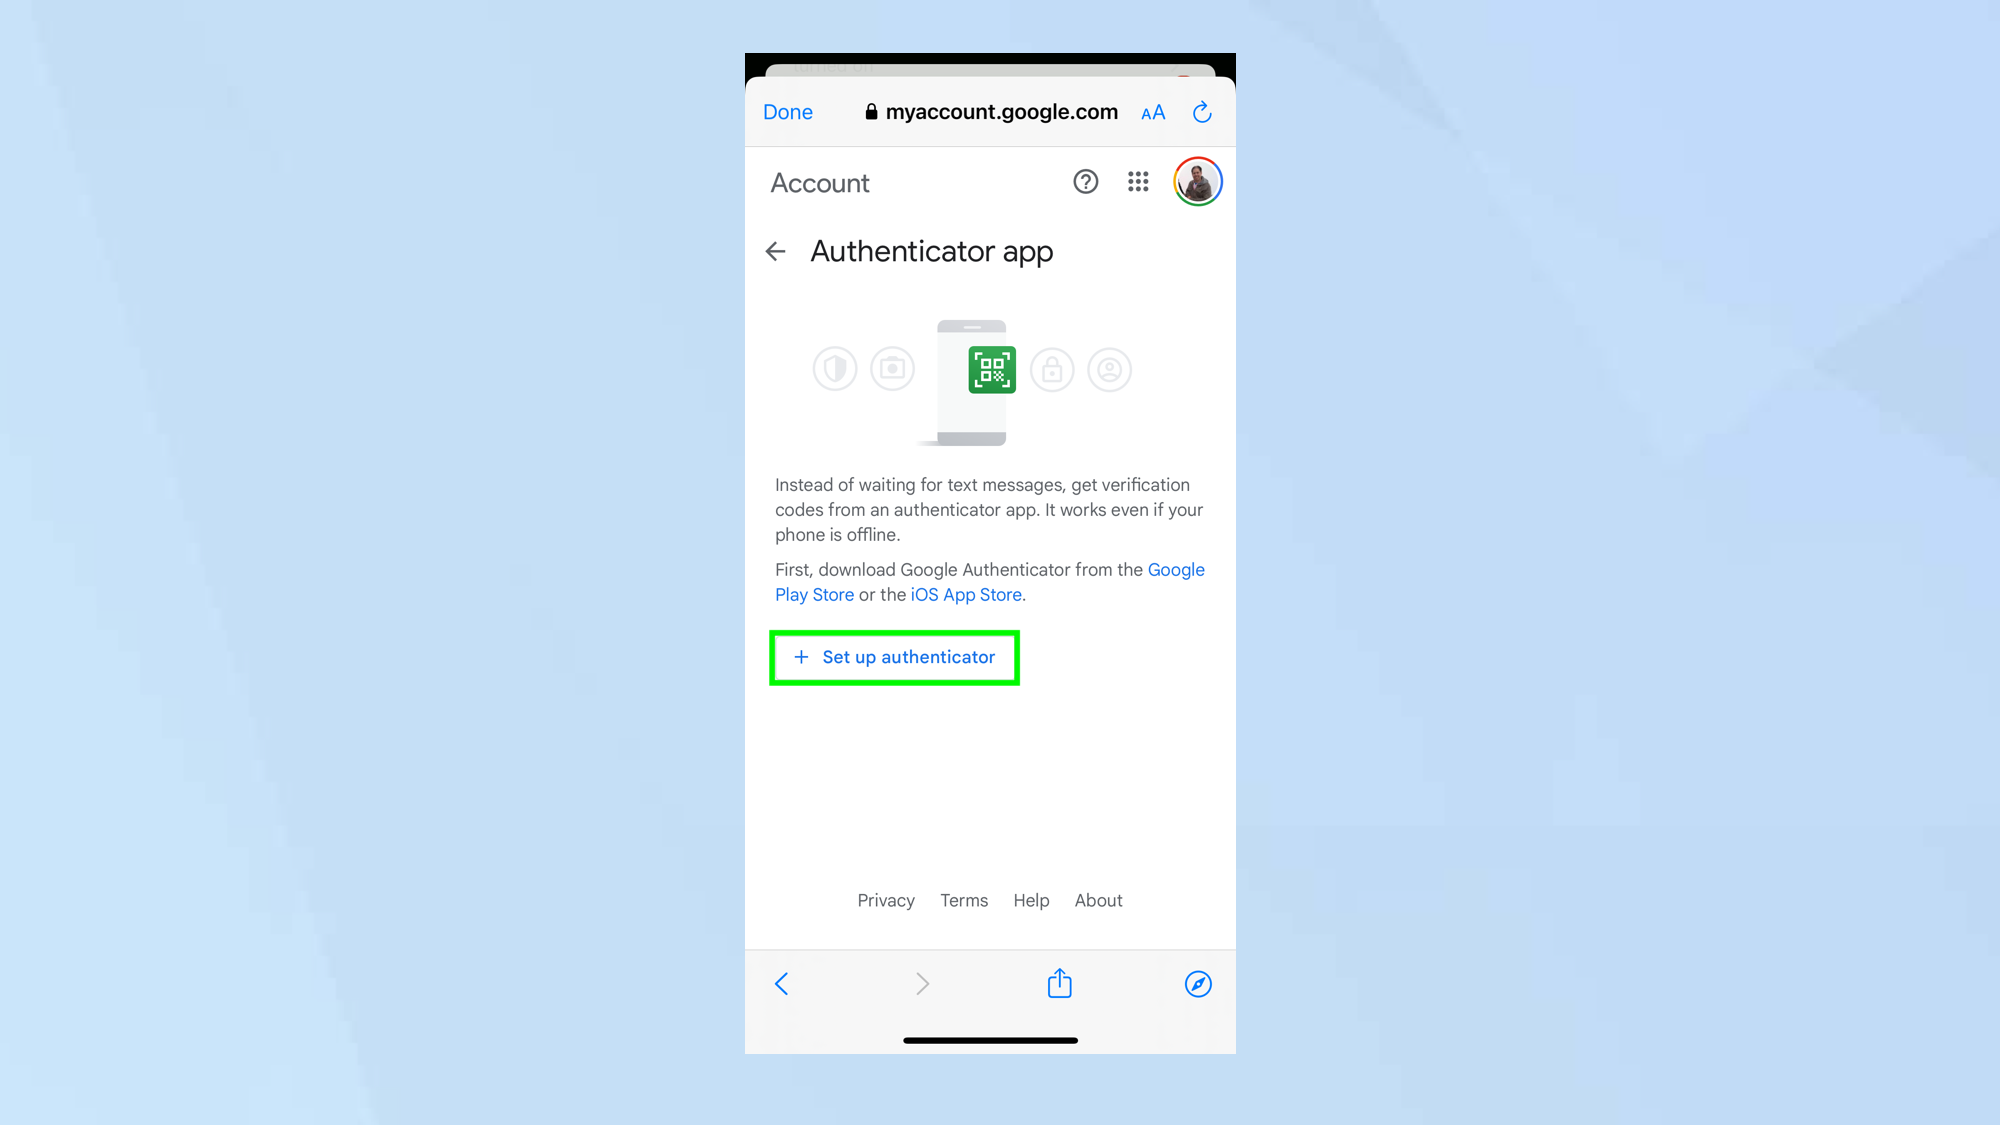
Next, tap Set up authenticator. You will need to download and install the Google Authenticator app.
7. Launch Authenticator
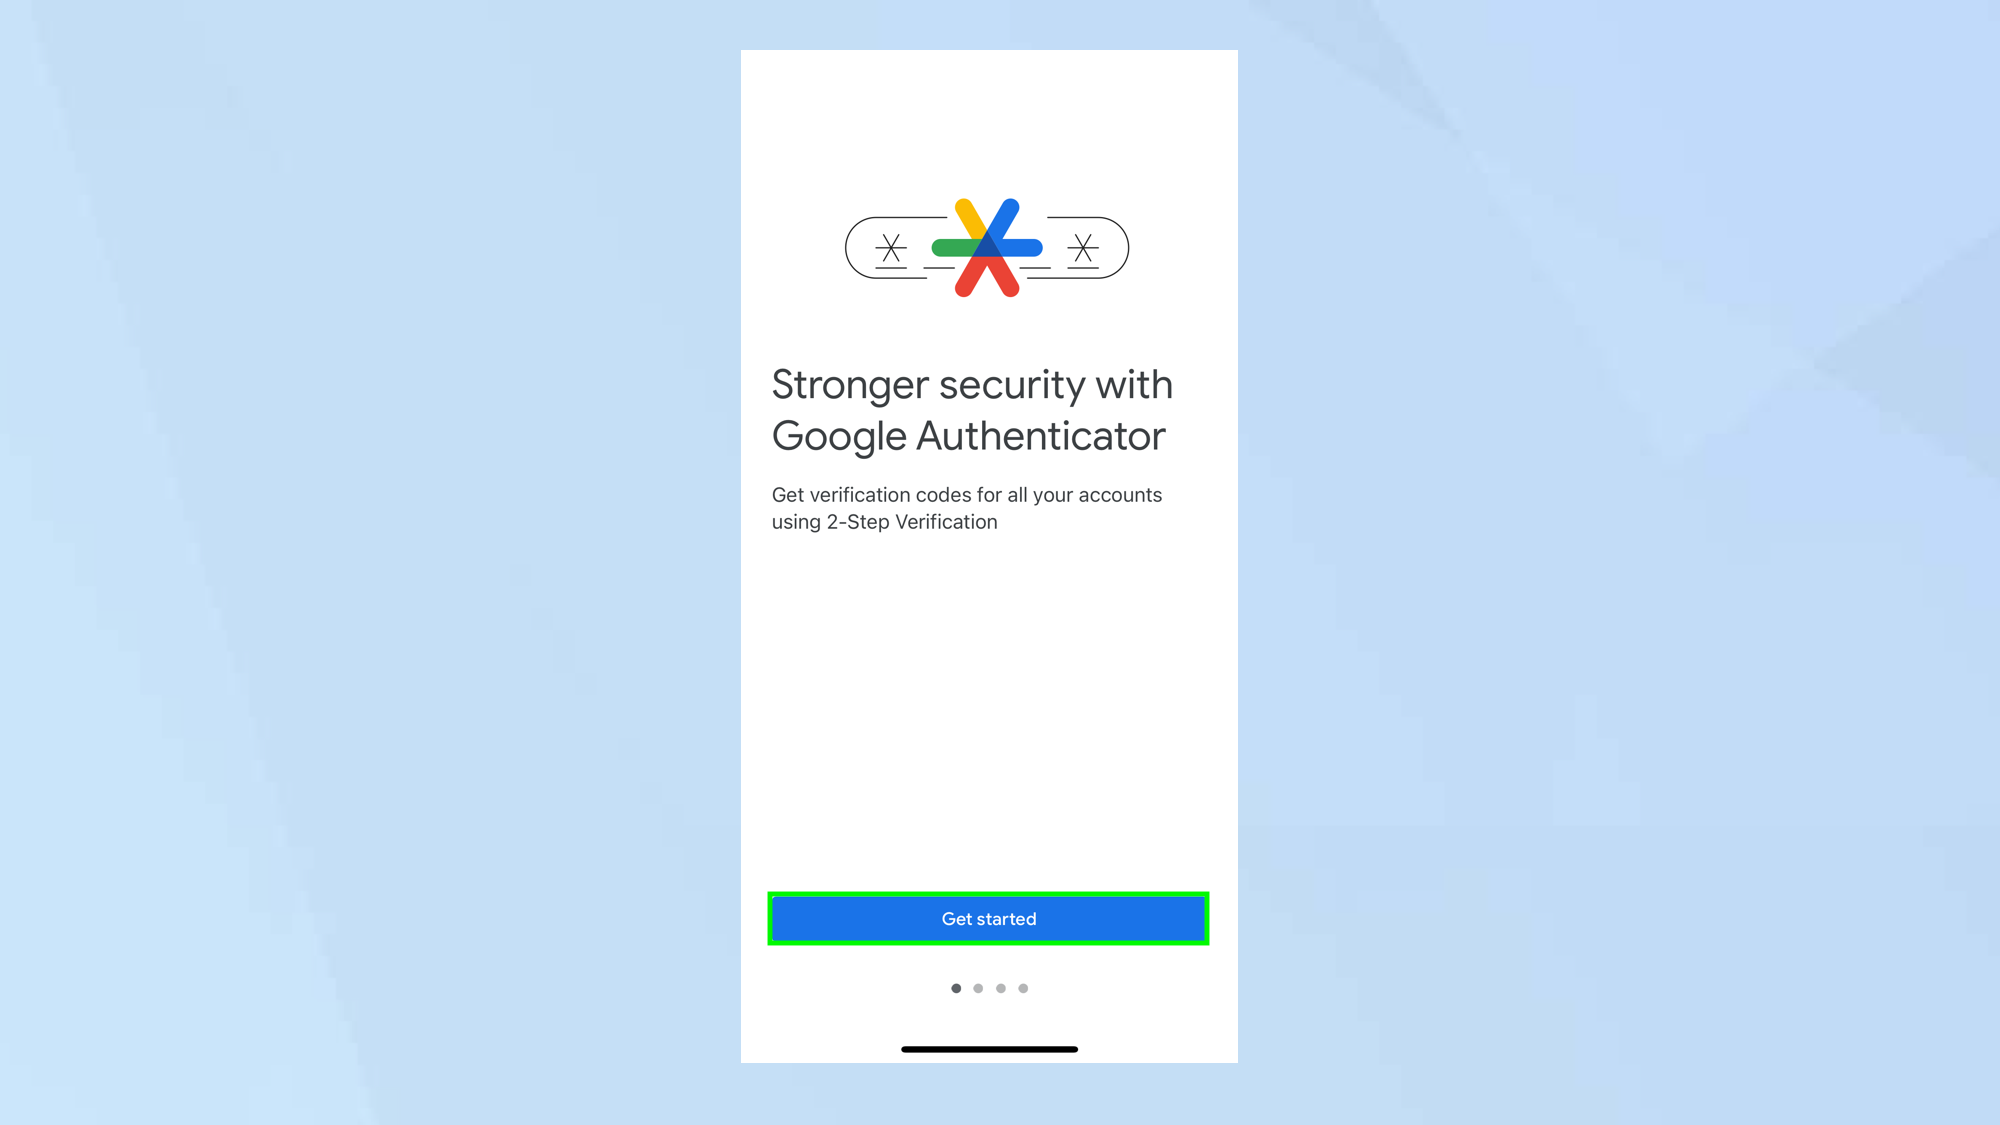
Open the Authenticator app and tap Get Started.
8. Sign in
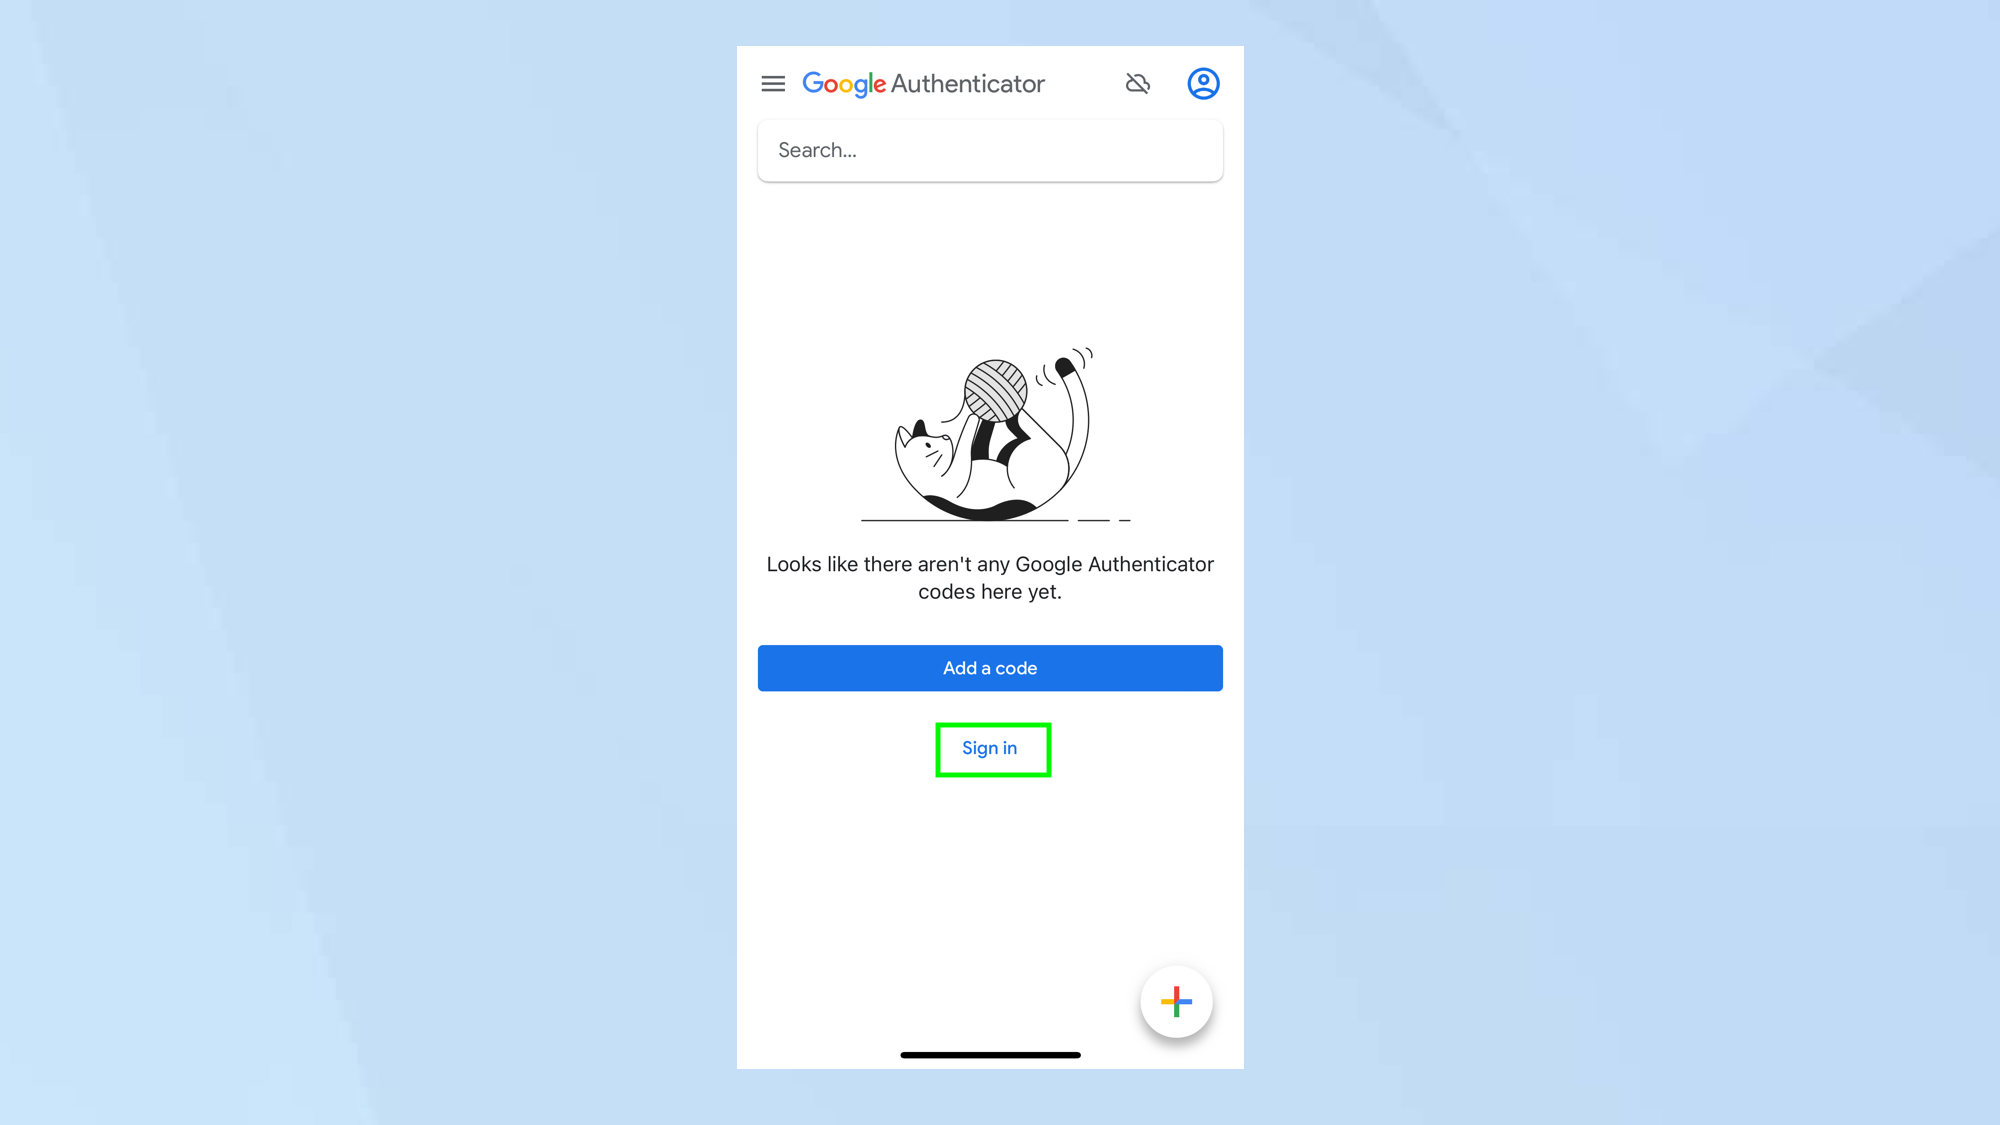
Next, tap sign in and choose your Gmail account (or tap Add another account if the suggested one isn’t correct). Tap Allow to permit the saving of codes to that account.
9. Add a code
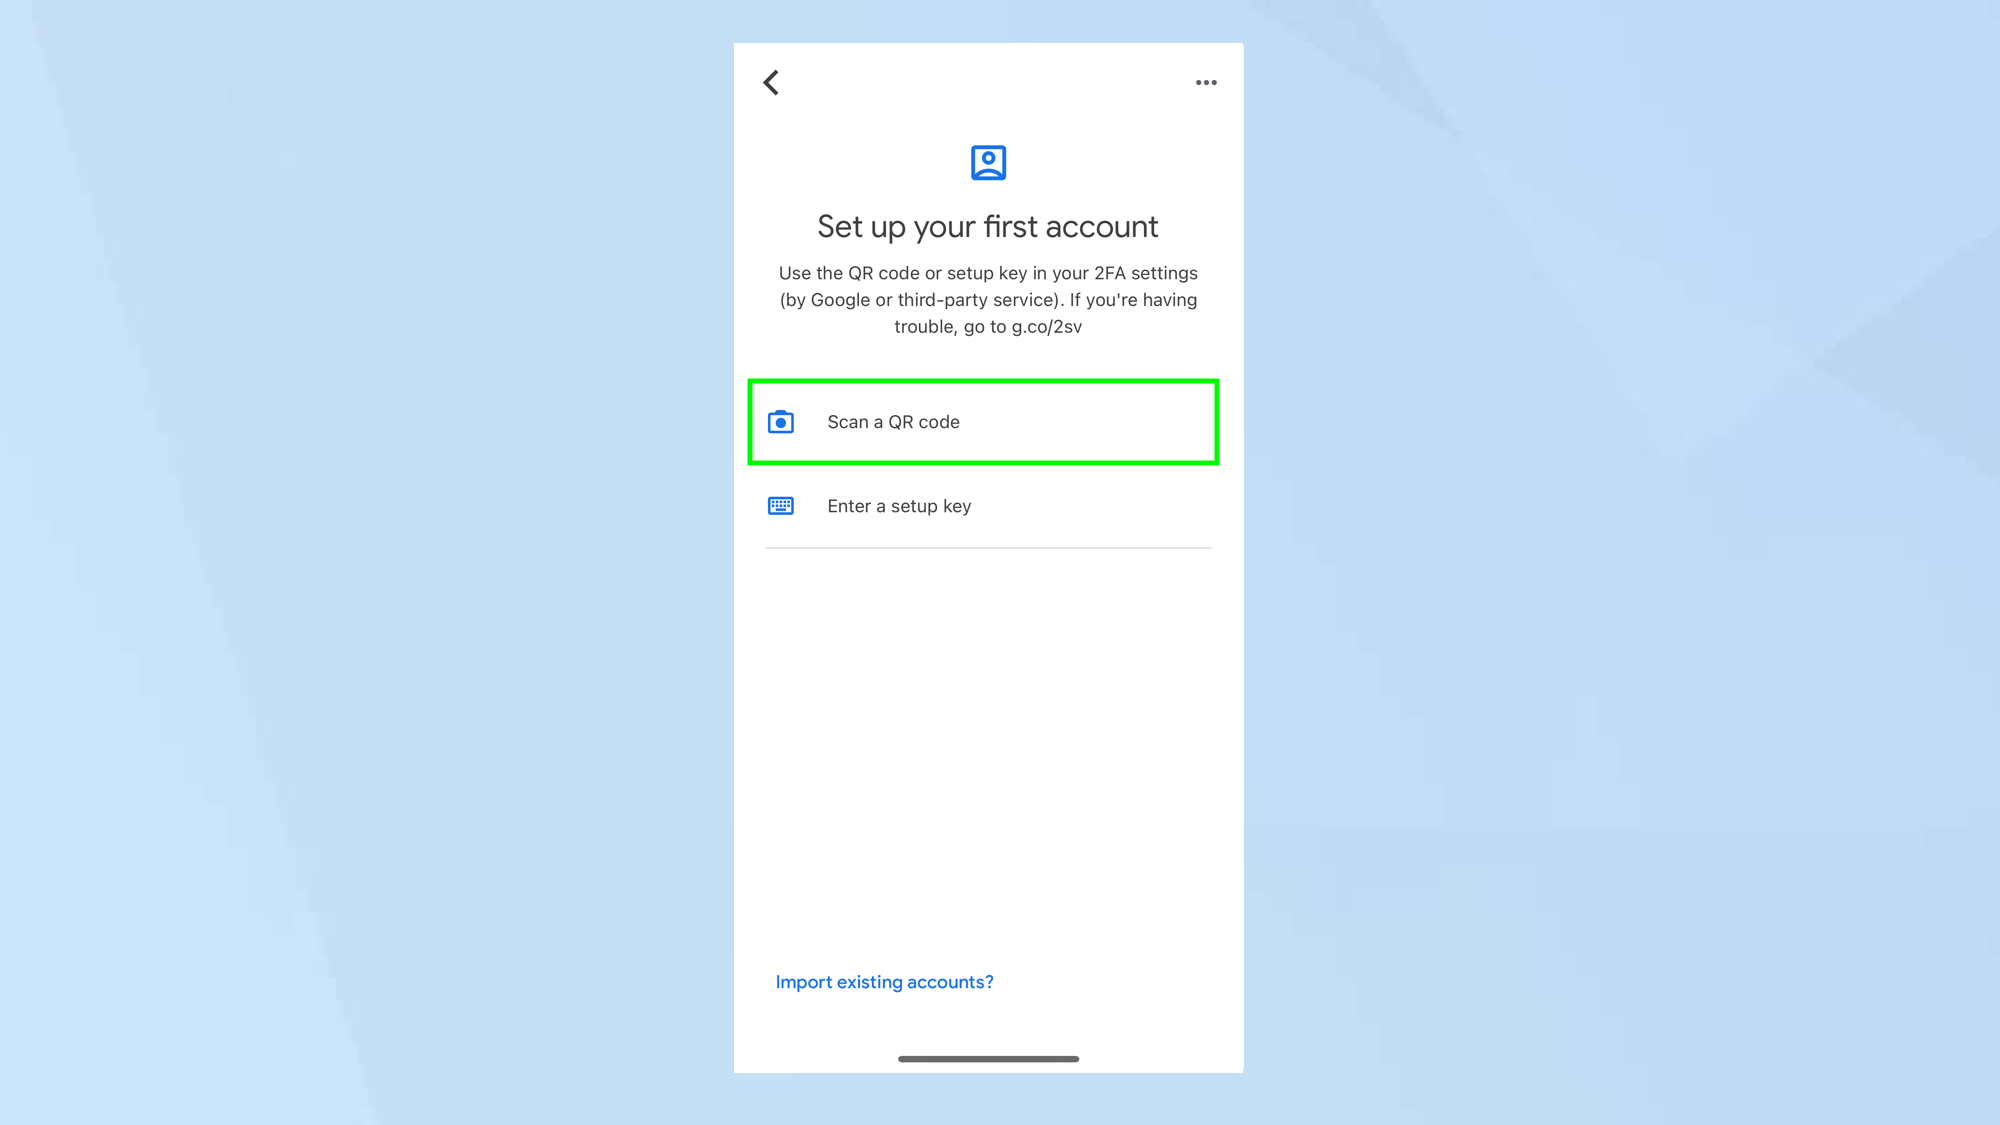
Now when you need a verification code, tap Add a Code or tap + and select Scan a QR code. A six digit code will be created which you can use to sign in to your Gmail account.
And there you go. You now know how to set up Gmail two-factor authentication. Since you know what you're doing with 2FA now, you might also want to know how to set up two-factor authentication on Facebook,how to enable two-factor authentication (2FA) for Ring cameras, how to enable 2FA on the Epic Games Store and how to enable Epic Games two-factor authentication on Fortnite. Find many other guides in our Gmail hub too.
Sign up to get the BEST of Tom's Guide direct to your inbox.
Get instant access to breaking news, the hottest reviews, great deals and helpful tips.

David Crookes is a freelance writer, reporter, editor and author. He has written for technology and gaming magazines including Retro Gamer, Web User, Micro Mart, MagPi, Android, iCreate, Total PC Gaming, T3 and Macworld. He has also covered crime, history, politics, education, health, sport, film, music and more, and been a producer for BBC Radio 5 Live.
