New iPhone 15 or 15 Plus? 11 features to try first
Get the most out of your iPhone 15 straight away
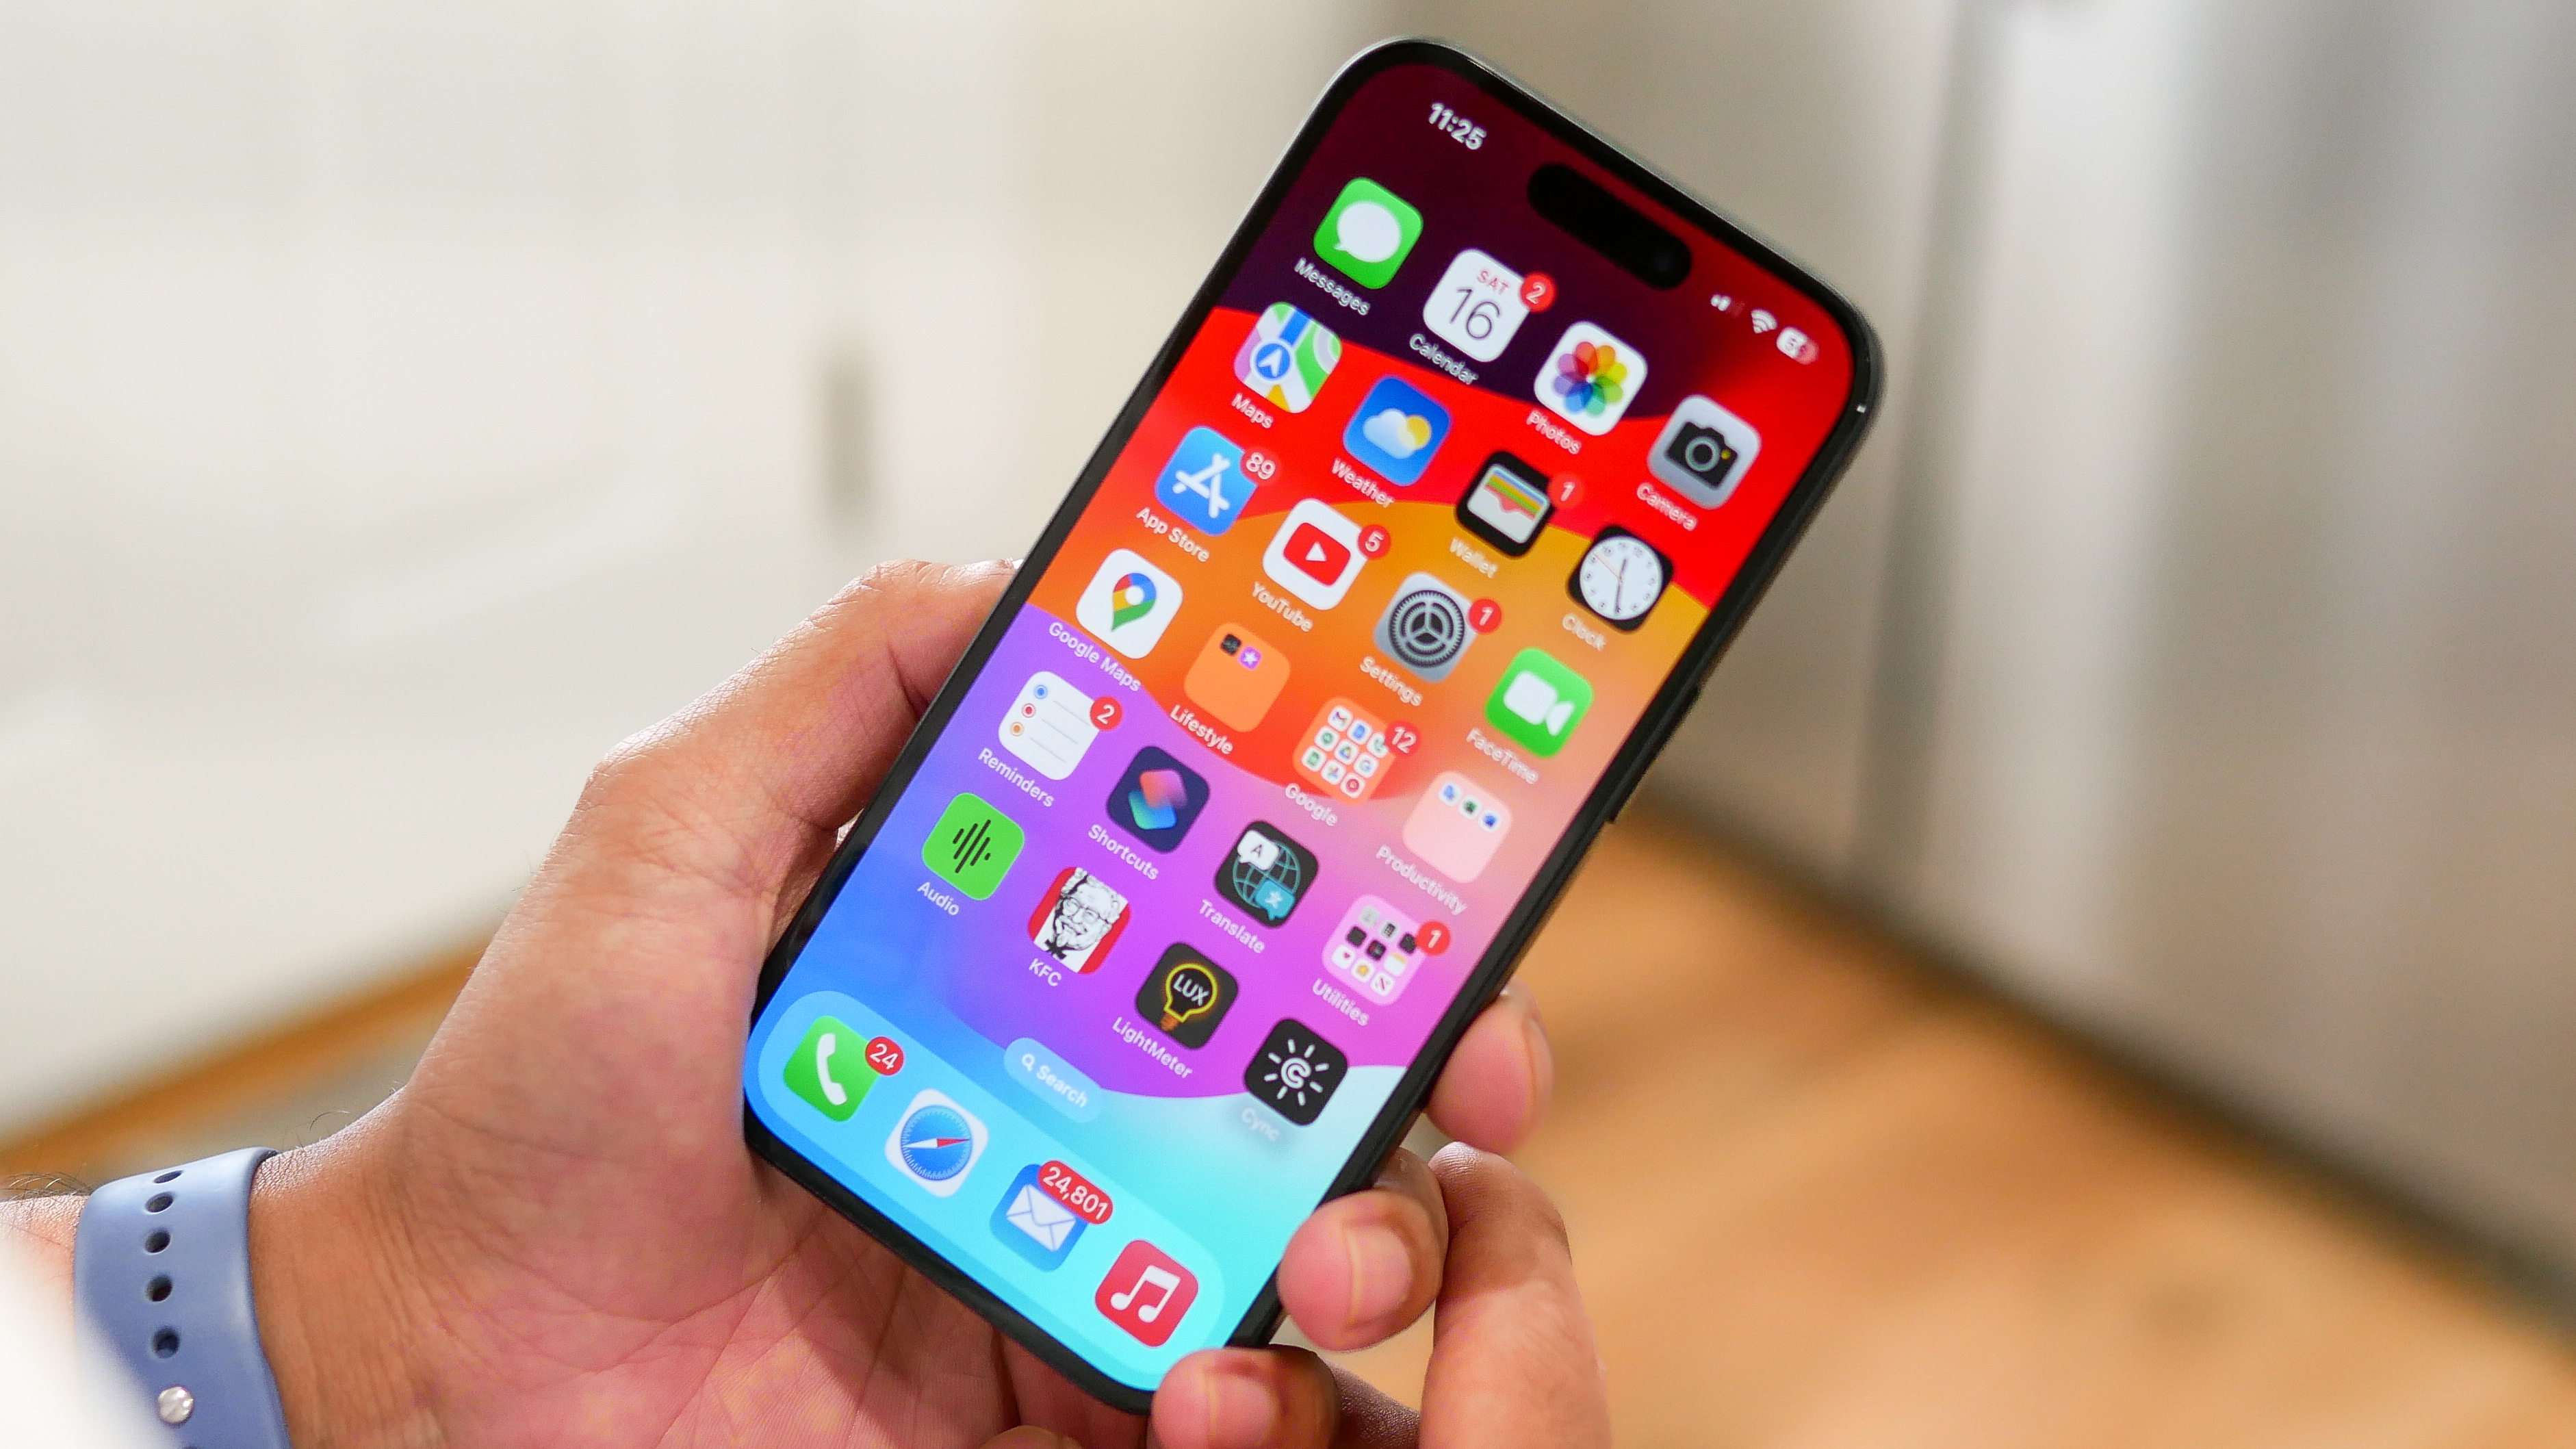
Getting up and running with an iPhone 15 or 15 Plus is simple enough. The Quick Start function will work its magic in rapid time, transferring data from an older iPhone, allowing you to set up FaceID, activate Hey Siri, Apple Pay and more.
But that is only the beginning. To get the most out of your iPhone 15 or 15 Plus, there are some other settings that you may want to try. And while your device may appear simple enough, the deeper you delve, the more you realise just how much power you can unlock.
Here we present 11 tips for setting up/using your new iPhone 15 or 15 Plus, making sure you’re off to a flying start.
11 settings and features to use first on your new iPhone 15
These tips will also work with most iPhones that have iOS 17 installed except where stated.
1. Set up your Apple ID
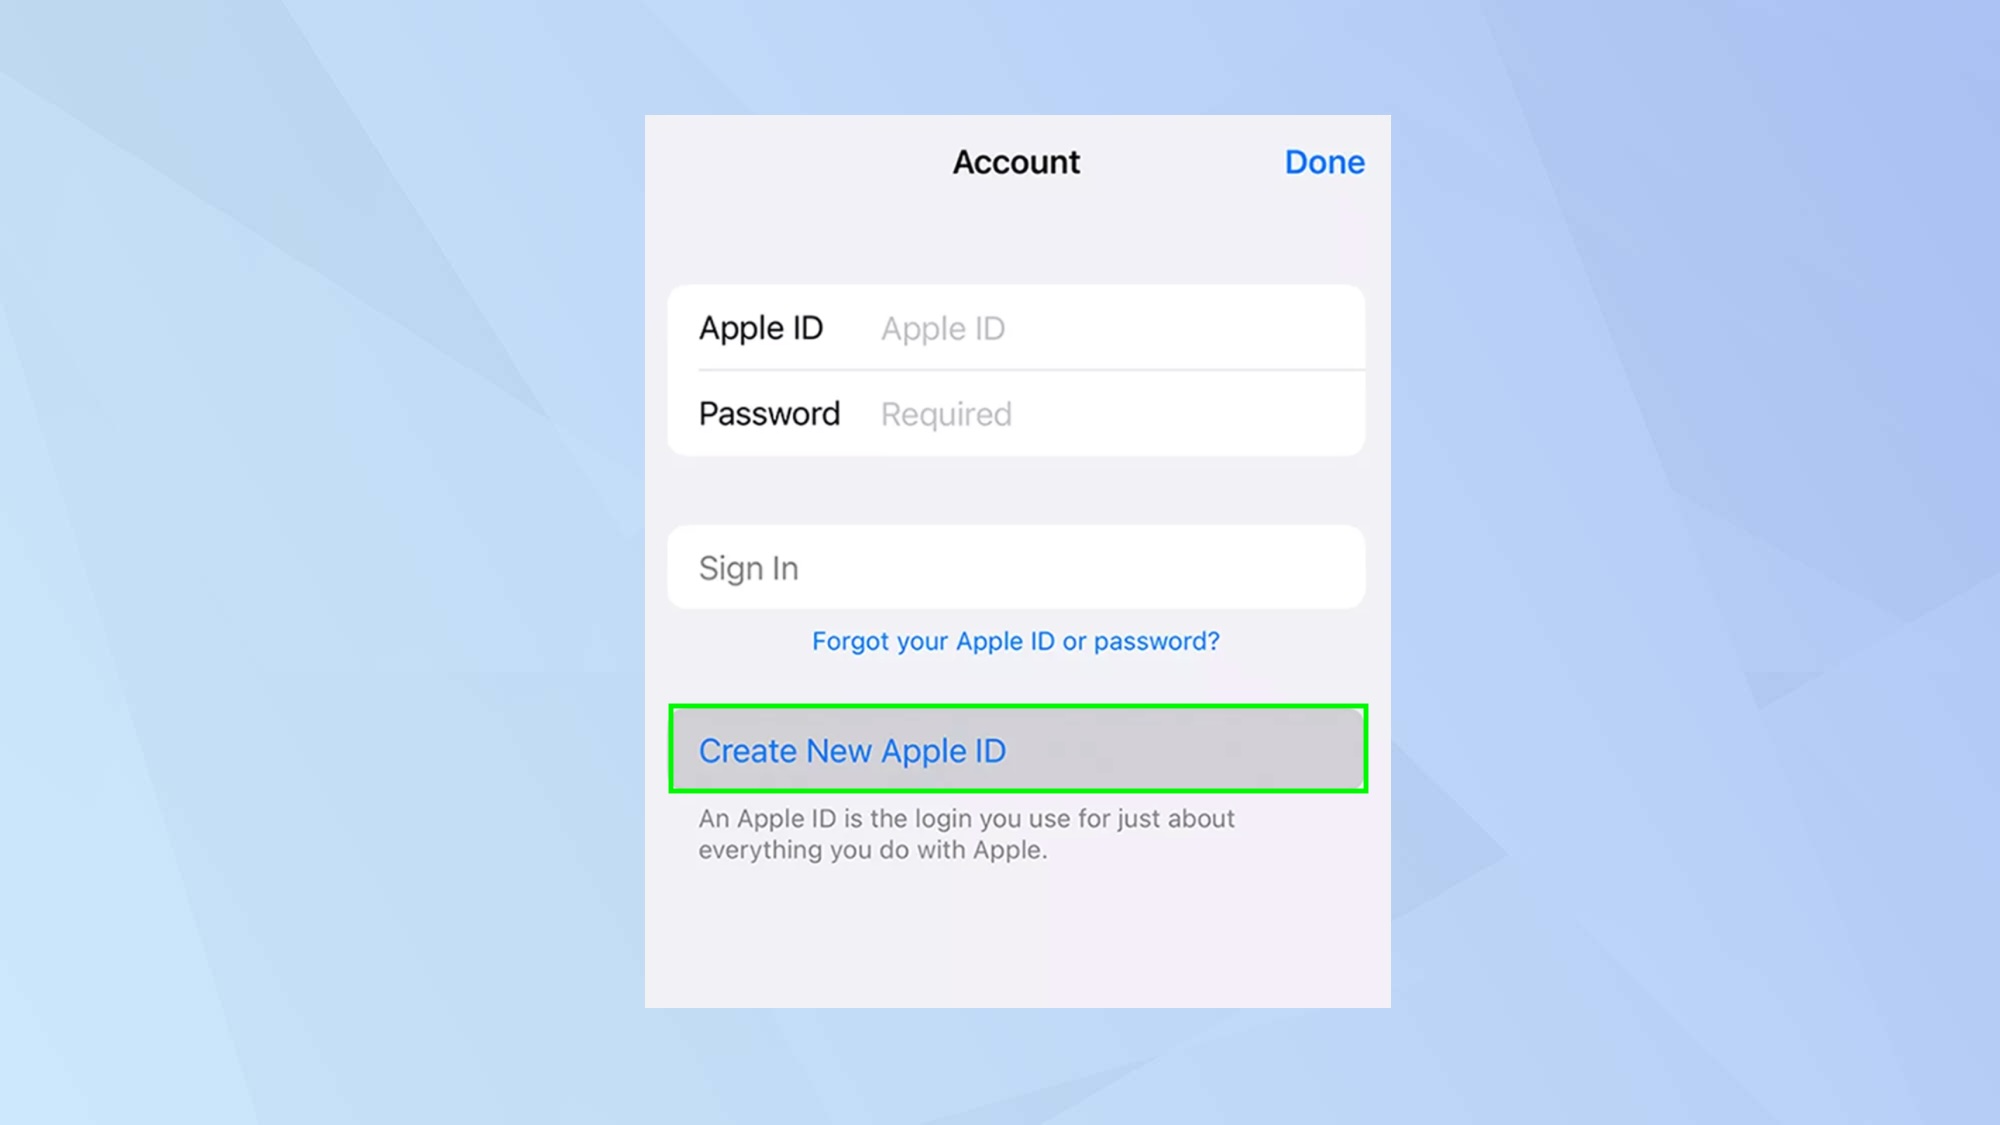
If you want to get the most out of your iPhone 15 or 15 Plus (and let’s face it, you do) then you will need to learn how to create an Apple ID. In doing so, you will be able to access a host of goodies from the App Store and iCloud to FaceTime and Apple Music. You will also be able to make purchases and find your iPhone if you ever lose it, as we’ll see below.
Apple IDs are totally free and you’ll be prompted to create one when you’re setting up your device. If you skipped this step, don’t worry, you just need to launch the App Store app, tap the account icon (top-right corner) and select Create New Apple ID. Then just follow the prompts.
2. Limit the battery life
One of the benefits of upgrading to iPhone 15 is the device’s longer battery life. You’ll get up to 20 hours video playback with an iPhone 15 and up to 26 hours video playback with an iPhone 15 Plus but you also ensure you squeeze the most out of the battery.
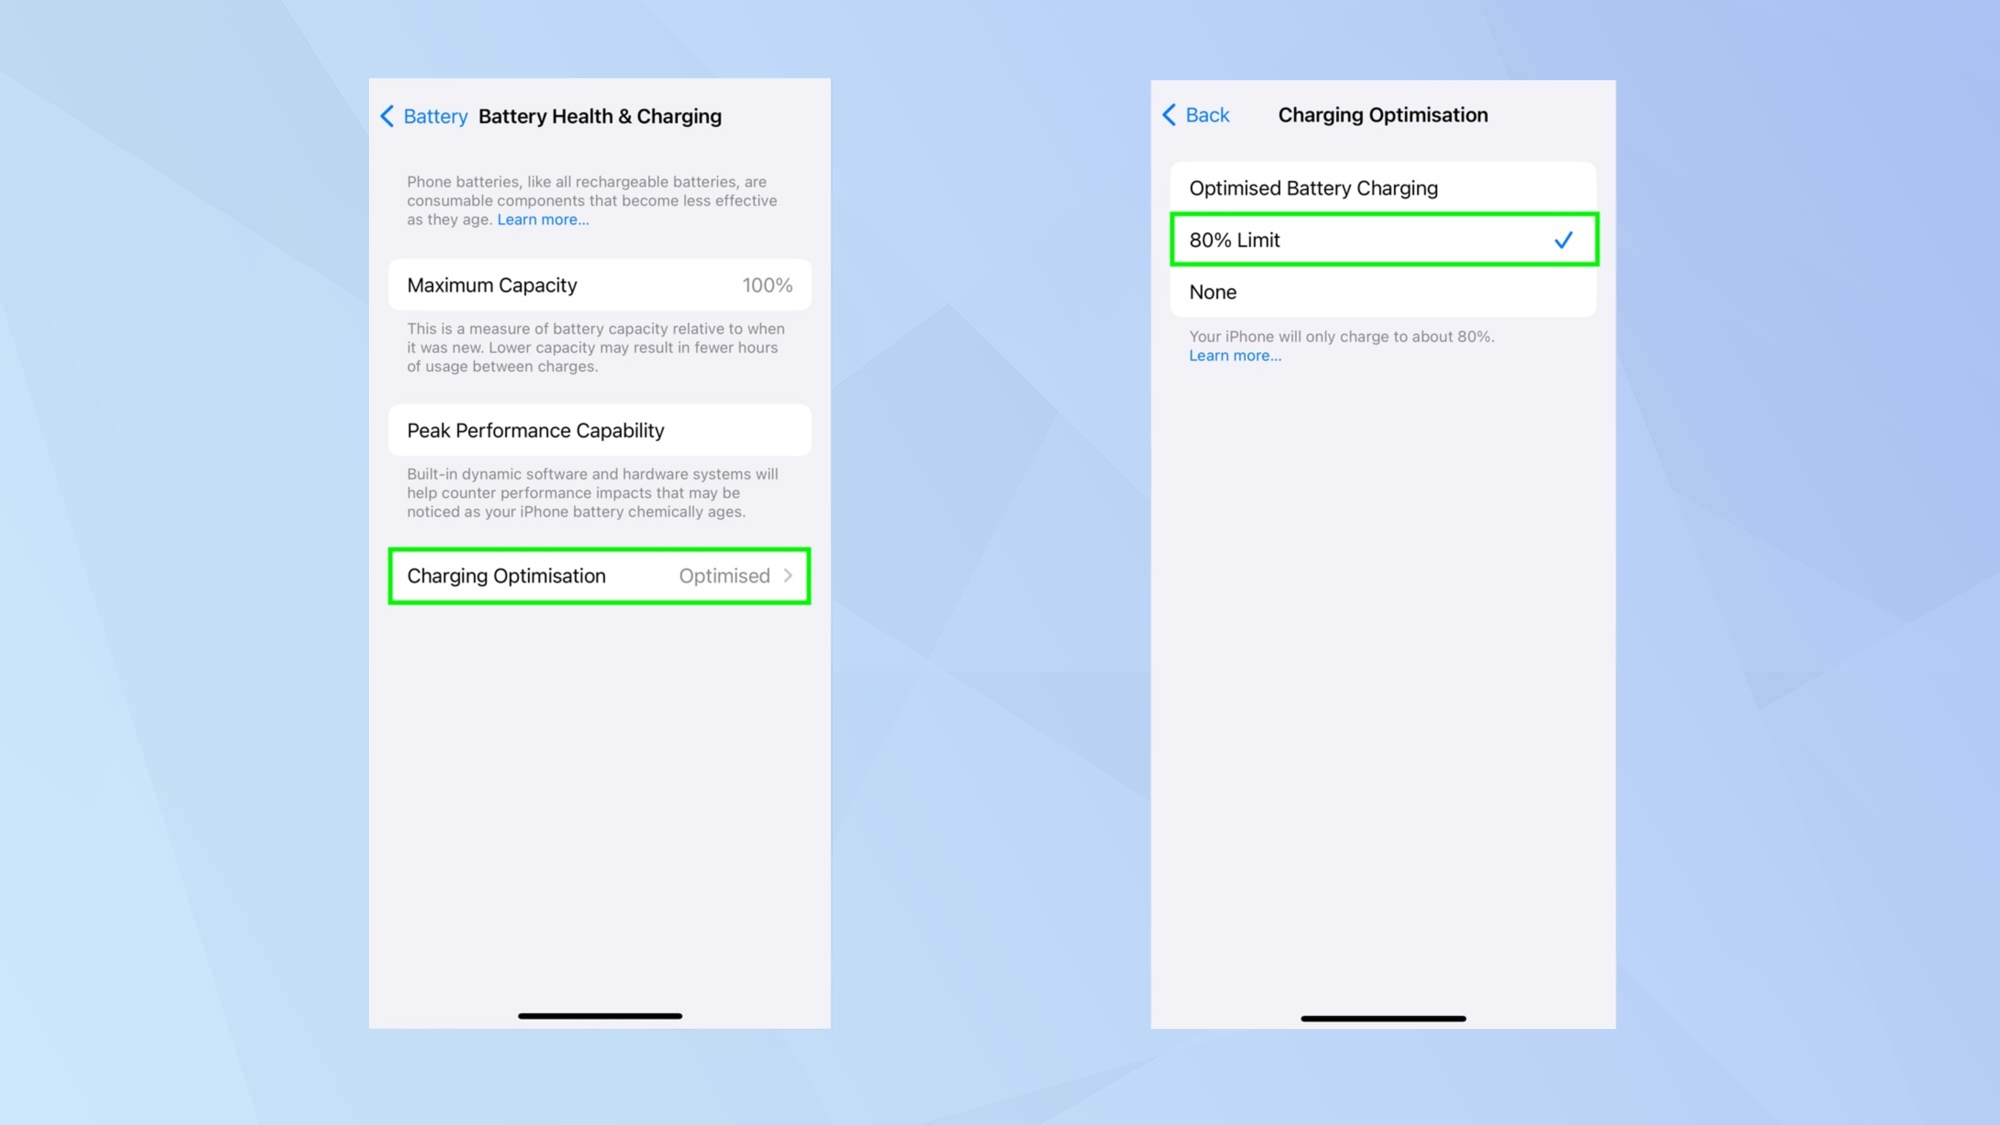
One of the best ways is to ensure you keep your battery juiced-up between 20% and 80%. One of the easiest ways to remain within the upper limit is learning how to limit your iPhone to 80 percent charge. There’s a built-in function in iOS 17 that allows you to do this so go to Settings, tap Battery and select Battery Health & Charging. Then tap Charging Optimization and select the 80% limit.
3. Create a Contact Poster
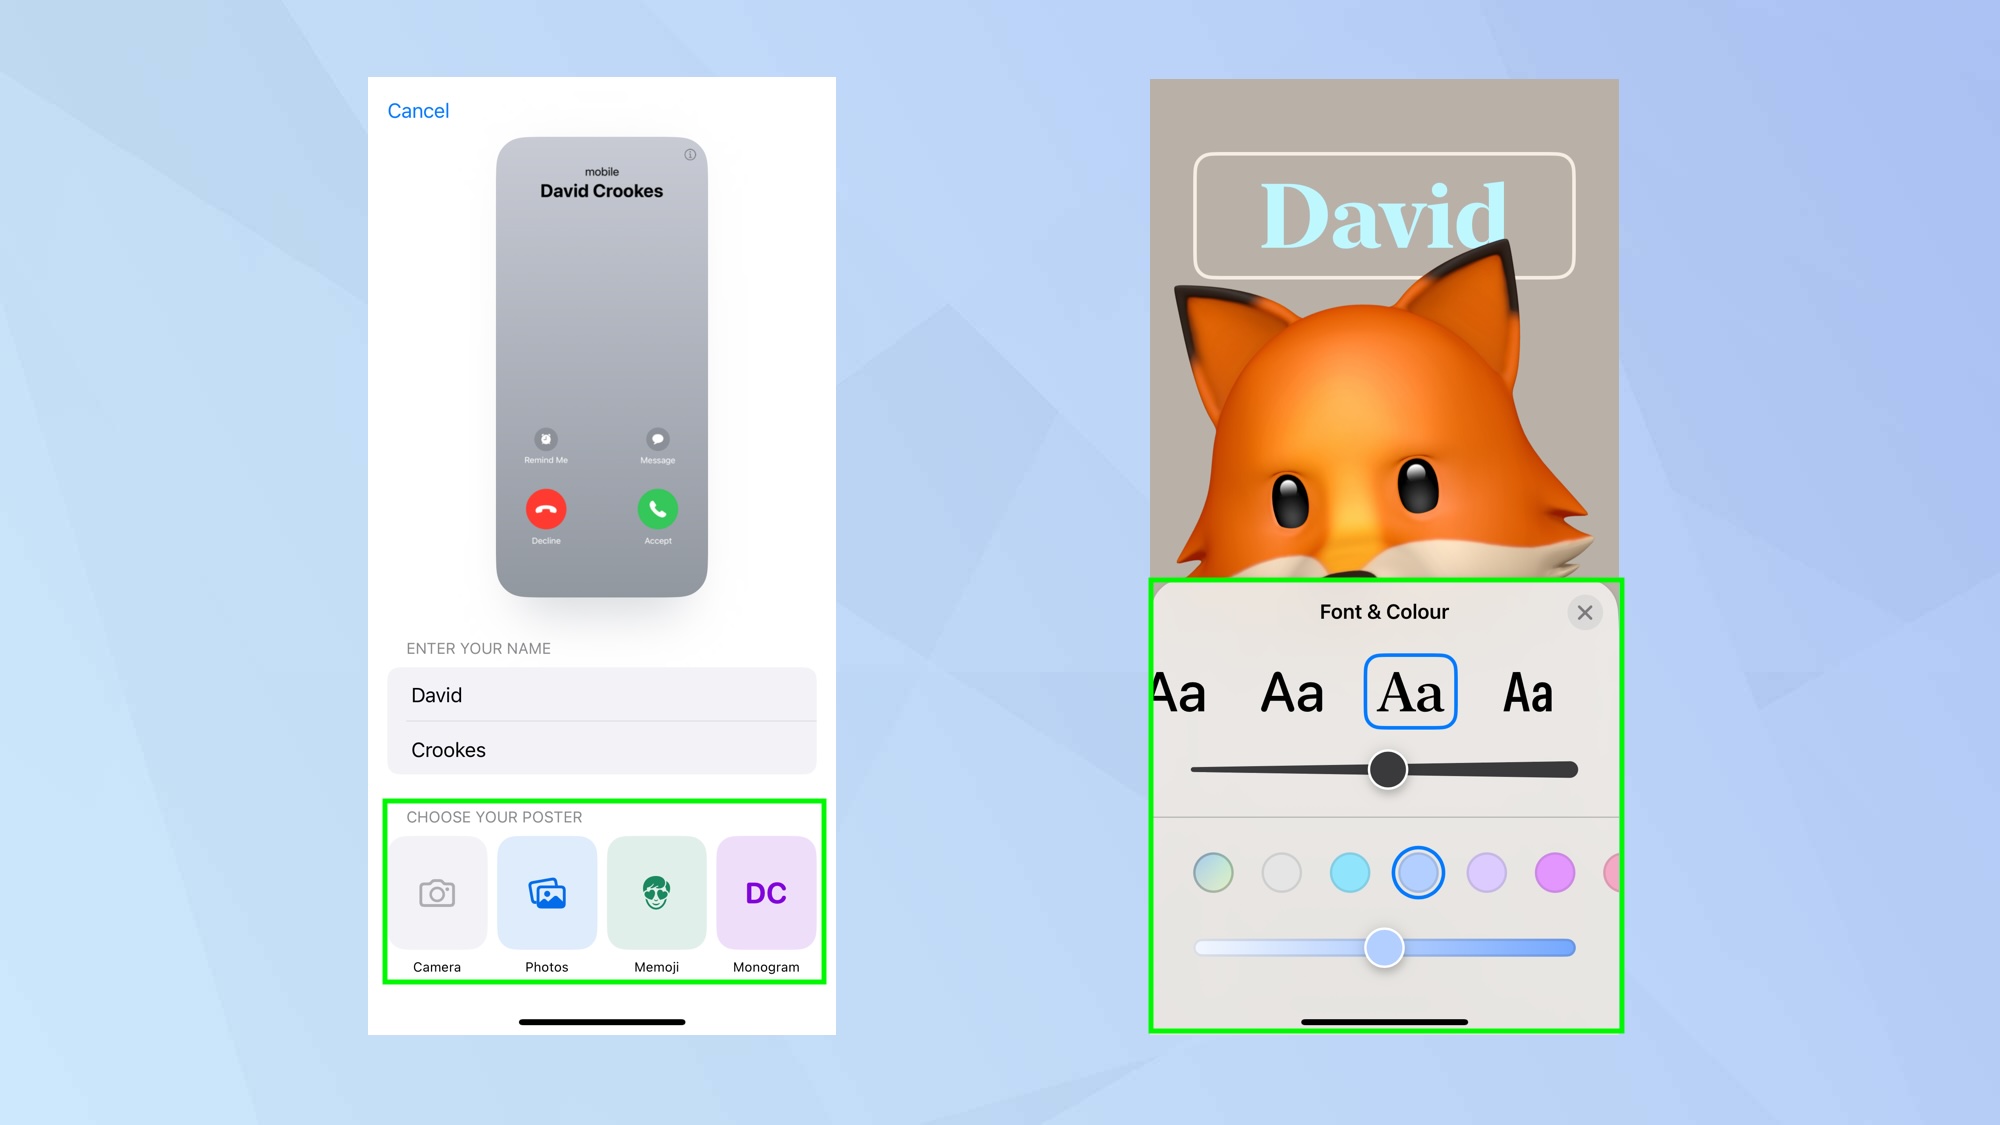
By discovering how to create a contact poster on iPhone, you can customize how you appear on other people’s iPhones. Not will this enable you to control how you appear in your own Contacts app or that of another iPhone user, your poster will also show on a contact’s phone when you call them. It’s like creating a business card but a lot more fun.
To set started, open your Contacts app, tap your card which appears at the top of the screen then select Contact Photo & Poster. Now tap Continue if setting up for the first time, otherwise tap Edit then select Customize. You can now choose a poster using a fresh photo, existing image, Memoji or initials. There are options to change colours, fonts and more.
4. Activate Find My
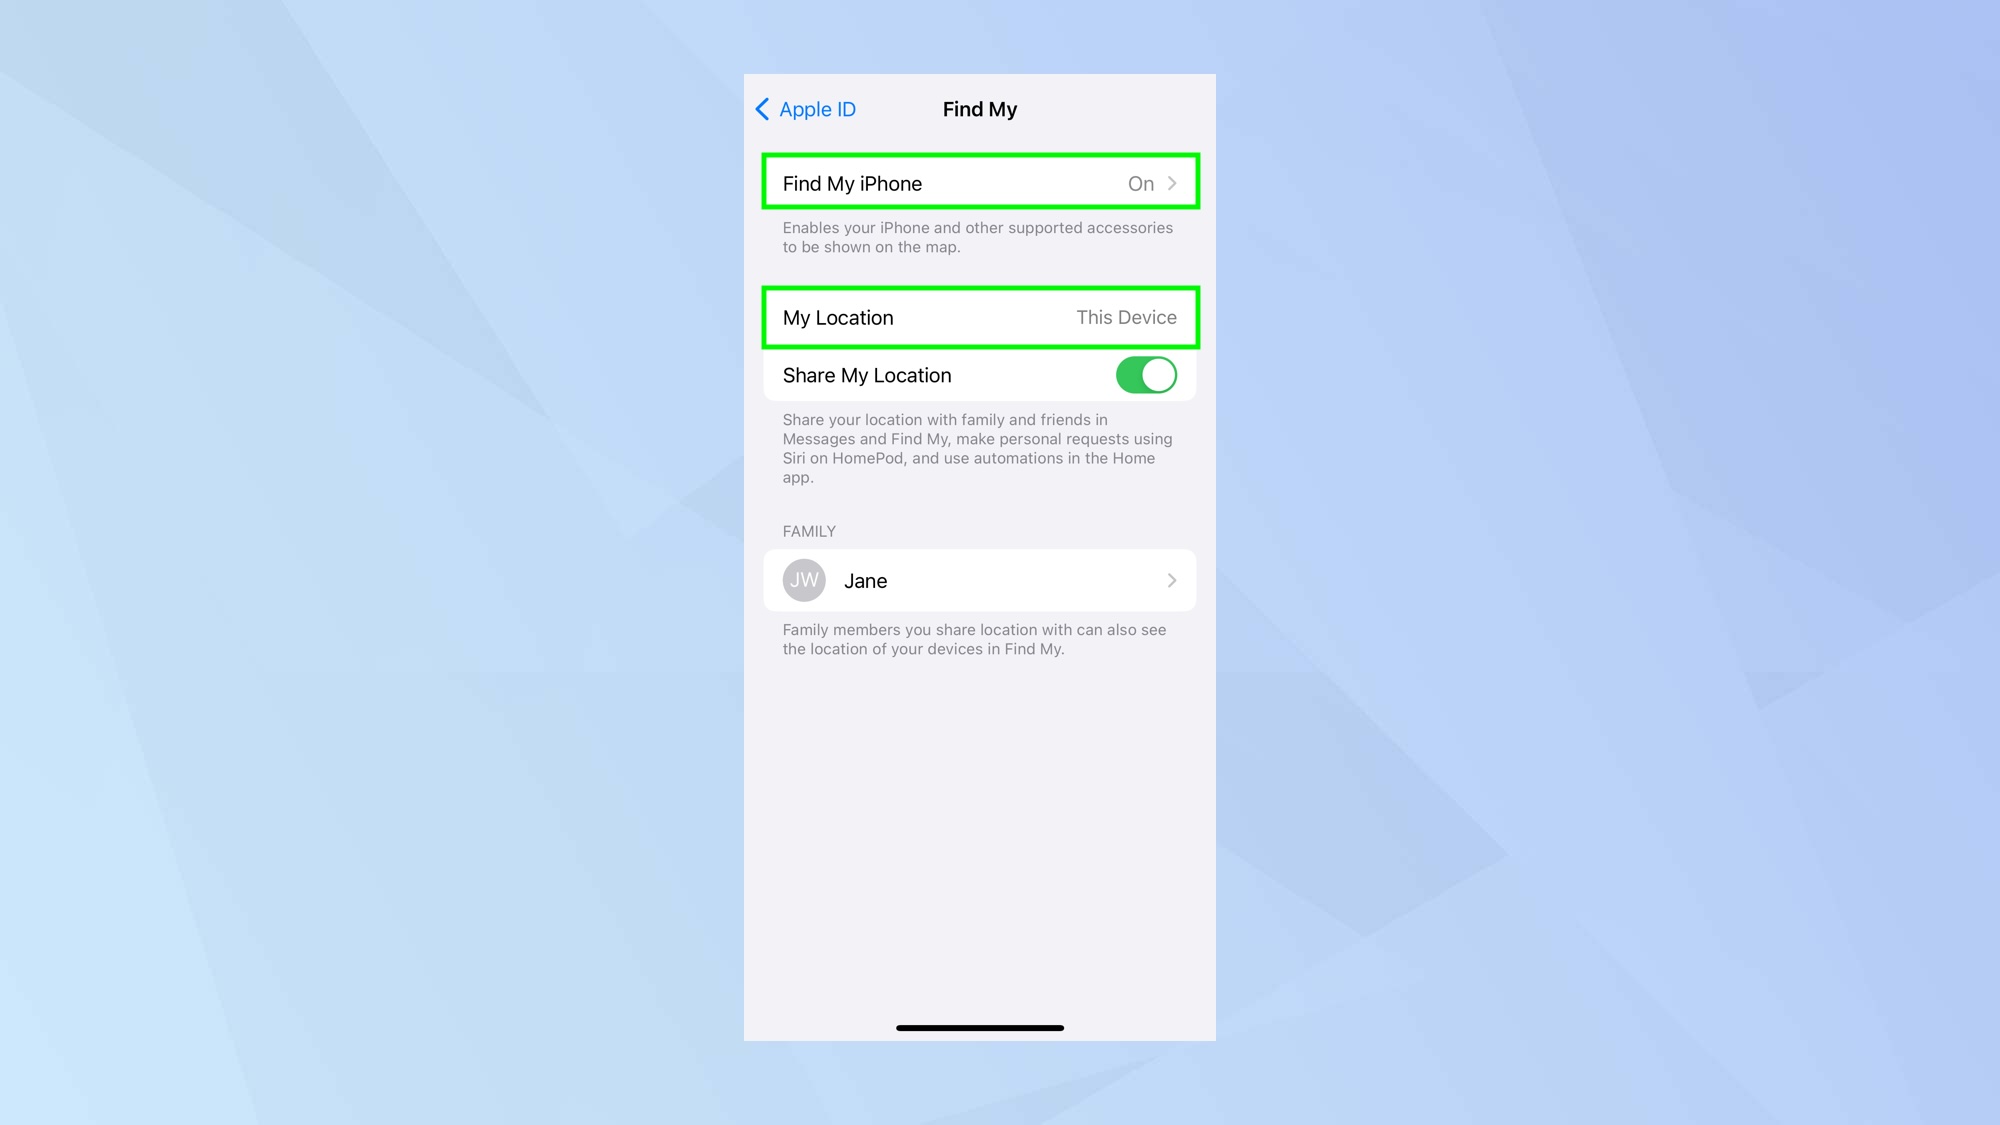
It’s important that you activate Find My on your iPhone. This will help you to locate your device should it ever become lost or stolen. It will share the location of your iPhone with iCloud and you can allow trusted people to know your whereabouts too. Knowing how to find a lost or stolen iPhone can make your life a lot less stressful.
To turn on Find My, open the Settings app, tap your name and select Find My. Now tap Find My iPhone and turn it on. You can also select Share My Location. Once done, your iPhone will be locatable (you could, for example, go to iCloud.com, sign in with your Apple ID and see where your device is). To make sure your iPhone can be found on a map, you also need to go to Settings, select Privacy & Security, choose Location Services and make sure you turn on Location Services.
5. Turn on AirDrop/NameDrop
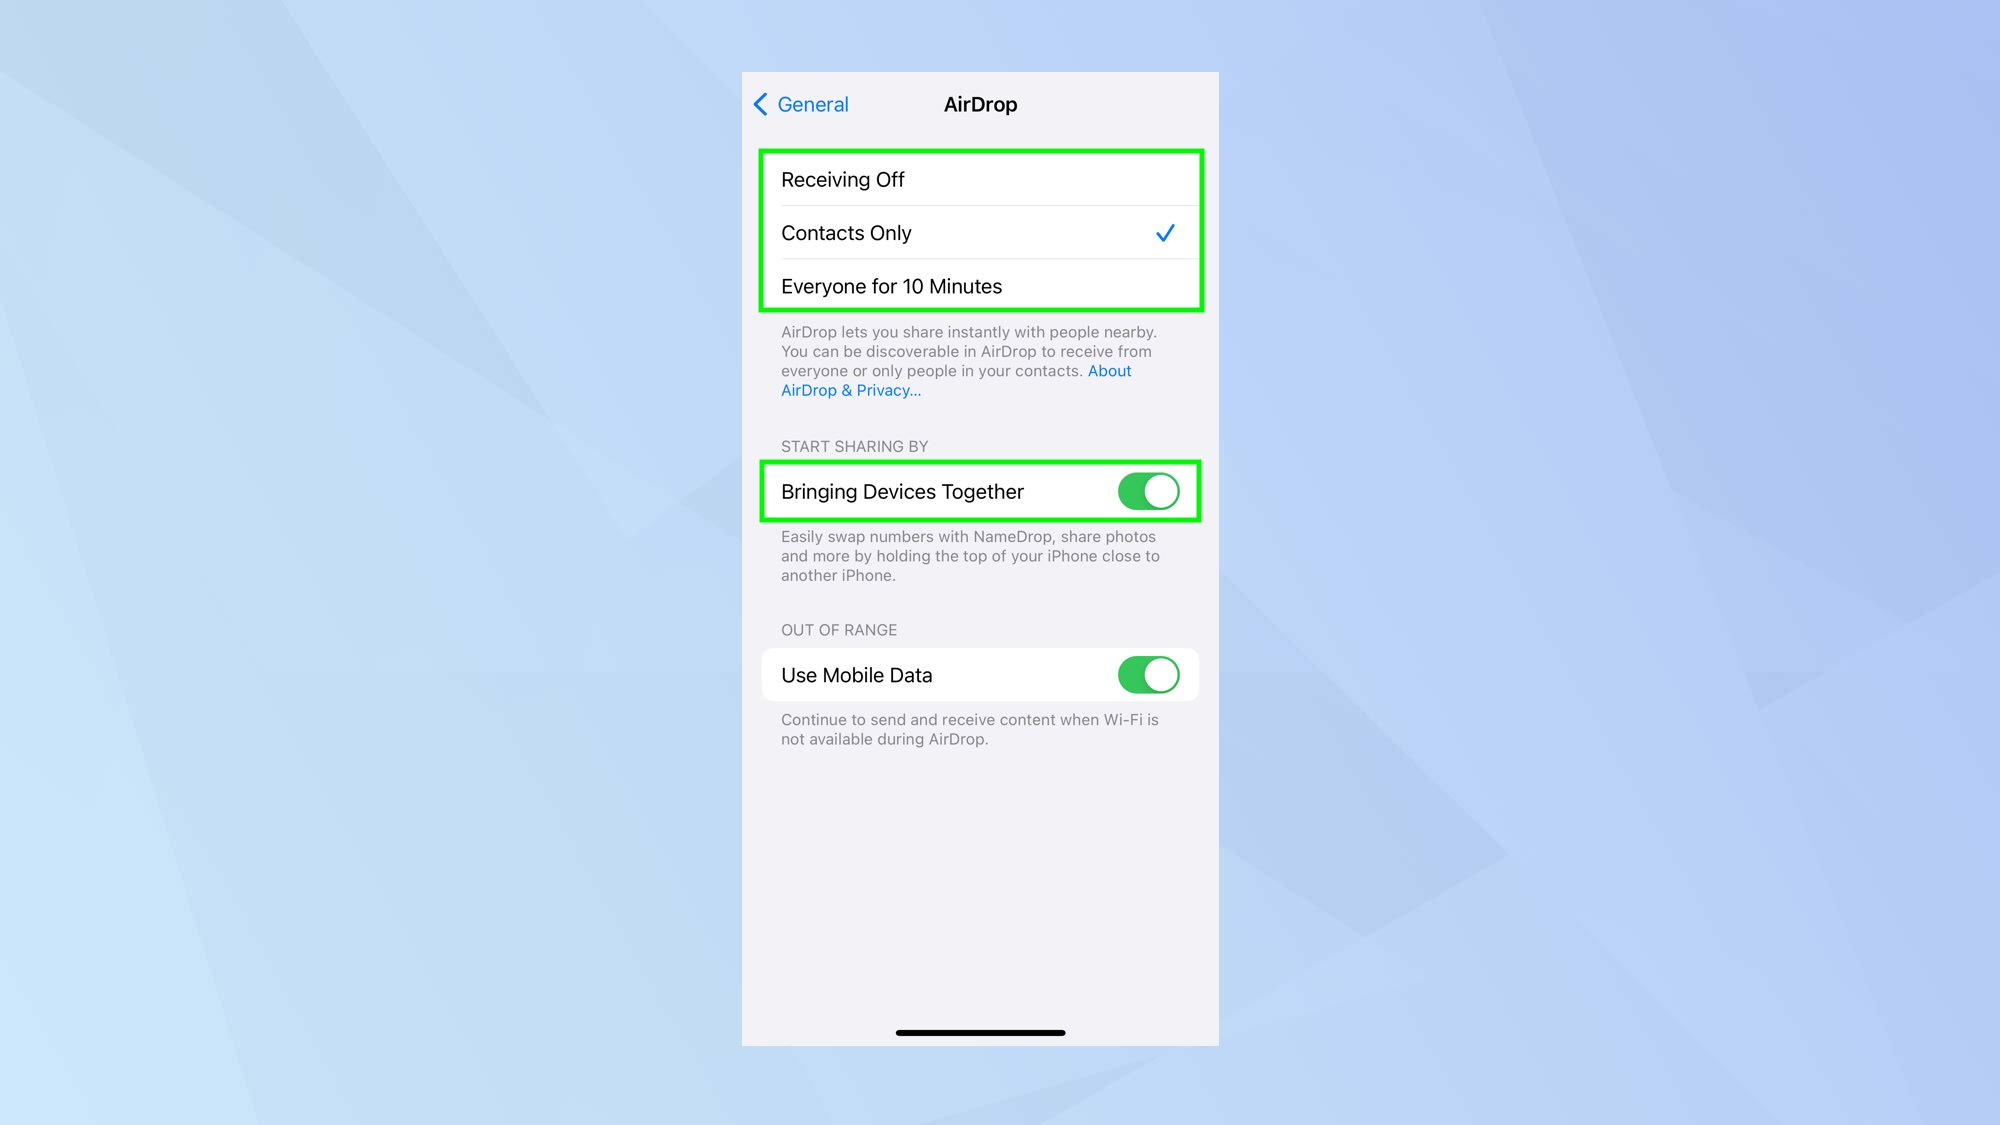
Once of the most useful features of your iPhone 15 is the ability to transfer files to and from other Apple devices so long as they are within Wi-Fi and Bluetooth range. It means, for example, that you and a friend can easy share images between your iPhones.
Learning how to use AirDrop on iPhone is straightforward and you can tailor the experience if you go to the Settings app, tap General and select AirDrop and choose between Contacts Only or Everyone for 10 minutes. The former will limit AirDropping to people you know while the latter allows anyone with an iPhone to transfer files with your device — crucially, for a limited time for privacy and security.
You can also use your iPhone 15 to send your contact information to another iPhone by moving the top of your device towards another. Make sure your turn on Bringing Devices Together. Then learn more about how to use NameDrop on iPhone.
6. Use the Health app
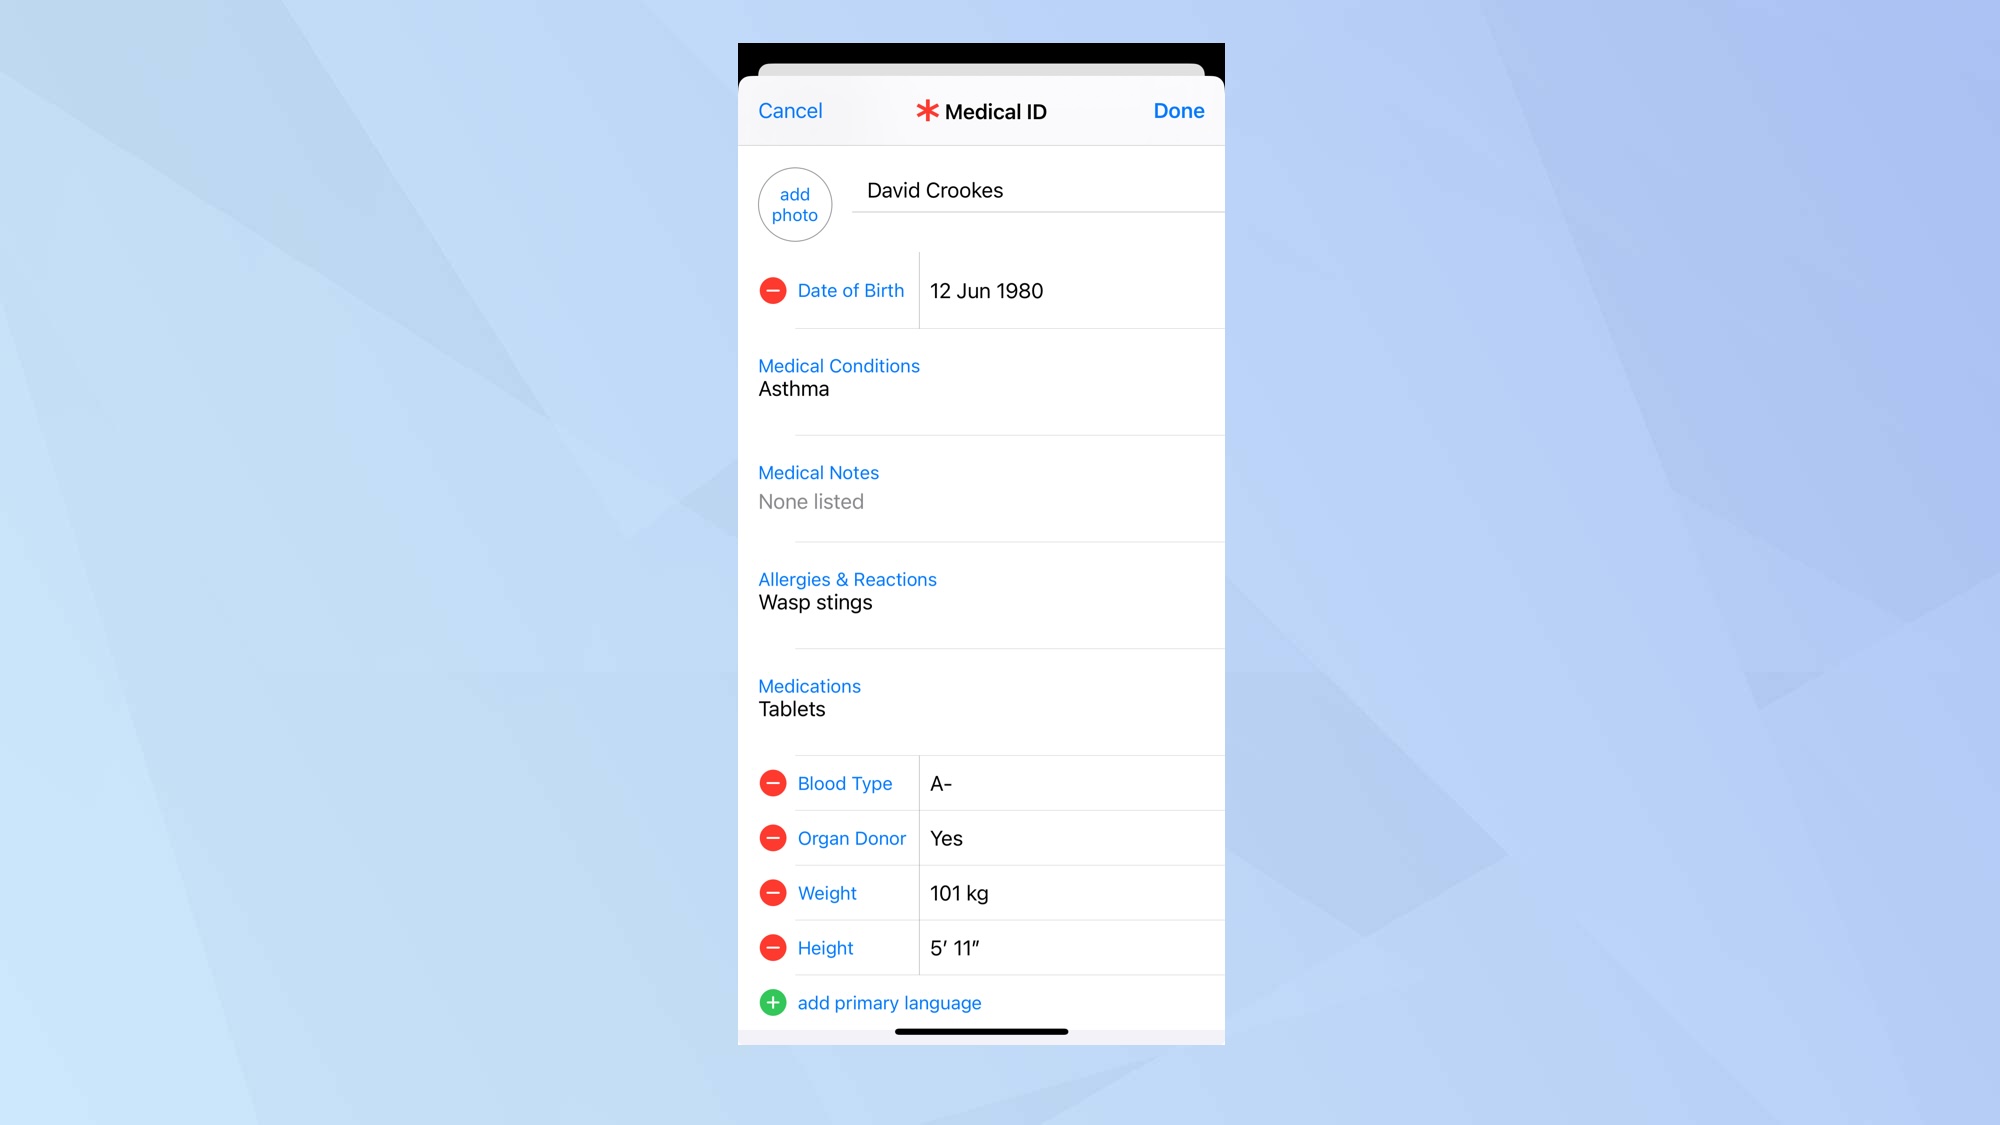
The Health app has been given an upgrade and it’s better than ever before, even going so far as helping to diagnose anxiety and depression. To do this, you need to learn how to use the mental health questionnaire — essentially, go to Health, select Browse and choose Mental Health Questionnaire. The Health app also lets you sync fitness trackers and Apple Watch while keeping a track of your heart, hearing, medications and more. Tap Browse and play around.
Before you do, though, it’s worth setting up the basics. The Health app lets you input information that could prove useful in an emergency, giving first responders access to vital data. You should fill in this information: launch the Health appand tap your profile in the top-right corner. Then select Medical ID and fill in health information such as your medical conditions, allergies, medications, blood type, weight and height. You can also add an emergency contact.
7. Customize the Control Center
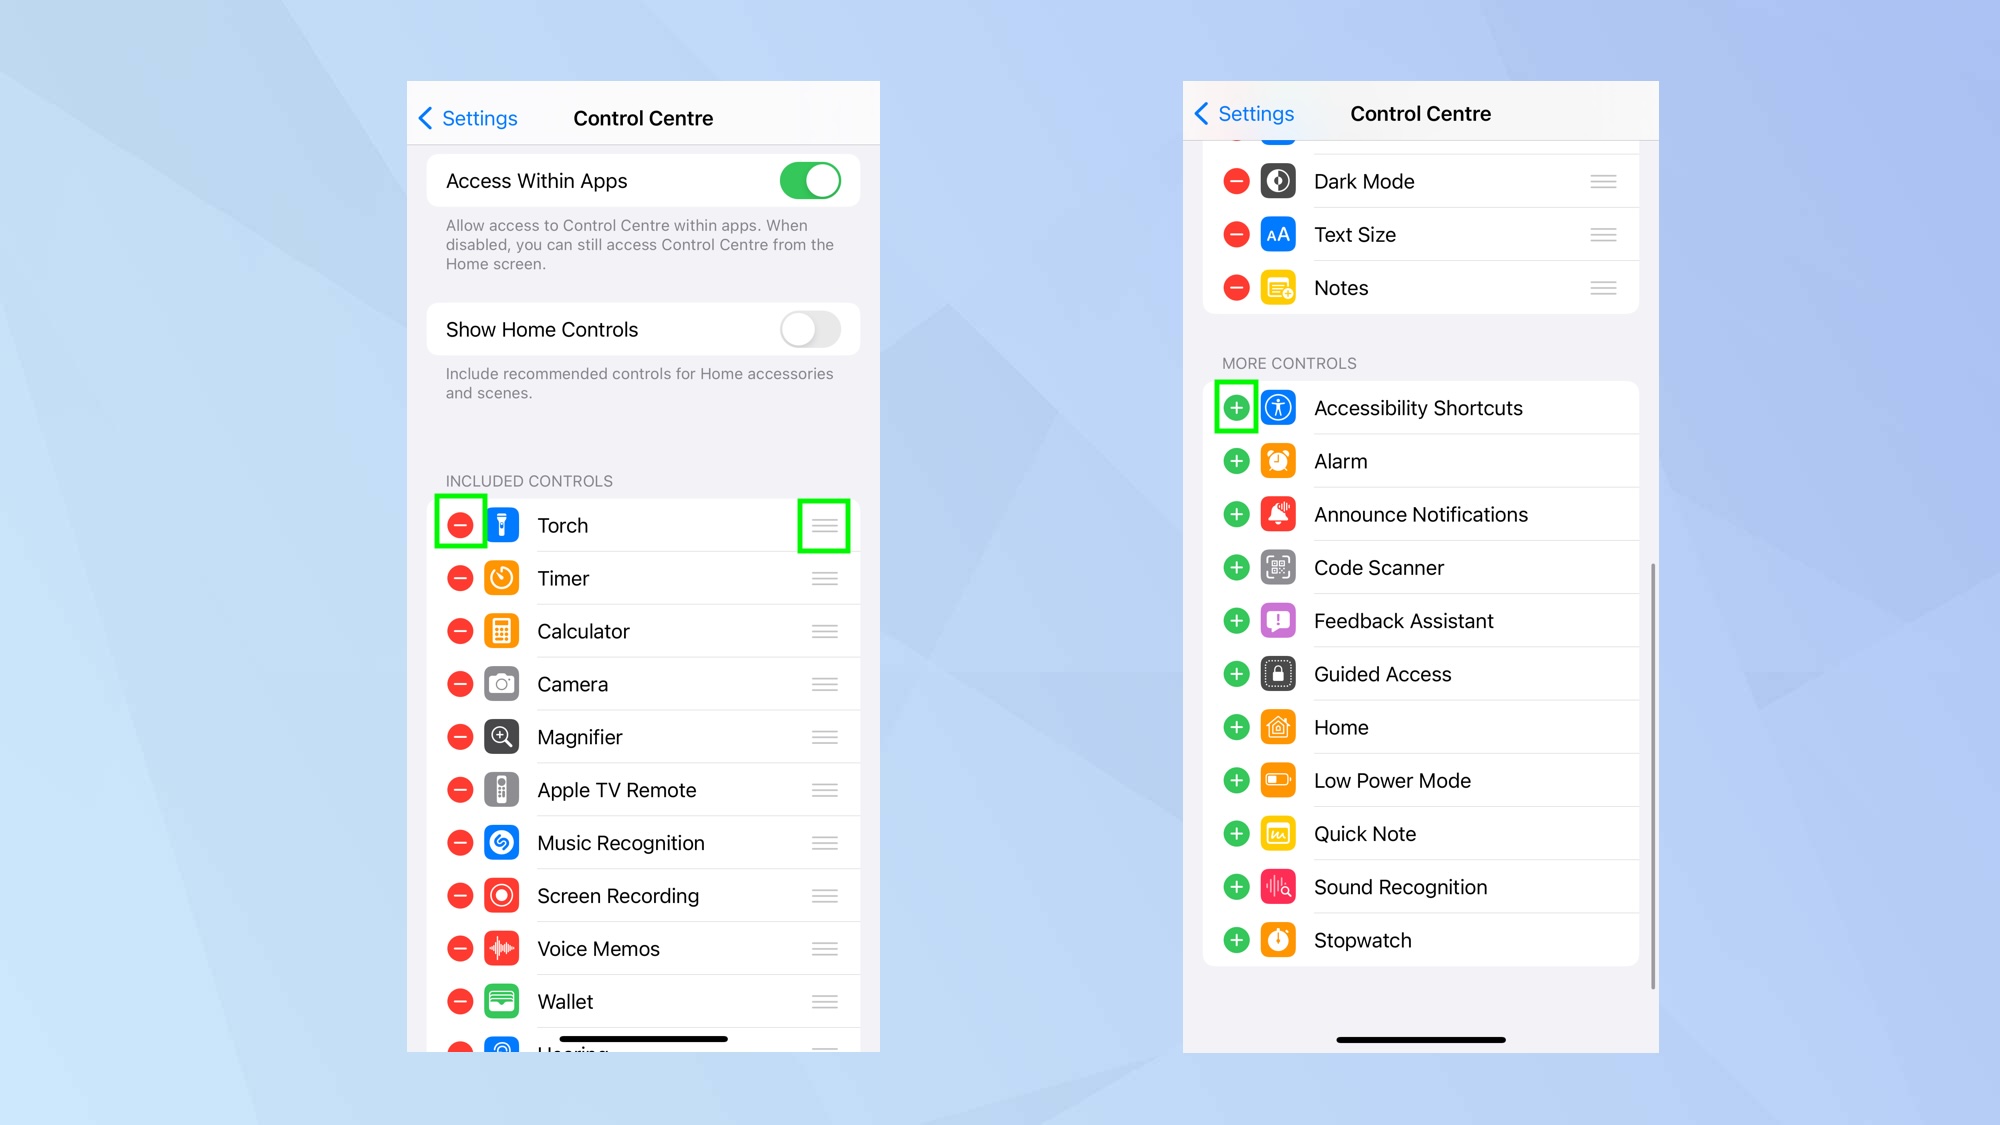
You will likely find that you use the Control Center a lot – and if you’re not sure where it is, just swipe down from the top-right corner of the screen and you’ll see it. To ensure that the most useful functions of the Control Center are at your fingertips, you should learn how to edit Control Center on iPhone. Just open the Settings app, tap Control Center and either tap the red delete symbol next to a function and tap Delete or tap the green plus symbol to a function that you want to add. You can rearrange the functions if you tap and hold the three lines icon next to one and drag it into position.
8. Set up your Mail
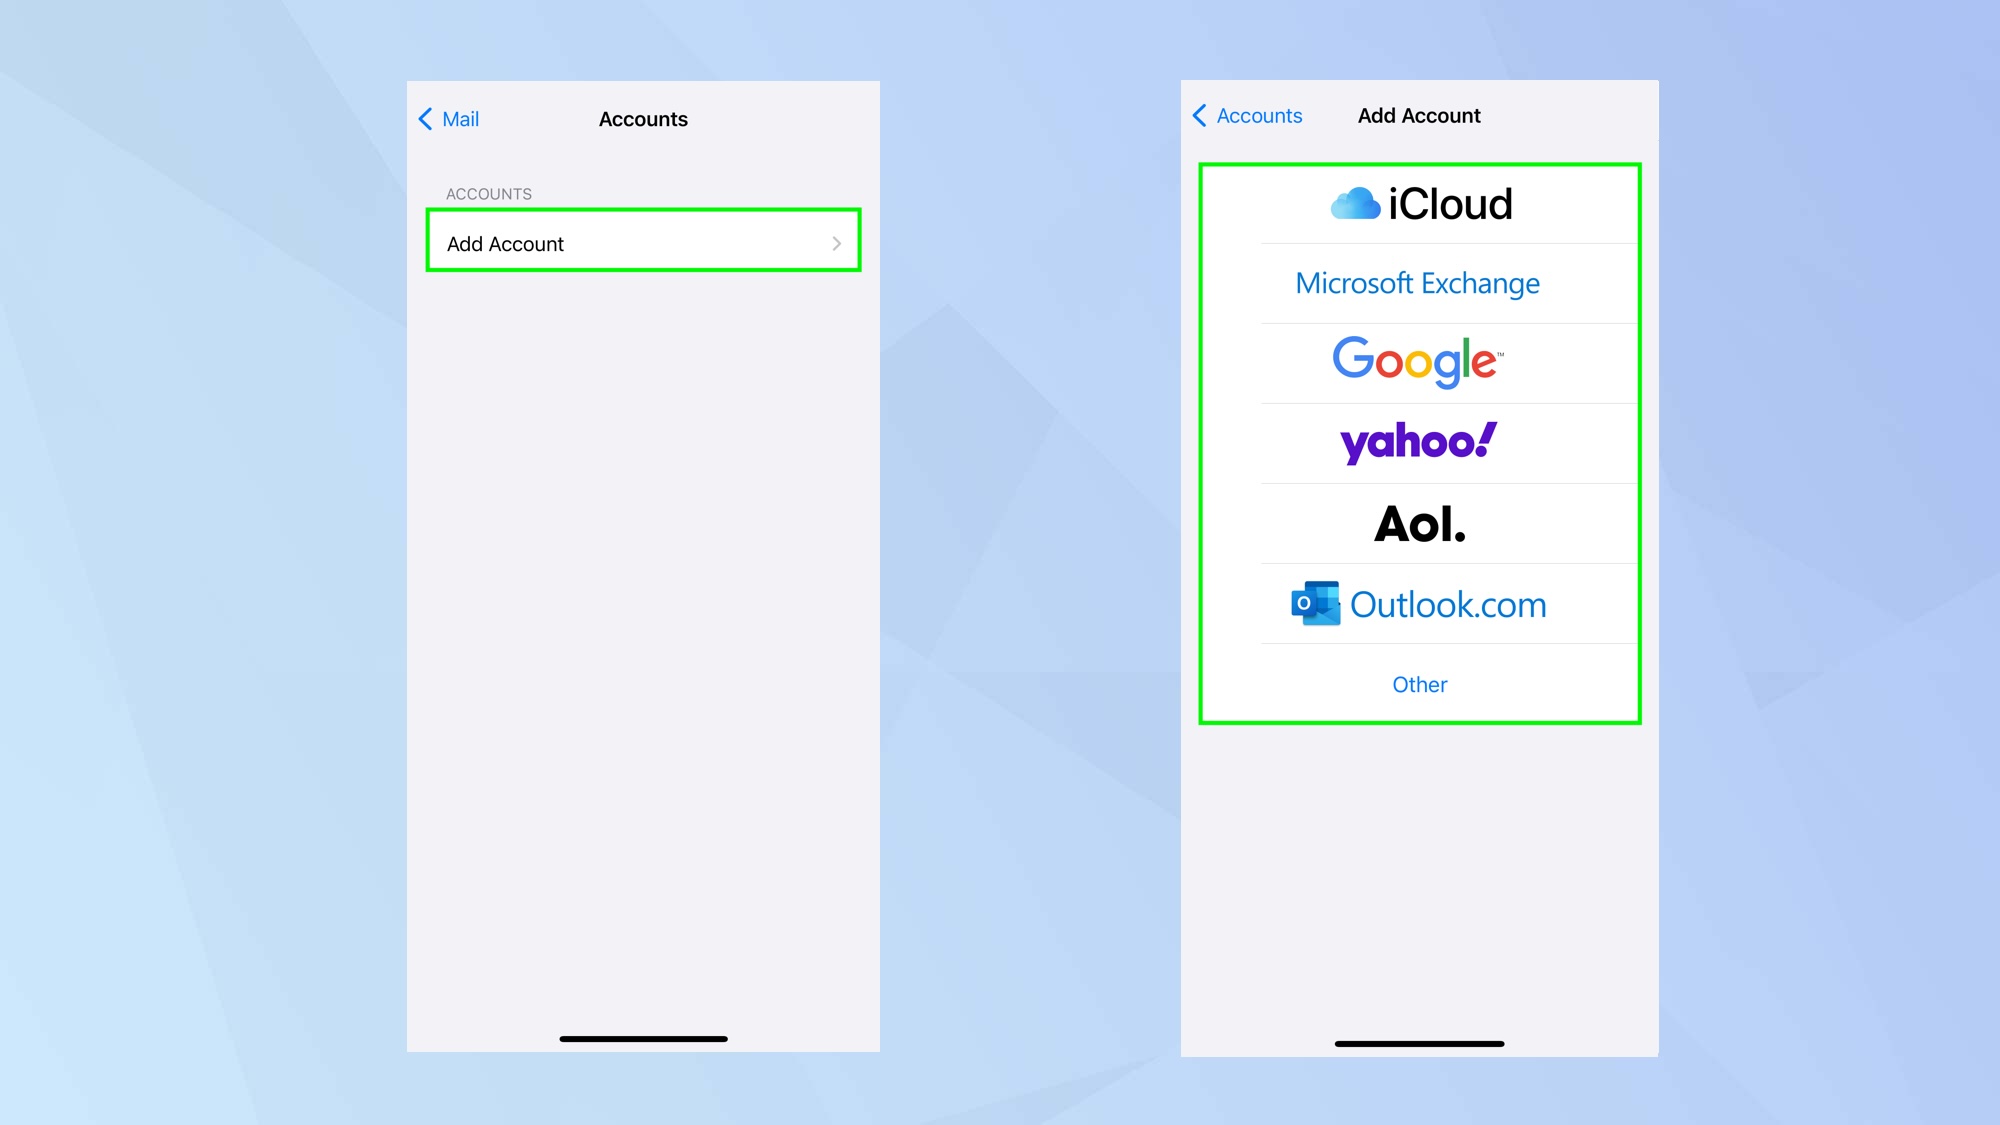
Sure, email is a bit old fashioned these days but it’s still very well used so you need somewhere convenient to store them. For most people, the Mail app will work well and you can quickly set it up for use with most major email providers, including iCloud, Microsoft Exchange and Gmail. It’s easy enough to do: launch the Settings app, choose Mail, tap Accounts, select Add Account and select the email provider. Now fill in the details and tap save.
You can also tailor the Mail app. Don’t want two-line previews of your emails? Then tap Preview and change it to none or one, three, four or five lines. You can also show To/Cc labels, change the swipe functionality and decide if you want to organize your emails by thread.
9. Enable the camera level
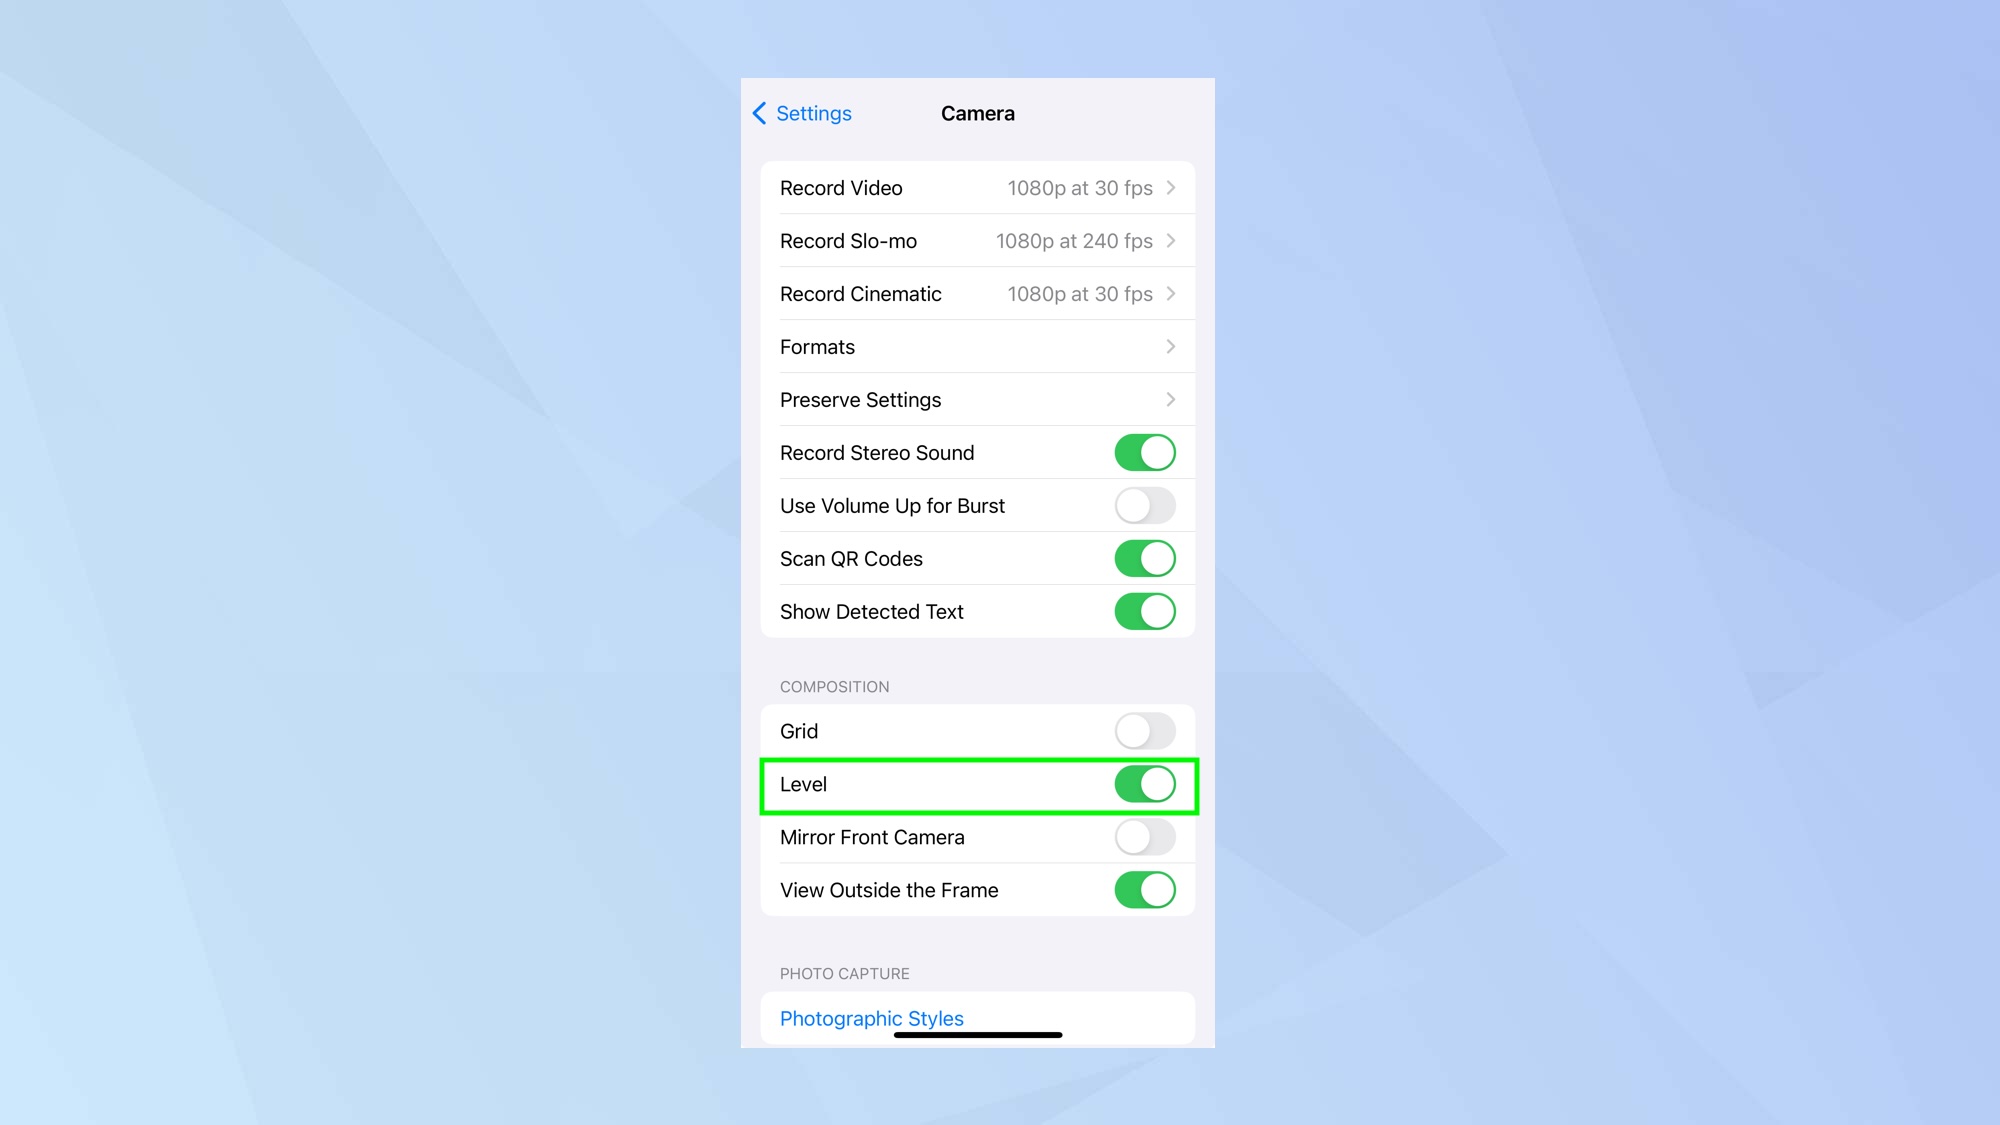
Your iPhone 15 is more than just a phone, of course: for many people’s it’s also a fantastic camera. But if you’re keen to take your shots to another level, then you will want them to be set up well. And using a level – a tool which will show left and right tilt and allow you to better position your device – will help you to do that.
Indeed, once you know how to enable the iPhone camera level, you’ll be to take better landscape shots. Just open the Settings app, select Camera and toggle on Level. You can then open the Camera app, flip the phone into the horizontal position and make use of the guidelines.
10. Organize the Home Screen
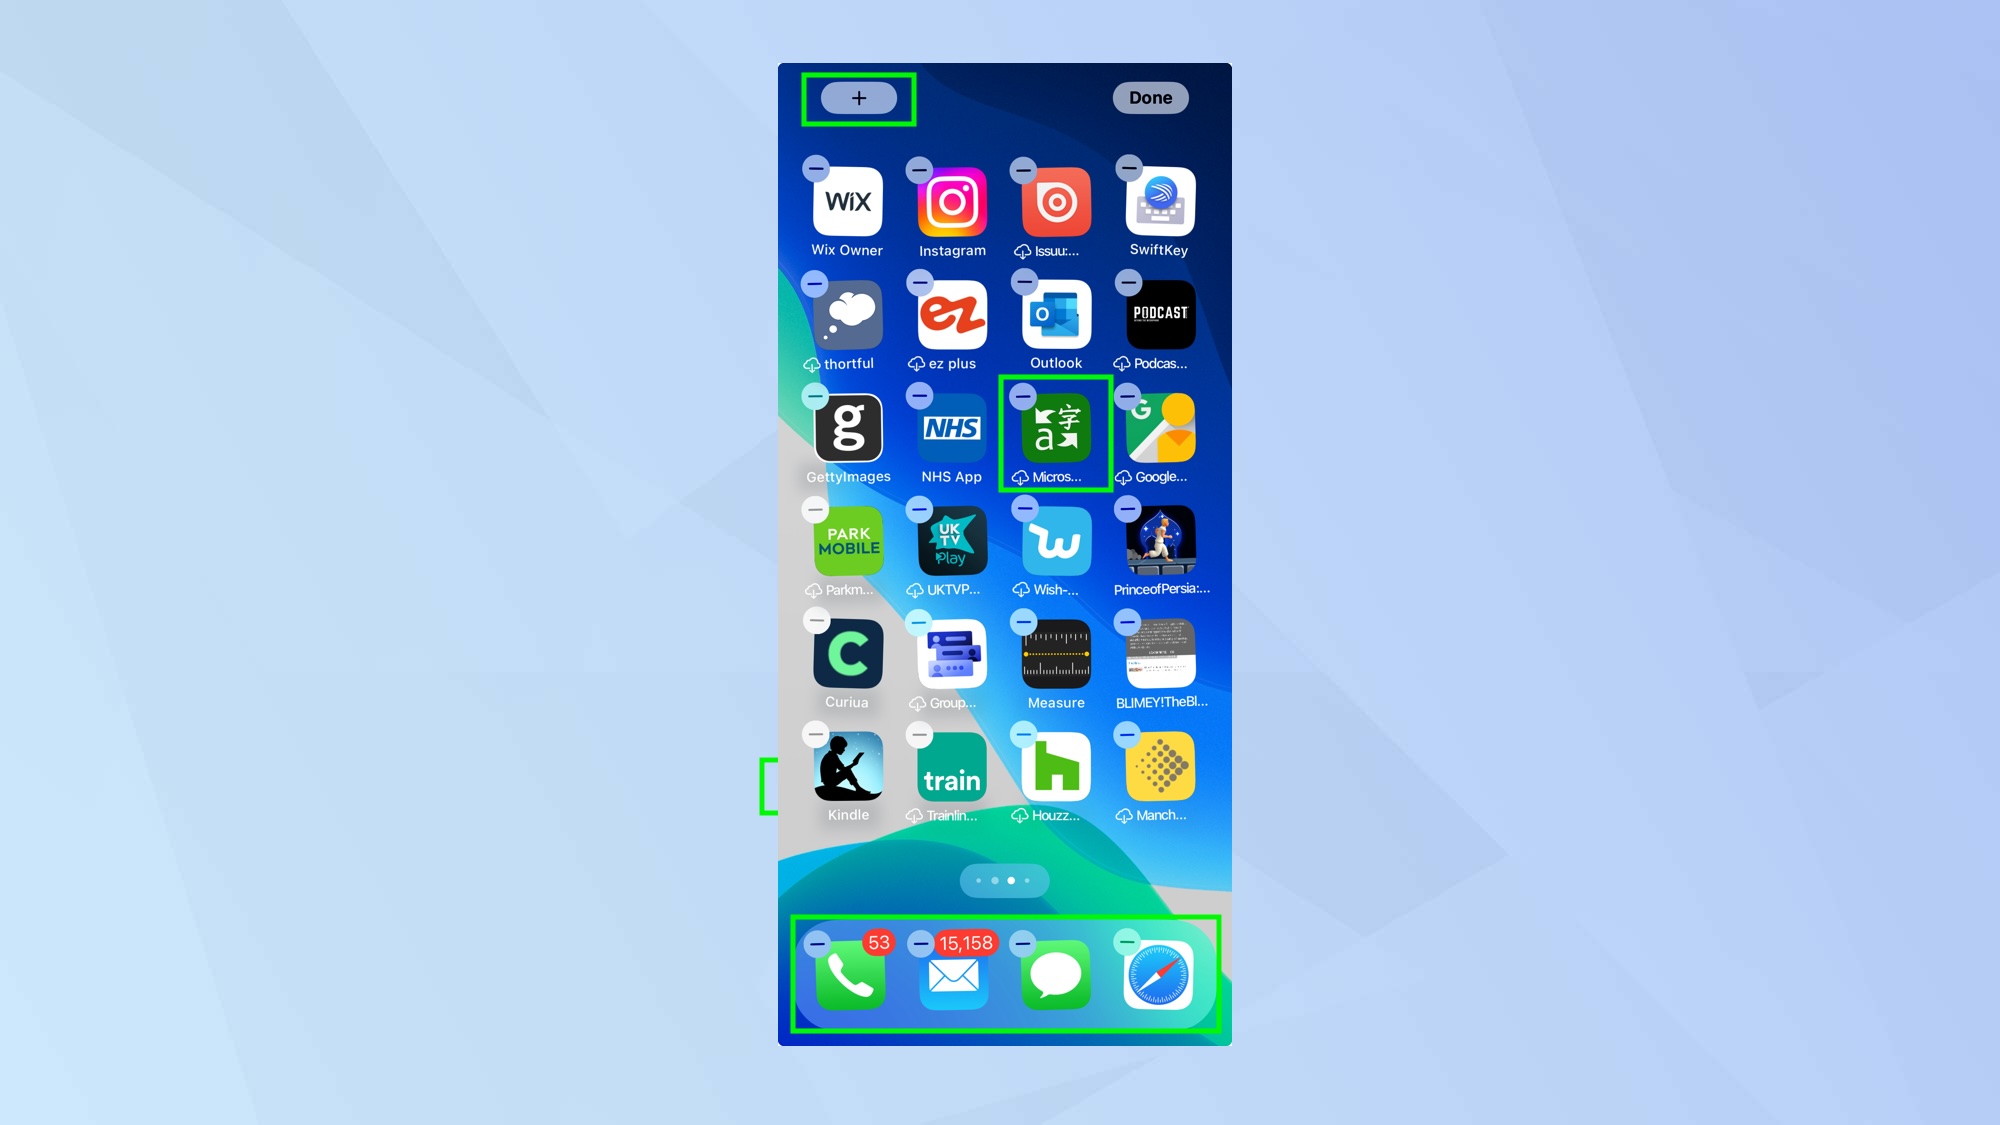
Once you’ve become familiar with your iPhone, you’ll know which apps you’re tending to use the most and which you can do without. It’s always worth knowing how to delete apps on an iPhone so that you can reduce clutter and free up space (essentially press and hold the app icon and tap Remove app).
You should also know how to organize your iPhone apps in seconds – tap and hold on an icon then drag to move them around (you can place well-used apps in the Dock at the bottom of the screen). If you drag an app icon on top of another, you can create a folder. And if you want to know how to use interactive widgets on the iPhone, you can press and hold on the Home Screen and tap the + icon in the top-left corner before adding, say, the Reminders and Home widgets.
11. Set up Standby Mode
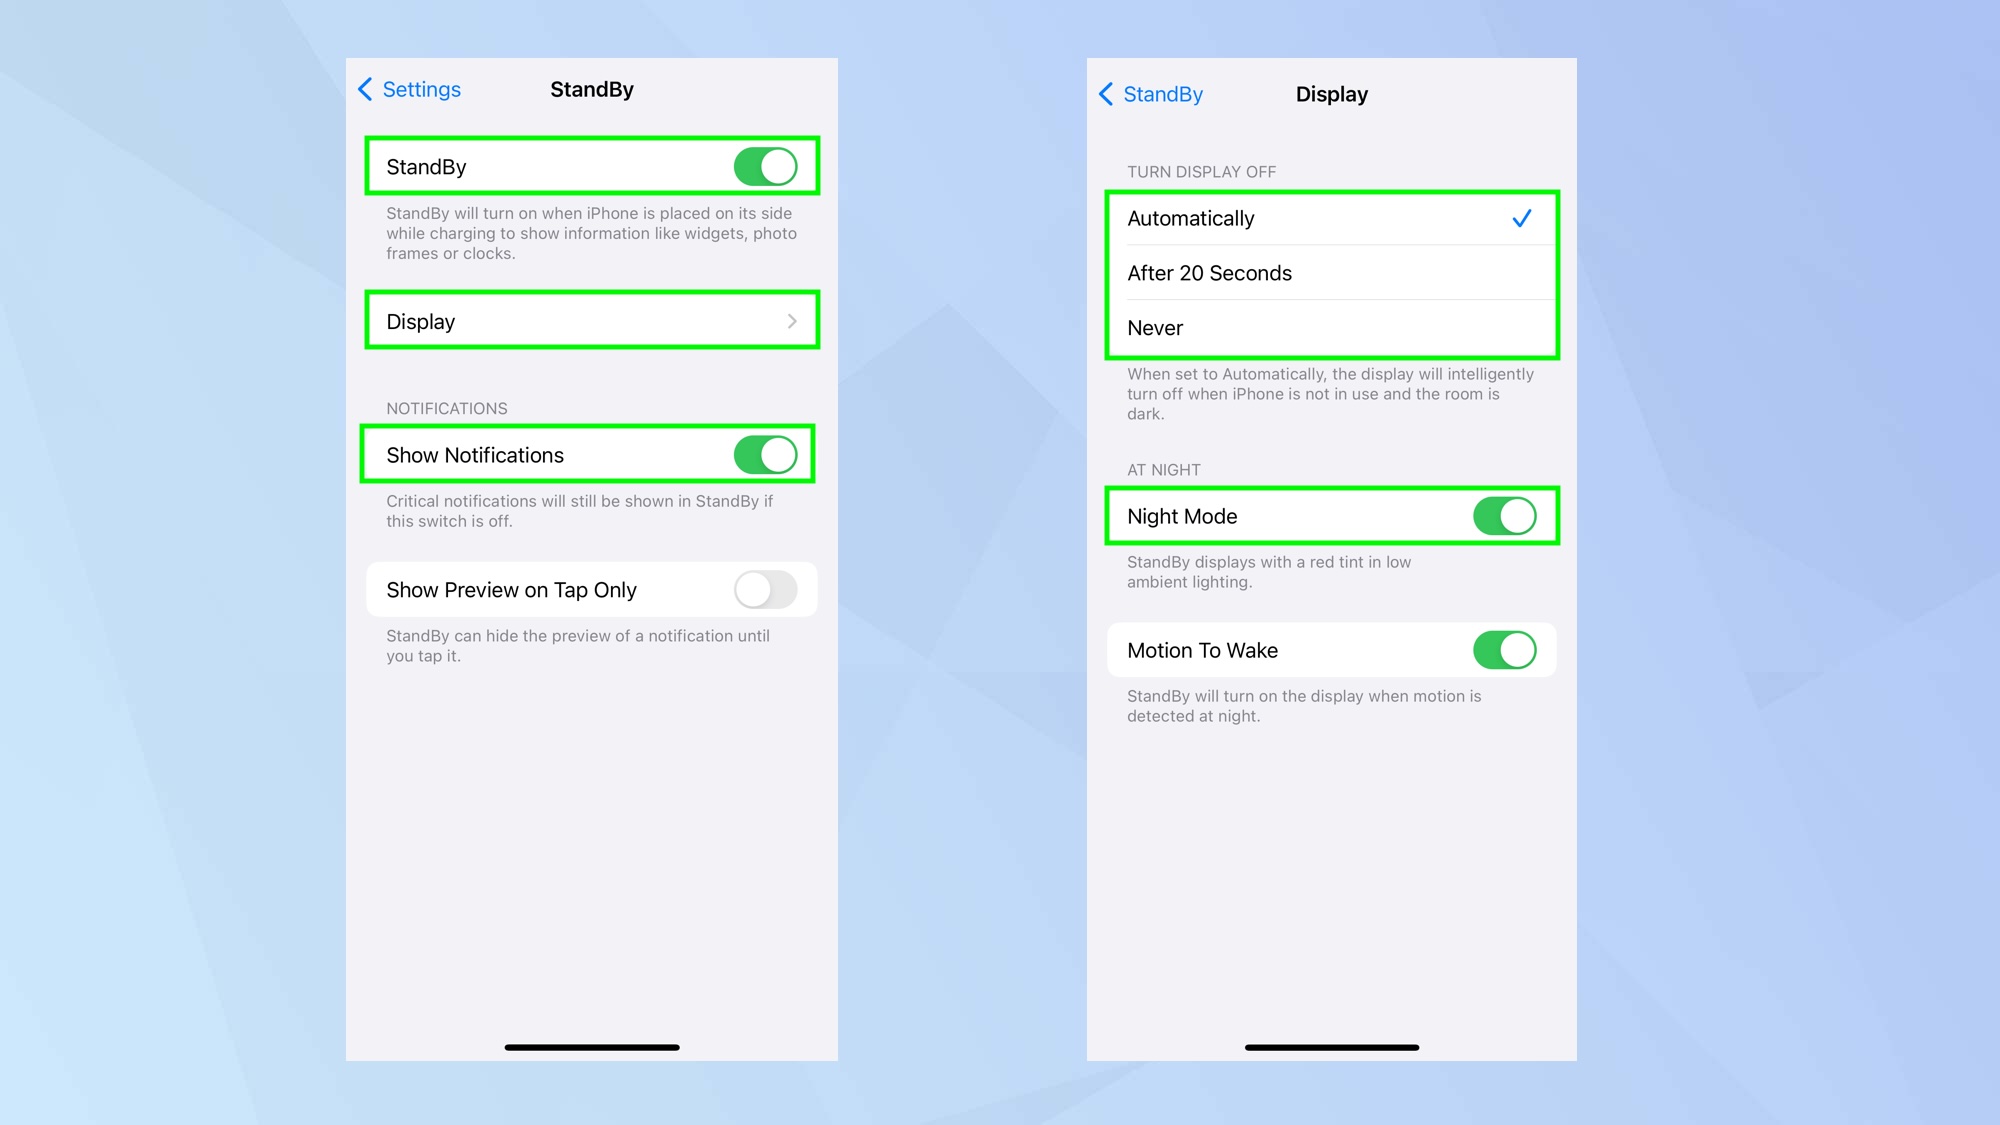
Your iPhone 15 or 15 Plus is also useful when you’re not touching it. Charge the device and turn it on its side and you will enter the StandBy Mode that has a widget-sized clock, weather reports and more available at a glance. The features are customizable so learn how to set up Standby Mode in iOS 17. You will find options if you launch the Settings app and select StandBy. Select Display, for instance, and you can choose how it looks at night and how long the screen stays active for.
If you'd like to keep learning more about your iPhone, you're in luck. We have plenty more guides to help you get the most out of your device. Check out our guide on how to identify plants on iPhone, how to clear RAM on iPhone and how to eject water from an iPhone.
Sign up to get the BEST of Tom's Guide direct to your inbox.
Get instant access to breaking news, the hottest reviews, great deals and helpful tips.

David Crookes is a freelance writer, reporter, editor and author. He has written for technology and gaming magazines including Retro Gamer, Web User, Micro Mart, MagPi, Android, iCreate, Total PC Gaming, T3 and Macworld. He has also covered crime, history, politics, education, health, sport, film, music and more, and been a producer for BBC Radio 5 Live.
