Mapping a network drive in Windows 10: Here's how to do it
Here’s everything you need for mapping a network drive in Windows 10
If you need to share files across a network, mapping a network drive in Windows 10 a trick you need to know. Forget sending email attachments or passing around a USB stick, this allows you to set up a drive that can be shared and accessible by multiple devices simultaneously.
This function is extremely useful if you’re collaborating with people from a remote location, or for working on group projects with people across timezones. In today’s current climate, it’s a vitally important tool that looks to only become more useful.
- How to use Windows 10 like a pro
- Best keyboards in 2021
- The best laptops, ranked
Mapping a network drive might sound extremely complicated, but on Windows 10 it’s actually a fairly straightforward task. Once you set it up, you can be automatically logged into the drive when you start your device as well, so you won’t have to repeat the setup multiple times.
So, if you’re unsure how to go about mapping a network drive in Windows 10, let's get to our step-by-step walkthrough to show you how to do it:
1. Select Settings from the Start Menu
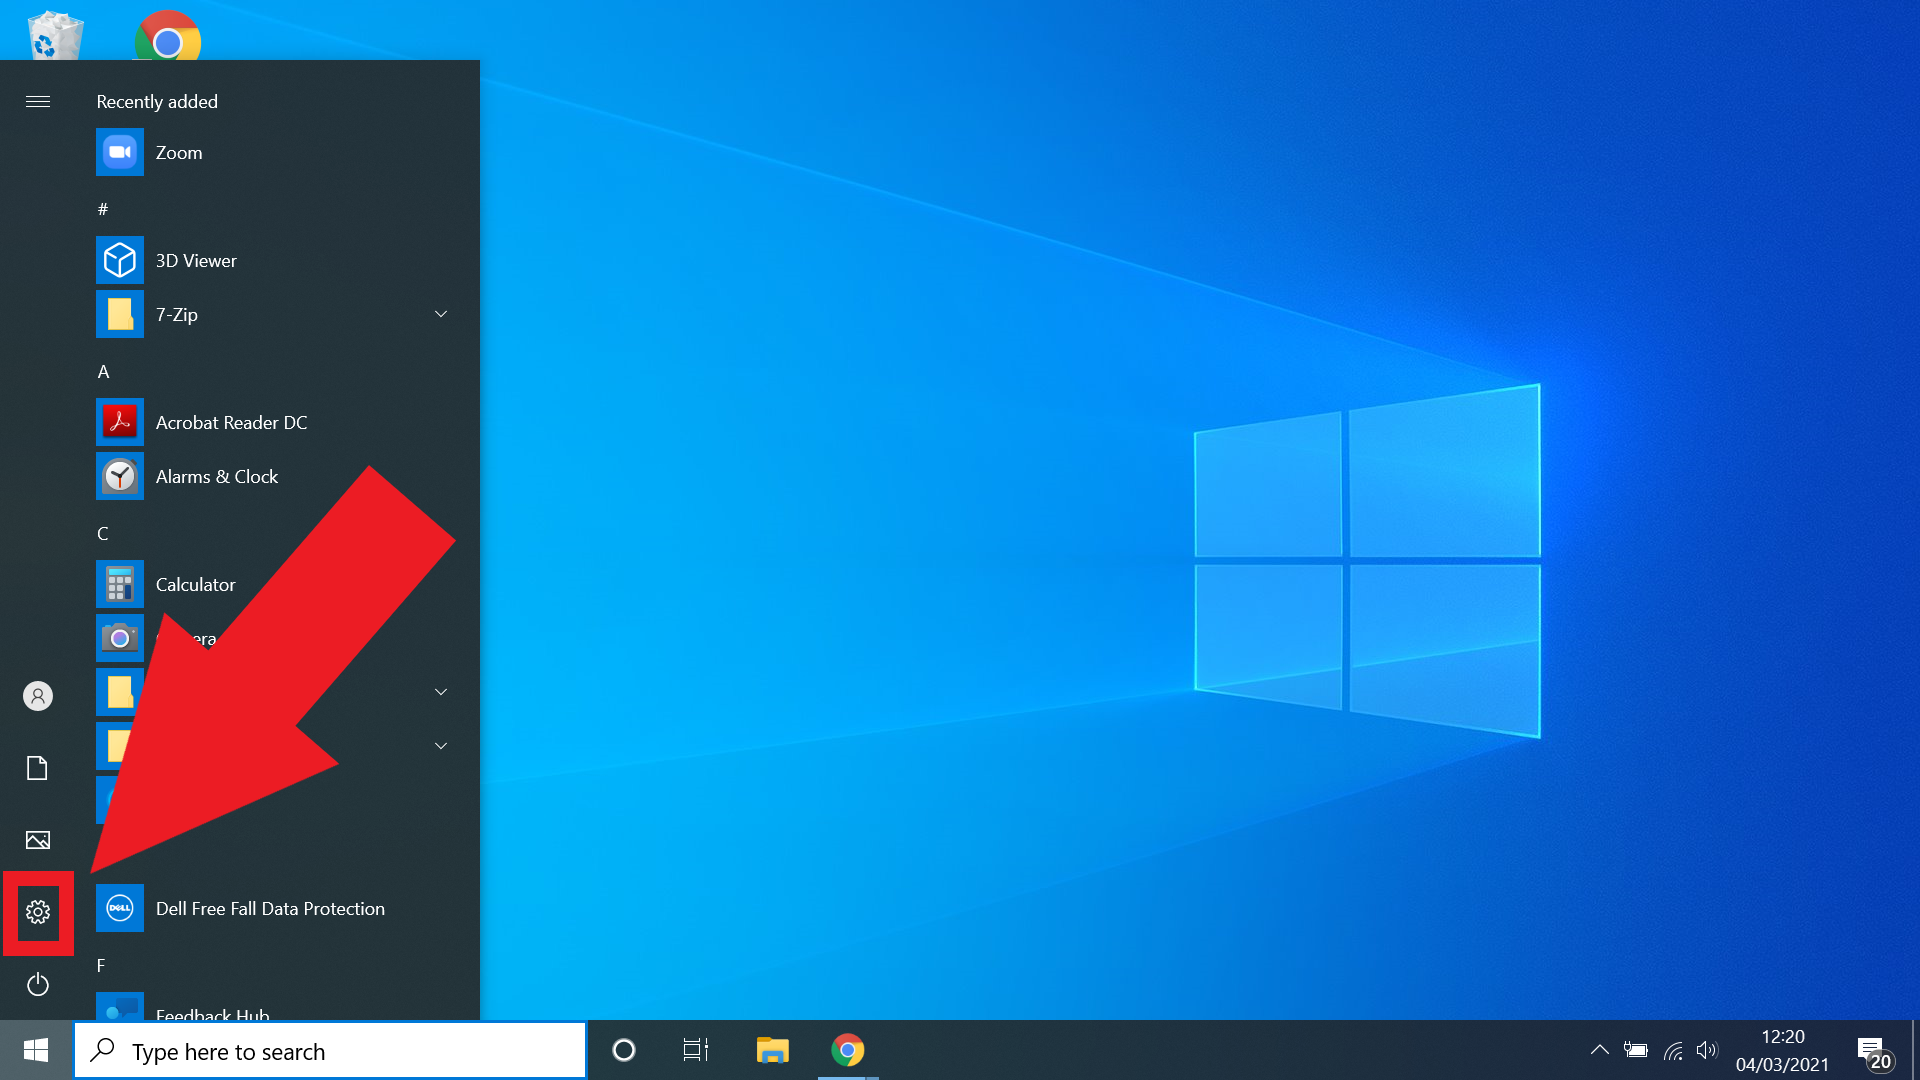
The Start Menu can be found on the bottom left of the toolbar in Windows 10. Just click the Windows logo to bring the Start Menu up and then select Settings. Alternatively, just type in ‘settings’ into the conveniently located search bar.
2. Select Network and Internet
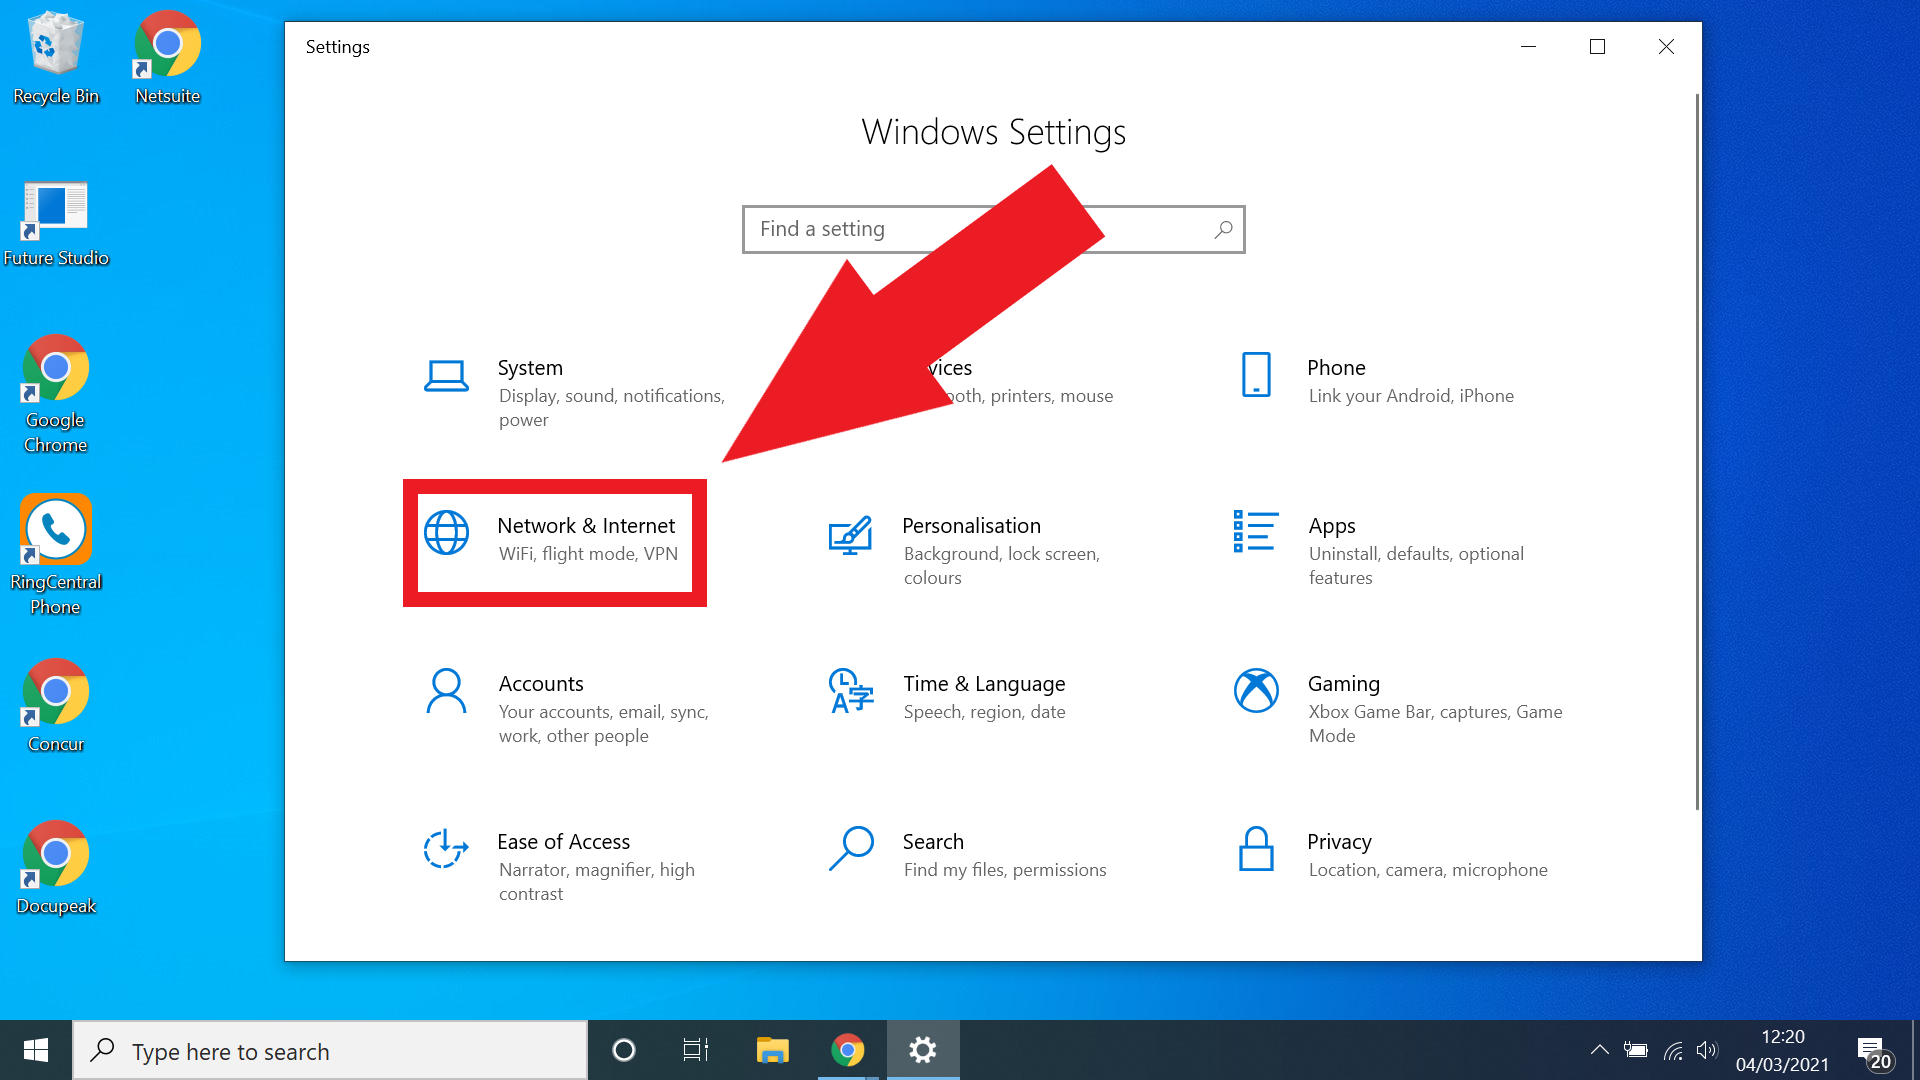
With the Settings Menu open, select the Network and Internet option. If you’re having any issues locating it, you can also use the search bar at the top of the Settings Menu to easily locate it.
3. Select Wi-Fi from the Network and Internet Menu
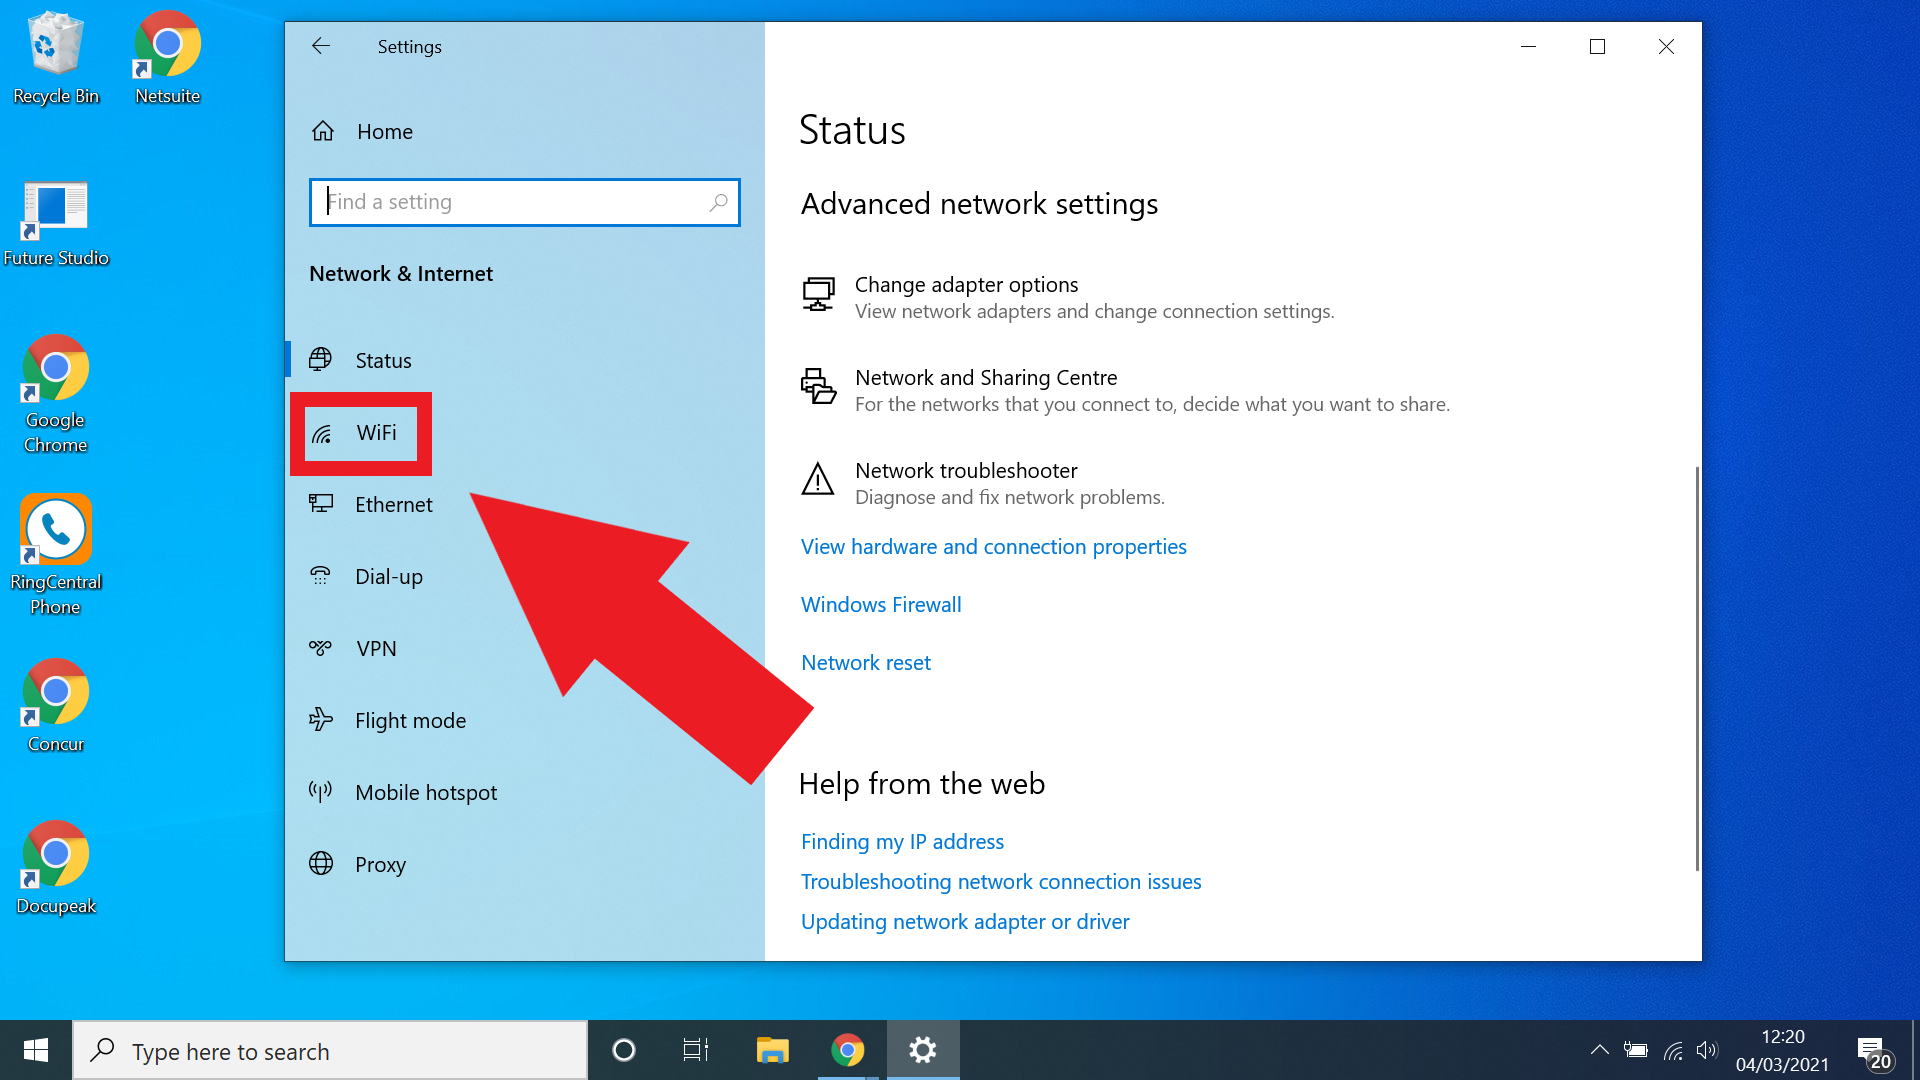
On the left-hand side of the Network and Internet Menu you’ll see a tab labeled Wi-Fi, select this one. Again there is also a search bar, should you have any issues locating the tab.
Sign up to get the BEST of Tom's Guide direct to your inbox.
Get instant access to breaking news, the hottest reviews, great deals and helpful tips.
4. Select Change advanced sharing options
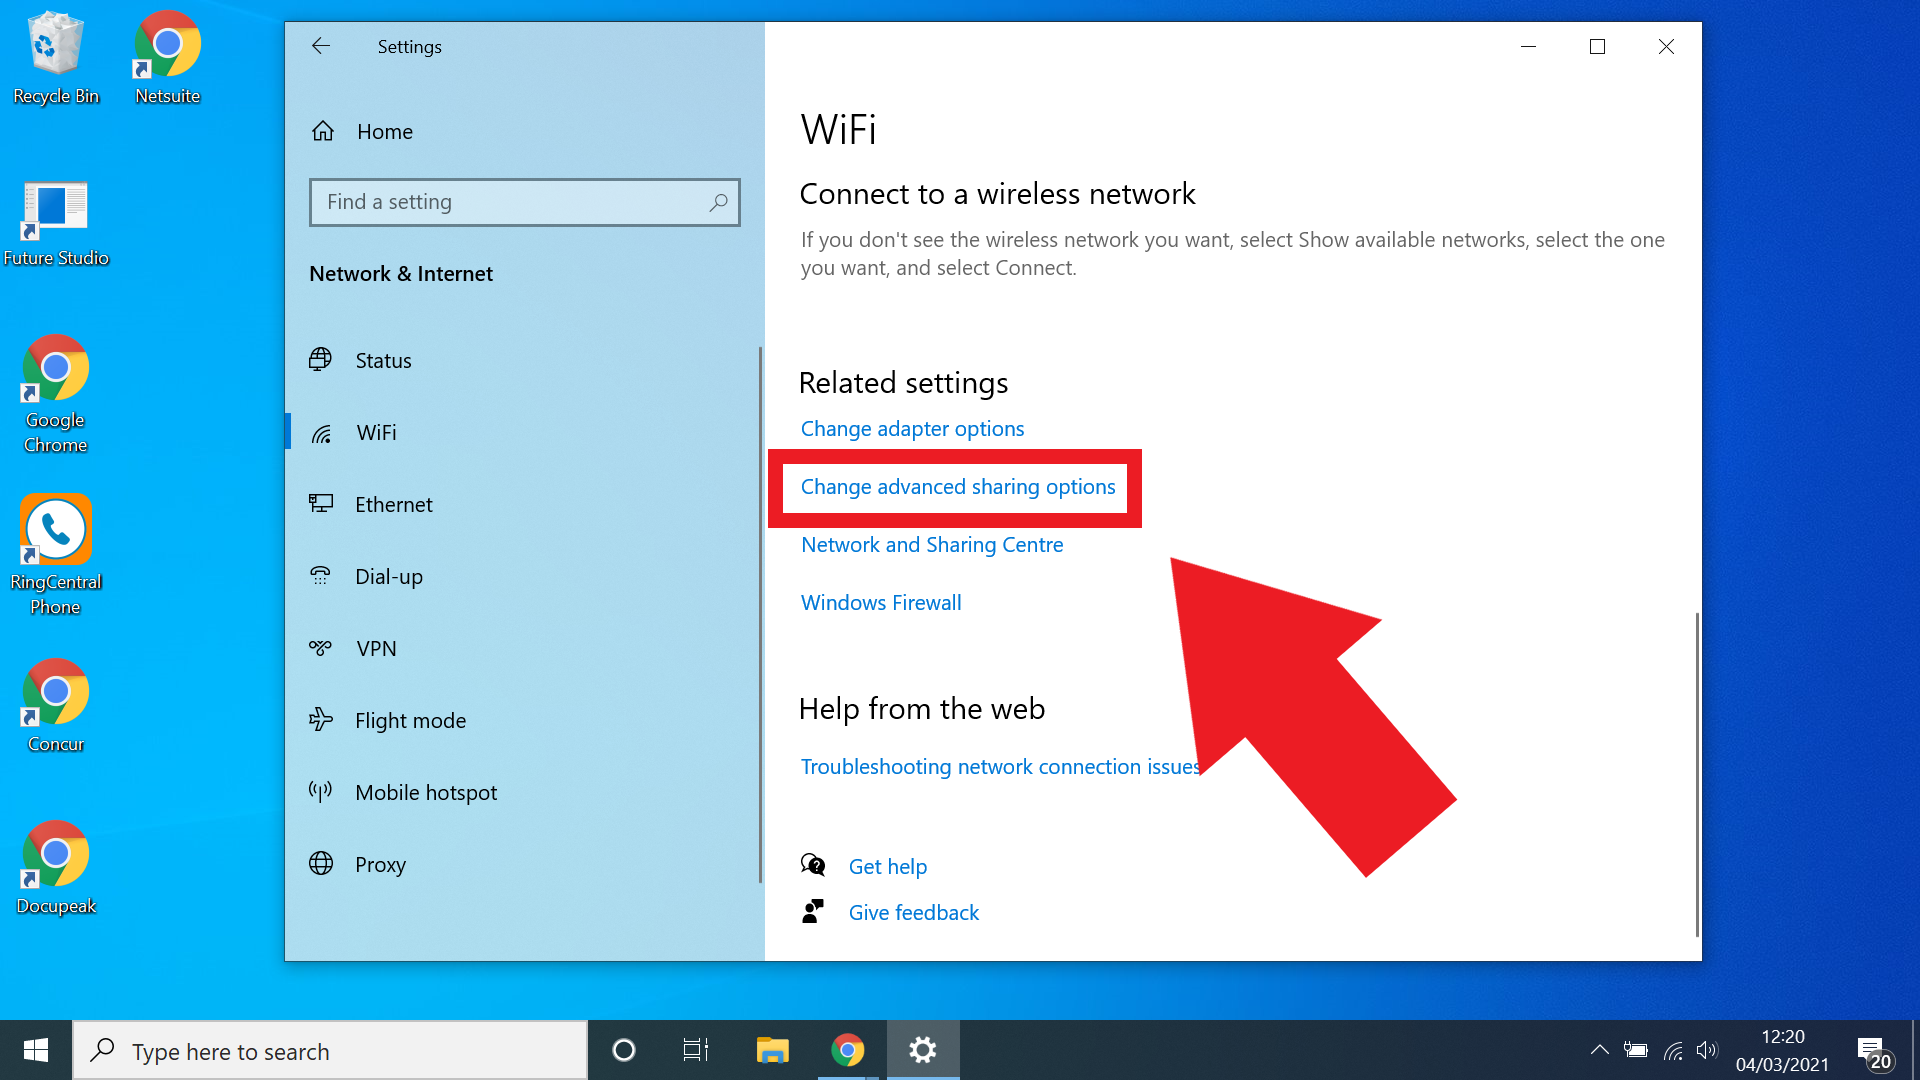
From the Wi-Fi tab in the Settings Menu, scroll down until you get to the “Related settings” subheading. Here click the “Change advanced sharing options” option.
5. Click Turn on network discovery
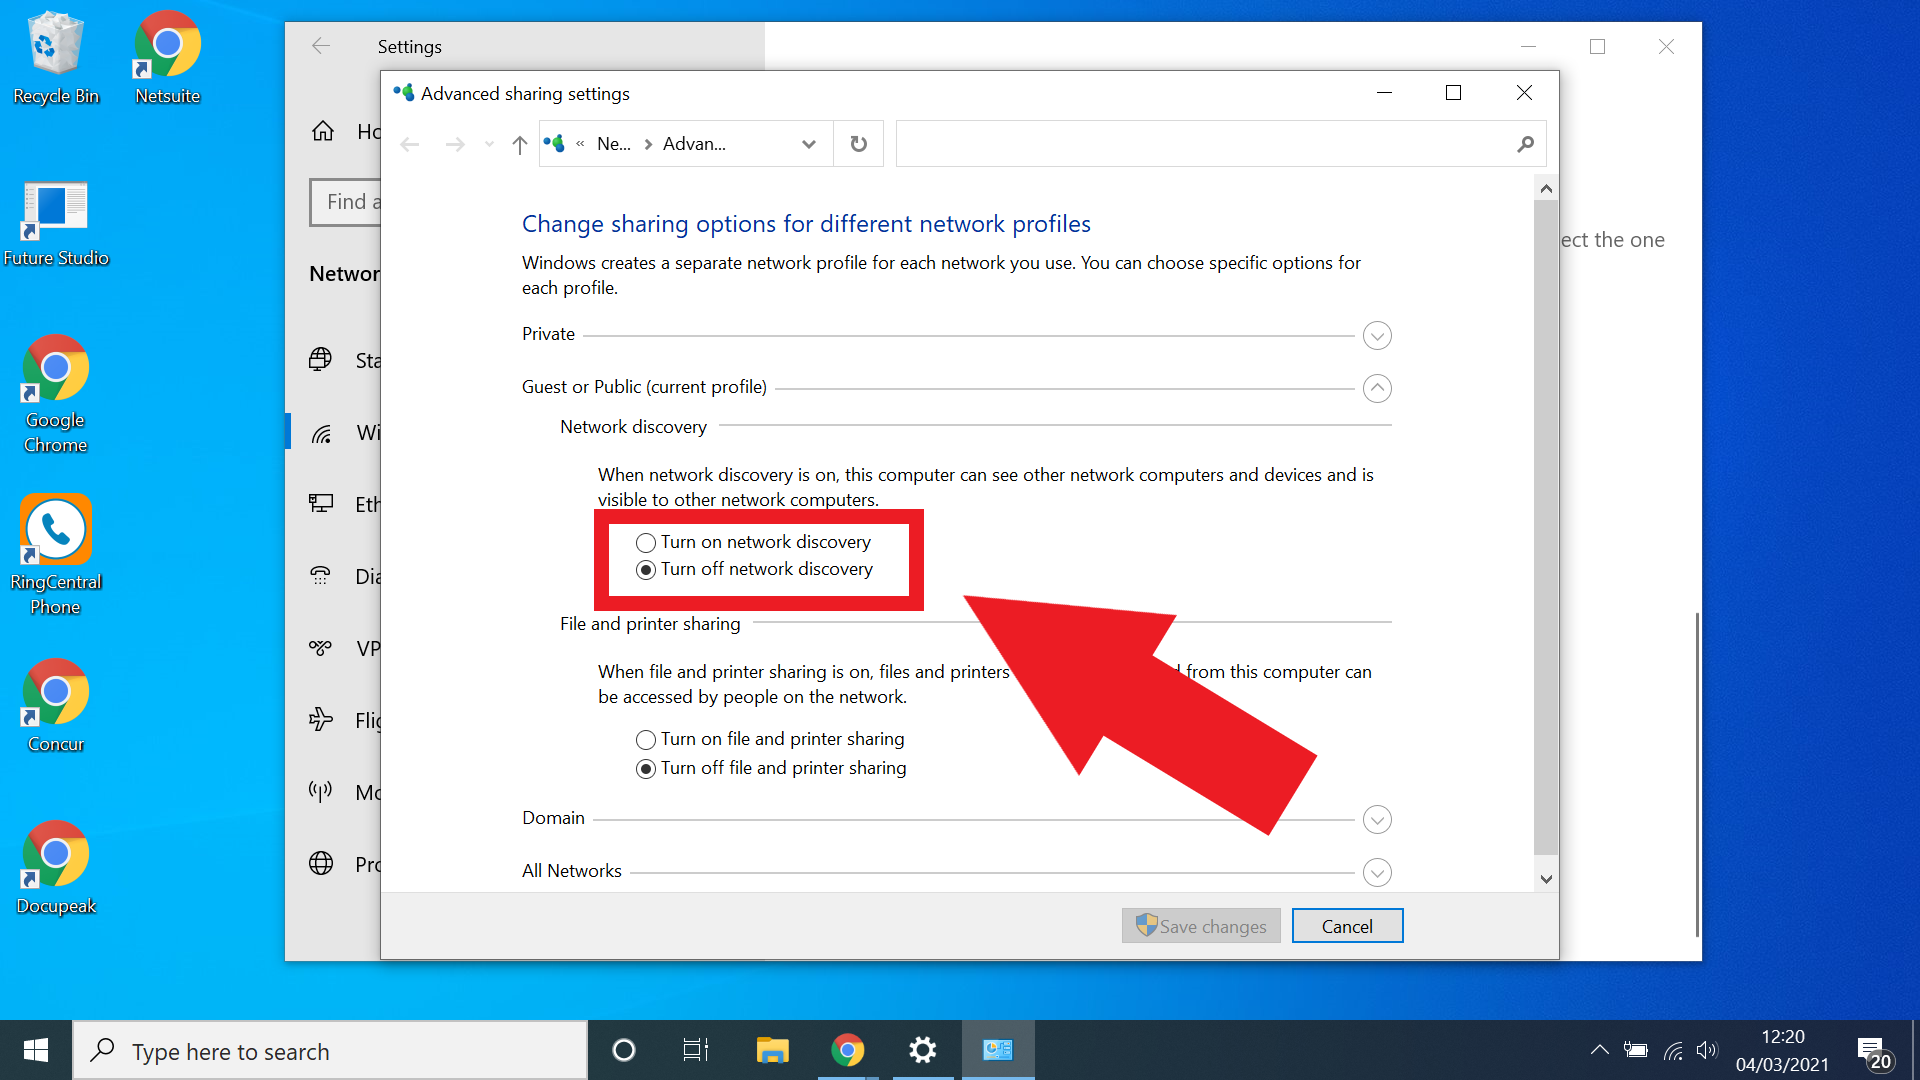
Ensure that network discovery is turned on in the settings, once you’ve done so hit the “Save Changes” button in the bottom corner of the window. If network discovery is already enabled then the button “Saving Changes” button should be greyed out.
6. Open File Explorer
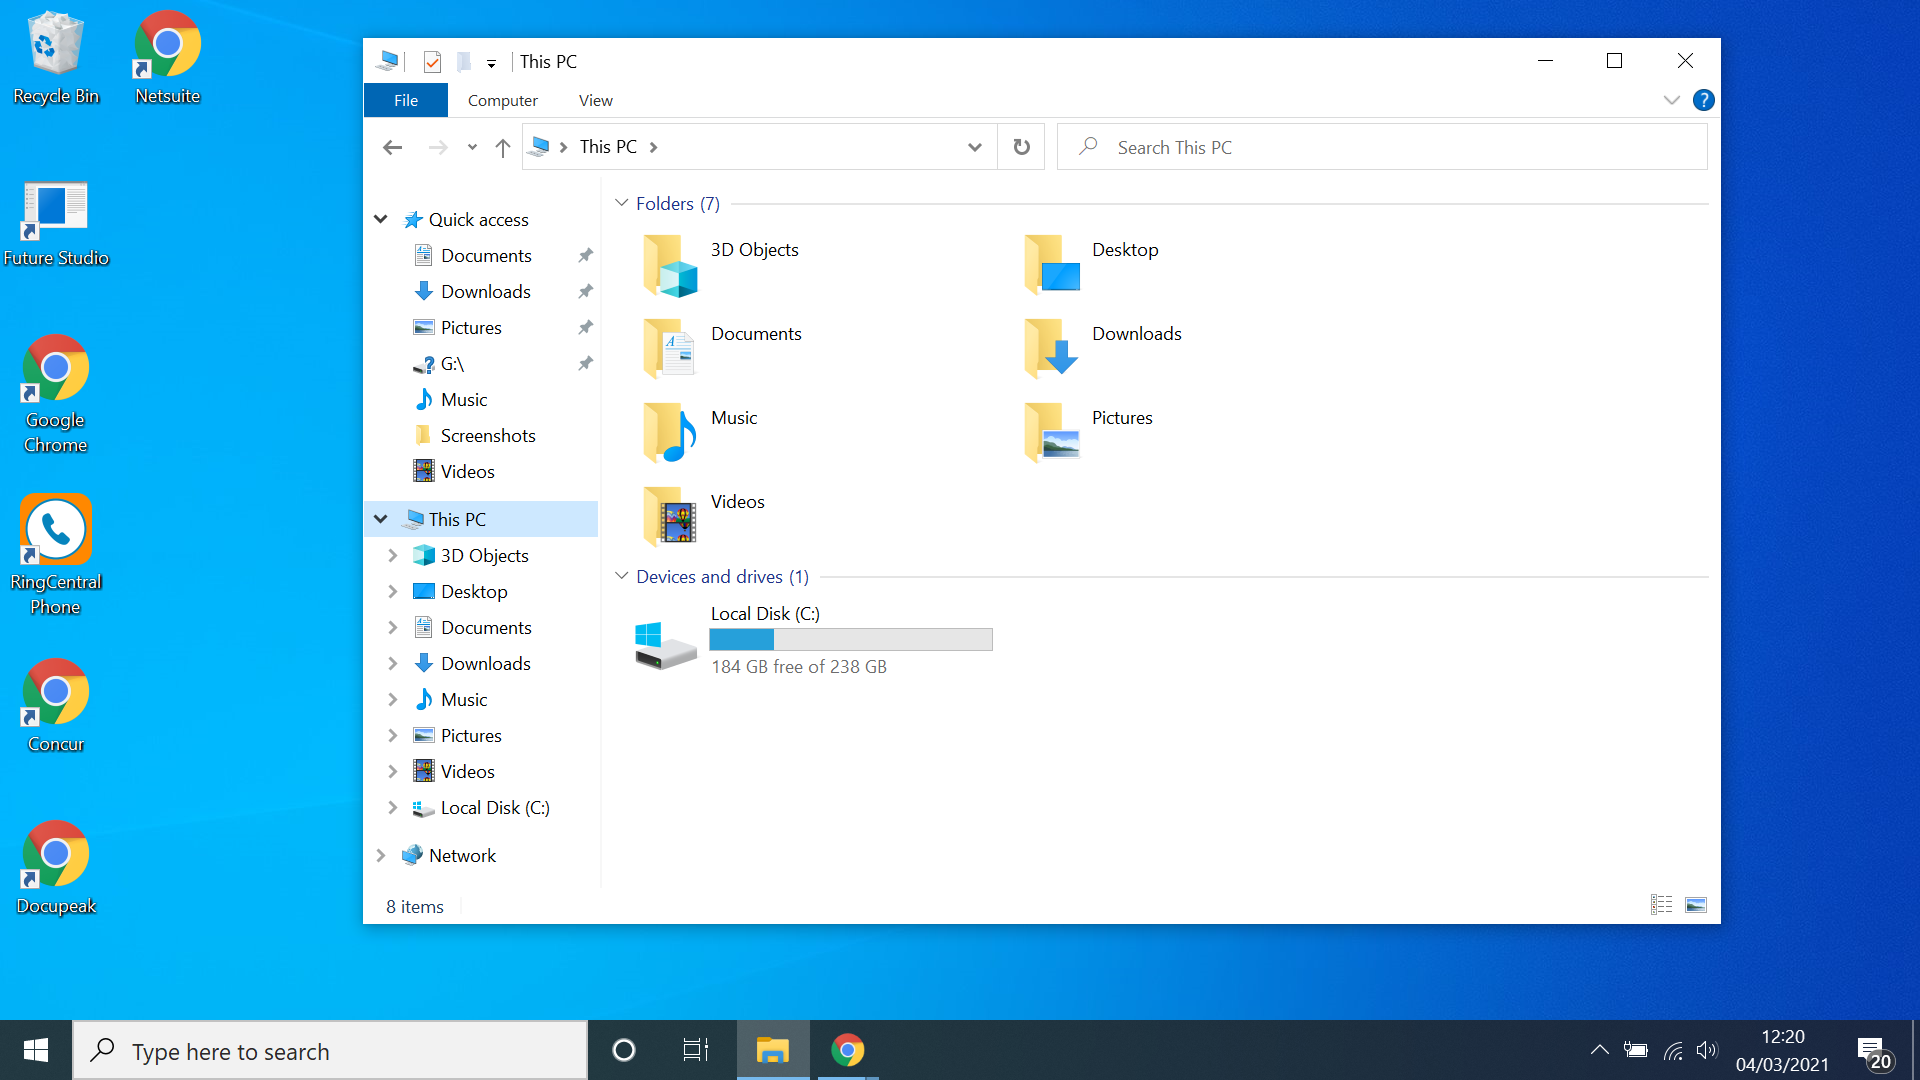
File Explorer may well be pinned to your toolbar. If it’s not, you can easily locate it using the search bar next to the Start Menu.
7. Click on This PC and then the Computer tab
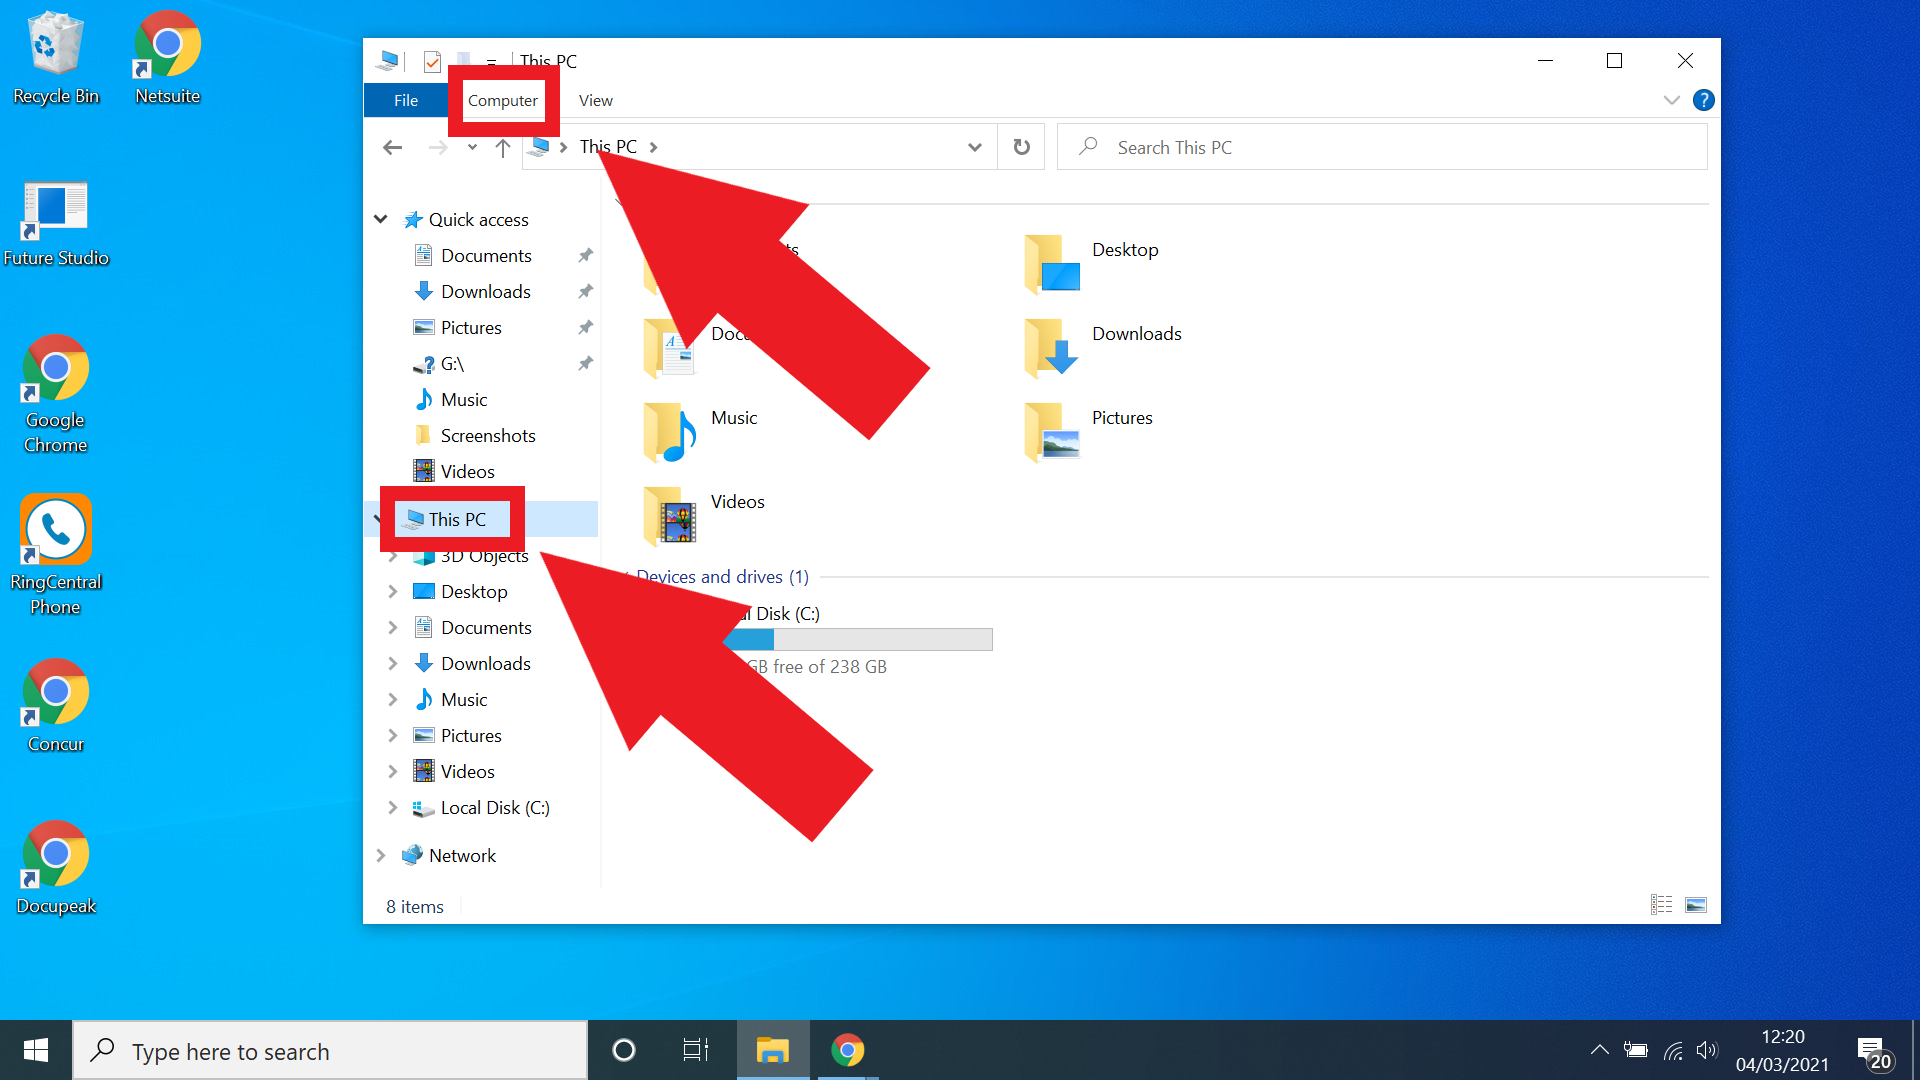
Once you’ve opened up File Explorer, navigate over to the This PC menu and then open up the Computer tab from the bar at the top of the window.
8. Select map network drive
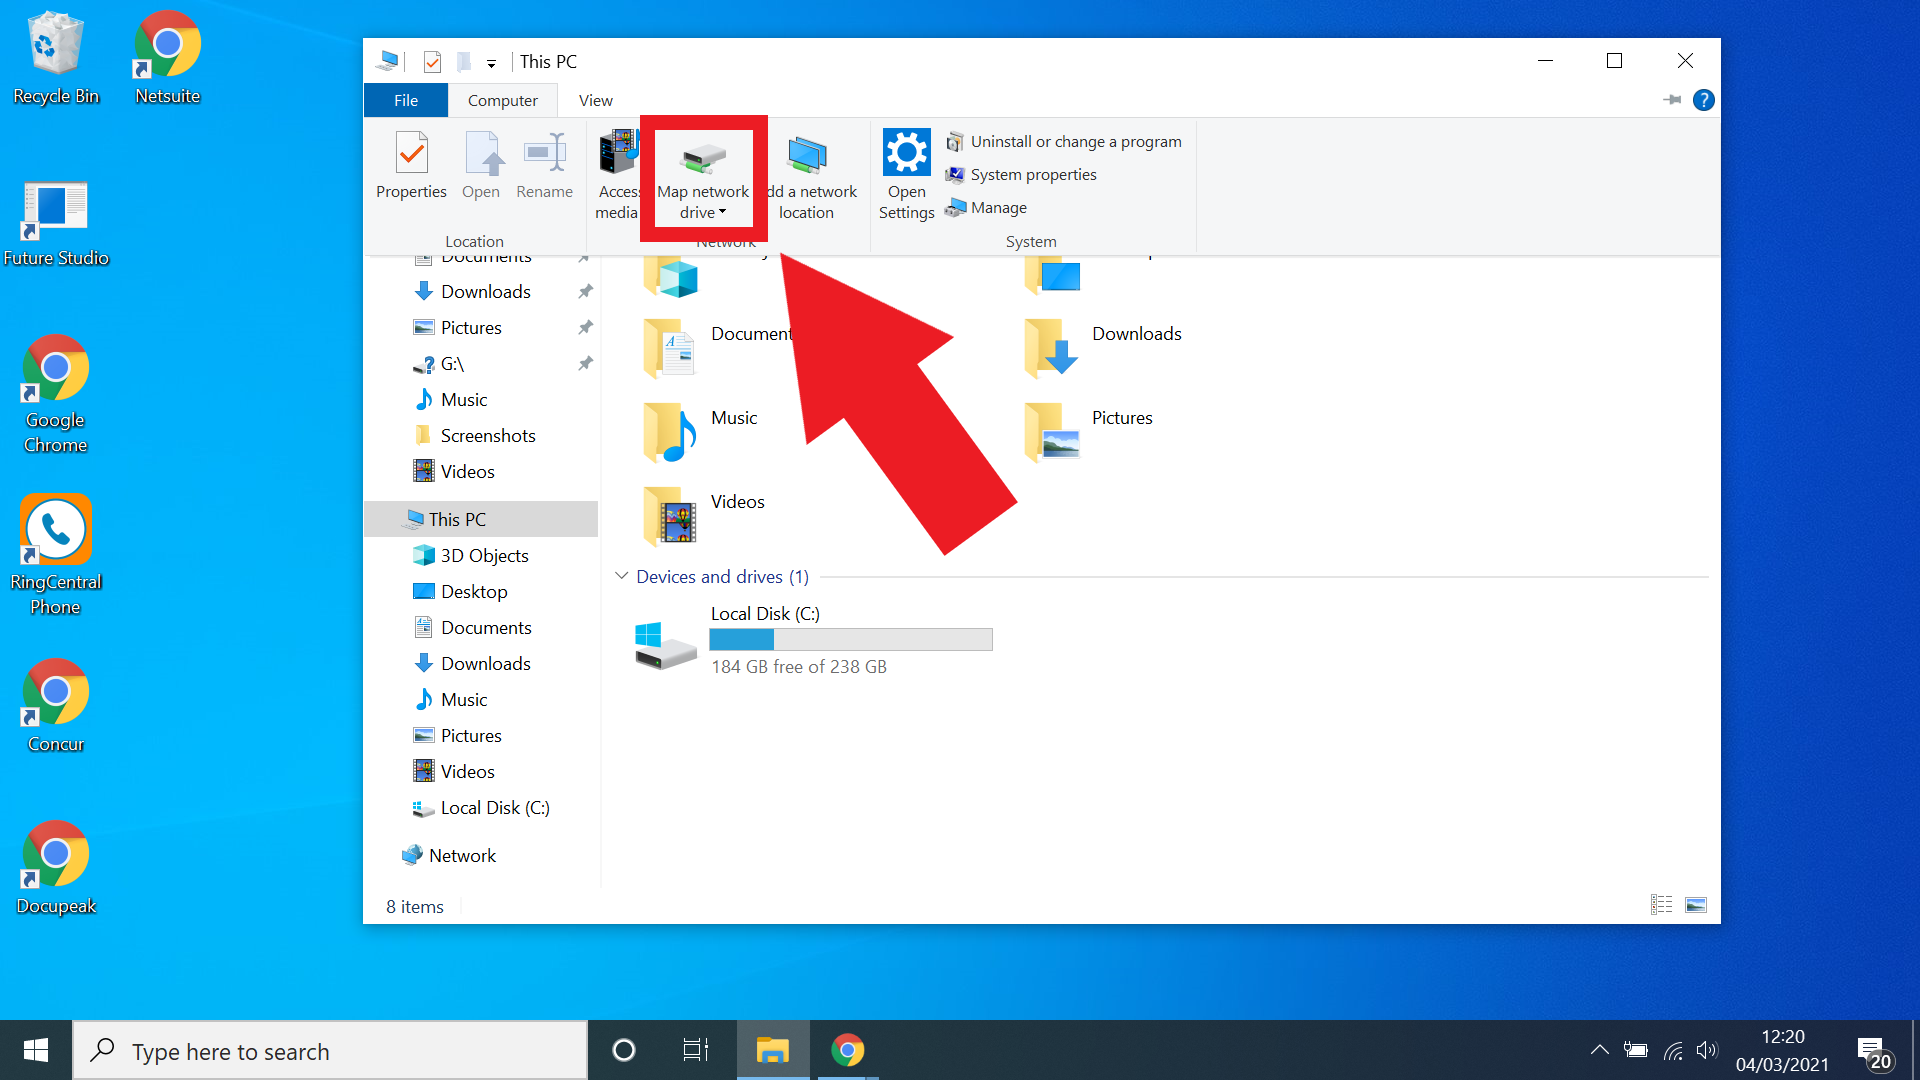
Click the Map network drive option from the Computer tab. This should bring up a new window.
9. Select a drive letter
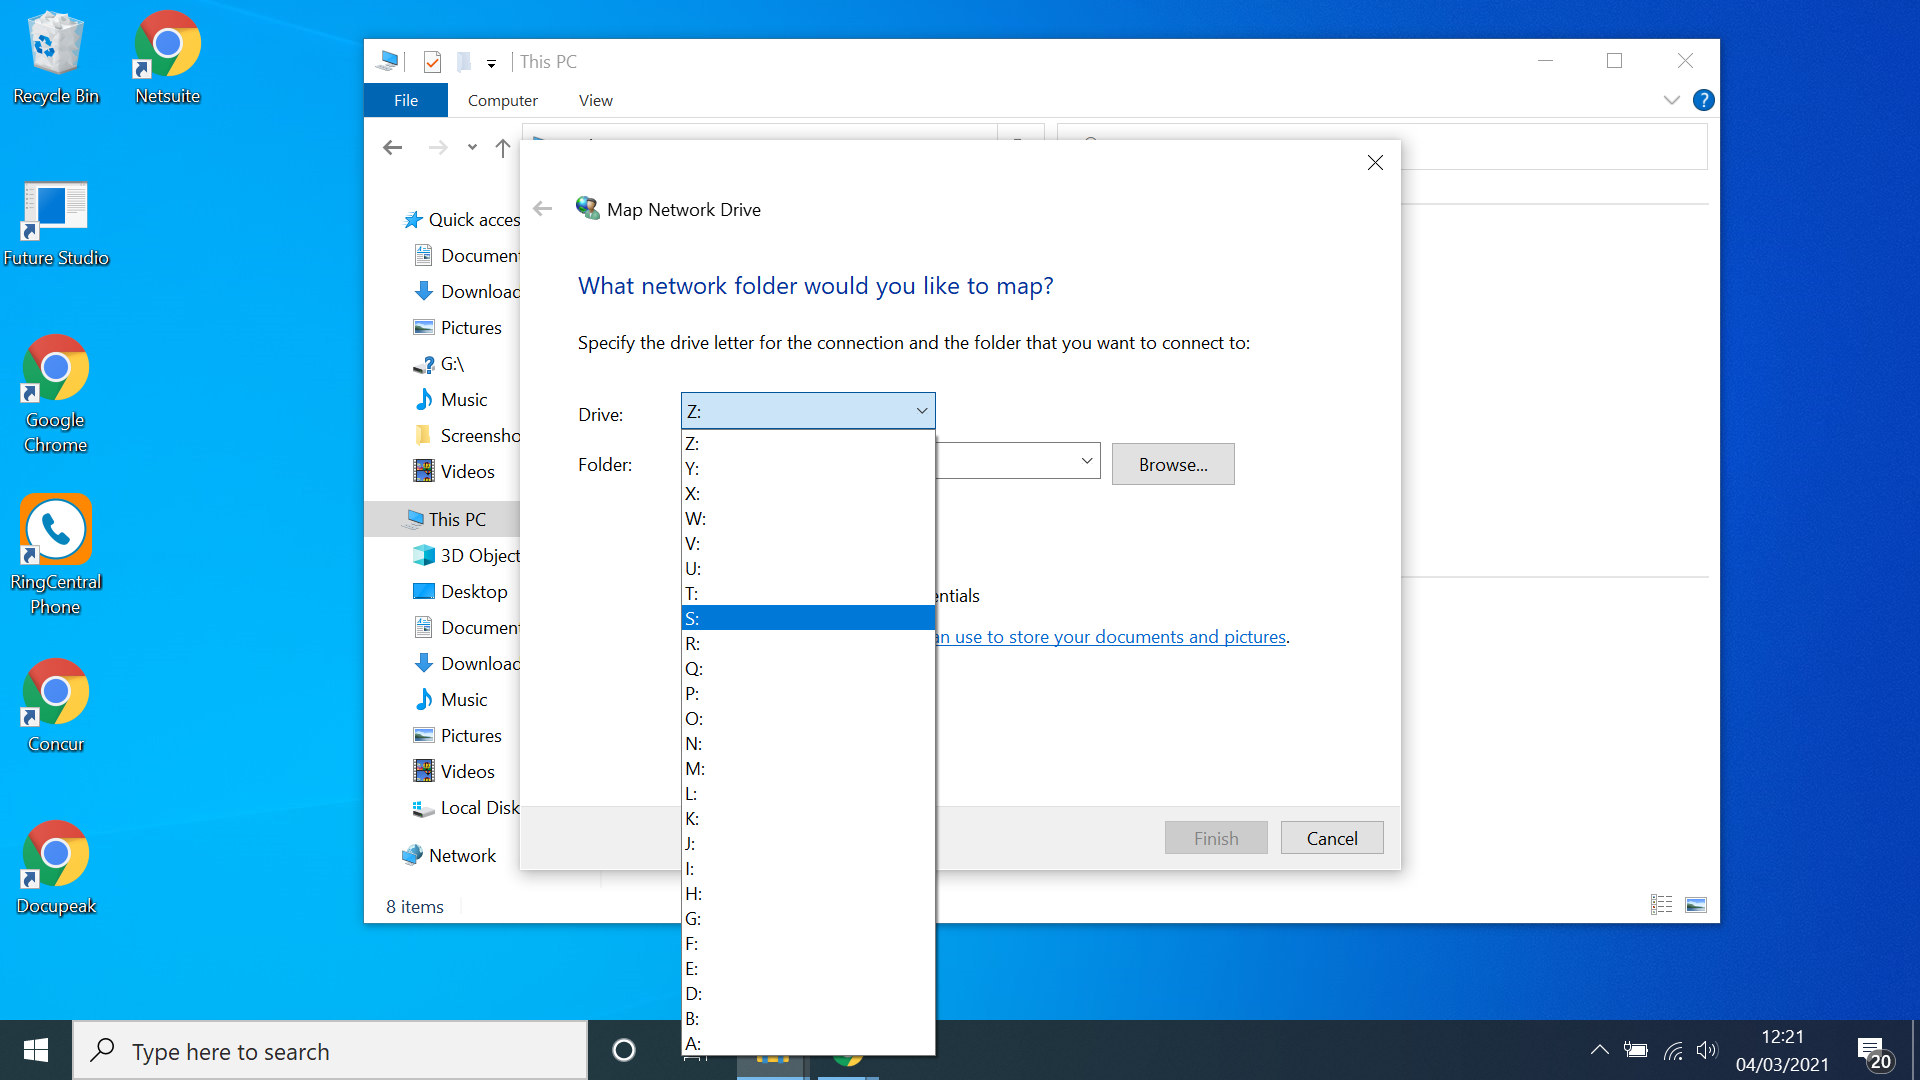
From the Map Network Drive window, use the dropdown menu to select a drive letter. You can select any drive letter, it doesn’t matter which. Just make sure you remember it.
10. Locate the folder
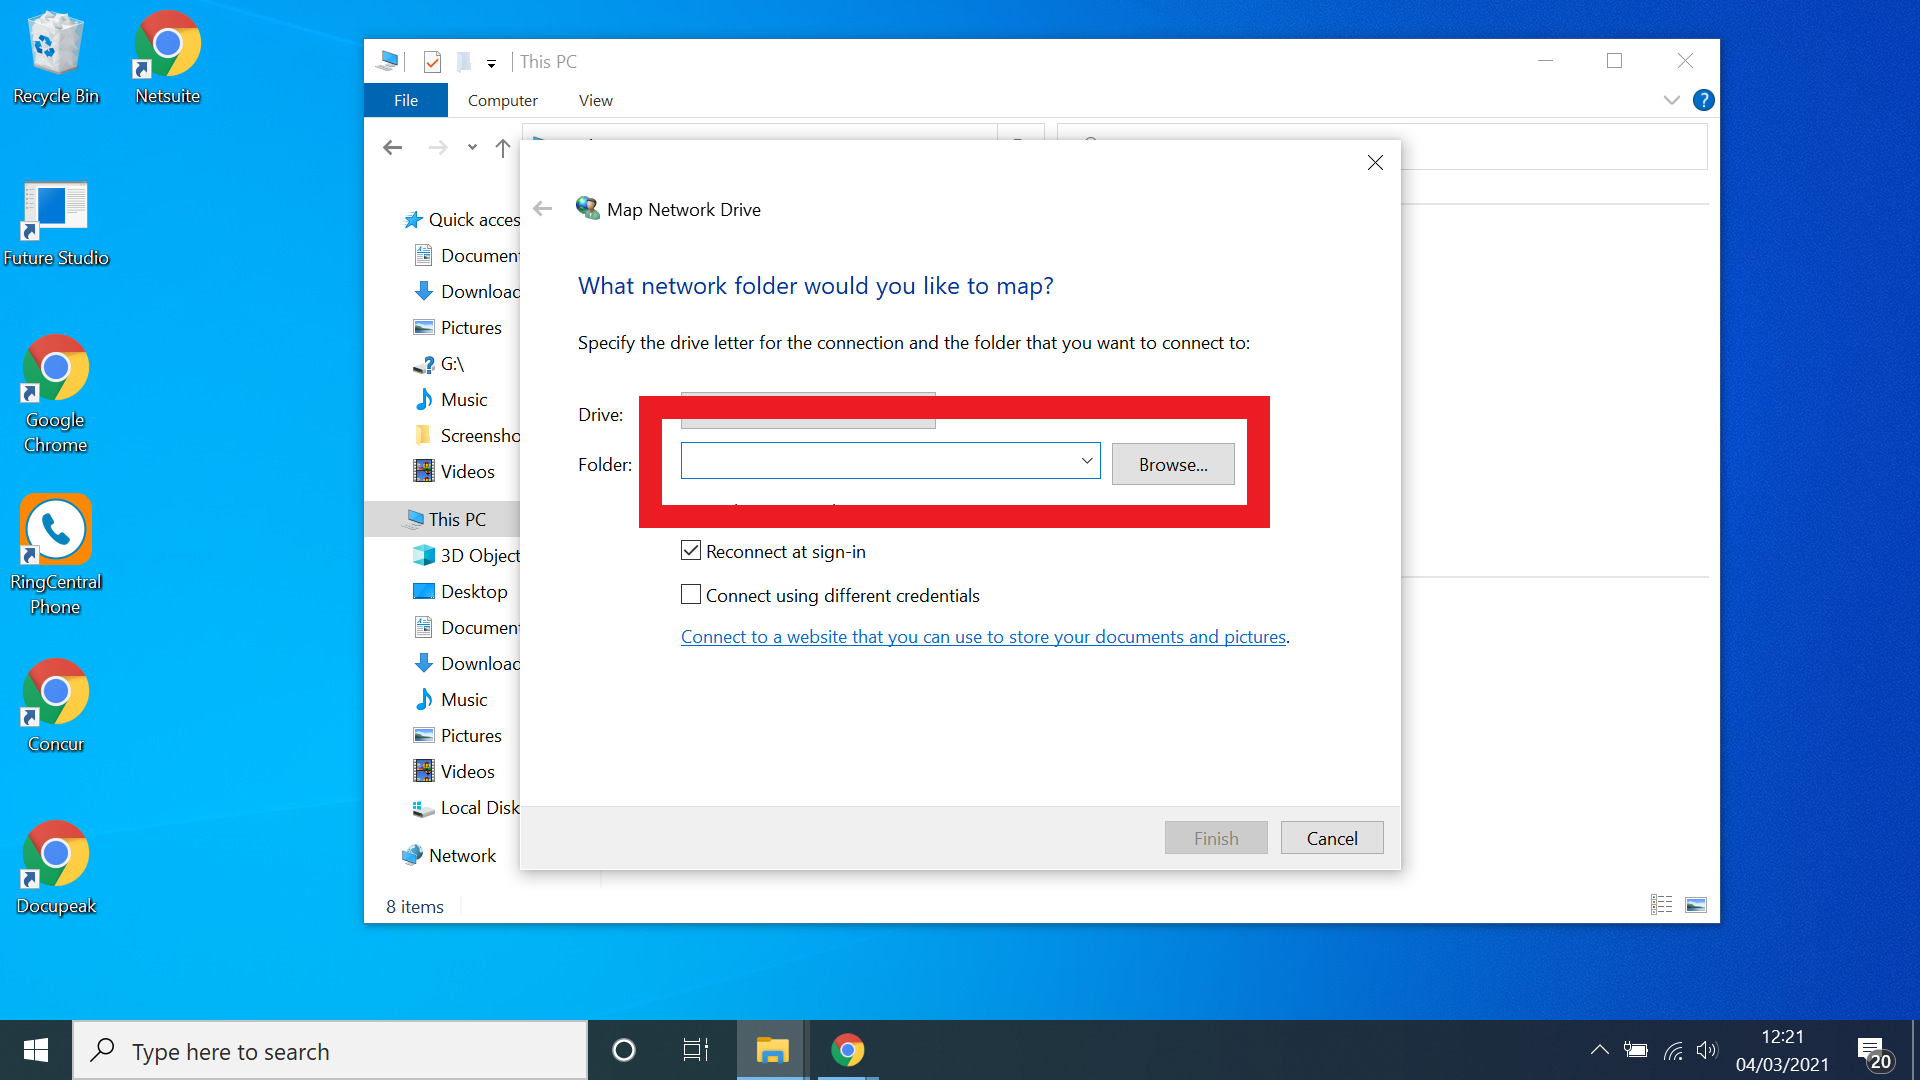
Search for your folder in the prompt, type its path into the field or use the browse tool to find the folder. If this is your first network drive you’ll see a single drive on the list, if you have several already setup then you should see them all when you click the Browse button.
11. Select Reconnect at sign-in (Optional)
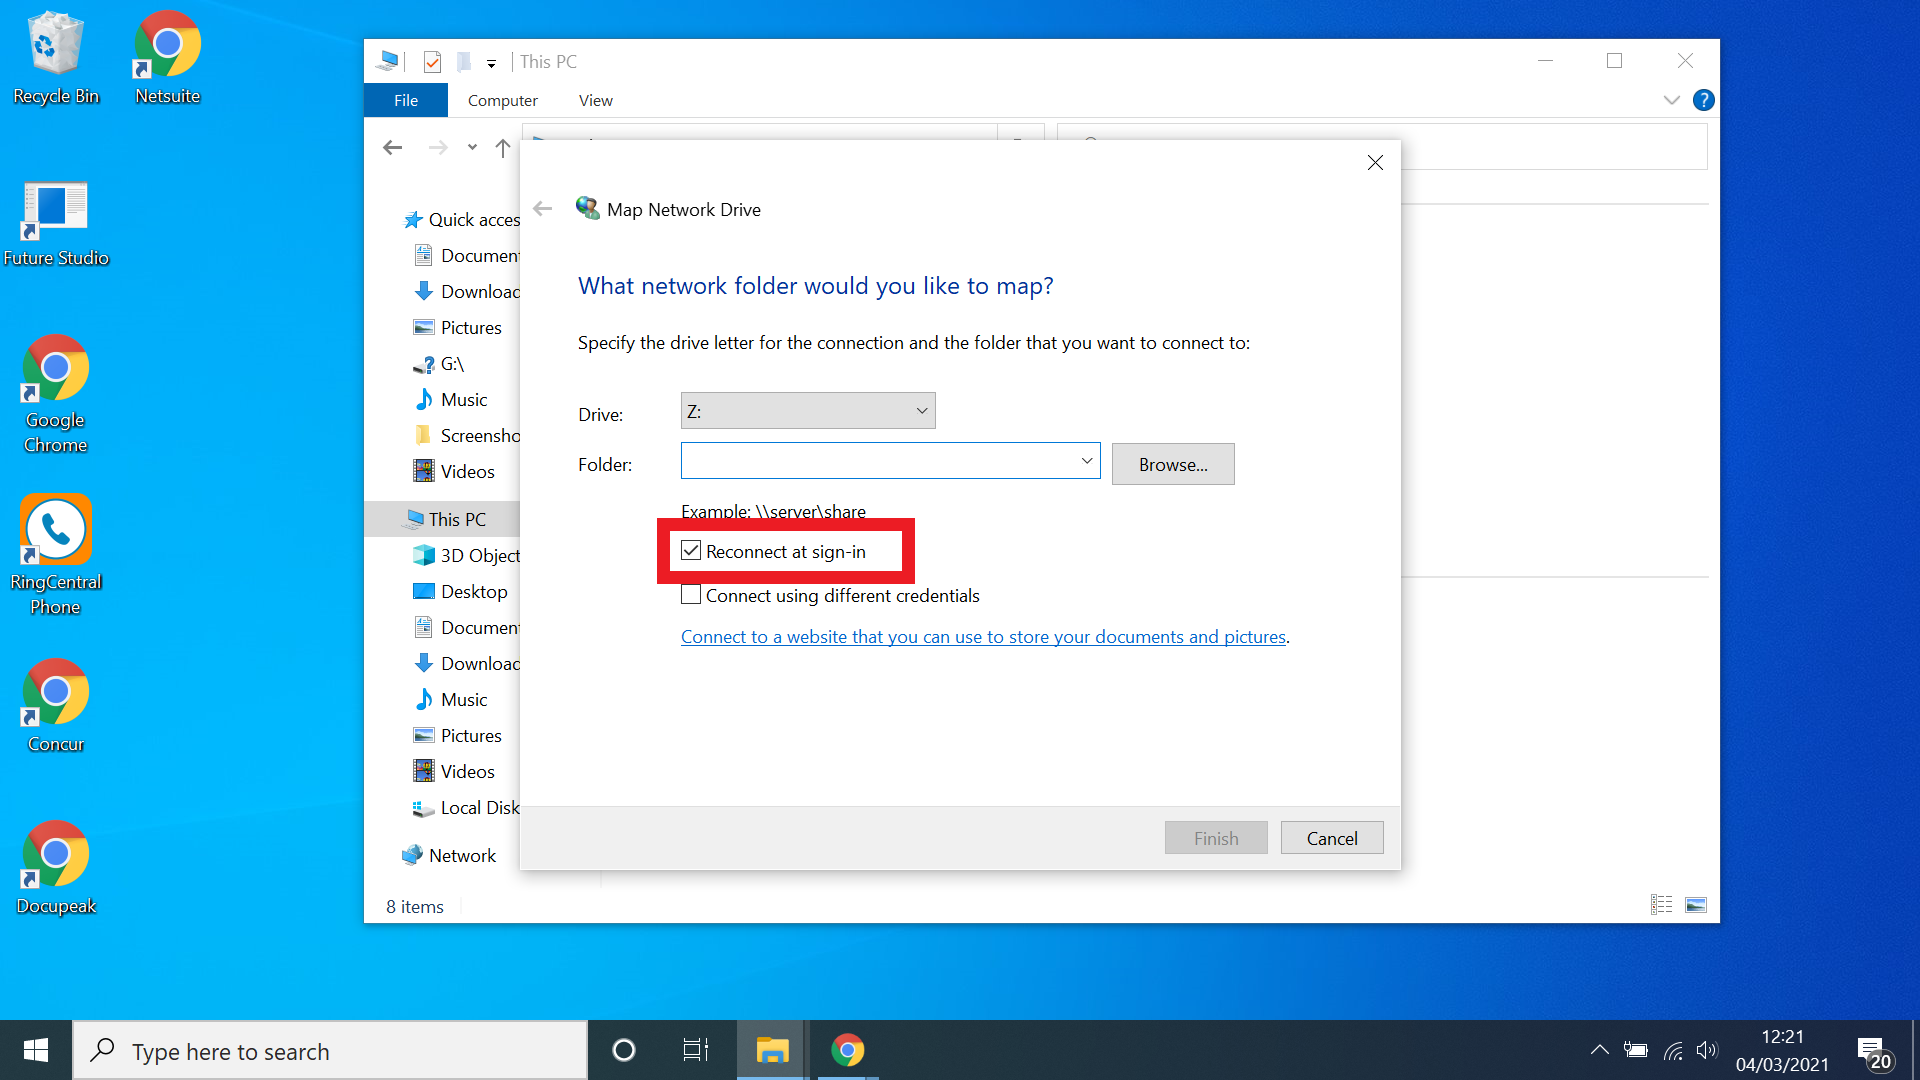
Select Reconnect at sign-in if you want your computer to automatically ensure that the mapped drive is available to you when you turn on your device. Uncheck the box if this is something you don’t need.
12. Select Finish
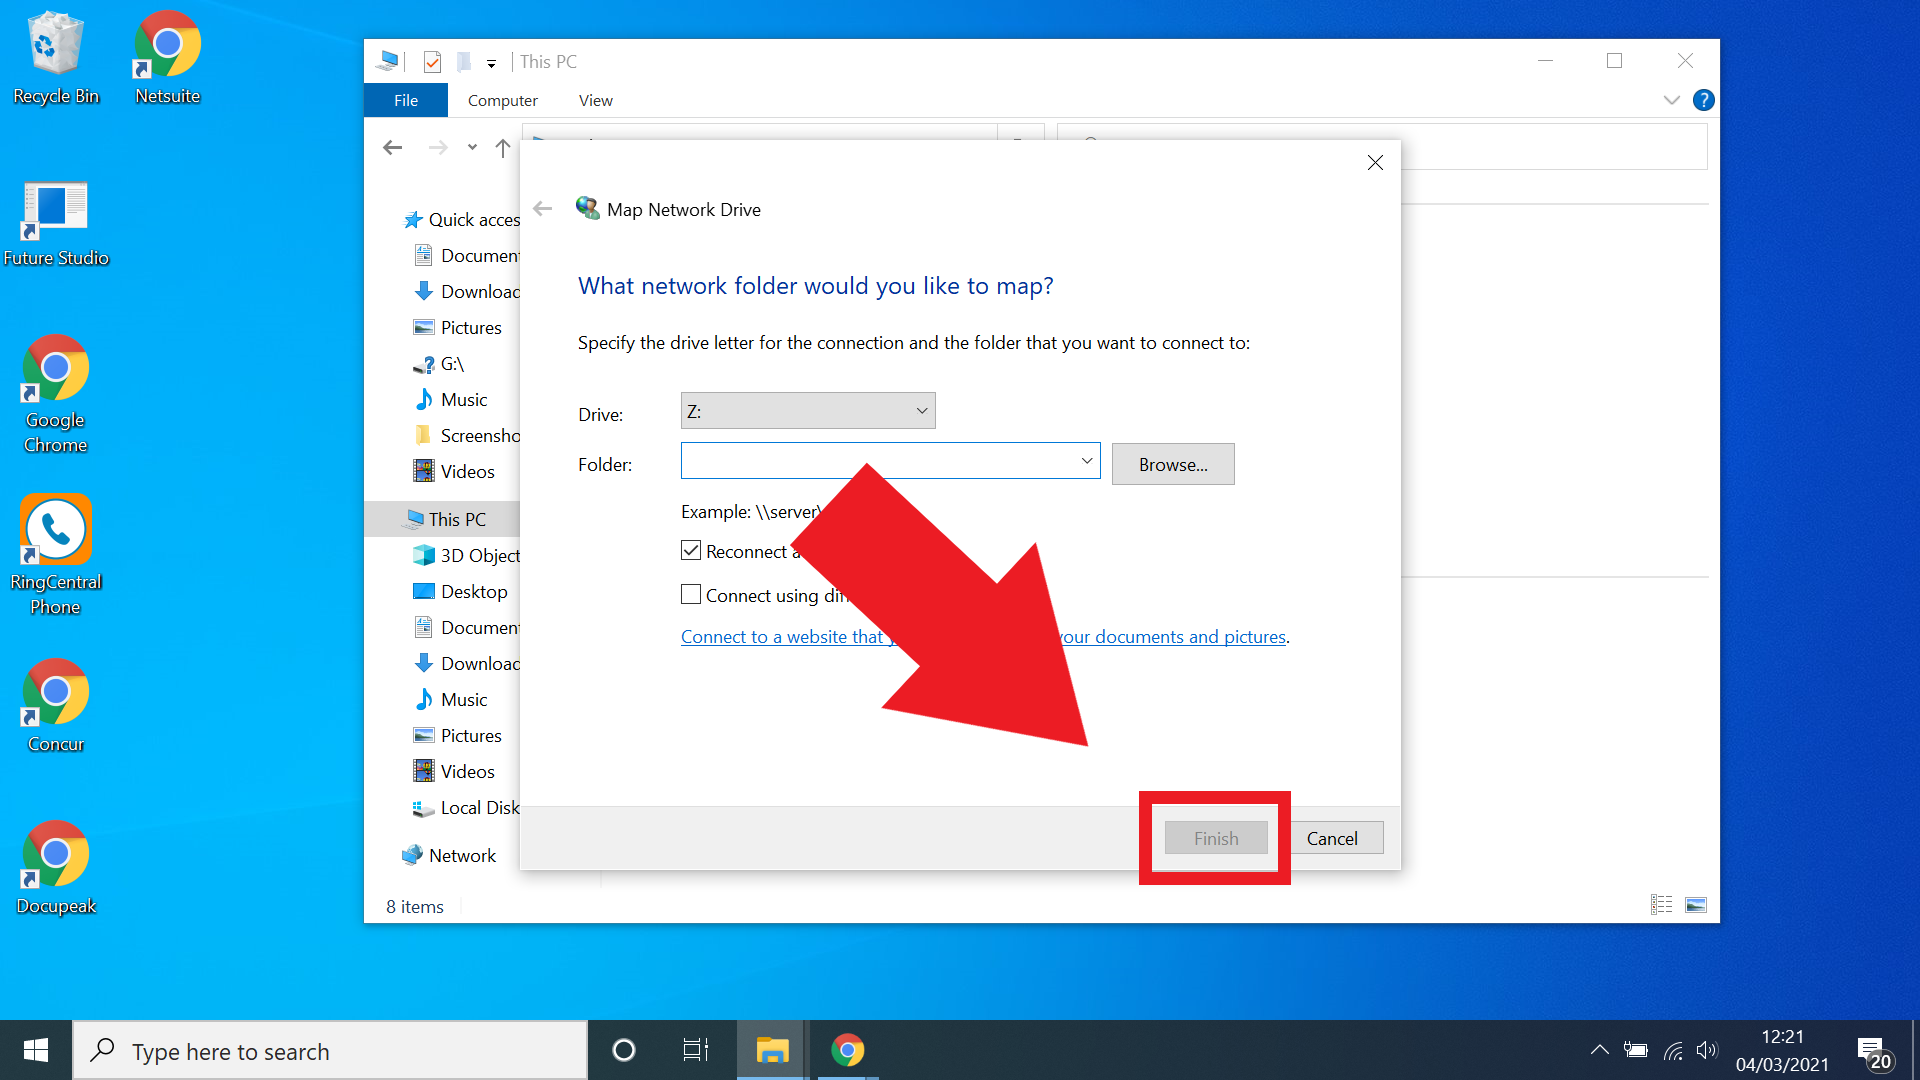
Once you’ve followed all the above instructions, just tap ‘Finish’ in the Map Network Drive window and you’re all set.
More Windows 10 tips
How to find your Windows 10 product key | How to encrypt files on Windows 10 | How to install Windows 10 | How to turn on Bluetooth for Windows 10 | How to screenshot on Windows 10 | How to boot into Windows 10 safe mode | How to split the screen on Windows 10 | How to record a screen on Windows 10 | How to update drivers on Windows 10 | How to update Windows 10 | How to change the password on Windows 10 | How to factory reset on Windows 10 | How to speed up Windows 10 | How to reinstall Windows 10

Rory is an Entertainment Editor at Tom’s Guide based in the UK. He covers a wide range of topics but with a particular focus on gaming and streaming. When he’s not reviewing the latest games, searching for hidden gems on Netflix, or writing hot takes on new gaming hardware, TV shows and movies, he can be found attending music festivals and getting far too emotionally invested in his favorite football team.
