15 underrated iOS screenshot features every iPhone owner should know
Did you know about them all?
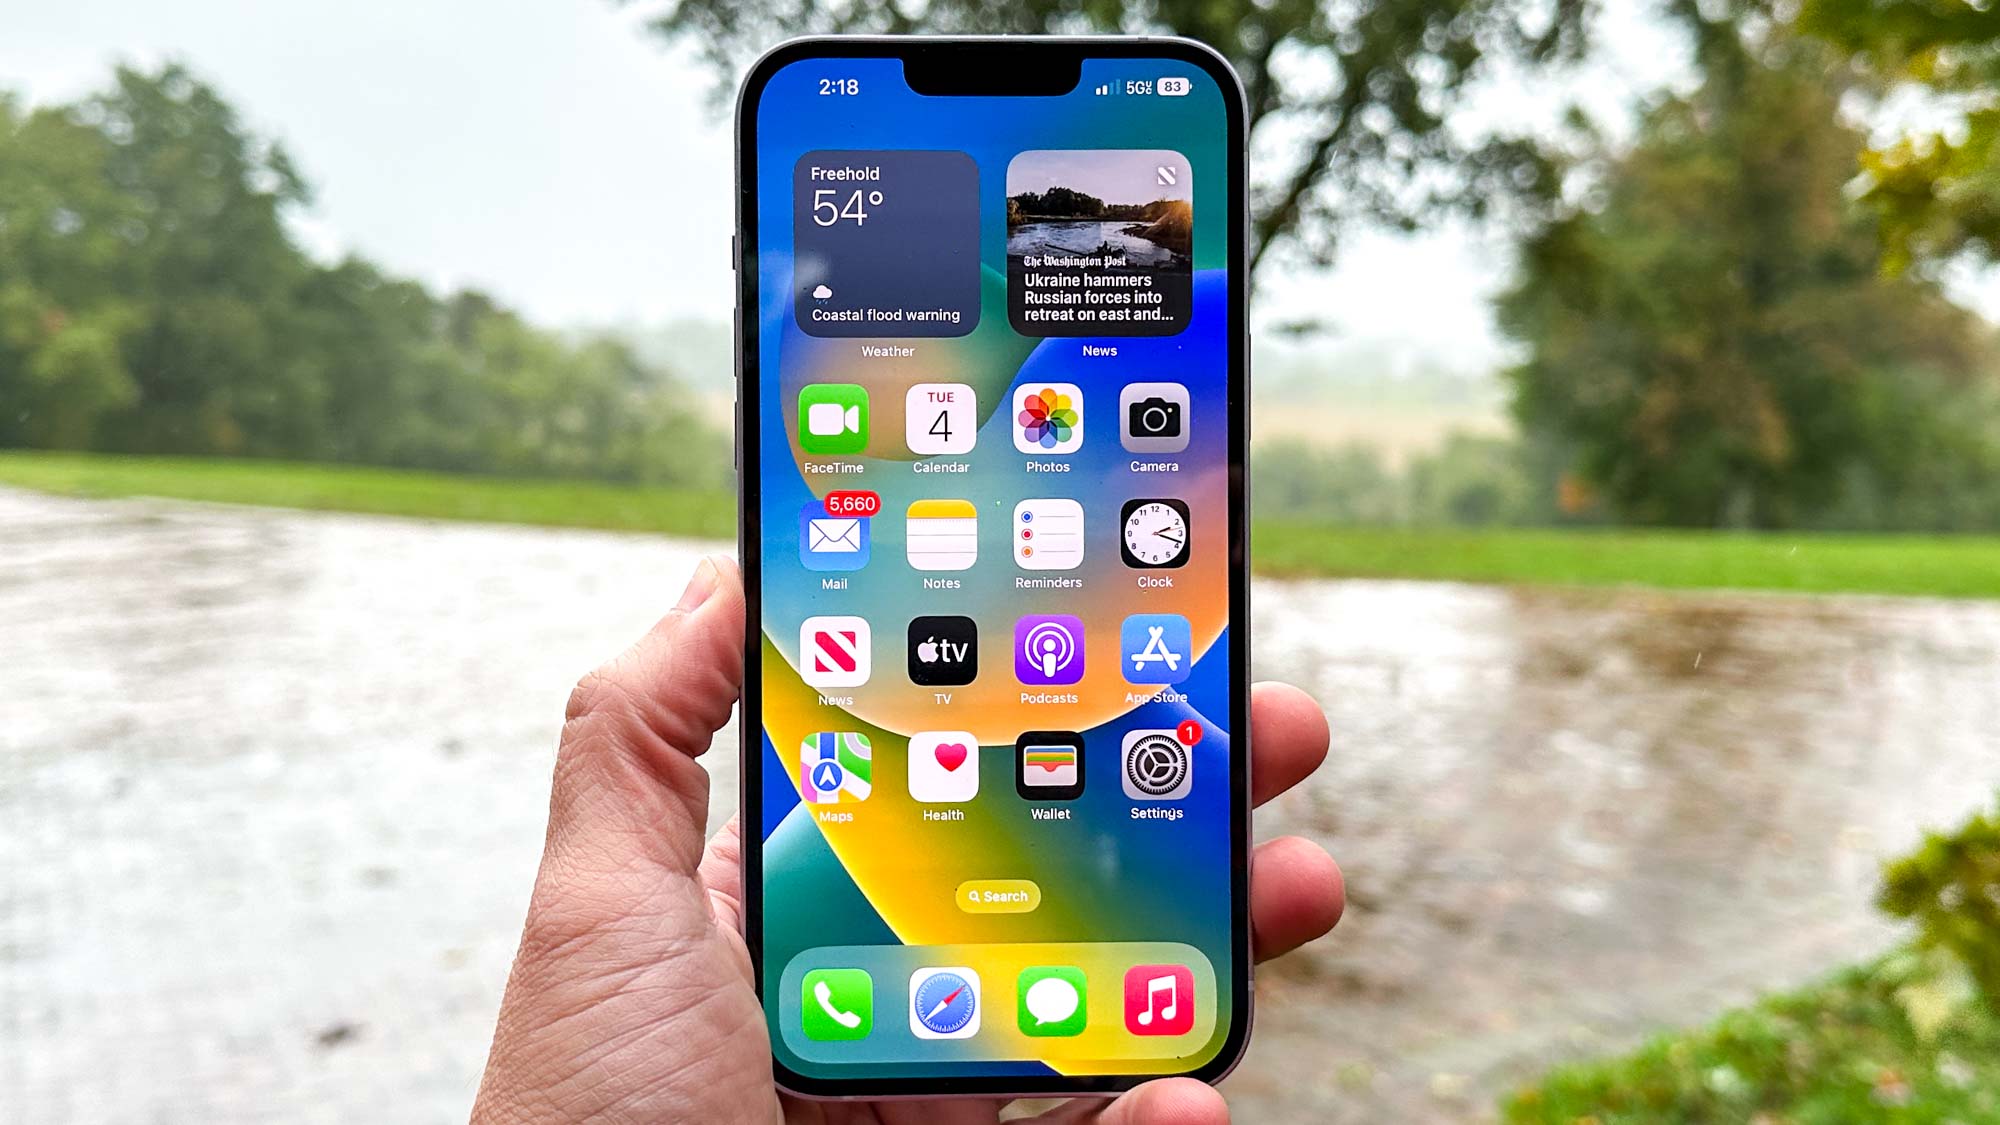
- Take a full page screenshot
- Take multiple screenshots
- Drag and drop into apps
- Delete single or multiple screenshots
- Annotate screenshots with Markup
- Switch between different erasers
- Move objects with the lasso tool
- Measure angles and draw lines with the ruler
- Add a signature to a screenshot
- Add shapes into screenshots
- Add text boxes to screenshots
- Apply a permanent magnifying glass
- Change a screenshot's opacity
- Identify subjects with Visual Look Up
- Select all the text in a screenshot
I think we can all admit that, on the face of it, the iPhone's screenshot function isn't exactly the most glamorous of features. Versus exciting iOS features like the ability to lift a subject out of a photo with Visual Look Up or edit a text message, screenshots might seem a little humdrum.
However, there are actually loads of features and tricks buried within the screenshots function, all designed to solve a specific problem and/or make your life easier.
Here, we've covered 15 of our favorites, and we'd wager there'll be at least one or two you didn't know about already. These are the 15 iOS screenshot features every iPhone user should know about.
15 iOS screenshot features every iPhone user should know
Before we start, it makes sense to ensure we're all on the same page, OS-wise, so make sure your iPhone is up to date. We can show you how to update your iPhone if you aren't sure. You'll also want to know how to take a screenshot on iPhone, if you're not already familiar. With that out of the way, let's get started.
1. Take a full page screenshot
There comes a time in any iPhone user's life where they need to screenshot outside of the bounds of a single screen — if you want to capture an entire recipe, for example, that spans several pages. Thankfully, you don't have to screenshot several times and try to stitch your different screen grabs together. Instead, you can take a full page screenshot.
To take a full page screenshot:
1. Take a screenshot and tap the preview window to open the editor.
Sign up to get the BEST of Tom's Guide direct to your inbox.
Get instant access to breaking news, the hottest reviews, great deals and helpful tips.
2. On the screenshot editor, tap Full Page.
3. Save your screenshot.
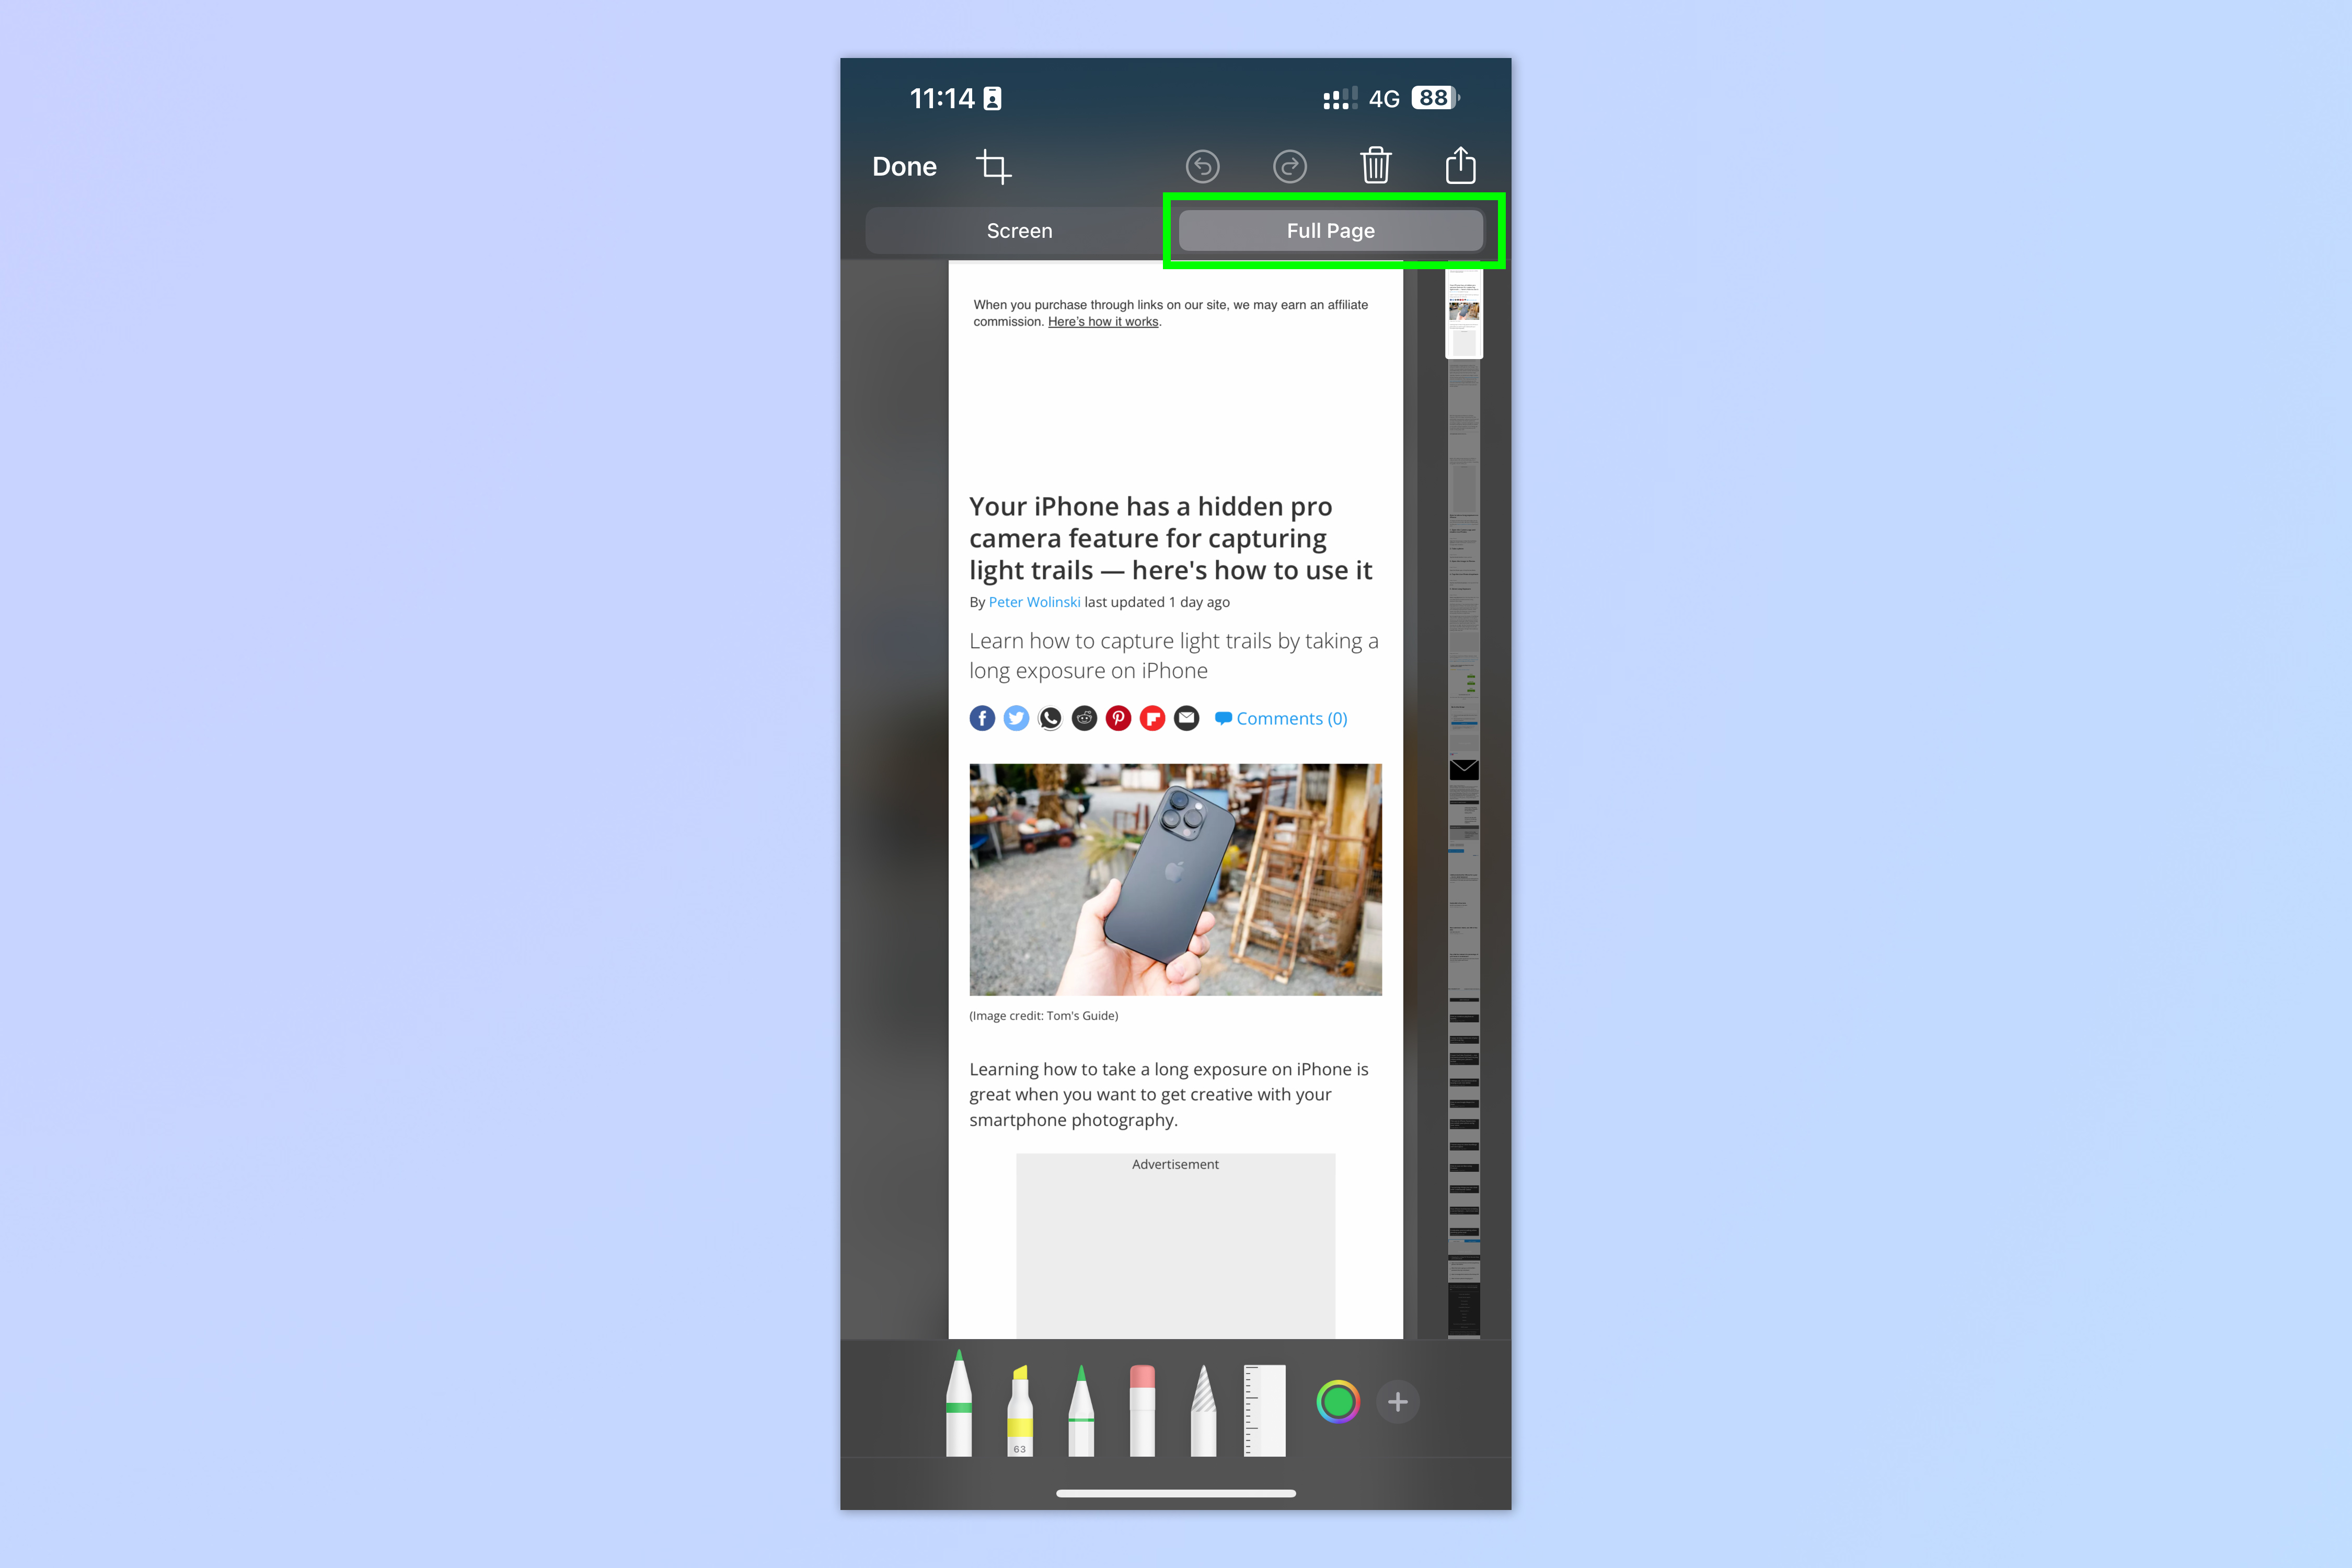
Full guide: how to take a full page screenshot on iPhone.
2. Take multiple sequential screenshots
In addition to taking full page screenshots, you can also take multiple screenshots in quick succession. This is perfect for quickly capturing the different stages of something happening on your screen.
To take multiple screenshots:
1. Take a screenshot.
2. Repeat taking screenshots as desired.
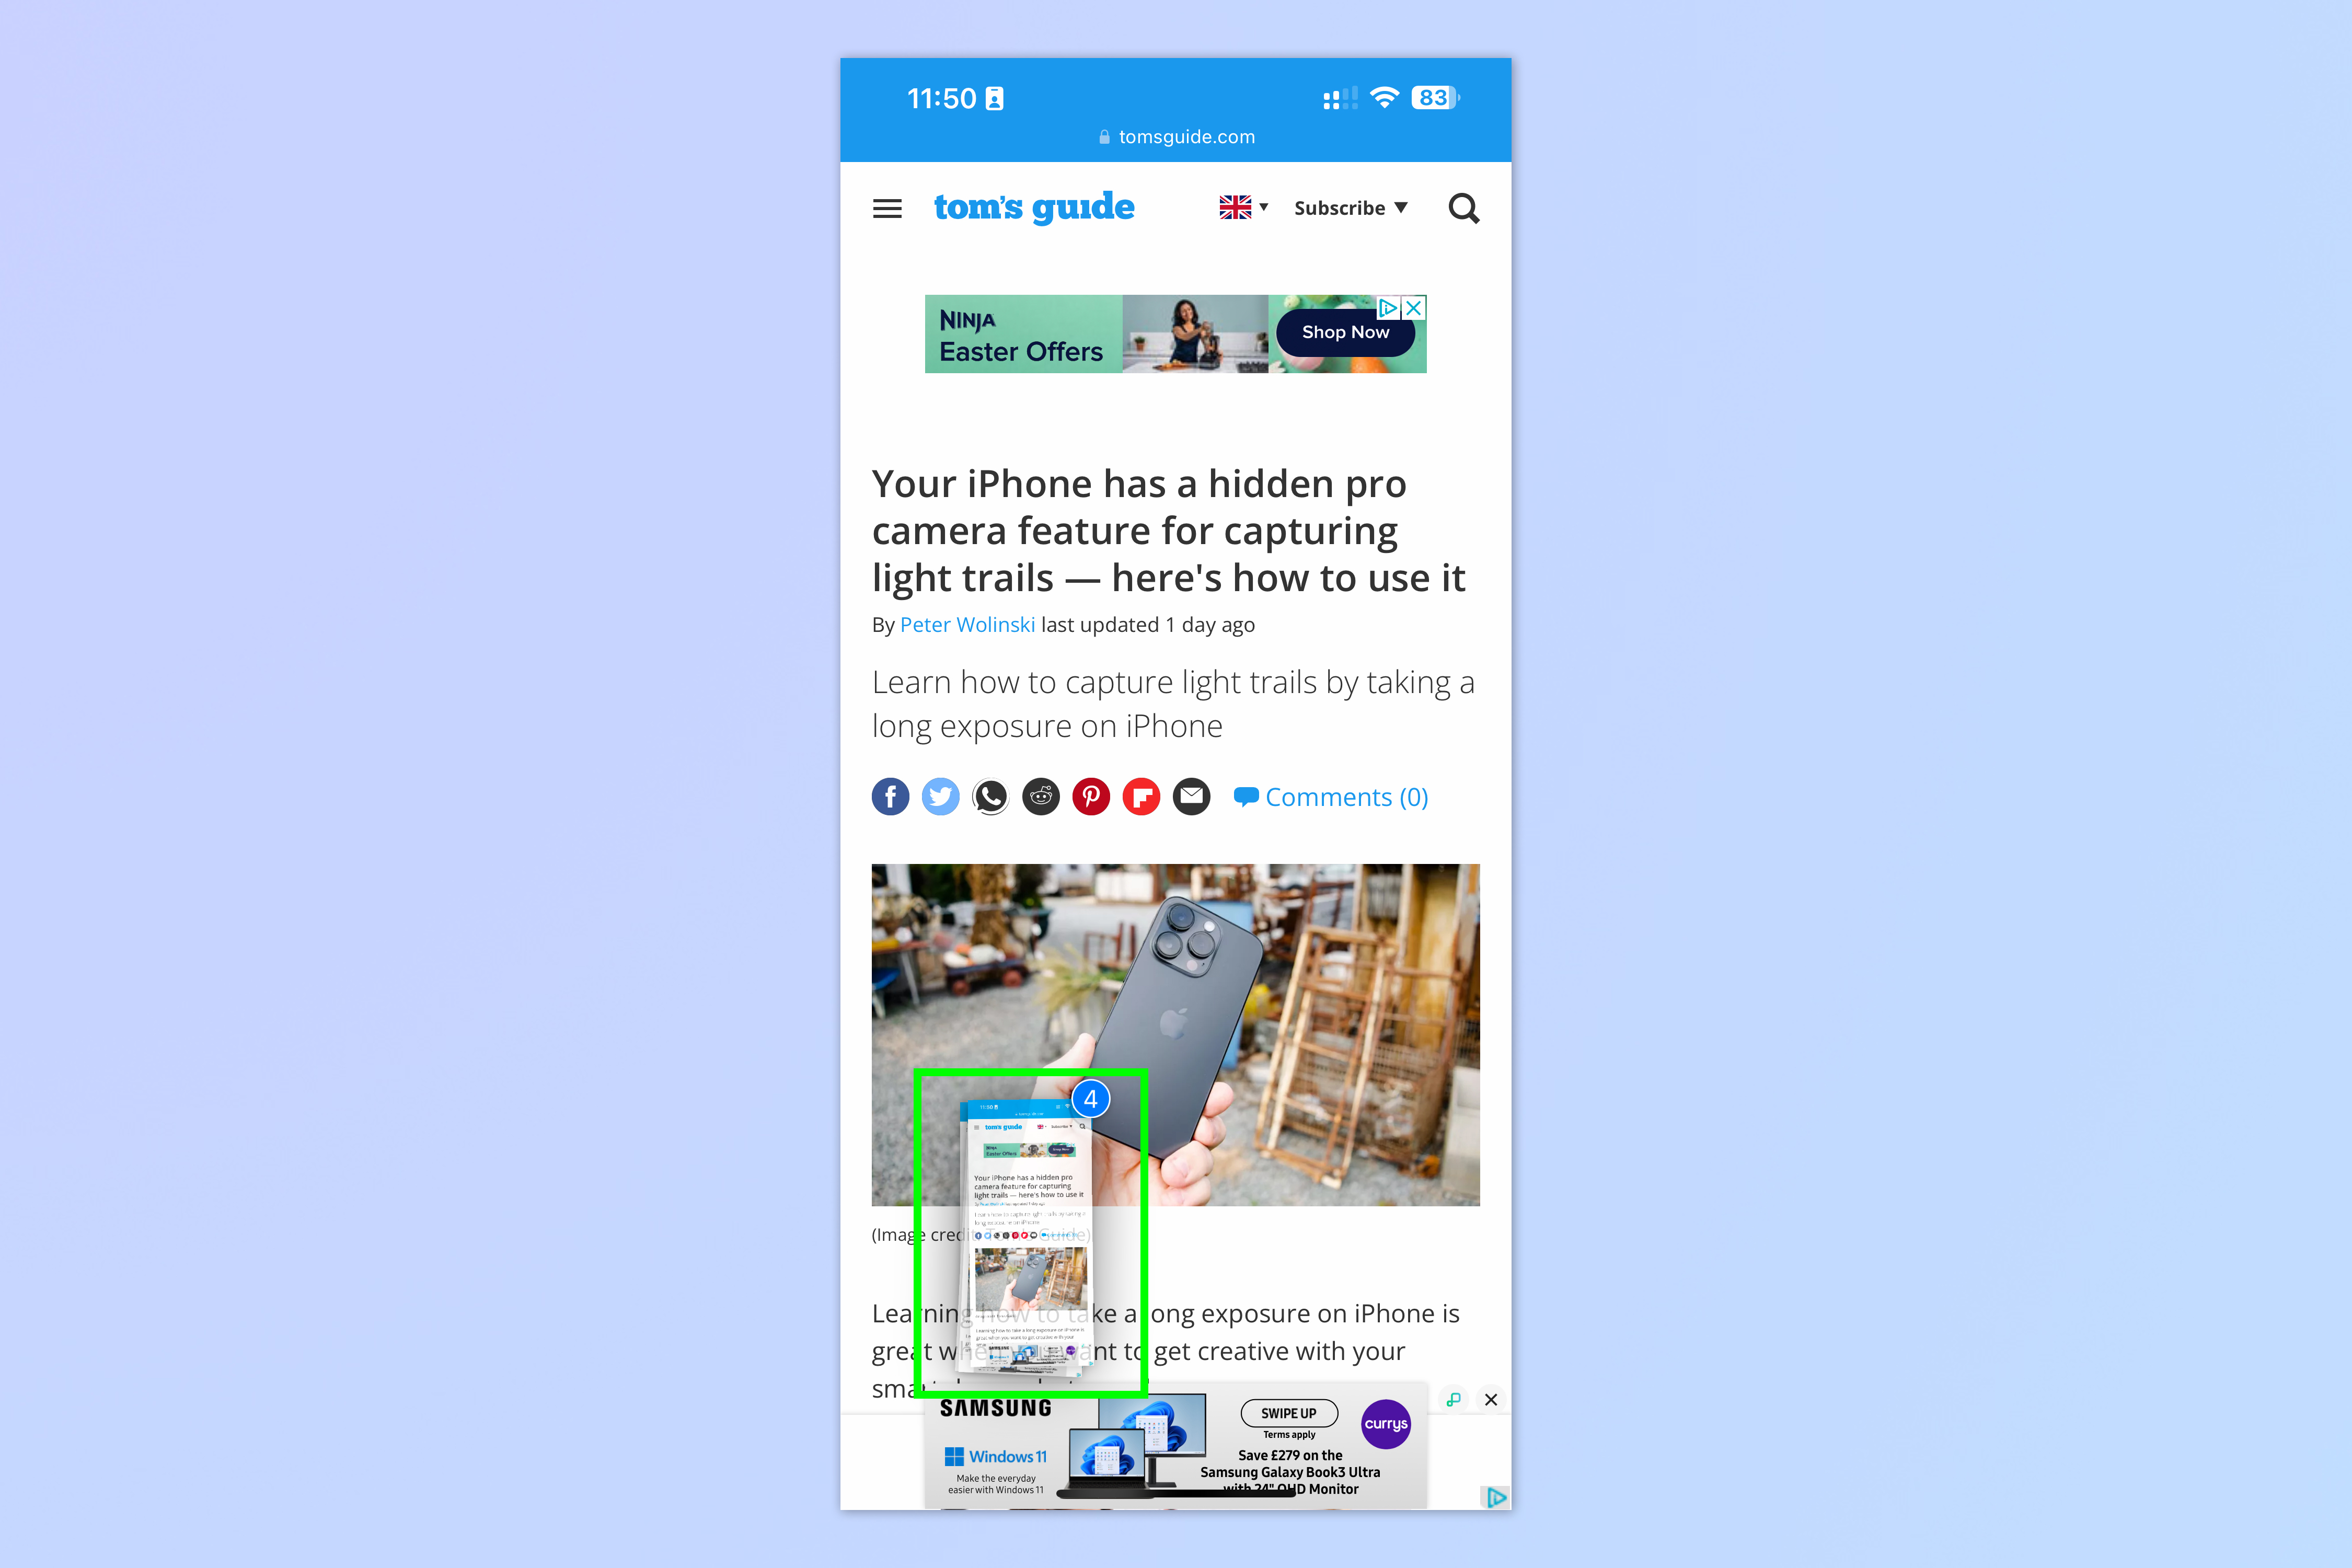
You'll see a stack of screenshots in your screenshot preview window, bottom left.
3. Drag and drop screenshots into apps
When you take and save a screenshot, it's automatically stored in your Photos app. There's even a bespoke screenshots folder that all your captures are added to automatically. However, what if you want to import your screenshot(s) to another application immediately? Well, as you might have guessed, there's a handy way to move screenshot images instantly to other apps using the iPhone's drag and drop function.
To drag and drop screenshots into apps:
1. Take a screenshot and, with one finger, tap and hold the screenshot preview box, bottom left.
2. Quickly nudge your finger upwards slightly so the screenshot preview detaches from its position.
3. With another finger, navigate to your home screen or app tray and tap an application to open it (here we've selected Notes).
4. When you see a green plus icon, release your first finger to drop the screenshots into the app.
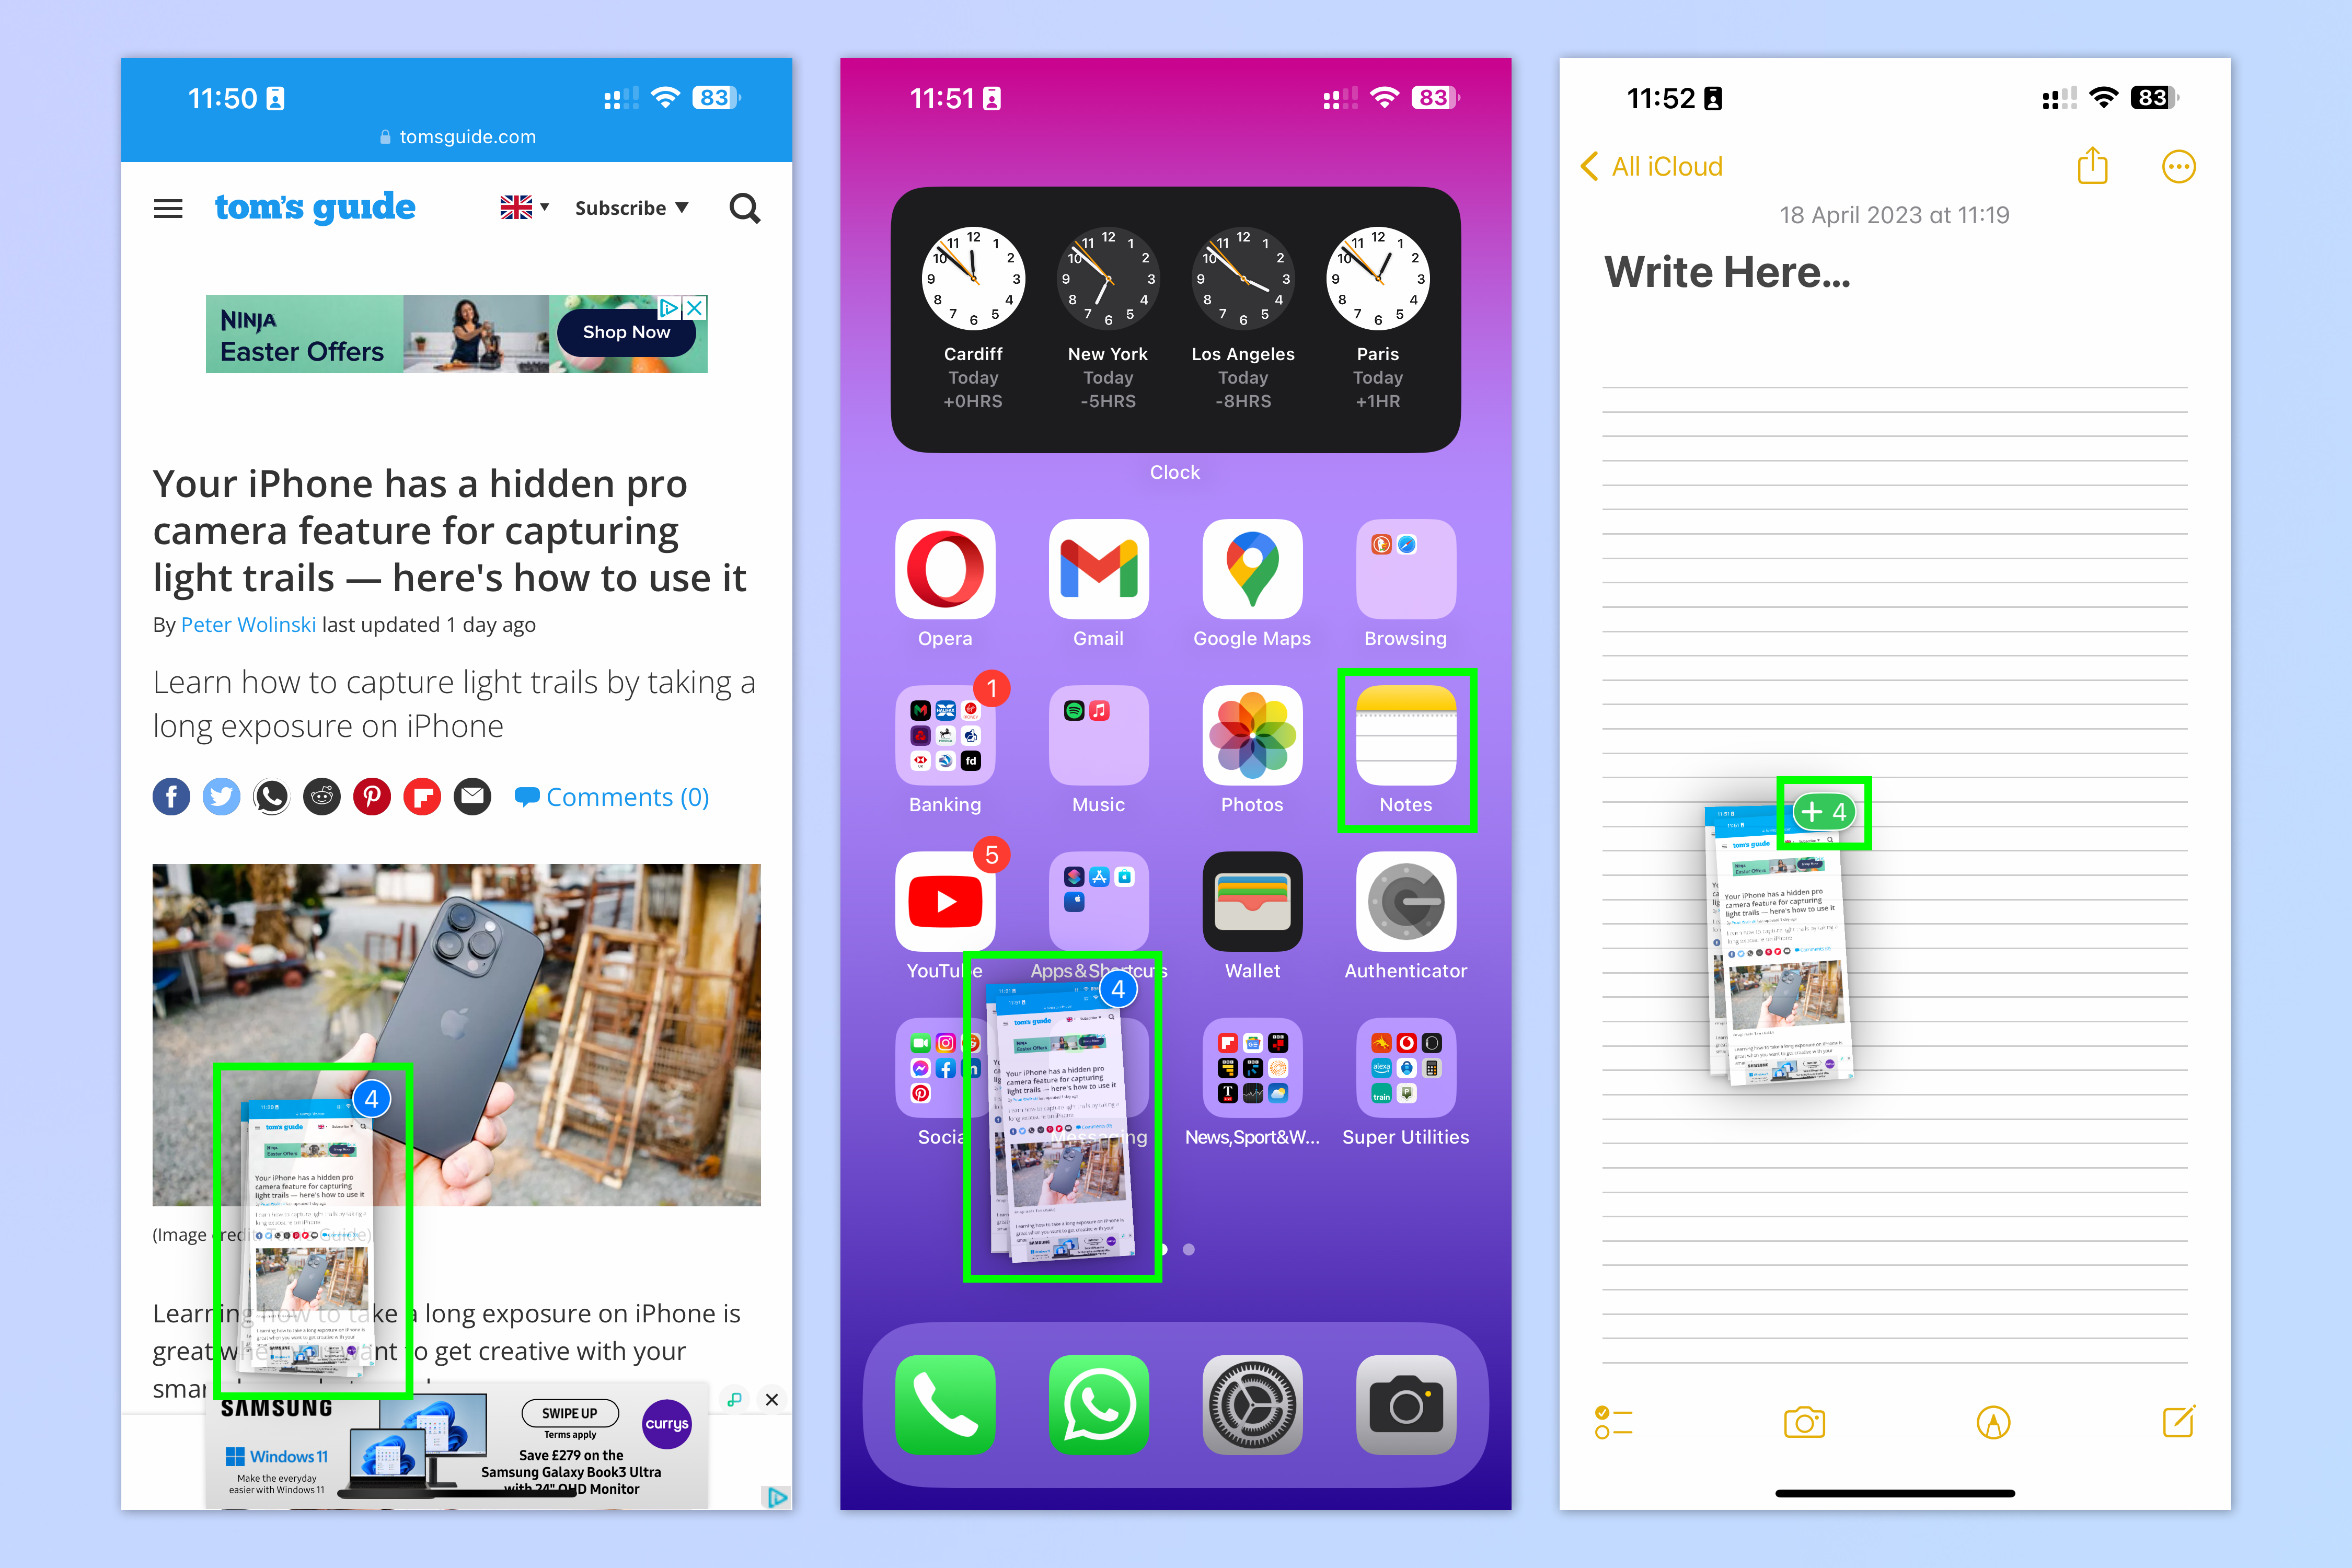
Similar guide: how to use drag and drop on iPhone.
4. Delete single or multiple screenshots
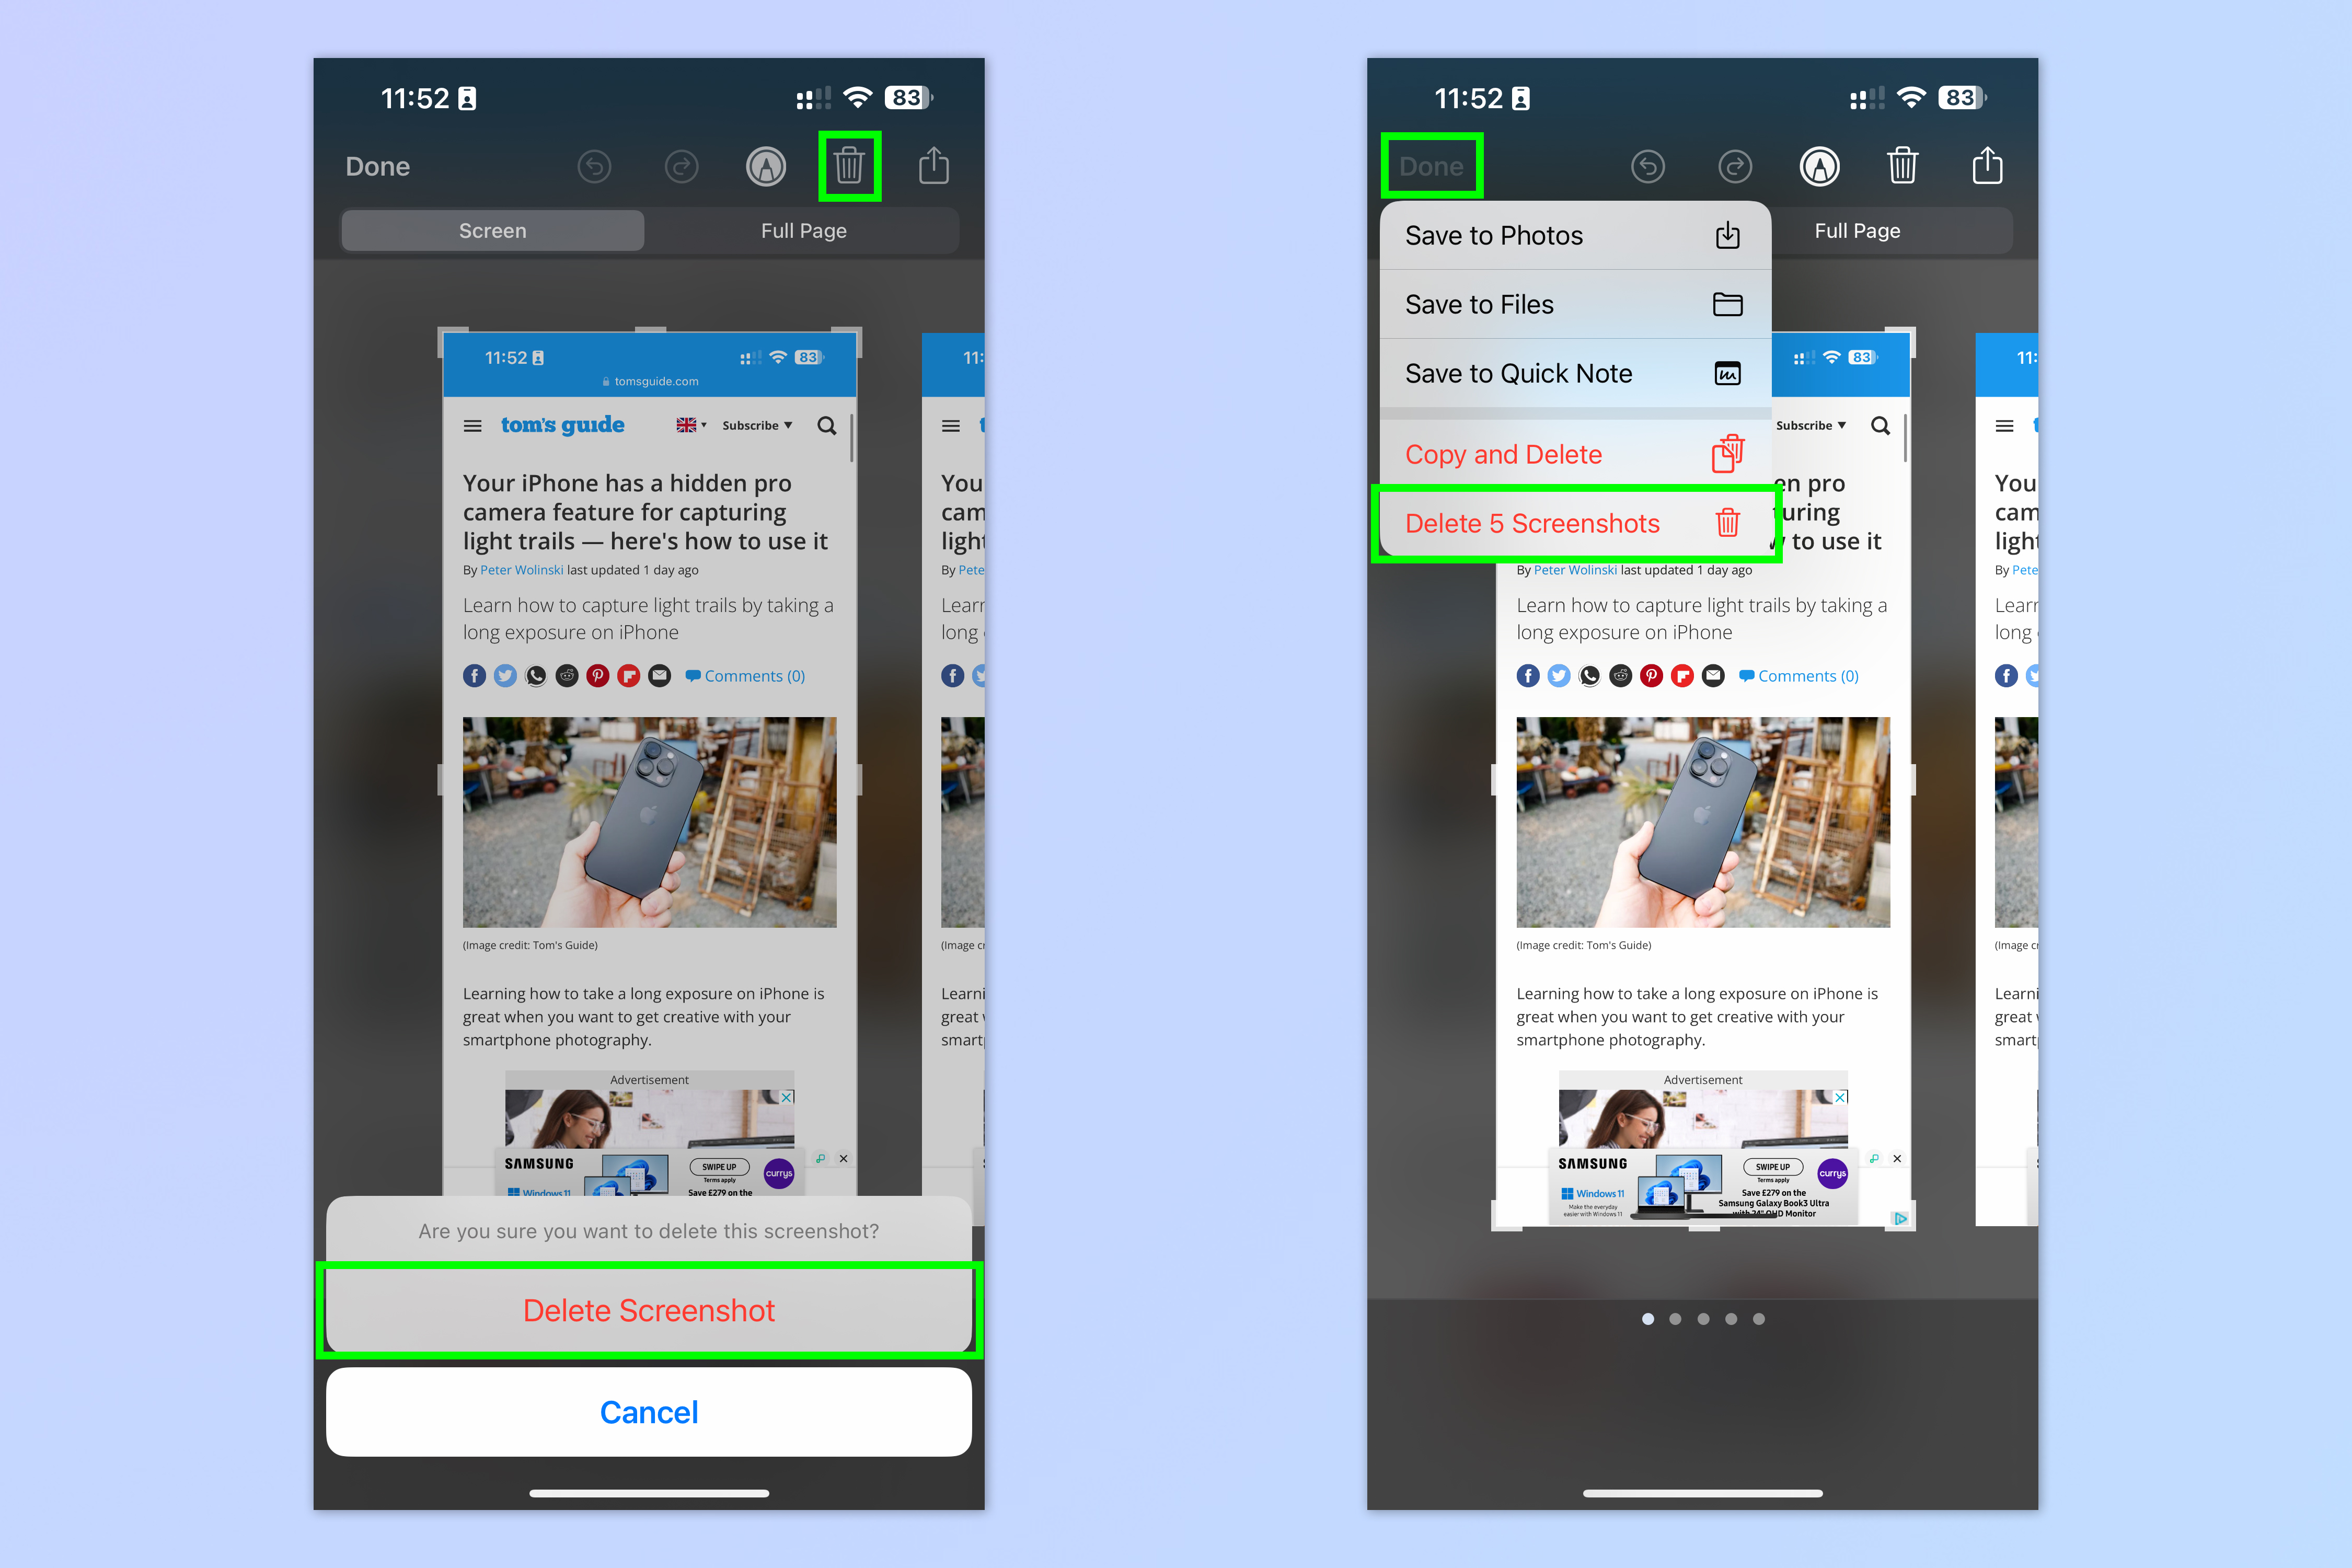
If you've taken multiple screenshots, you might think it's difficult to curate them and get rid of only the ones you want. Thankfully, that isn't the case. The screenshot editor lets you choose between deleting single screenshots as you swipe through them, or deleting the whole batch. You'd expect both of these functions to be wrapped up within the trash bin icon, but strangely they aren't. To delete all the screenshots you have to use the Done button, which makes it easy to miss this function if you didn't know where to look.
To delete single or multiple screenshots:
1. In the screenshot editor, tap the trash bin icon, then tap Delete Screenshot to get rid of a single screenshot.
2. Tap Done, then tap Delete All to dispose of the entire batch.
5. Annotate screenshots with Markup
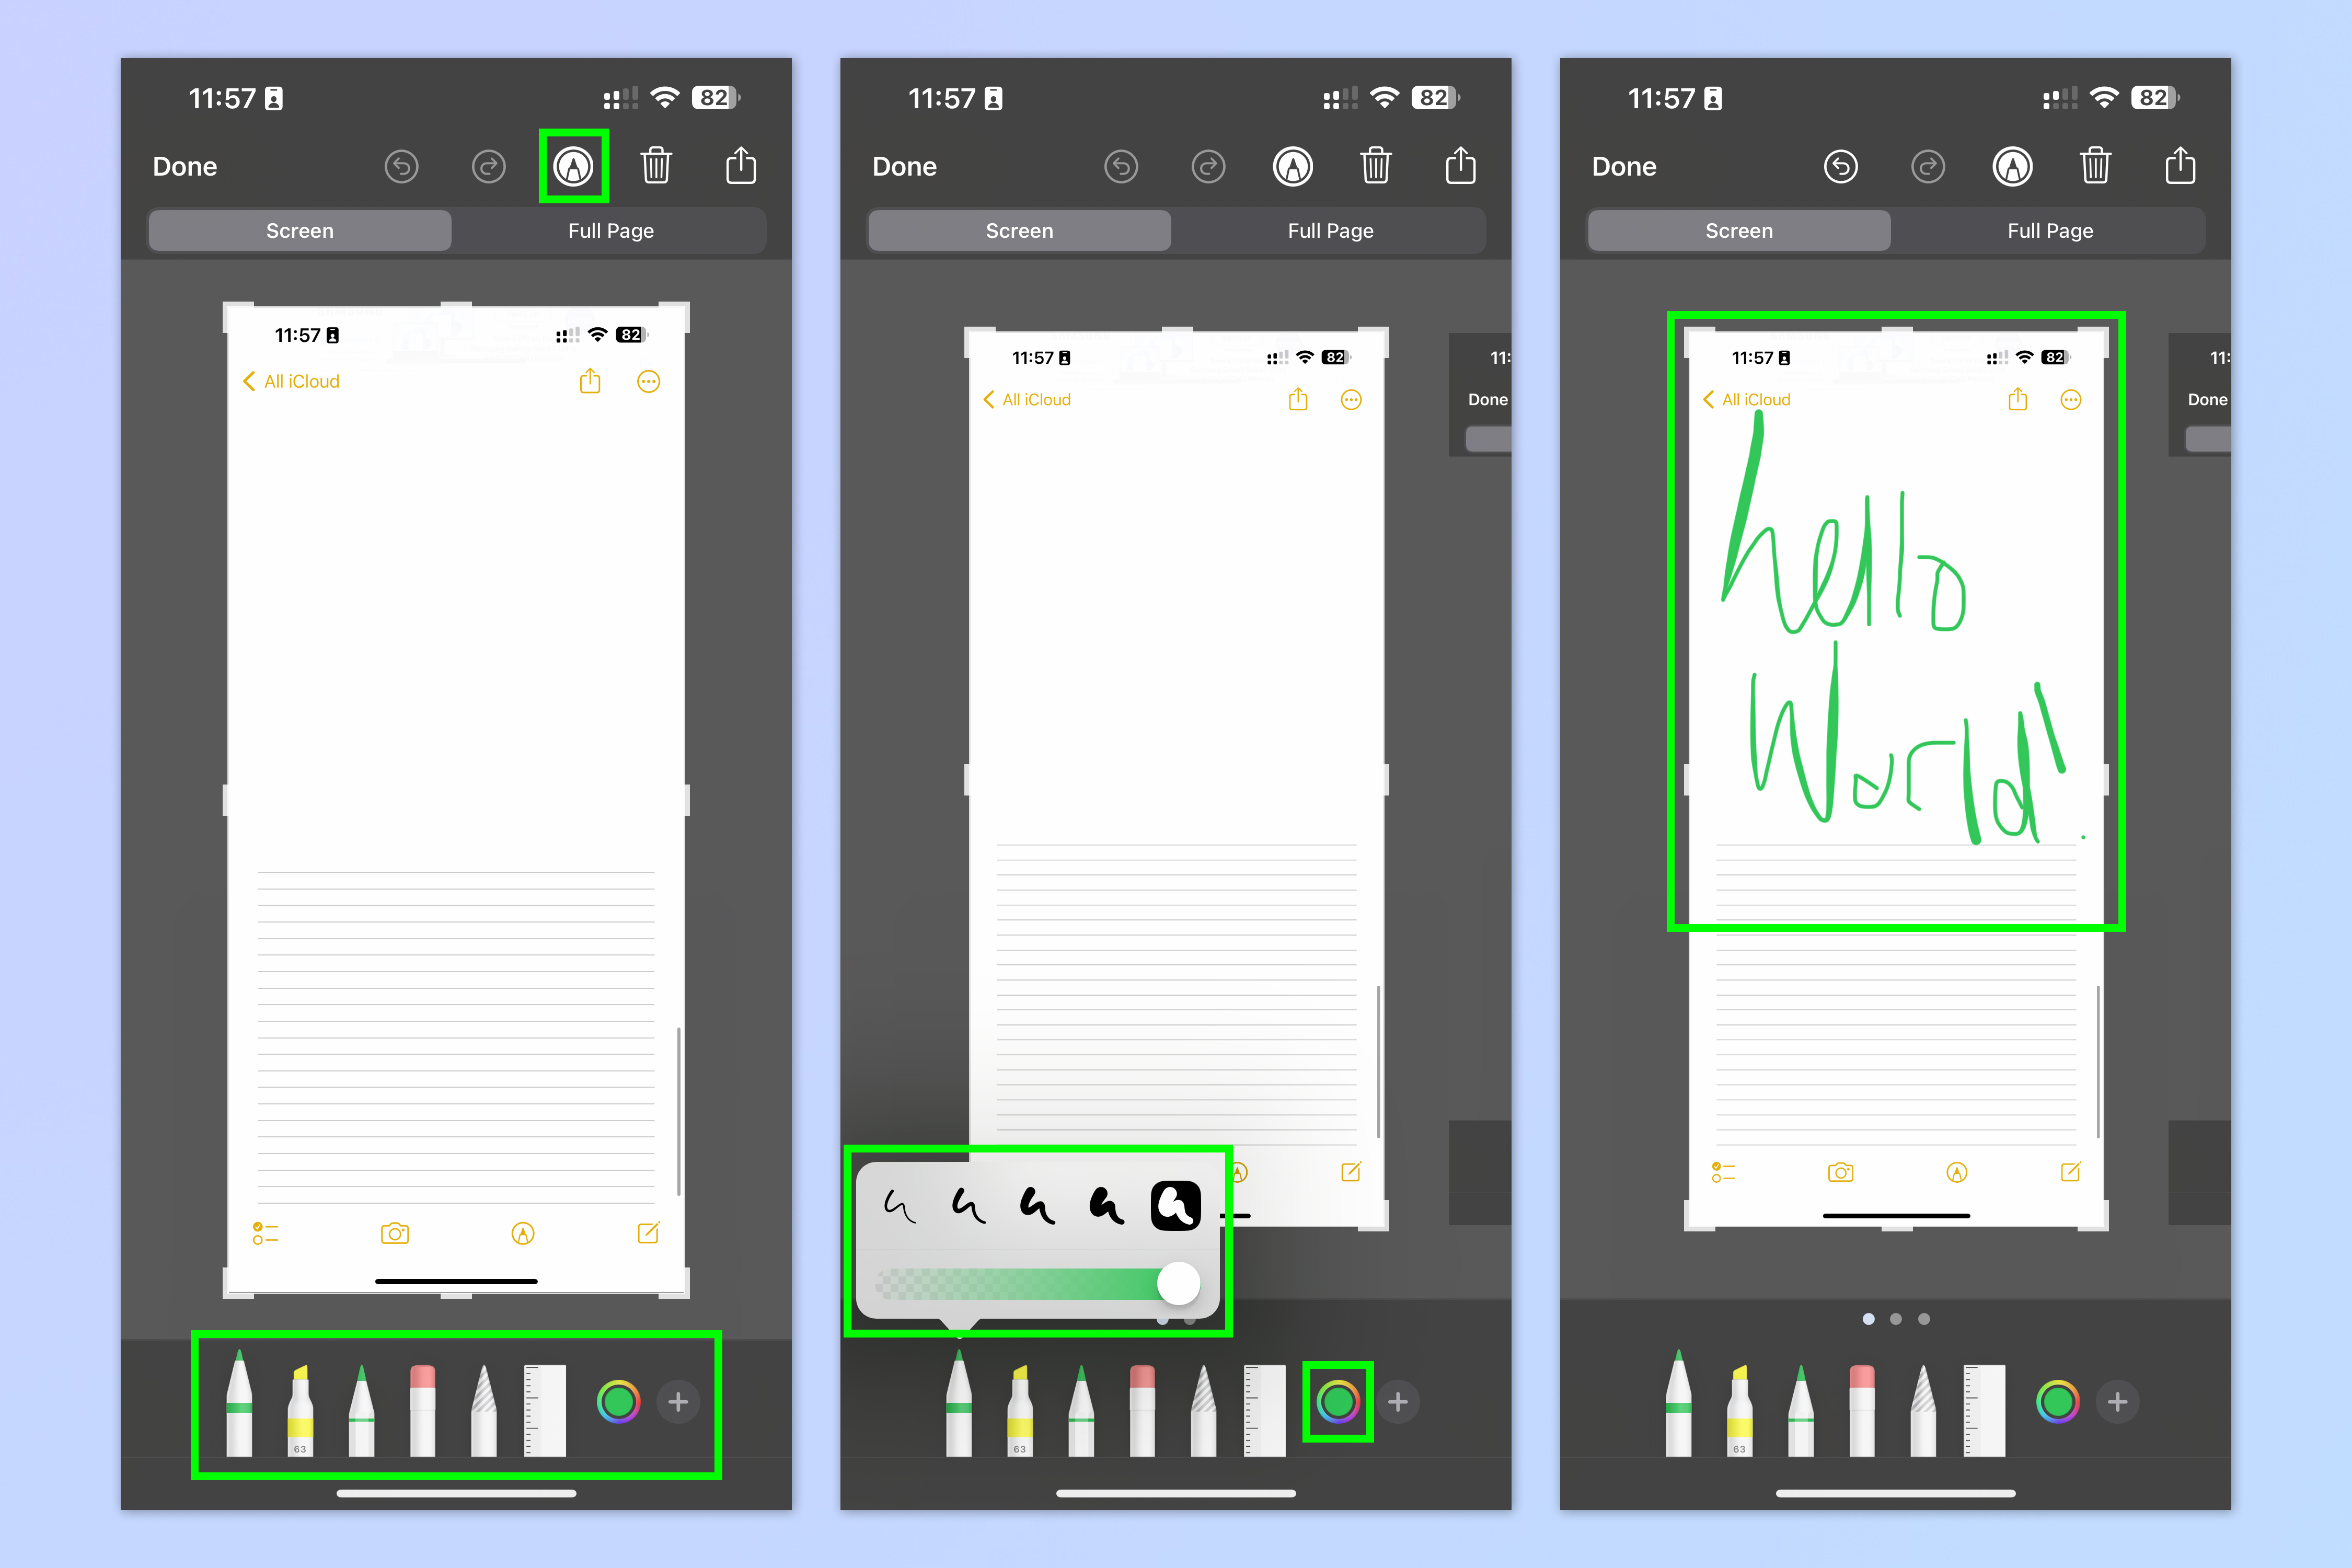
Screenshots needn't be vanilla. As such, your iPhone gives you a range of tools to annotate, draw on and highlight elements of your screenshot as you please. This is called the Markup menu, a staple feature across Apple devices. When you open the screenshot editor, you'll be on the Markup menu by default, but the steps below will show you how to get back to it, so you know.
To annotate a screenshot:
1. In the screenshot editor, tap the pencil icon to enter Markup mode.
2. Use the tool bar at the bottom to select an annotation tool. You can choose a pen, pencil highlighter or eraser. There's also a lasso tool and a ruler, which we'll cover in detail below!
3. Tap on an annotation tool to change its parameters, such as line thickness and opacity. Tap on the colored circle to change the line color.
4. With your finger, draw on the screenshot.
Fun fact: any rough shapes you draw with the pen will be snapped to the nearest shape if your iPhone detects you're trying to draw a specific shape. E.g. if you draw something approximating a rectangle, it will snap into a perfect rectangle.
6. Switch between different erasers
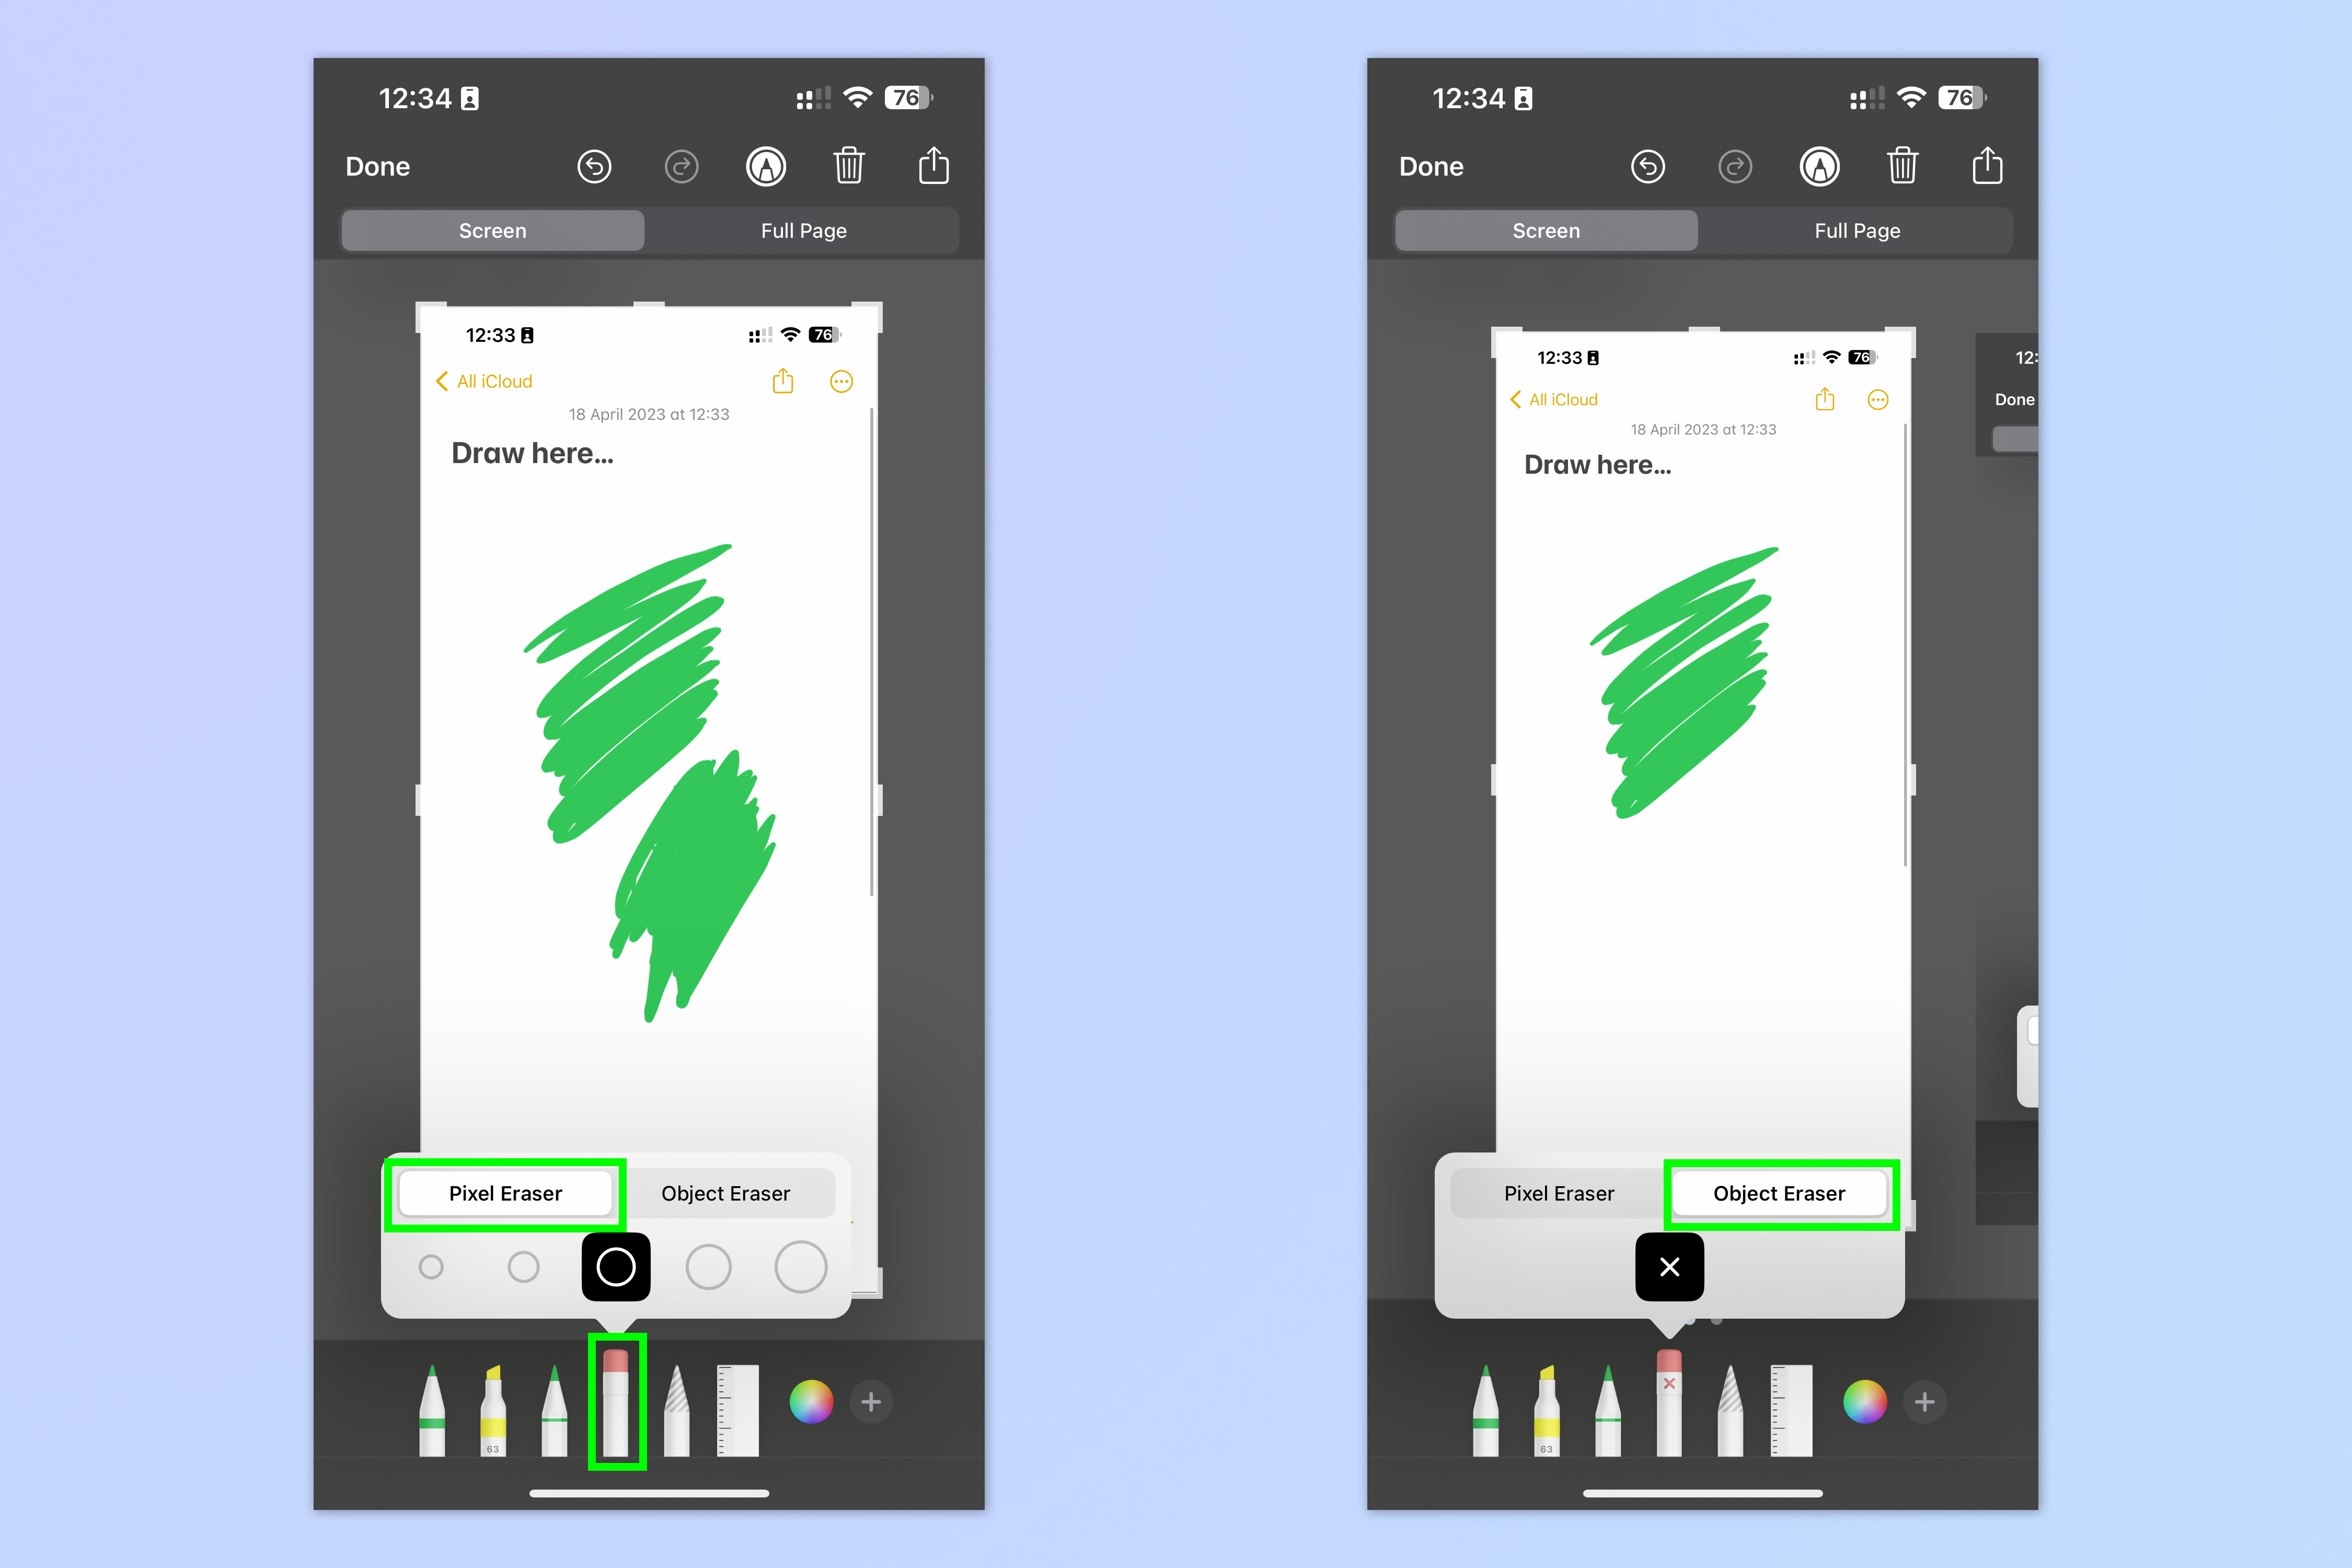
If you've annotated your screenshots a little wrong, you can use the eraser tool to undo your work. By default, it's a pixel eraser, which means it'll erase annotations, drawings and shapes wherever you touch with your finger. However, the pixel eraser can be a little messy, and you might miss bits by mistake. Luckily, Apple have thought about that, and have included an object eraser too. With the object eraser, you can erase an entire object, be it a shape, annotation, scribble, or artwork. When it comes to hand-drawn annotations, a single object is an instance where you've drawn without lifting your finger. Once you lift your finger and start drawing a separate line or scribble, that counts as a new object.
To switch between Markup erasers:
1. Long press the eraser button.
2. Tap either pixel or object eraser. On the pixel eraser, you can also select a different sized eraser head.
7. Move objects with the lasso tool
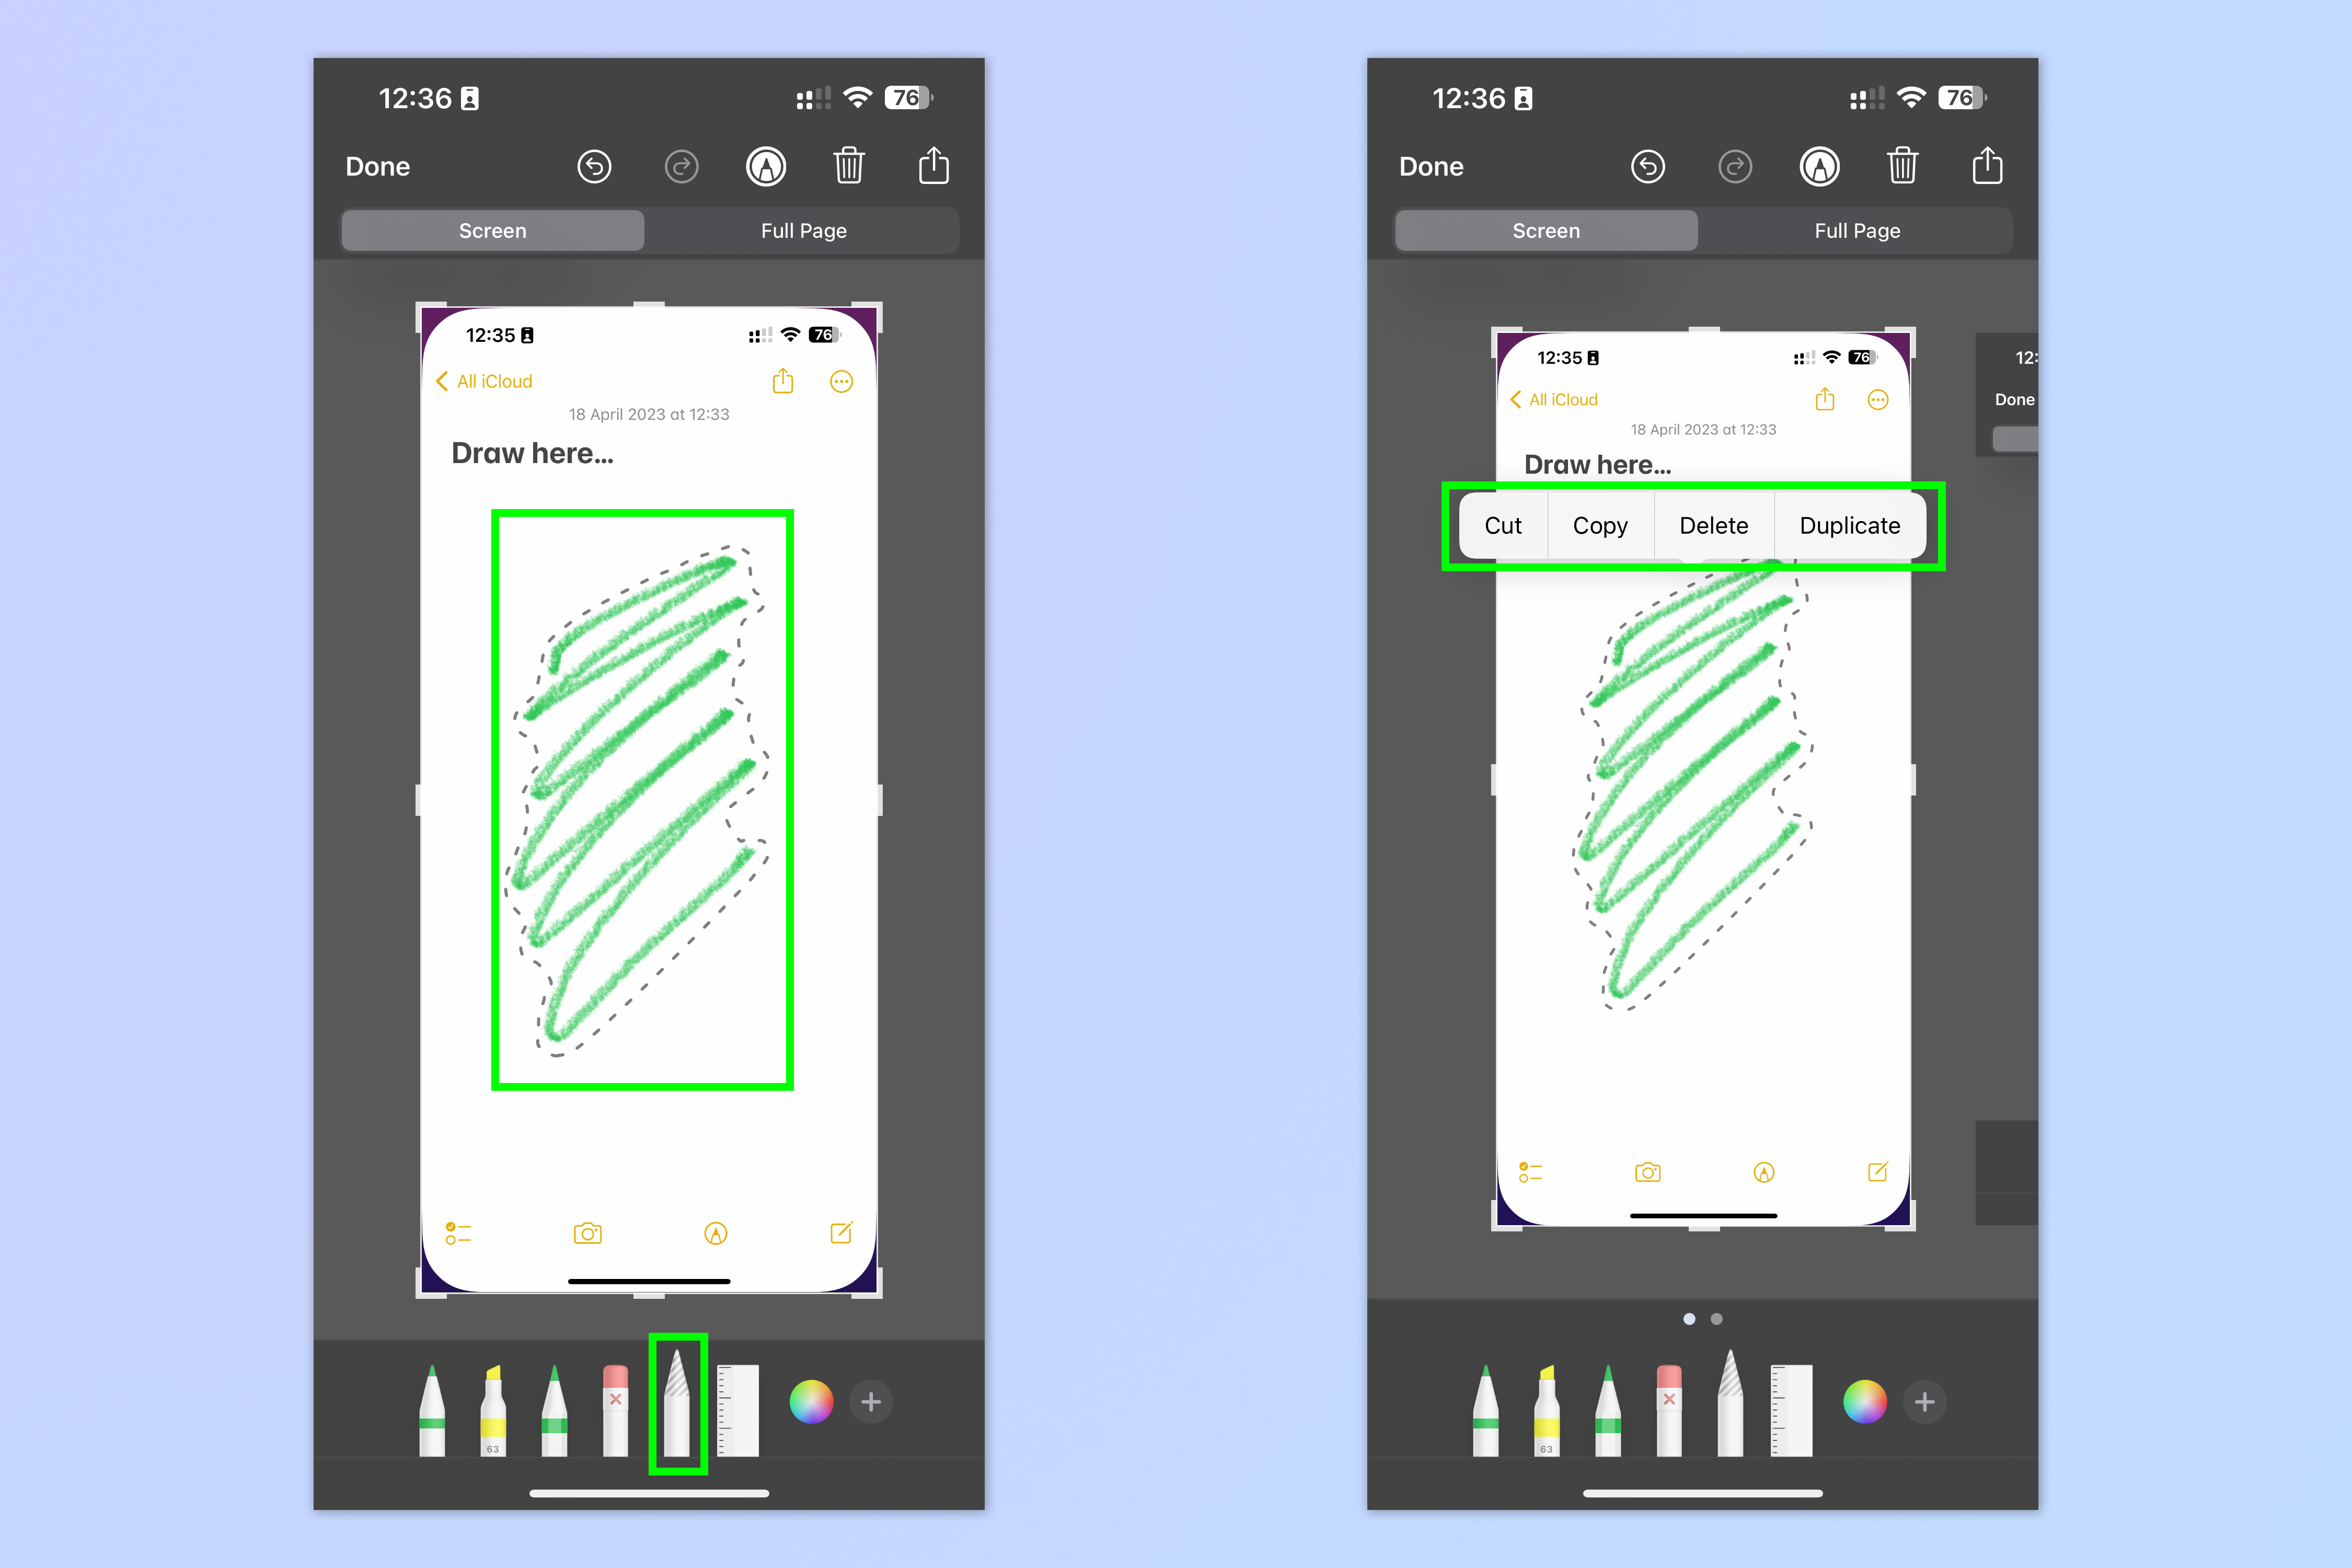
You can also move drawn objects or annotations by using the lasso tool. The lasso tool is the striped pencil and allows you to draw around objects. Once you've drawn round them, you can move them to a better position on screen or copy them and paste to other screenshots or into other apps.
To use the lasso tool:
1. Tap the lasso icon.
2. Draw around an object on the screenshot.
3. Move the object with your finger or, if required, long press and select either copy, cut, delete or duplicate.
8. Measure angles and draw straight lines with the ruler
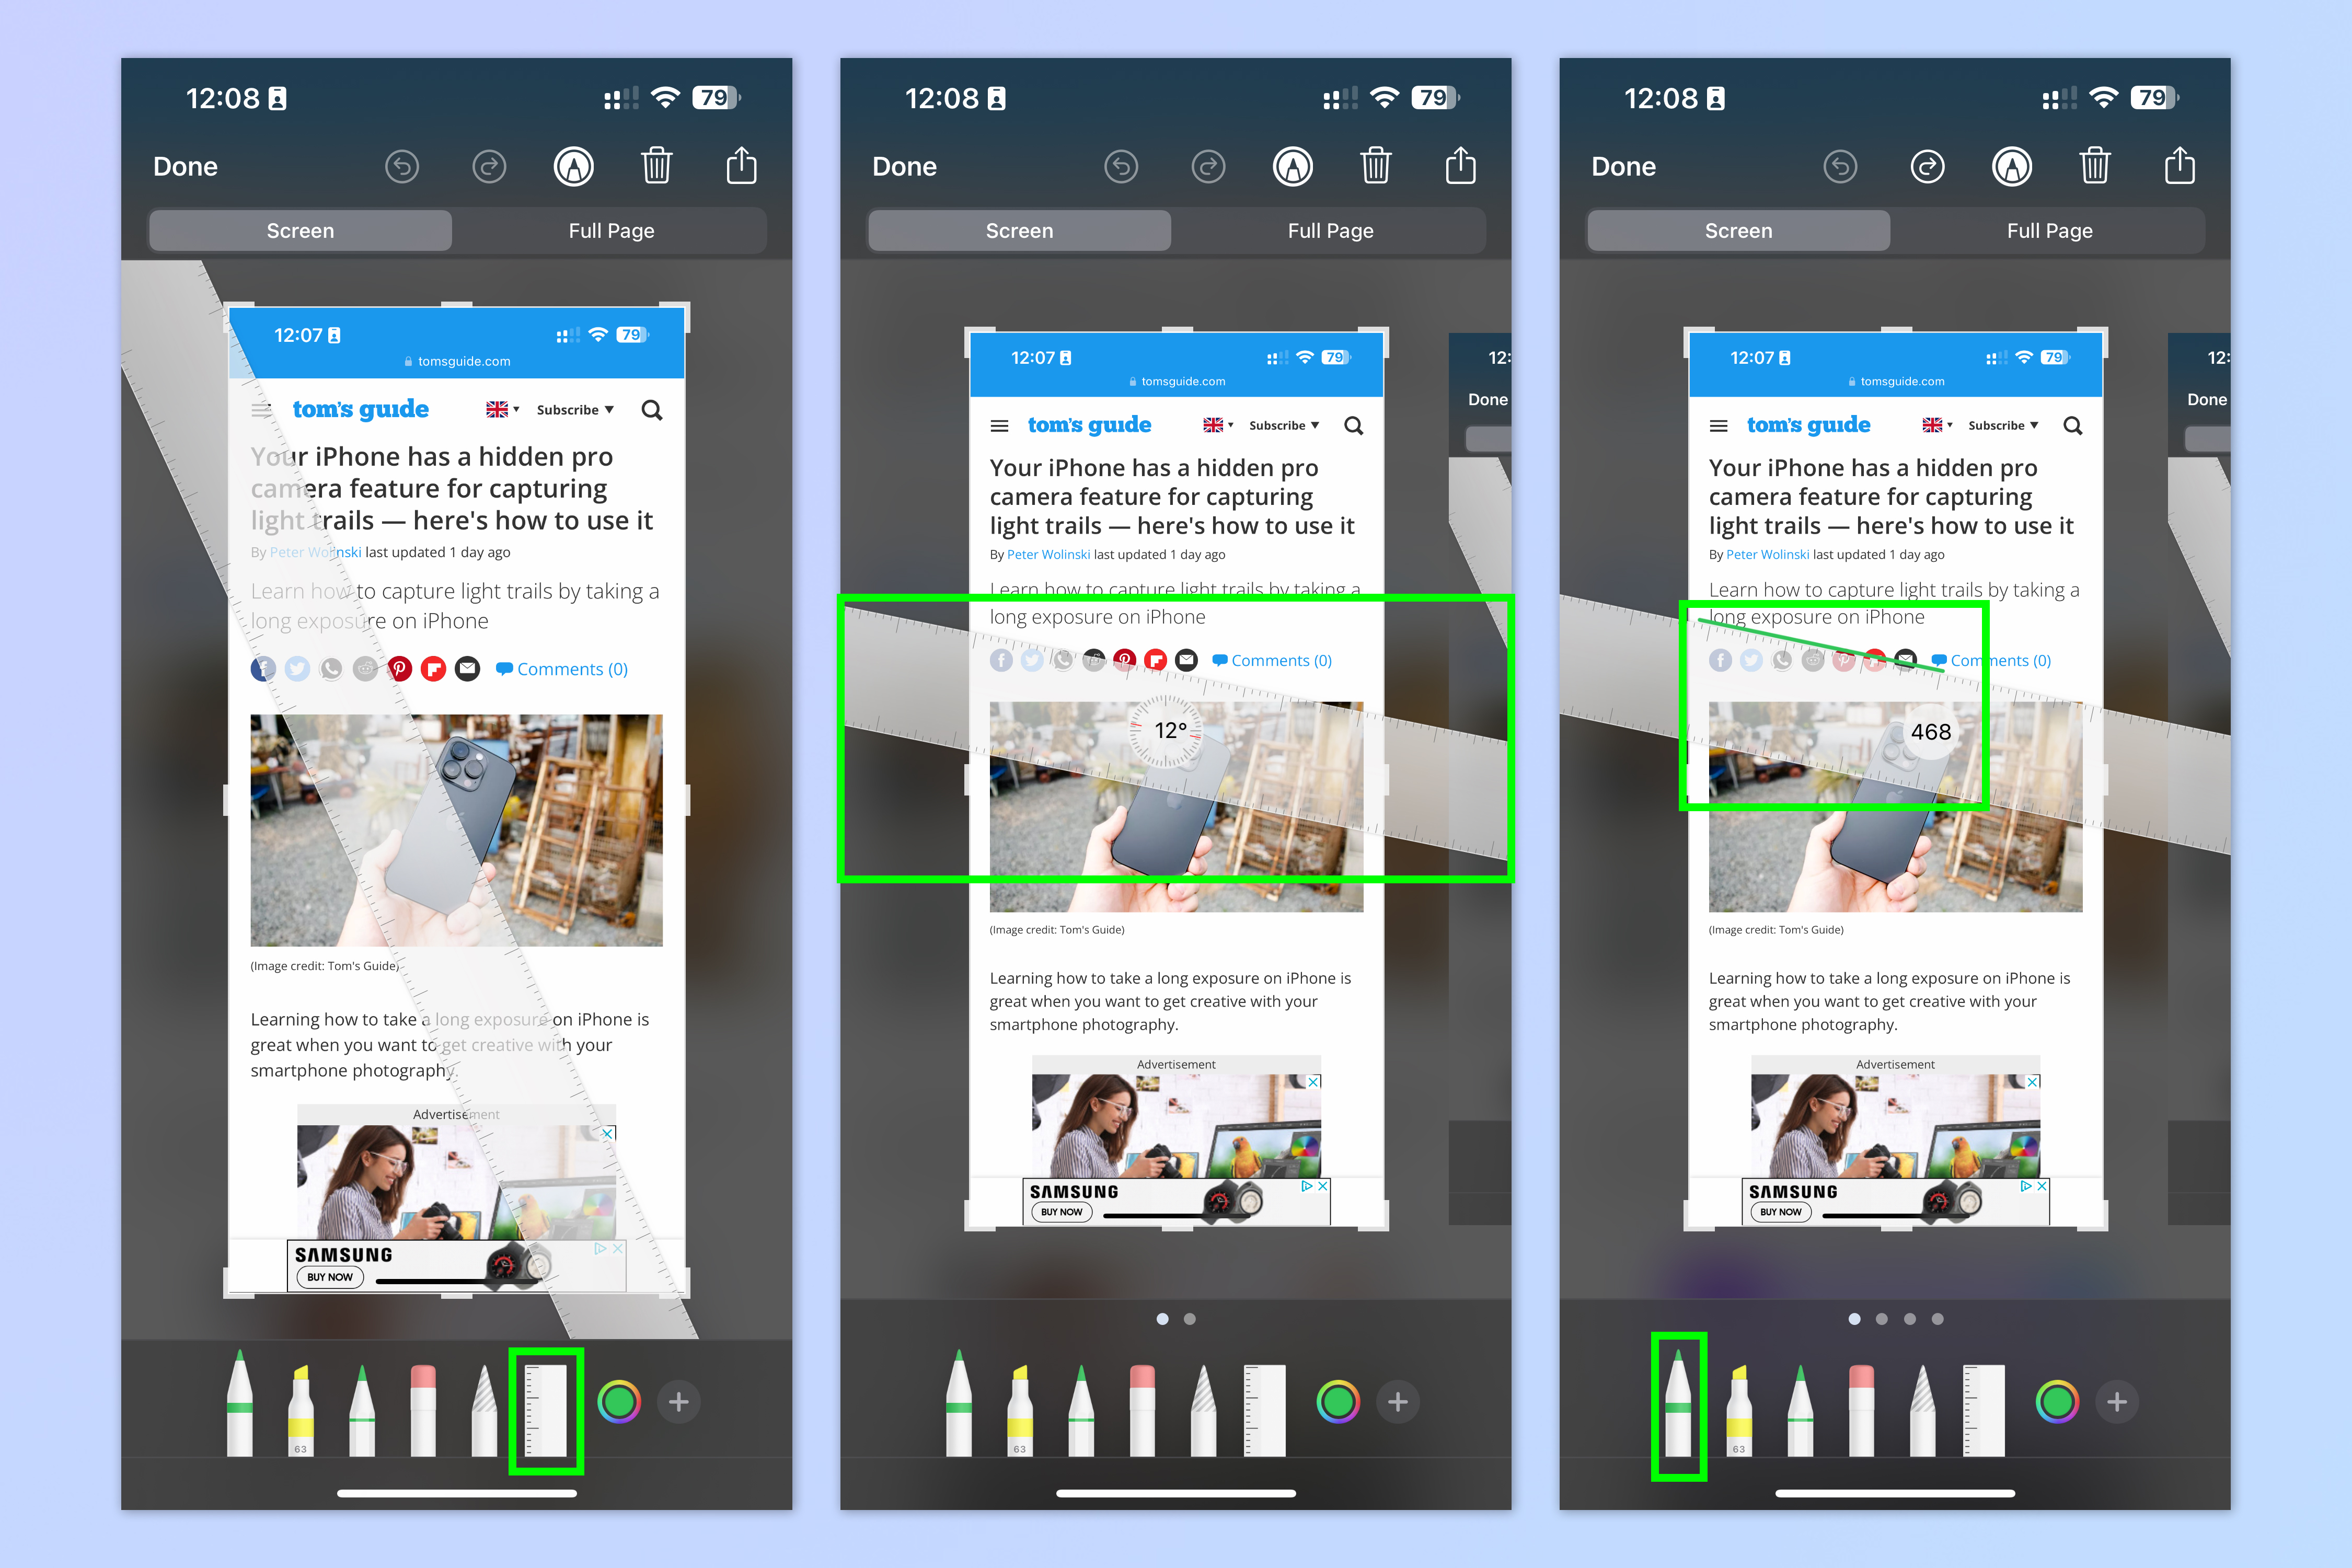
The last Markup tool is the ruler, which is incredibly handy. As you'd expect from a ruler, it allows you to measure the length of on screen objects and draw perfectly straight lines. However, this ruler also allows you to measure the angle of anything on screen, too.
To use the ruler:
1. Tap the ruler and move it about the screen using your finger.
2. Two-finger pinch and twist the ruler to rotate it. You'll see the angle it's at appear in the center, allowing you to measure on-screen angles.
3. Select the pen tool and draw along the ruler with a finger to draw a straight line. The number in the center will denote your line's length in pixels.
9. Add a signature to a screenshot
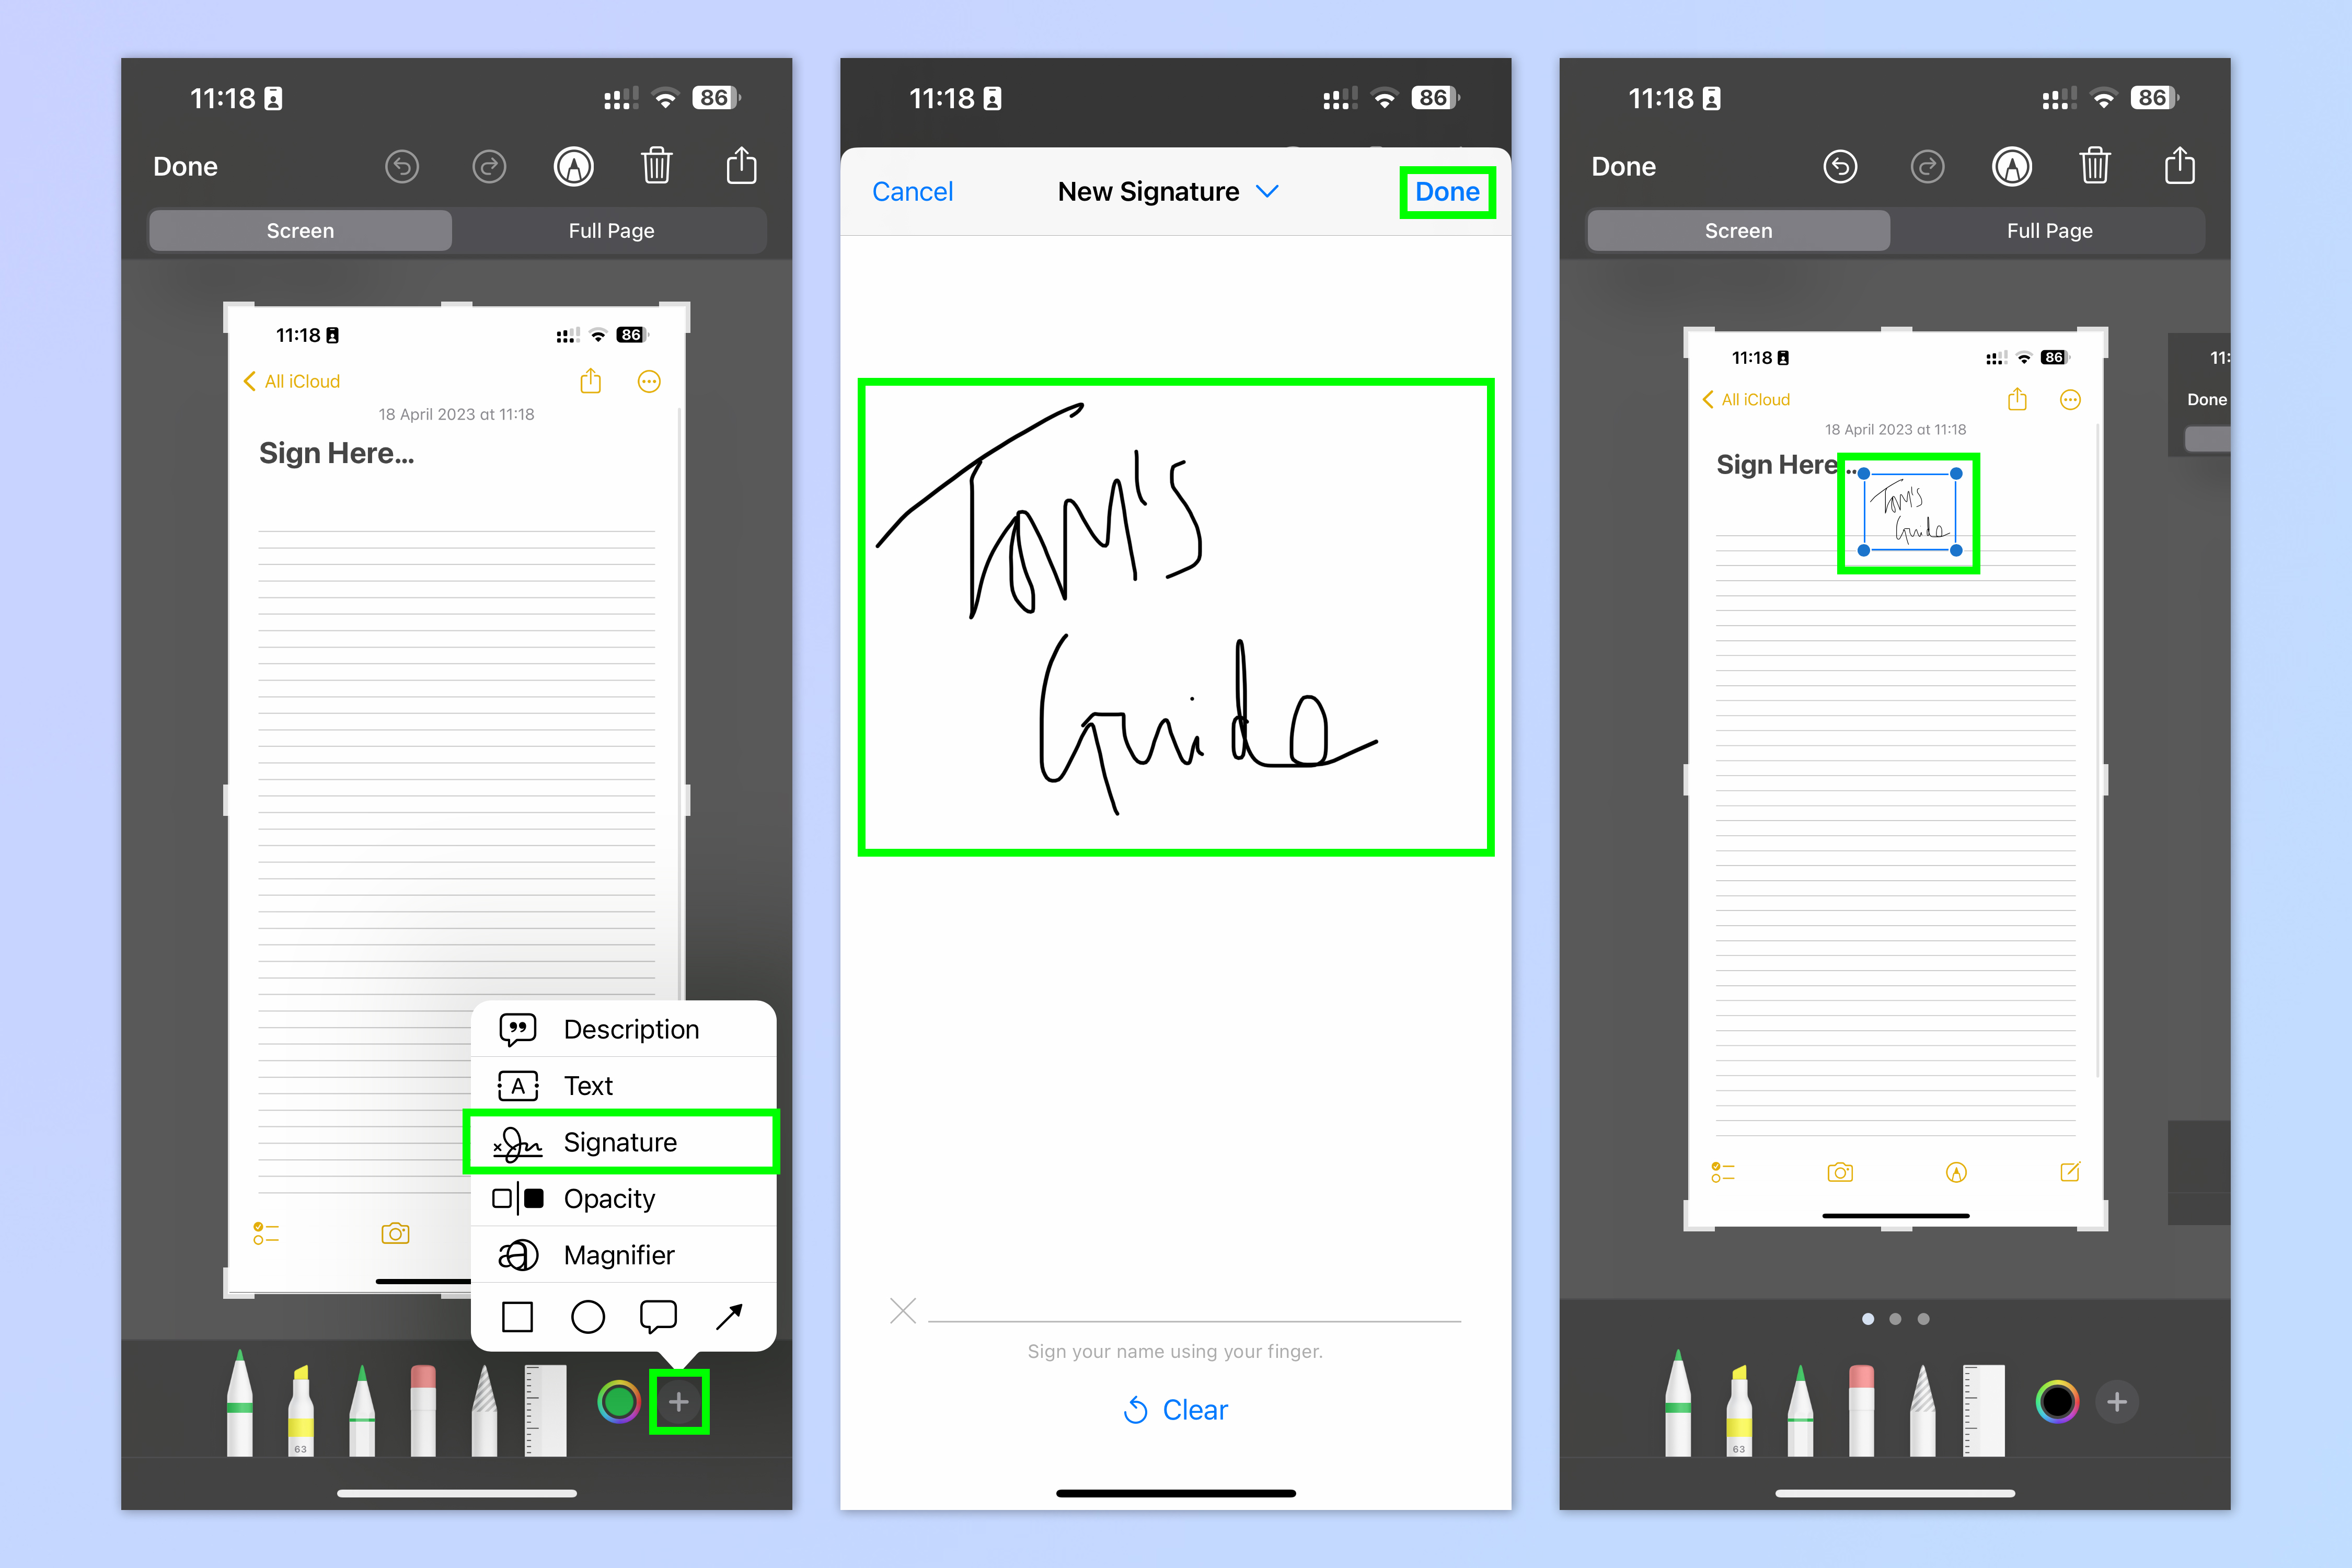
E-signatures are an increasingly popular method for signing contractual agreements, but they aren't perfect. It still isn't always easy to sign PDFs if you don't have a PDF editor installed on your device, for example. Sometimes you also just need to scribble a super quick signature to prove you agree to something. Thankfully, screenshots allows you to place a signature with ease. Better yet, you can apply a signature to a full page screenshot and then save the screenshot as a PDF, making this method a really great way to sign, save and send a contractual document in a professional format.
To add a signature to a screenshot:
1. Tap the plus icon when in Markup mode and tap Signature.
2. Draw your signature, then tap Done.
3. Tap and drag the blue box and anchor points to move and resize your signature on the screenshot.
10. Add shapes into screenshots
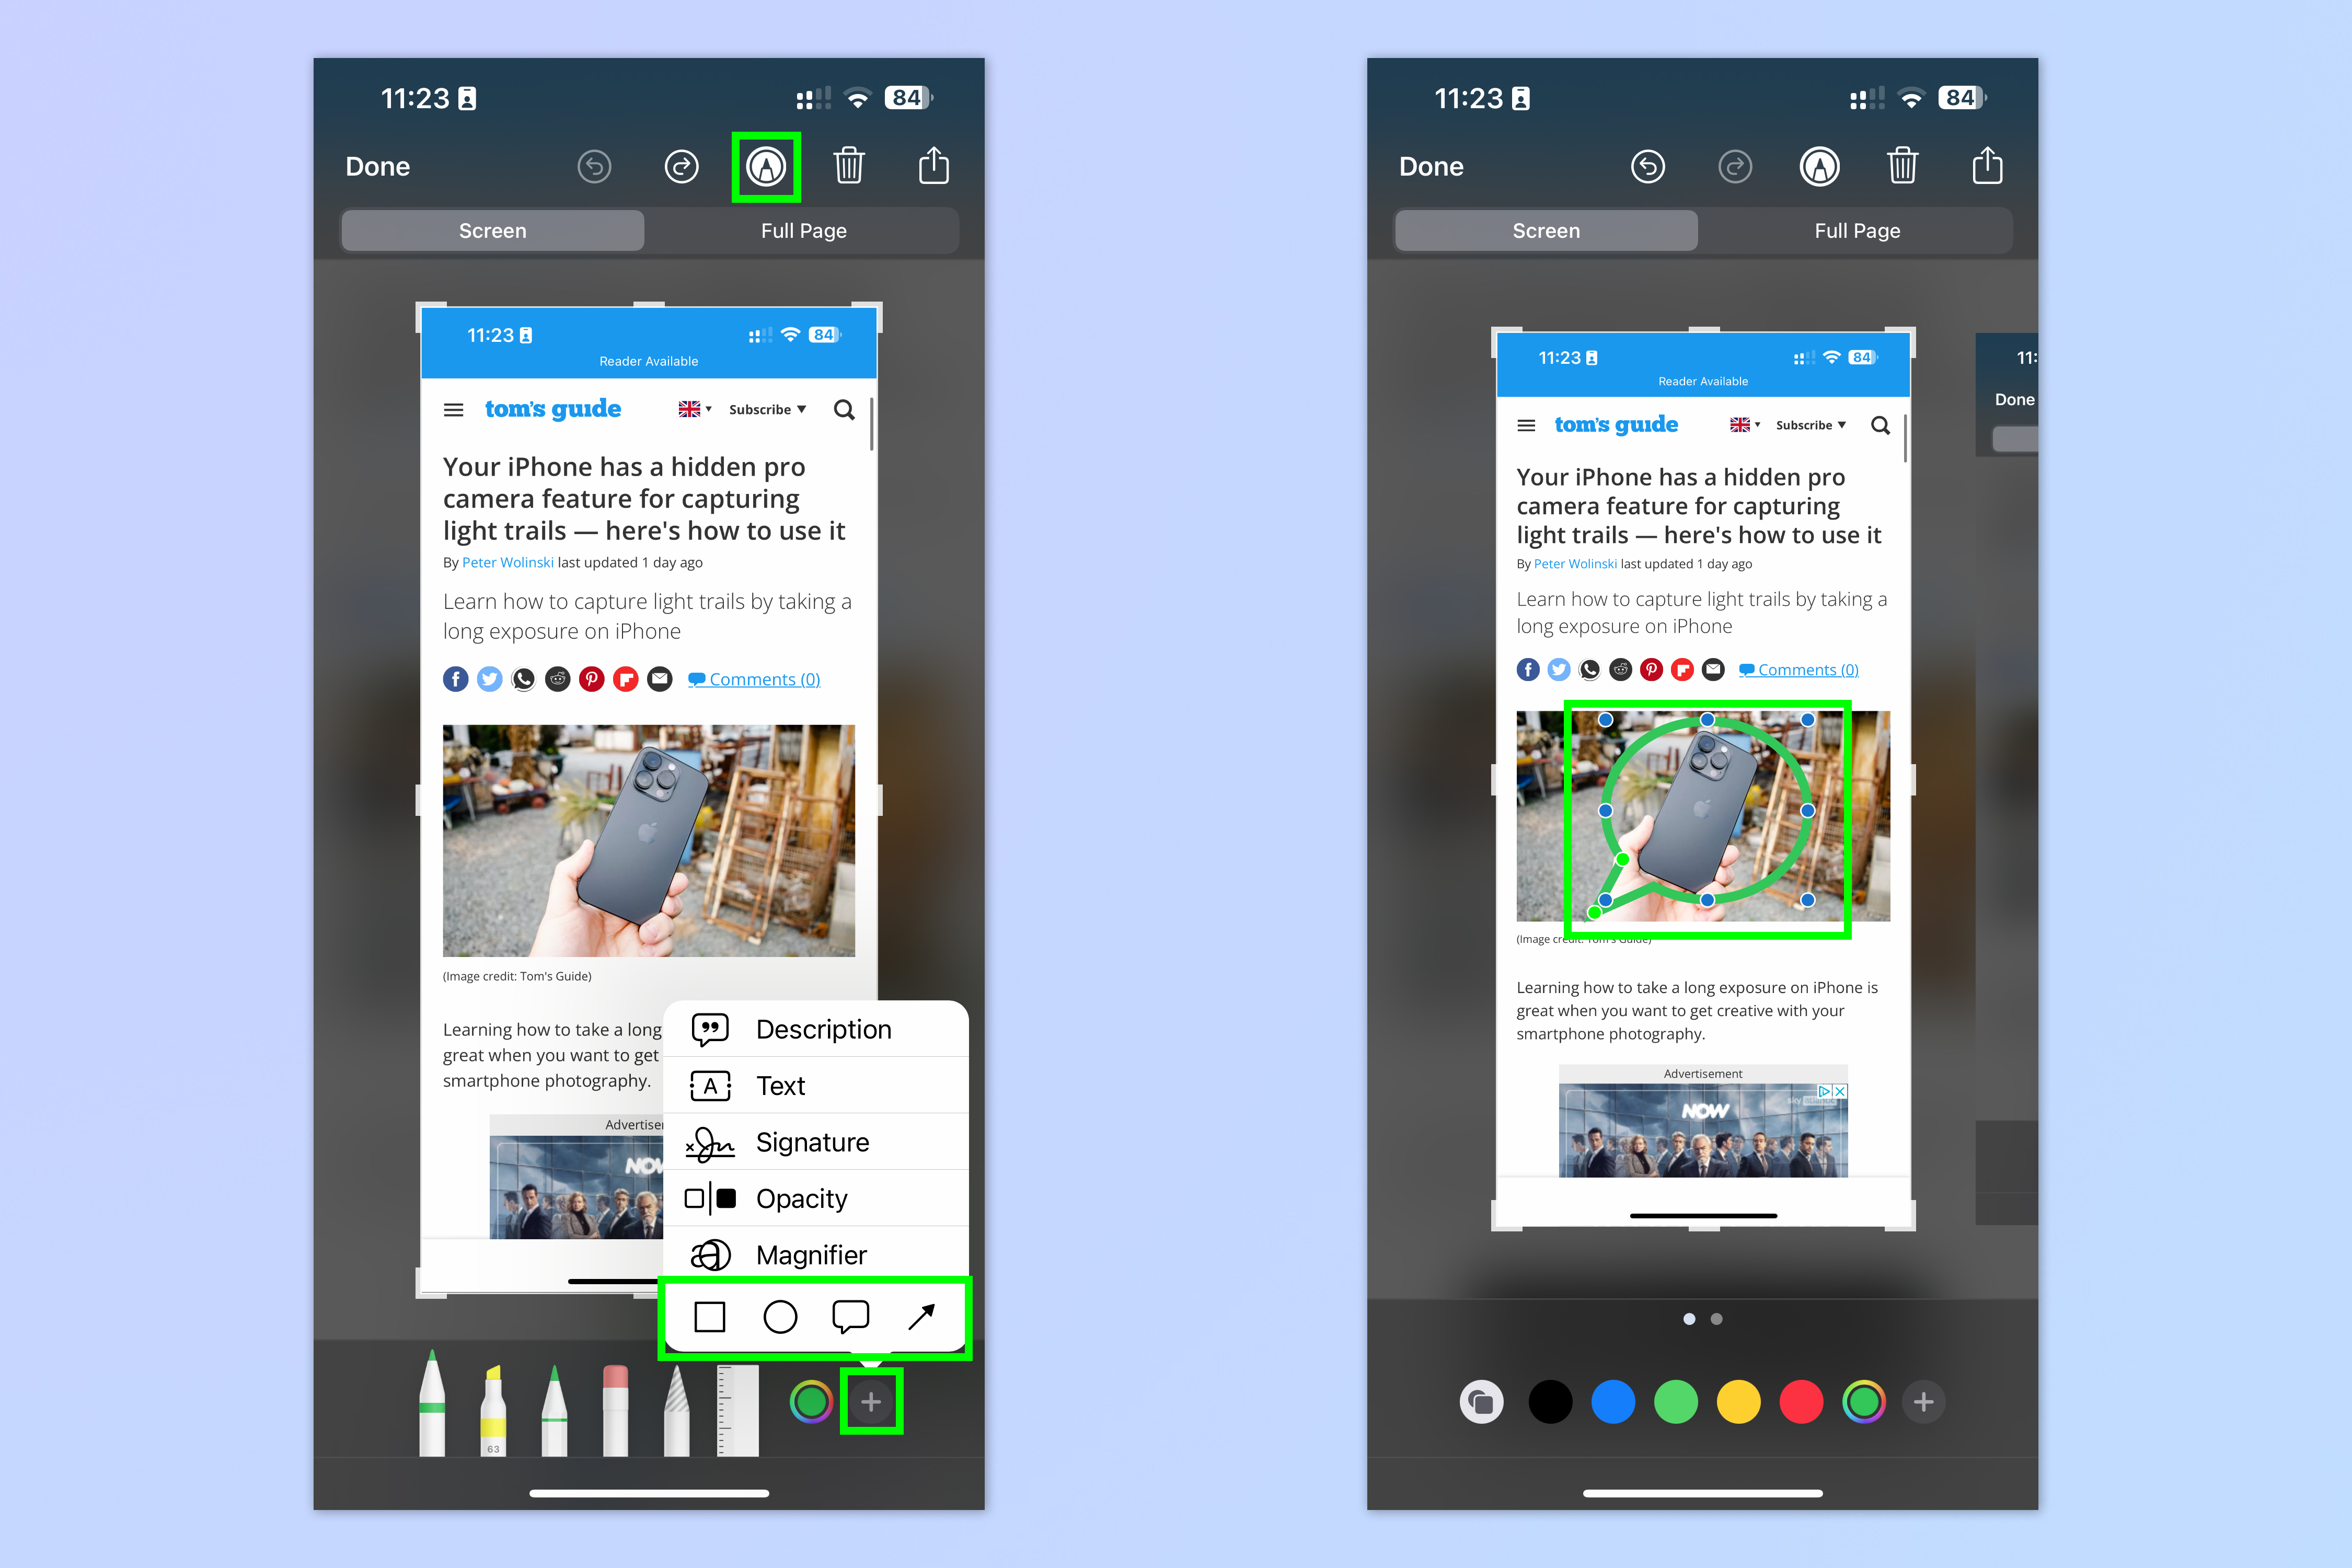
Like adding signatures, you can also add lines and shapes into your screenshots, to customize them or make them amusing. There are four basic shapes to begin with: a circle, a square, a speech bubble and an arrow. However, you can manipulate the shapes using anchor points once placed and, combined with hand- or ruler-drawn lines, make any shape you like.
To add shapes to screenshots:
1. Tap the plus icon when in Markup mode and select one of the shapes at the bottom of the pop up.
2. Drag the shape to where you want it on the page and adjust its size and parameters using the green and blue anchor points.
11. Add text boxes to screenshots
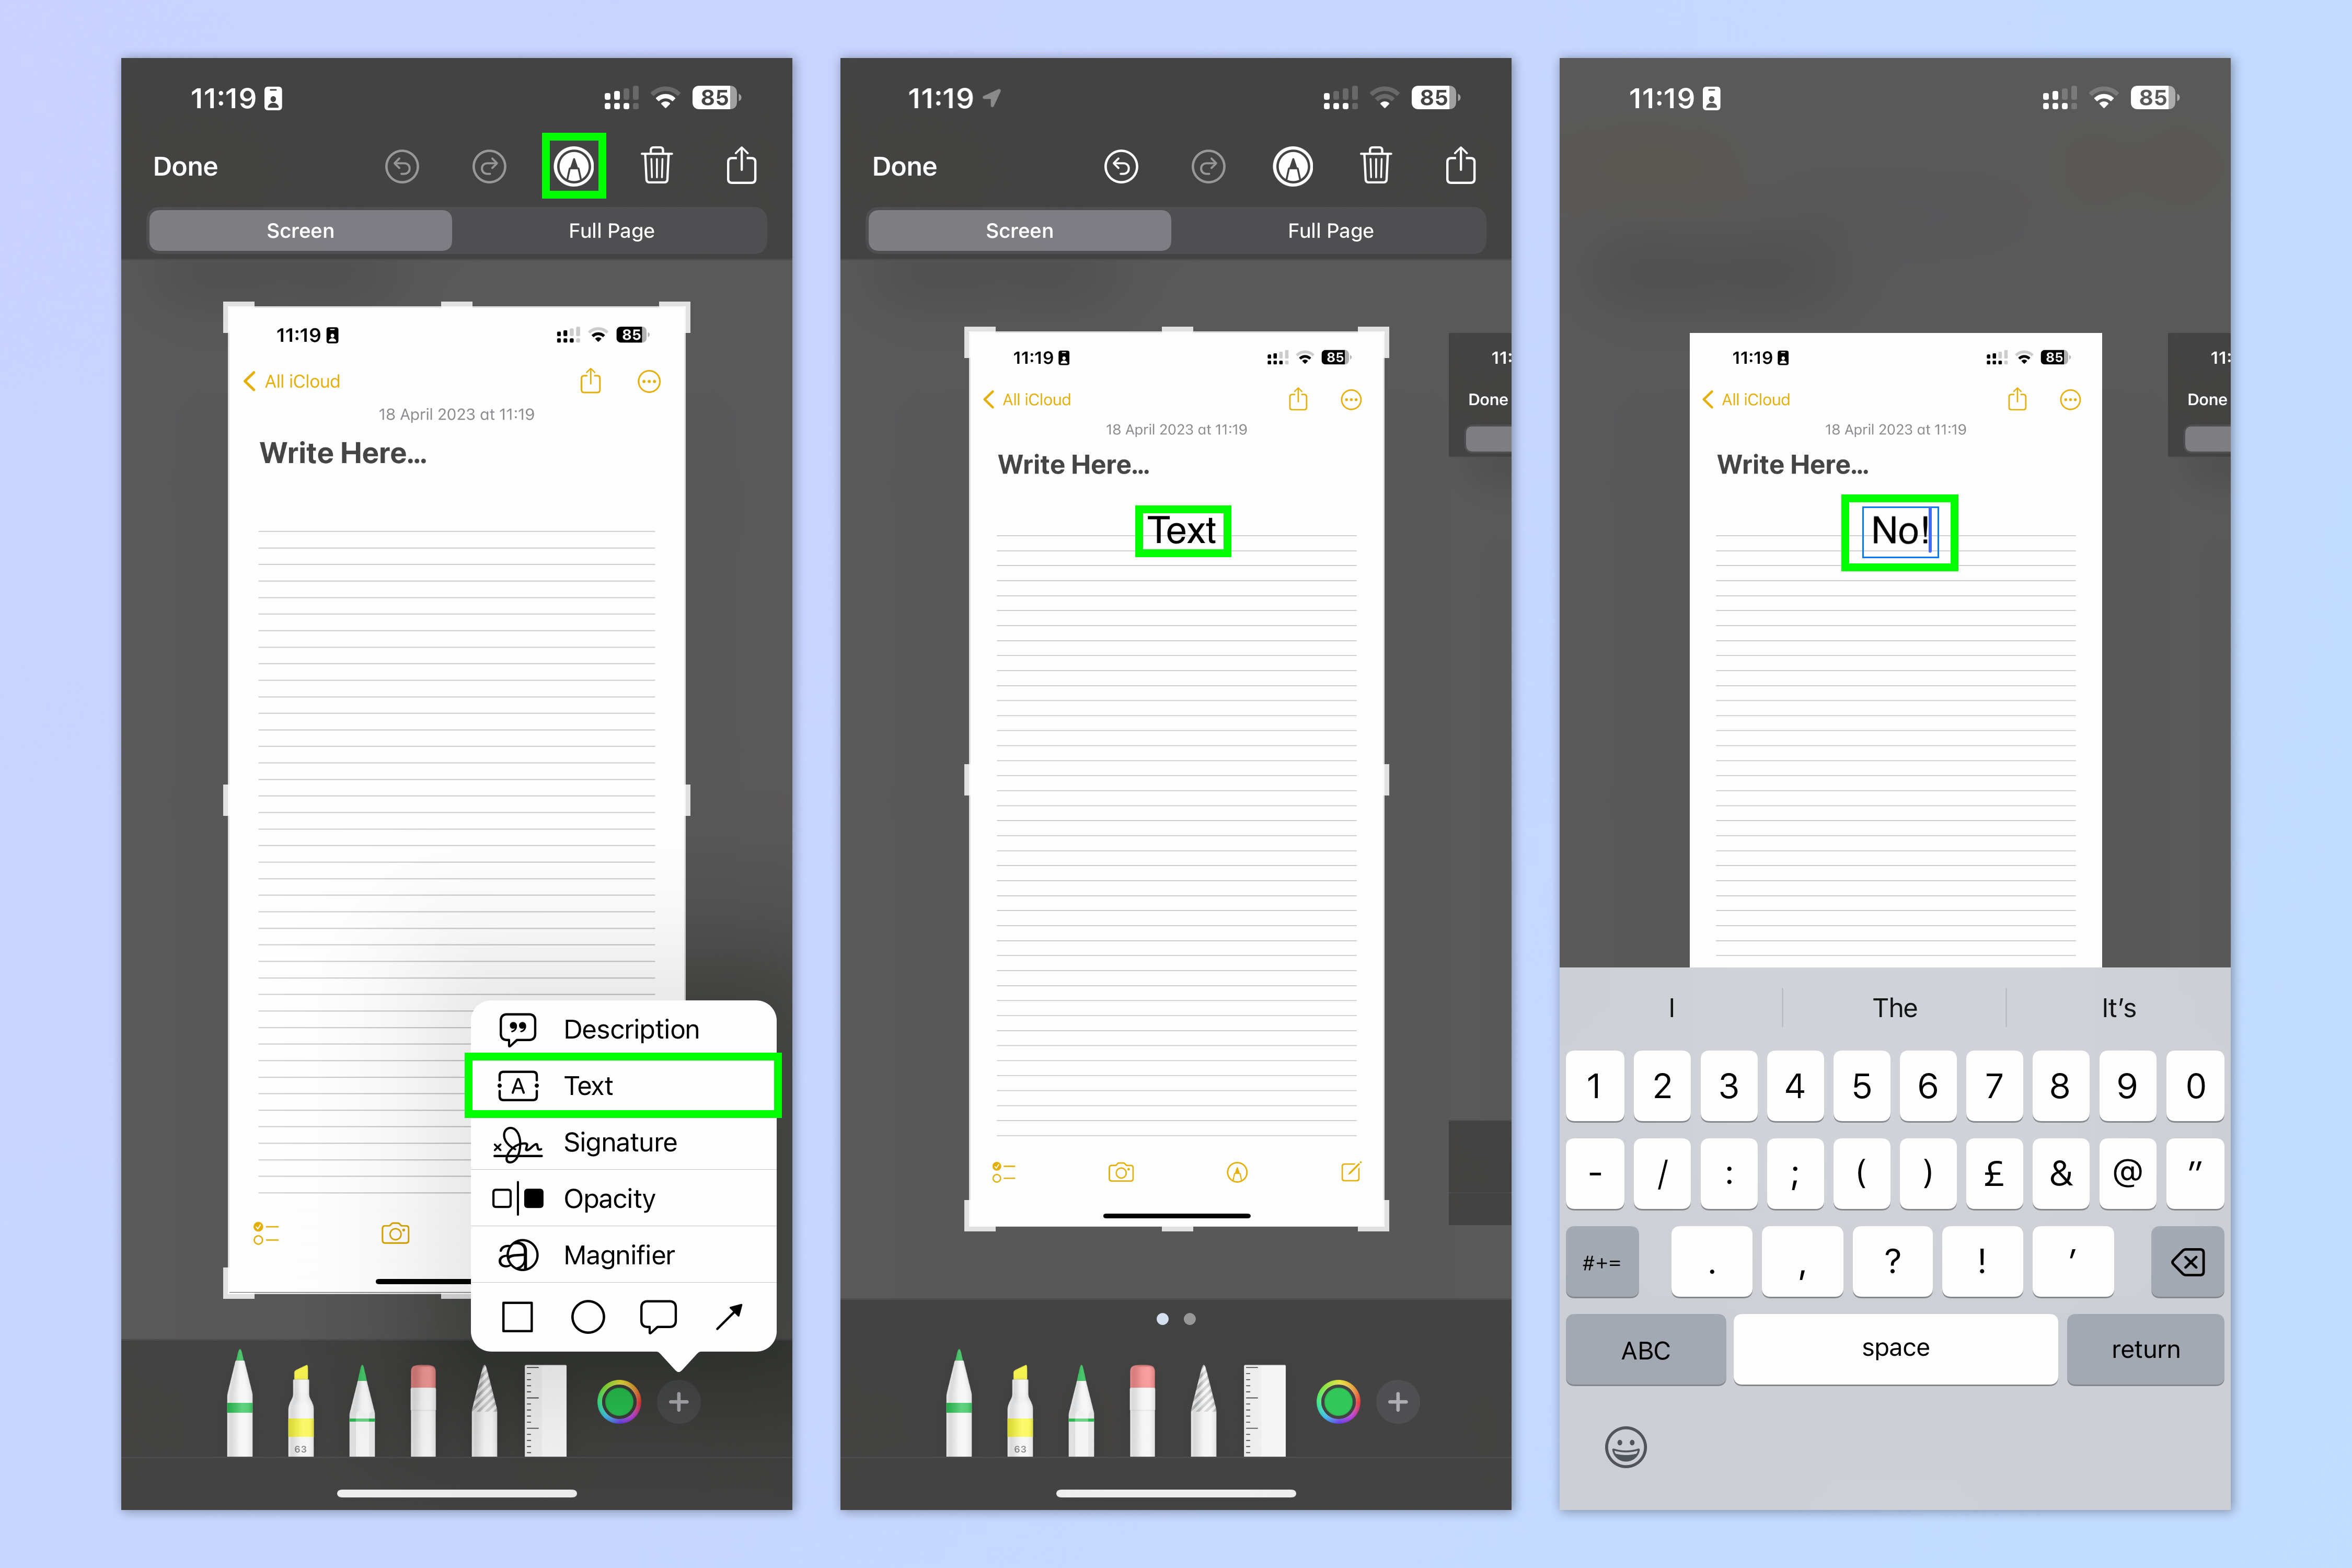
As well as adding signatures and shapes, you can also add text boxes to screenshots and populate them with properly formatted text rather than hand-drawn notes. This is extremely useful if you're trying to make serious on-page notes about elements of the screenshot, when revising for instance. You can also add the text to the speech bubbles, for amusing on-page captions.
To add a text box:
1. Tap the plus icon when in Markup mode and select Text.
2. Position the text box where you want it on screen.
3. Tap the text box and type in your text.
12. Apply a permanent magnifying glass
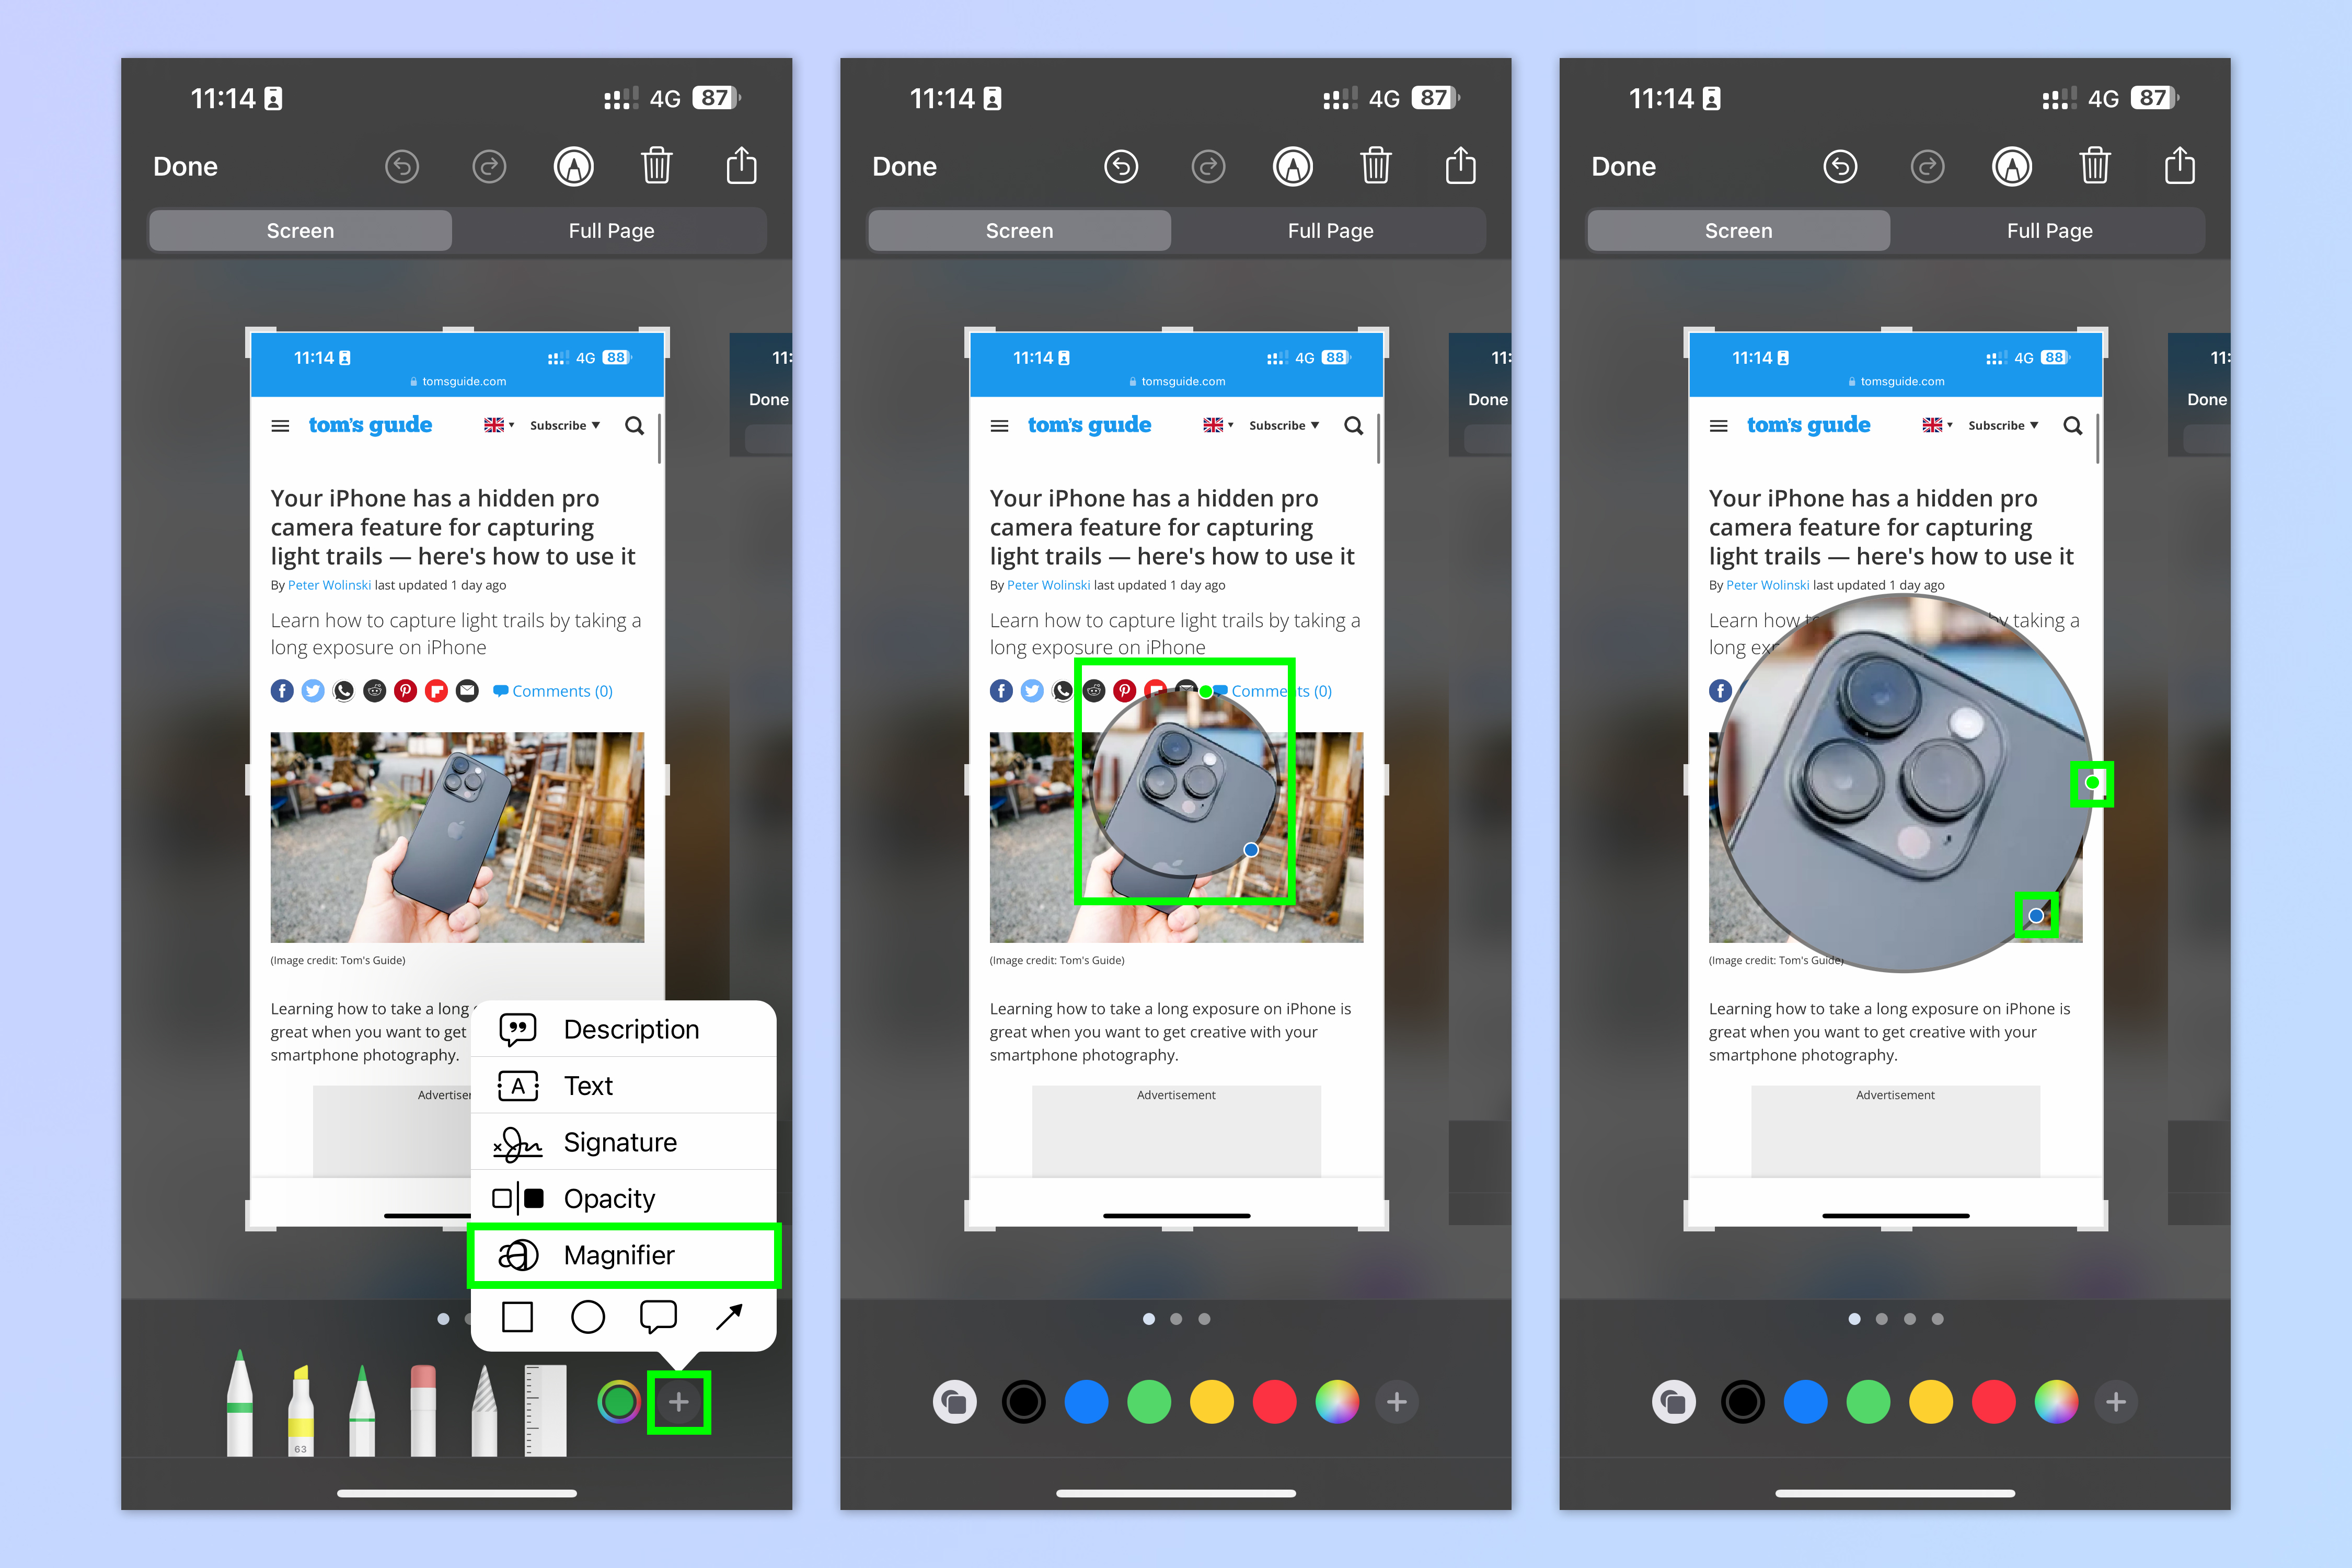
The screenshot menu features a magnifying glass tool which can be placed over any element on the page to enlarge it. This is extremely useful if you're sending a screenshot to someone who has a visual impairment, as you can magnify any element you think they'd miss and/or you want them to pay attention to. It's also useful for simply making a page element stand out!
To apply a magnifier to a screenshot:
1. Tap the plus icon when in Markup mode and select Magnifier.
2. Position the magnifier where you want it on screen.
3. Tap and drag the blue anchor point to adjust the size of the magnifier. Tap and drag the green anchor point to adjust the amount of magnification.
13. Change a screenshot's opacity
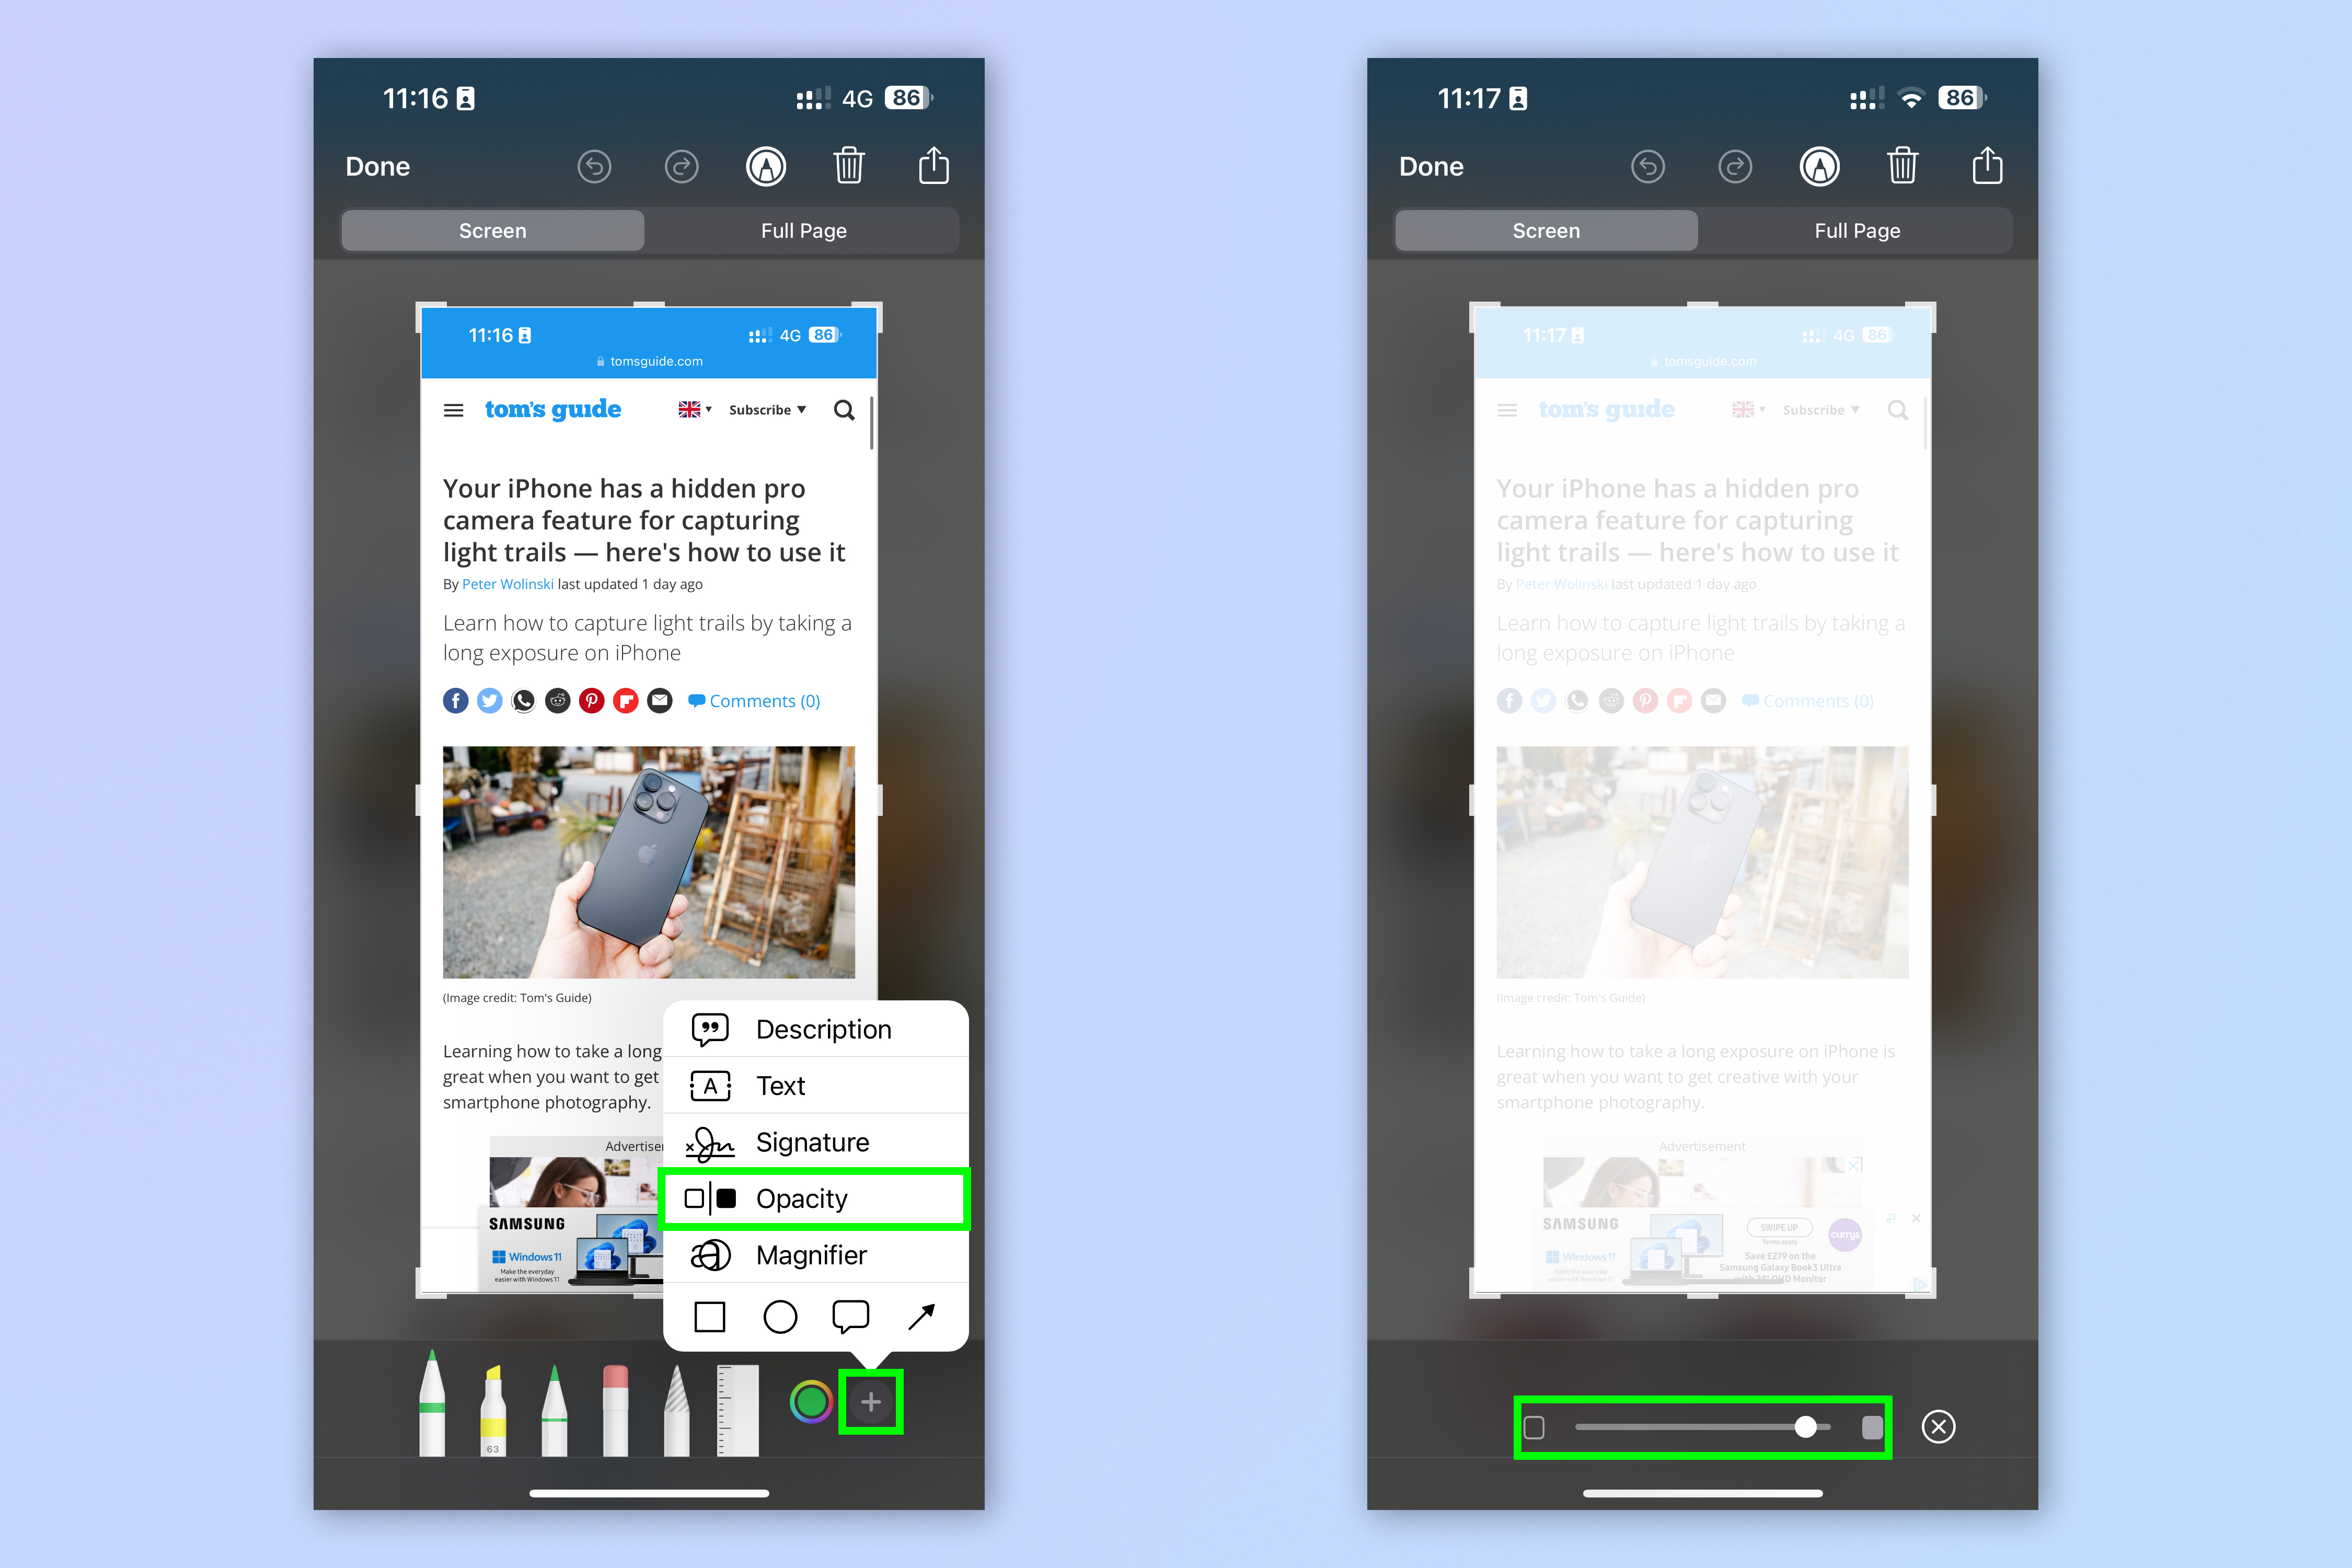
Want to make a screenshot more or less opaque? Of course you do. Who wouldn't? Luckily for you then, the screenshot editor has an opacity slider. Now, while this may seem a little pointless, it does have its uses. By changing the opacity of the screenshot, you can draw more attention to your annotations and make them stand out better. This could be extremely useful on cluttered screenshots where you want to make your notes and mark ups a little easier to read.
To change the opacity of a screenshot:
1. Tap the plus icon when in Markup mode and select Opacity.
2. Now drag the opacity slider to change the opacity.
14. Identify subjects with Visual Look Up
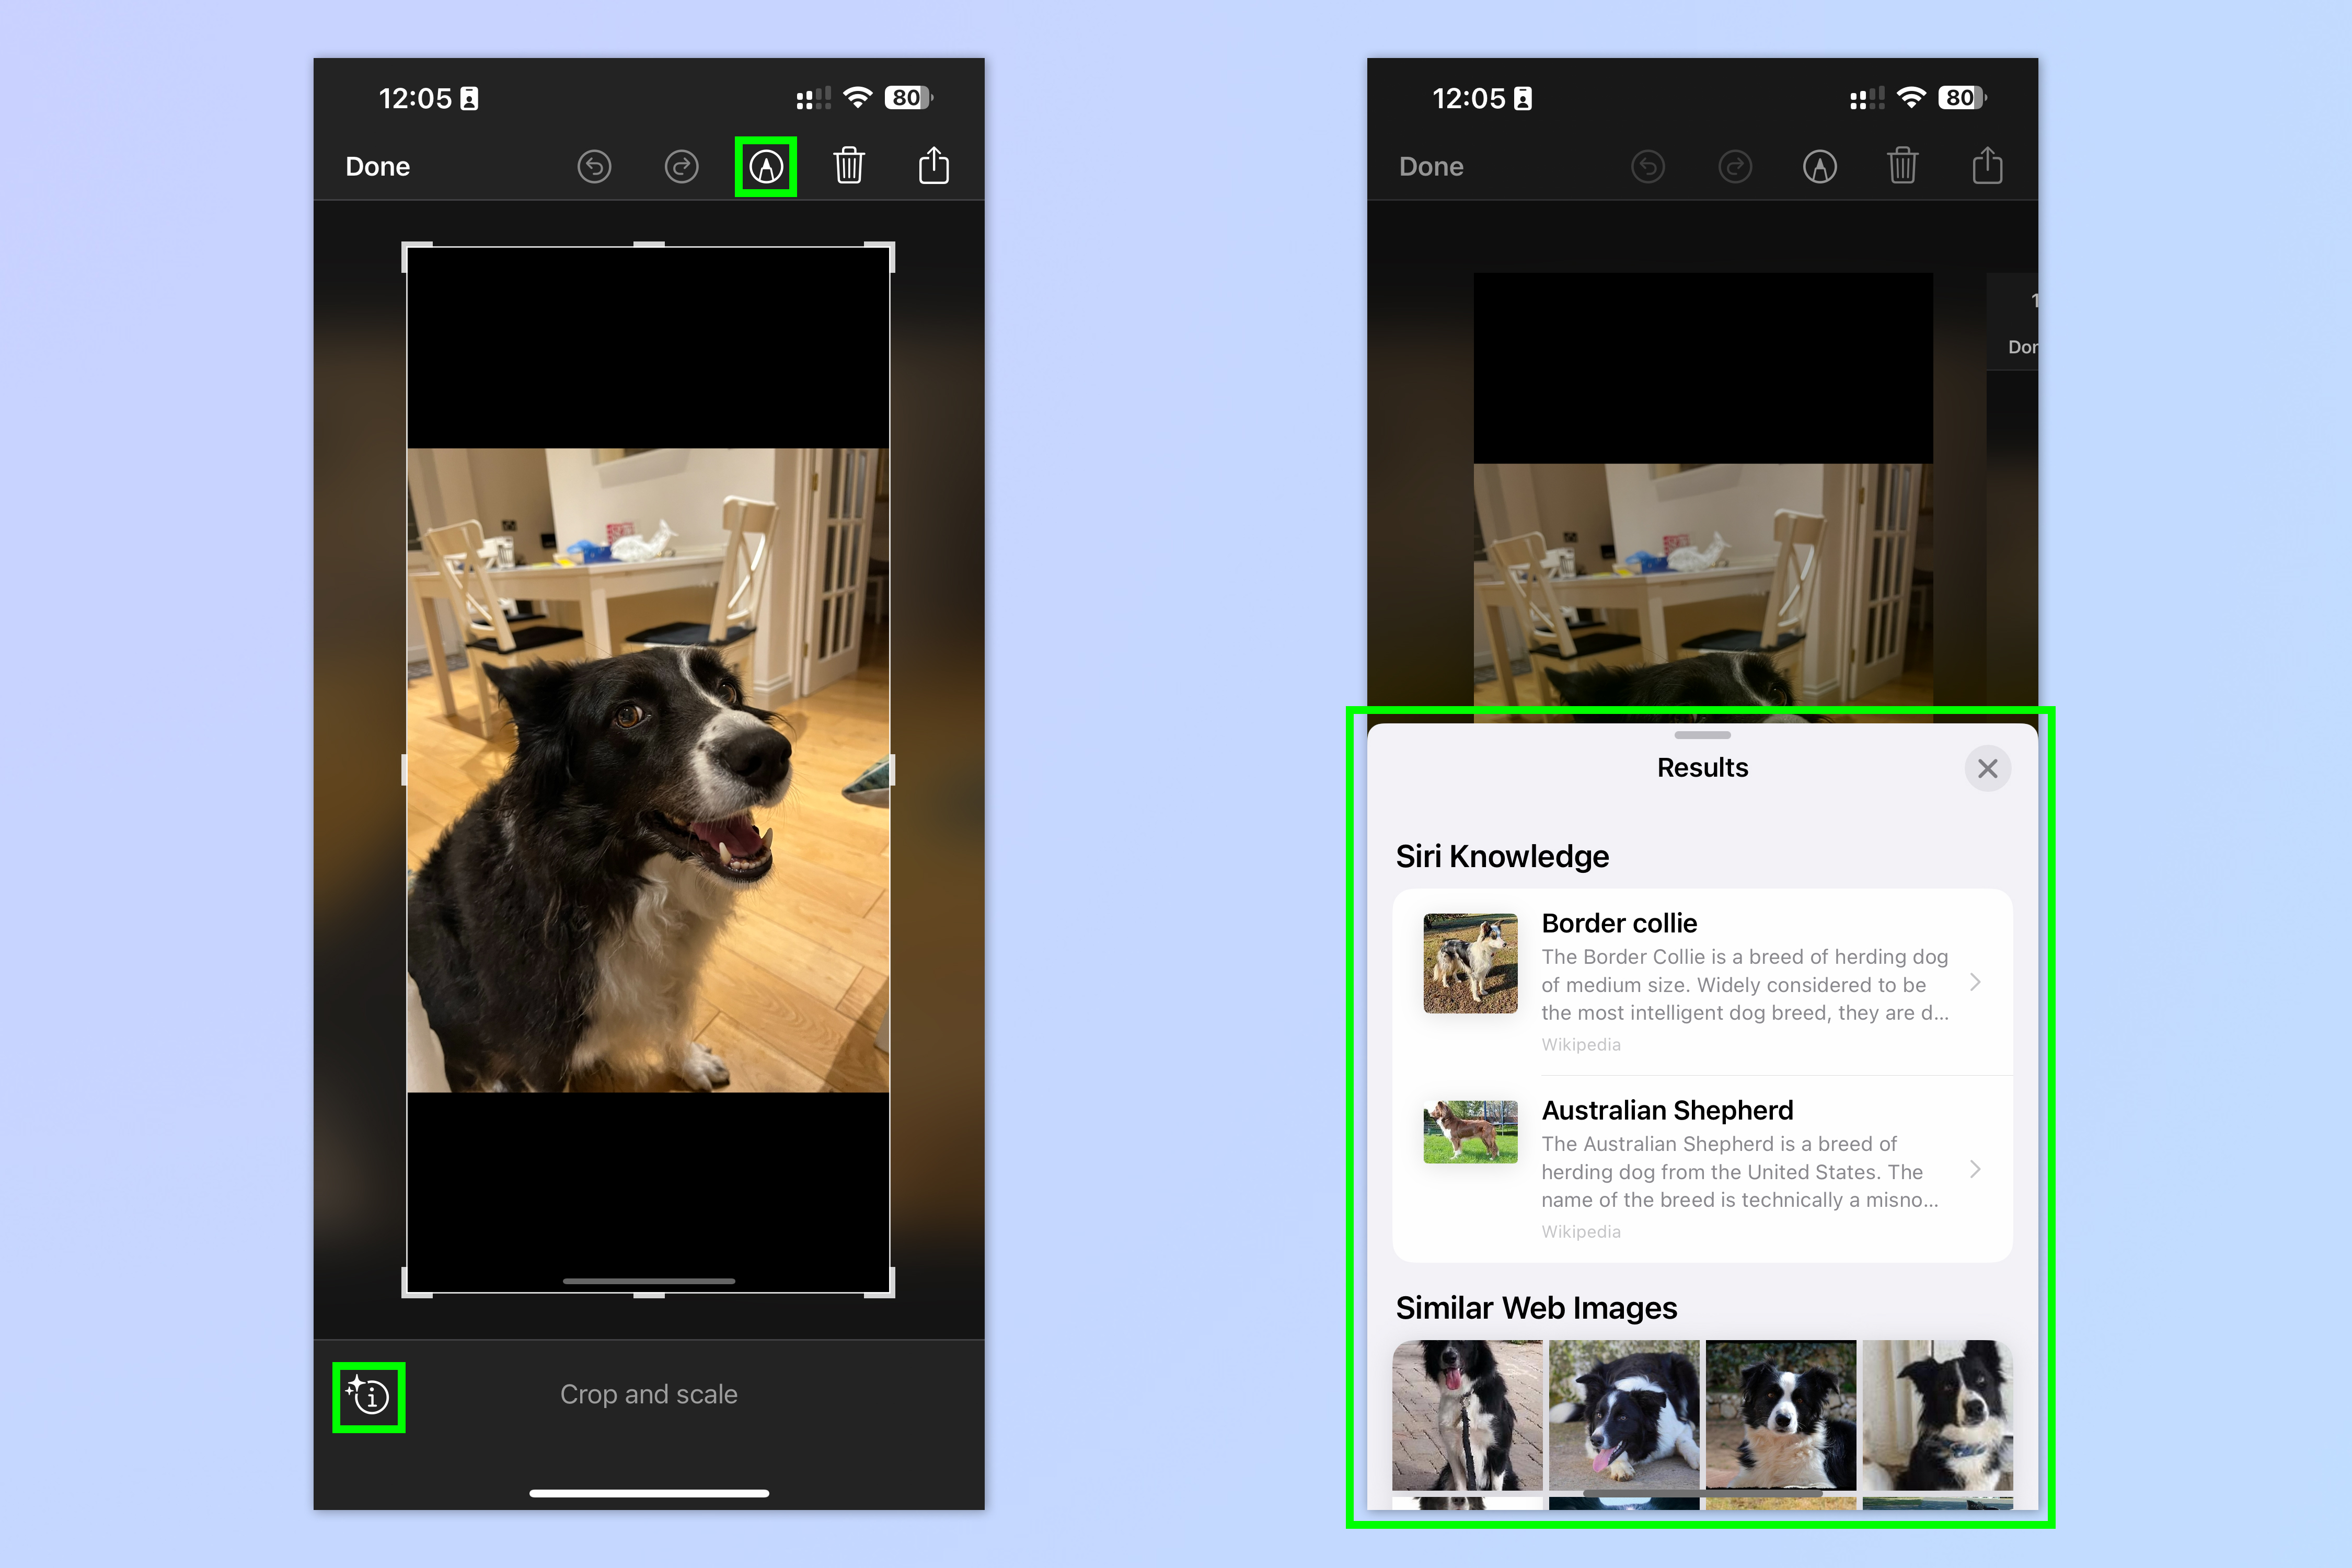
You may be aware of the iPhone's Visual Look Up feature, which can identify subjects like plants, animals or places within a photo and provide information on them. Well, you can use the same Visual Look Up function with screenshots. It can be a little fiddly with busy screenshots, requiring a bit of cropping to isolate the subject you want to look up. However, it's about as reliable as the base Visual Look Up feature and, with large images of animals such as dogs, often doesn't necessitate any cropping.
To use Visual Look Up with a screenshot on iPhone:
1. Open the screenshot editor and, if you're in Markup (usually you will be by default) tap the Markup button to leave Markup.
2. Tap the "i" button, bottom left to launch a Look Up. This will only appear if your iPhone identifies something it can look up in the screenshot.
15. Select all the text in a screenshot
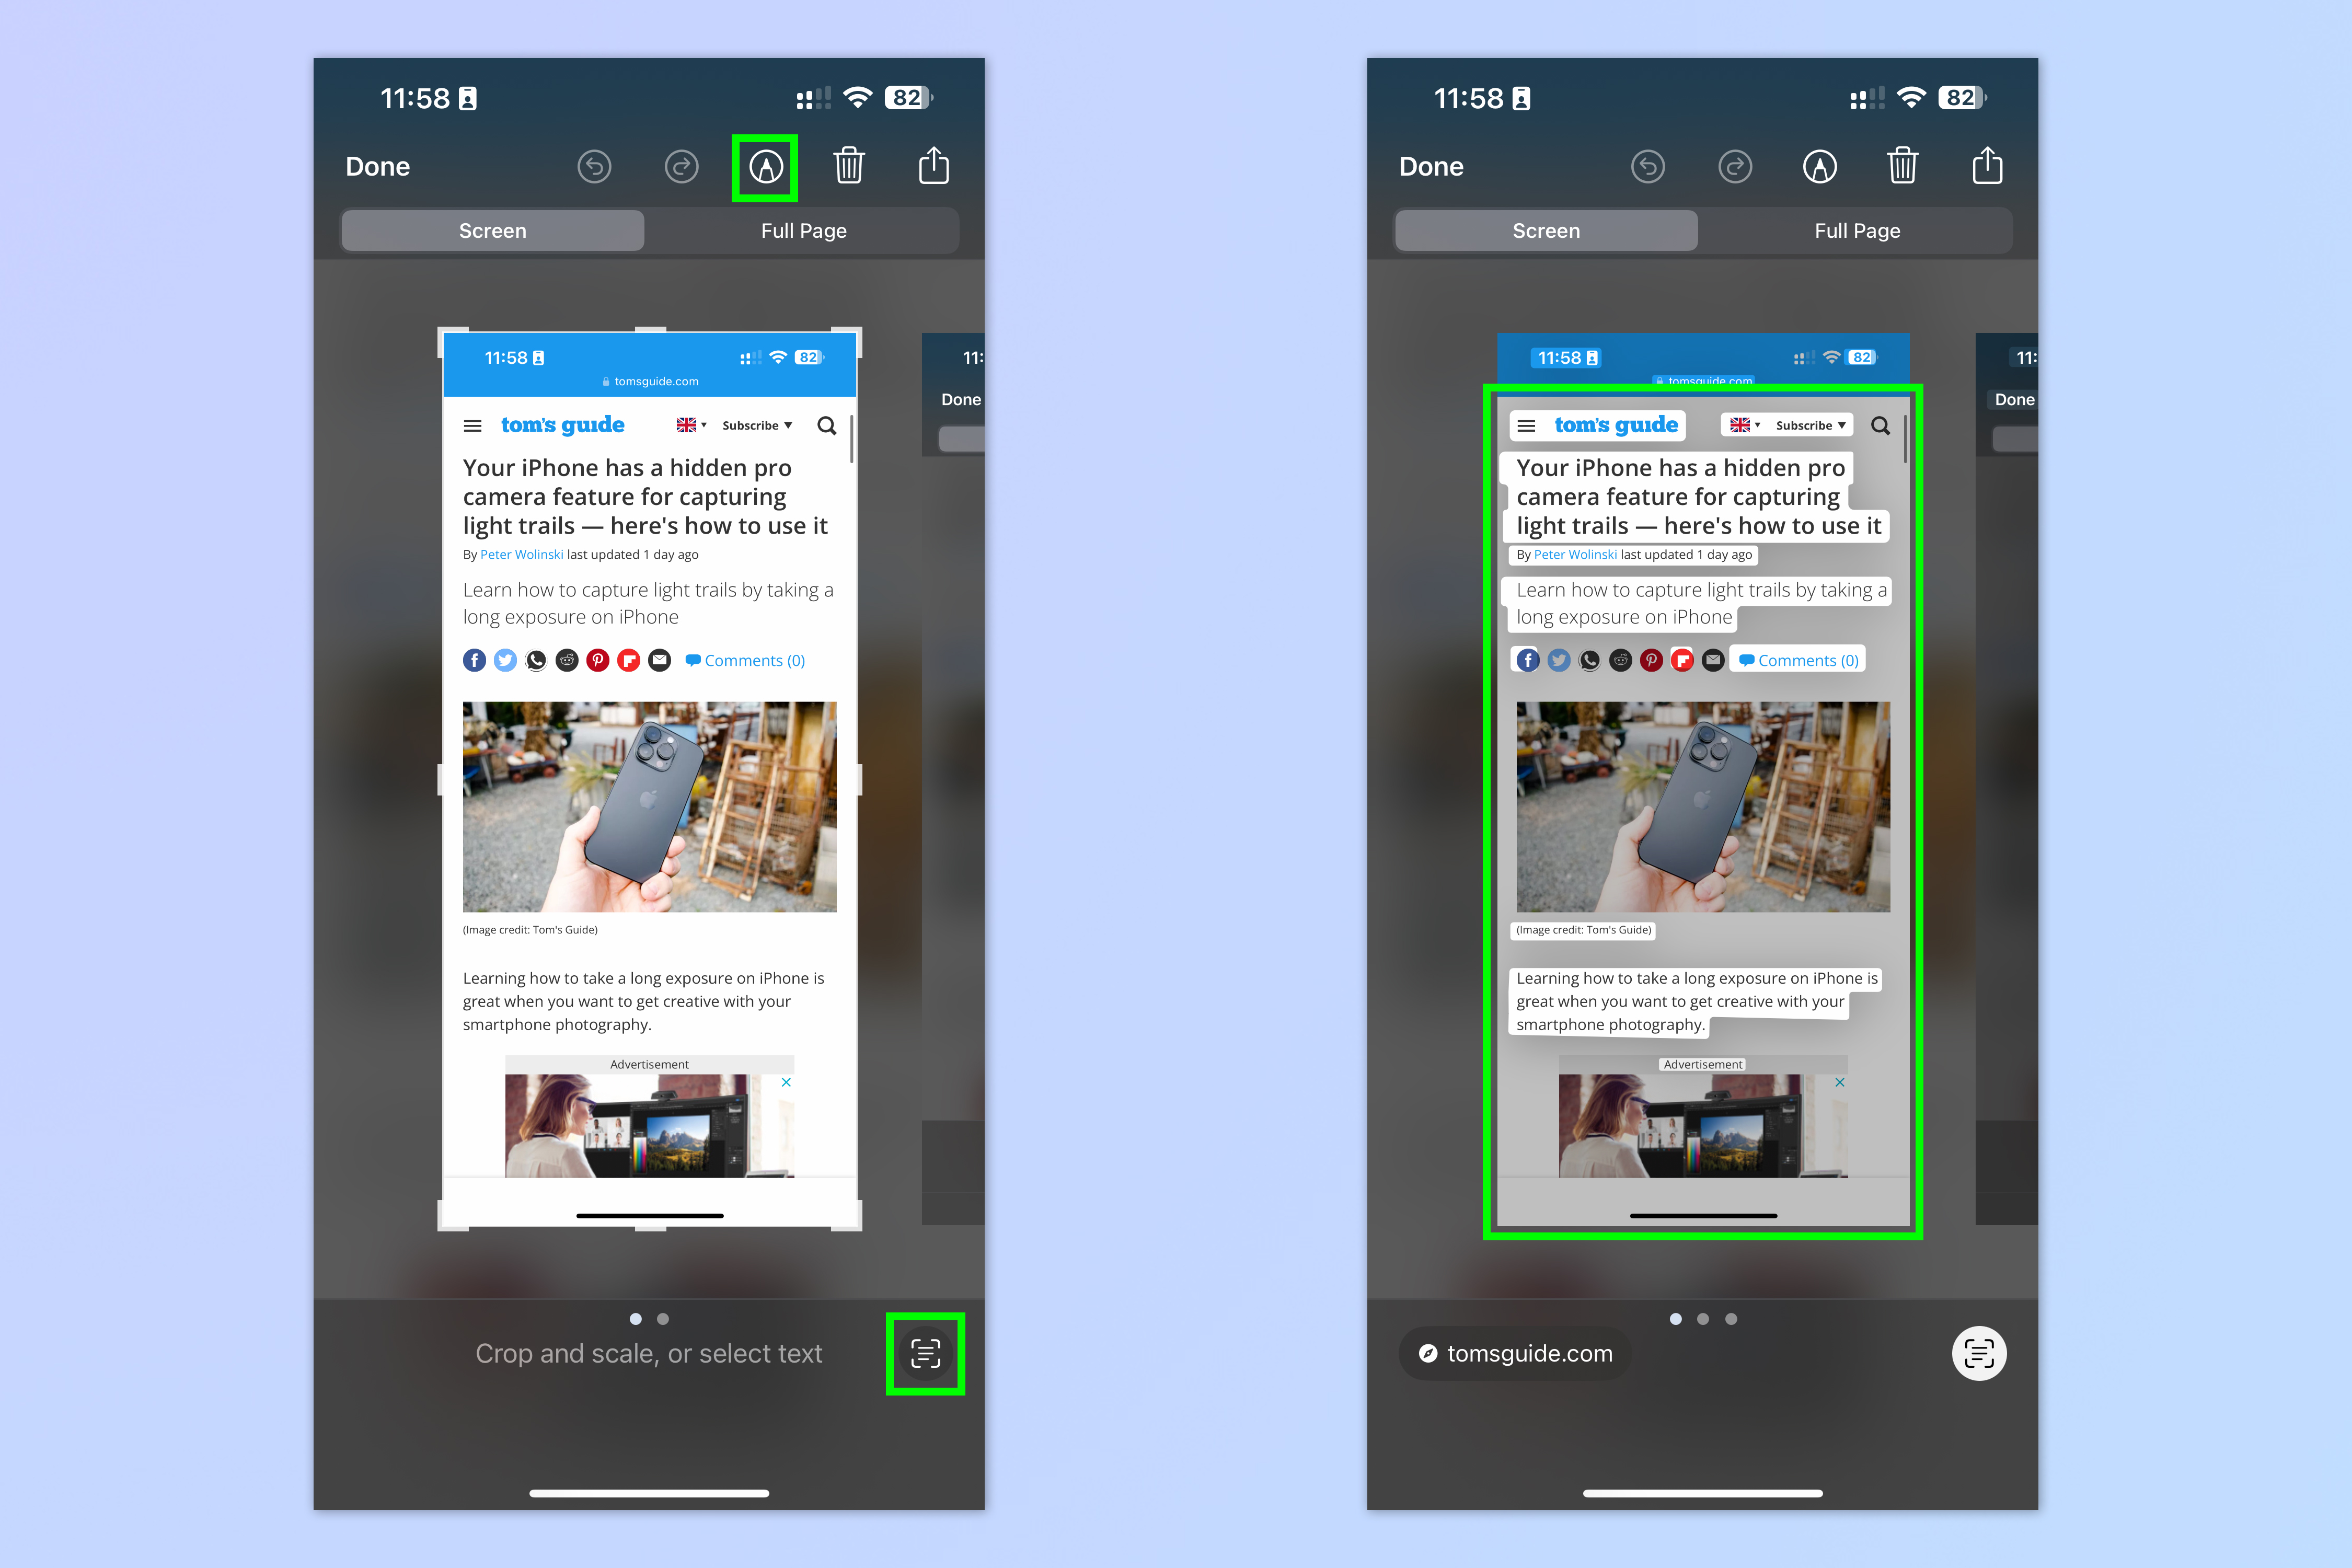
If you've taken a screenshot of an entire page of text, there's a good chance that text is of interest to you. Perhaps it's a recipe you want to make later on, or an informative page you're using to study. Likewise, there's also a high chance you'll want to use that text in other places — your Notes app, for example. Well you needn't type out all the text into your notes, because you can use the iPhone's text capture function within the screenshot edit menu, to select and copy just the text.
To select the text in a screenshot:
1. Tap the pen icon at the top to ensure you are out of Markup mode.
2. Tap the select text icon, bottom right. Your iPhone will now identify all the text on screen. Long tap any of the text and you can highlight some or all of it to translate copy or share.
If you found this guide useful, why not check out our other ones, including the hidden iOS Messages features everyone should know, the hidden iOS gestures that will change how you use your iPhone and the hidden iPhone features you should be using.

Peter is Reviews Editor at Tom's Guide. As a writer, he covers topics including tech, photography, gaming, hardware, motoring and food & drink. Outside of work, he's an avid photographer, specialising in architectural and portrait photography. When he's not snapping away on his beloved Fujifilm camera, he can usually be found telling everyone about his greyhounds, riding his motorcycle, squeezing as many FPS as possible out of PC games, and perfecting his espresso shots.
