How to track changes in Word
Knowing how to track changes in Word gives you a powerful collaboration tool

Microsoft Word isn’t just for writing documents by yourself. If you know how to track changes in Word, it becomes ideal for collaborating on files with your colleagues, as any amendments will be highlighted and be much easier to spot.
This, in turn, provides a platform on which to review others’ changes, suggest edits of your own and even comment on specific passages. In this guide, we’ll show you how to all of these Track Changes features in Word.
- How to sign a Word document with digital or handwritten signatures
- Here’s how to convert a PDF to Excel
- How to change line spacing in Word
While you can use the Track Changes tool to leave notes for yourself, it’s mainly designed for collaborating on documents with multiple authors. You can either save a copy of a document with tracked changes included, which you can then email or otherwise share, or simply leave your changes in a cloud storage copy that all authors can access at once.
Either way, tracking your changes is usually better than simply making direct edits because it helps colleagues understand where and why you made an amendment. The comments feature also encourages collaboration as it lets you start a discussion on potential changes, and not just make unilateral edits.
How to track changes in Word: Turn Track Changes on and off
1. In Word, open the “Review” tab. Then, click “Track Changes,” then “Track Changes” in the drop-down menu that appears. Alternatively, just press Ctrl + Shift + E.
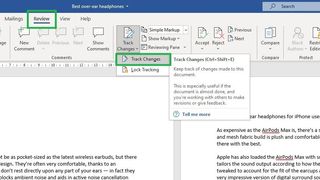
2. The “Track Changes” button in the toolbar will be highlighted to show that tracked changes are active. To stop tracking changes, simply repeat step 1 and check that the button is no longer highlighted.
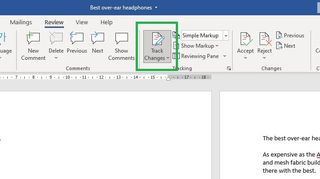
How to track changes in Word: Show or hide tracked changes
1. By default, Word won’t show tracked changes in the text itself. Instead it will leave small markers within the margins, aligned to wherever in the text a change was made.
Sign up to get the BEST of Tom's Guide direct to your inbox.
Get instant access to breaking news, the hottest reviews, great deals and helpful tips.
Click these markers to show the changes — text edits are marked with a small red line, and comments by a speech bubble. Clicking again will hide them.
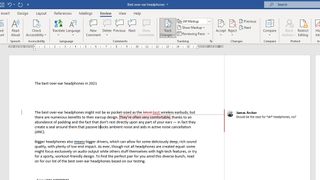
2. Alternatively, you can set tracked changes to always appear within the document; deleted text, for example, will be visible with strikethroughs.
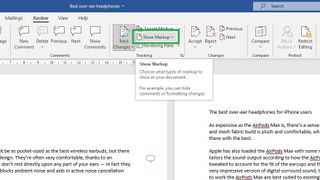
To enable this feature, click the “Review” tab then, next to the “Track Changes” button, click “Show Markup.”
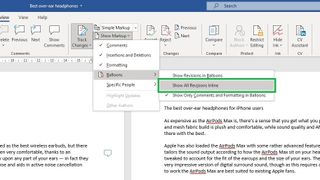
3. Move your cursor over “Balloons,” then click “Show All Revisions Inline.” Note that even with this setting, you can still hide changes by clicking their corresponding marker in the left margin.
How to track changes in Word: Write, resolve and delete comments
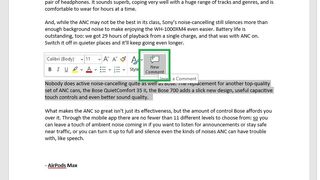
1. To create a comment, highlight a section of text and click the “New Comment” button when it appears.
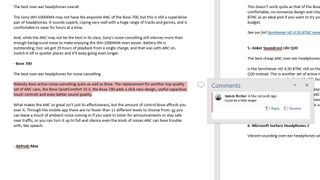
2. Write your comment and click off the comment box to save it.
3. To mark a comment as resolved, right-click the section of text that was highlighted for the comment and click “Resolve Comment.”
Alternatively, you can click “Delete Comment” from the same menu, to remove it entirely.
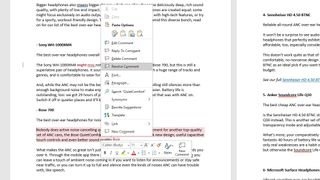
How to track changes in Word: Accept or reject changes
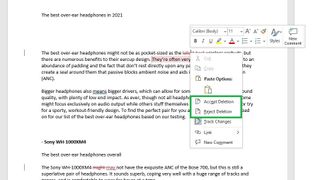
1. Right-click on any inserted or deleted text; it helps to have the “Show All Revisions Inline” setting selected for this.
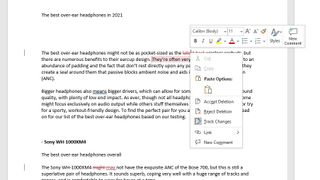
2. Click “Accept” or “Reject” for that specific insertion or deletion. Accepting a change will add the text to the document and cease tracking it, while rejecting a change will undo it.
Again, it will no longer be tracked unless someone else makes the same change.
James is currently Hardware Editor at Rock Paper Shotgun, but before that was Audio Editor at Tom’s Guide, where he covered headphones, speakers, soundbars and anything else that intentionally makes noise. A PC enthusiast, he also wrote computing and gaming news for TG, usually relating to how hard it is to find graphics card stock.

