How to resize an image for sharing online
If your pictures are too large to post or email then learn how to resize an image for sharing online while ensuring they retain their quality

Learning how to resize an image for sharing online comes in handy if you have a photo or illustration that is just too large for the web. By merely making a picture smaller, you will ensure you don't lose any of the image. You'll also be reducing the overall file size which will make it easier to share whether that's on social media, your own website or online.
Here we're going to look at how you can resize an image using free software that comes with either a Windows or Mac computer. In both cases, you will be able to maintain the aspect ratio of your images if you wish. It's also a good idea to work on a copy of the original image so that you don't end up overwriting it (you never know when you may need the original in the future). To do this, right-click the image and choose copy.
Resize an image on your Mac
If you want to resize an image on an Apple Mac — whether that's the best MacBook, an iMac or a Mac Mini — we'd recommend launching Preview. This image and PDF viewer comes baked into macOS and it has several editing and resize options.
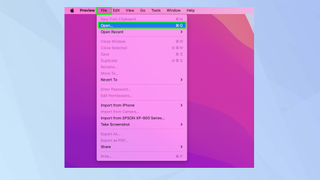
1. Launch Preview on your Mac and click File in the menu bar. Select Open and find an image you'd like to resize.
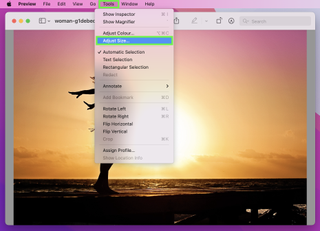
2. When you double-click the image, it will appear in Preview ready for editing. To resize, you can click Tools in the menu bar and select Adjust Size.
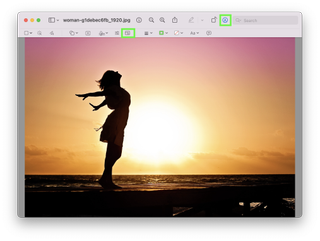
3. You can also make use of the resize options if you click the Markup Toolbar button in the Preview app window and then click the Adjust Size button.
4. In either case, you will see the Image Dimensions window. The easiest way to resize an image is to click Custom next to Fit into. Simply select one of the sizes.
Sign up to get the BEST of Tom's Guide direct to your inbox.
Get instant access to breaking news, the hottest reviews, great deals and helpful tips.
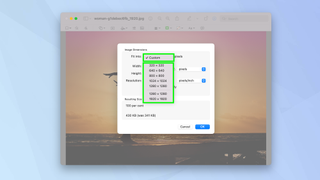
5. You can also manually alter the width and height of an image. Enter a value next to width and enter a value next to height.

6. By default, the values will relate to the number of pixels but you can change this. To do so, click Pixels and choose an alternative method of measurement including per cent, inches, centimeters, millimeters and points.
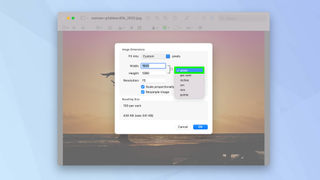
7. You can also change the resolution of an image. Usually, when sharing online 72 pixels per inch works best. They have a small file size too.
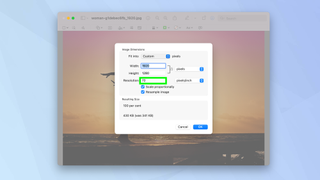
8. You can also decide whether or not you want to click Scale proportionally. By selecting this, the image will always maintain its original proportions. For example, if you enter a value in the width box, the value for height will automatically change to ensure the proportion remains intact.
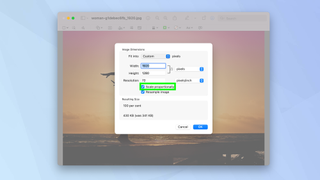
9. If you do not want your image to lose any detail, untick Resample image. Given that you will want a smaller file size for sharing online, you may want to tick Resample image instead.
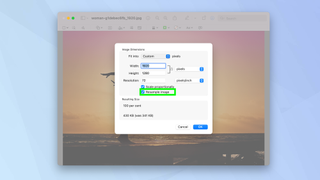
10. When complete, click OK. Now save your image (click File and choose either Save or Export).

Resize an image on your PC
To resize images using Microsoft Windows, we're turning to a tried-and-trusted friend: Paint. This app has been around since 1985 and it remains a fast and easy way to make simple edits to your images, including resizing them.
1. Launch Paint on your PC (you can click the Start button and type Paint, then double-click the icon). Paint can also be launched if you right-click on an image, select Open With and choose Paint from the list of apps).
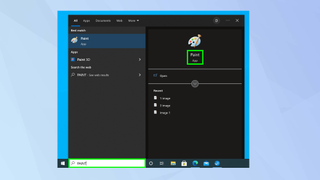
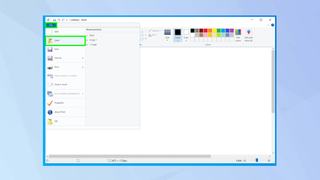
2. If you've launched Paint without selecting an image, just go to File and click Open. Now look for the image that you want to resize.
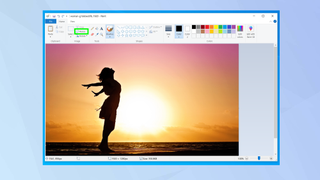
3. Look for the Image tab at the top of the Paint window and select Resize.
4. Click either percentage or pixels depending on how you want to make adjustments to the image's size.
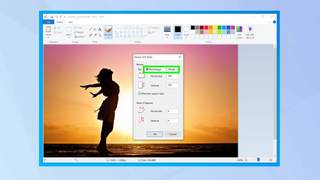
5. Now determine the horizontal and vertical size of your image.
If you are using percentage, then you will base this on 100% being full size. For example, if you enter 50 in either box, you will reduce the image by half of the original size.
If you are using pixels, however, then the number you enter in the box will be the exact number of pixels that you want the lengths to be.
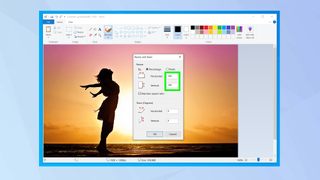
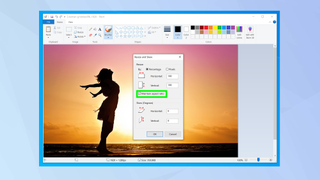
6. If you want to maintain the original proportion of the image, tick Maintain aspect ratio. For example, if you enter a value in the width box, the value for height will automatically change to ensure the proportion remains intact.
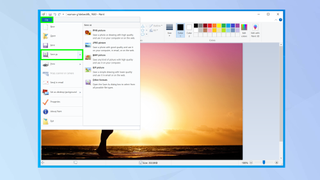
7. Now you can save your image. Go to File and select Save as. Then choose the format you want for your image. JPEG and PNG are good choices for the web.
And there you go. You now know how to resize an image for sharing online on a PC or Mac. If you want to do the same on mobile, then check out the best photo editing apps. You can also learn how to edit photos on iPhone. If your images are in HEIC format, discover how to convert HEIC to JPEG on Windows or learn how to change HEIC images to JPEG on iPhone.

David Crookes is a freelance writer, reporter, editor and author. He has written for technology and gaming magazines including Retro Gamer, Web User, Micro Mart, MagPi, Android, iCreate, Total PC Gaming, T3 and Macworld. He has also covered crime, history, politics, education, health, sport, film, music and more, and been a producer for BBC Radio 5 Live.


