How to create a drive partition in Windows
Mastering drive partitions in Windows: A step-by-step guide for organizing your digital world
Knowing how to partition a drive in Windows 11 is fundamental to getting the most out of your computer.
Drive partitions can elevate your Windows computer to a whole new level of organization. A drive partition is essentially a segmented section of a physical hard drive or solid-state drive, treated as an independent unit by the operating system. Think of it as a digital divider, allowing you to neatly compartmentalize your digital world.
Whether you want to optimize system performance, facilitate seamless data organization, or improve overall system resilience, this step-by-step guide will walk you through how to set up a virtual hard drive and create partitioning. Discover how partitioning can empower you to streamline data management, improve system organization, and make the most out of your computer's storage capabilities.
How to create a drive partition in Windows
This guide covers both creating a virtual hard disk (VHD) and the steps required to partition it. If you already have a VHD and want to skip straight to partitioning, go to Step 7.
1. Go to Control Panel > Create and format hard disk partitions
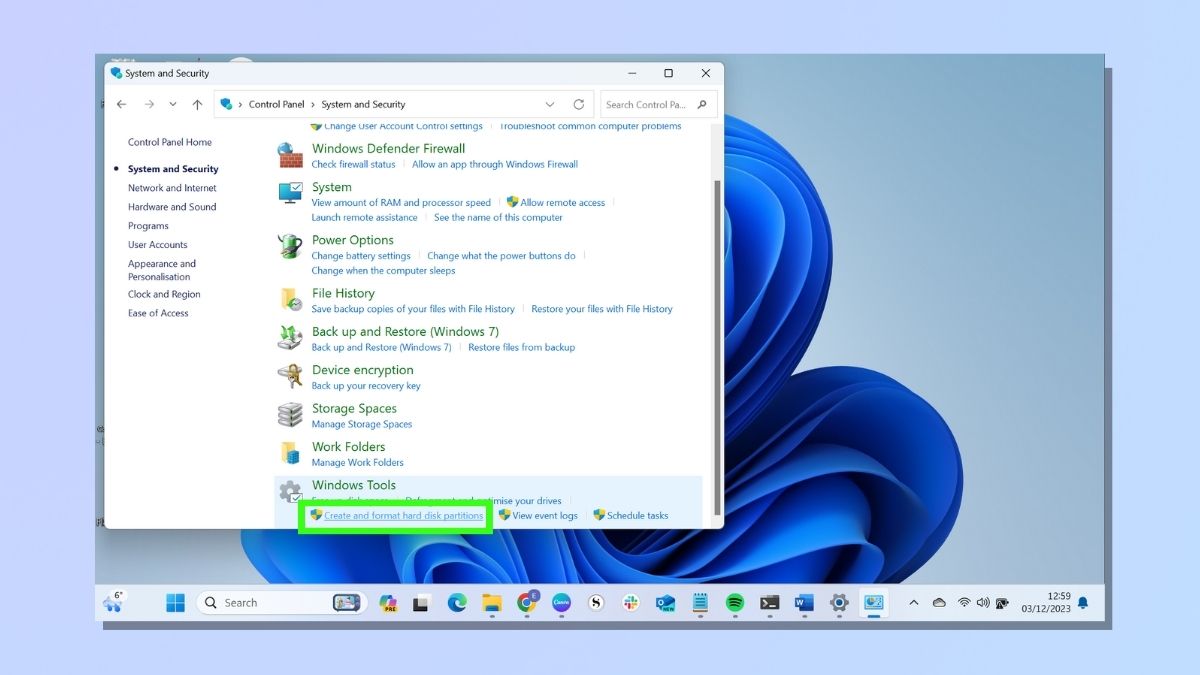
To get started creating your drive partition, go to the Windows control panel. From there, select System and Security. On the System and Security screen, under Windows Tools, select Create and format hard disk partitions.
2. Check your current disk management
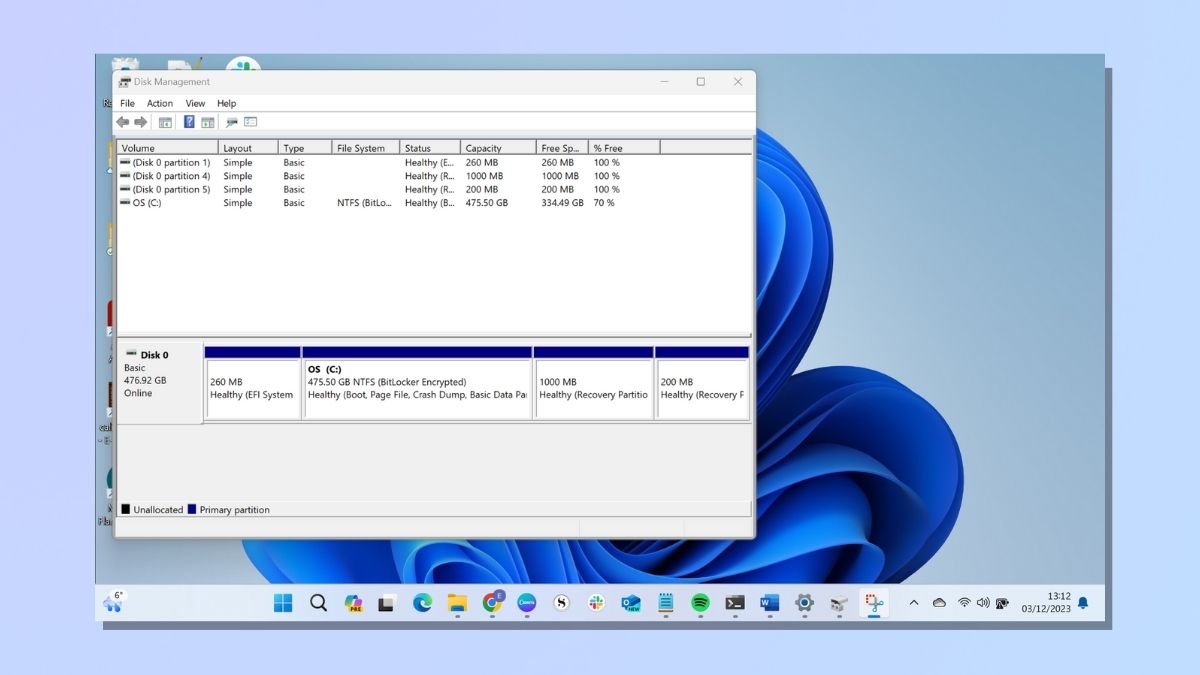
You will then see the disk management screen. This shows all your current disk partitions. Check your current disk partitions to see which drive you want to partition. As you can see from the screenshot above, I haven't created any new partitions yet, so the only disk showing is Disk 0, which is the default number assigned to the physical disk drive.
3. Select requirements for your virtual hard disk
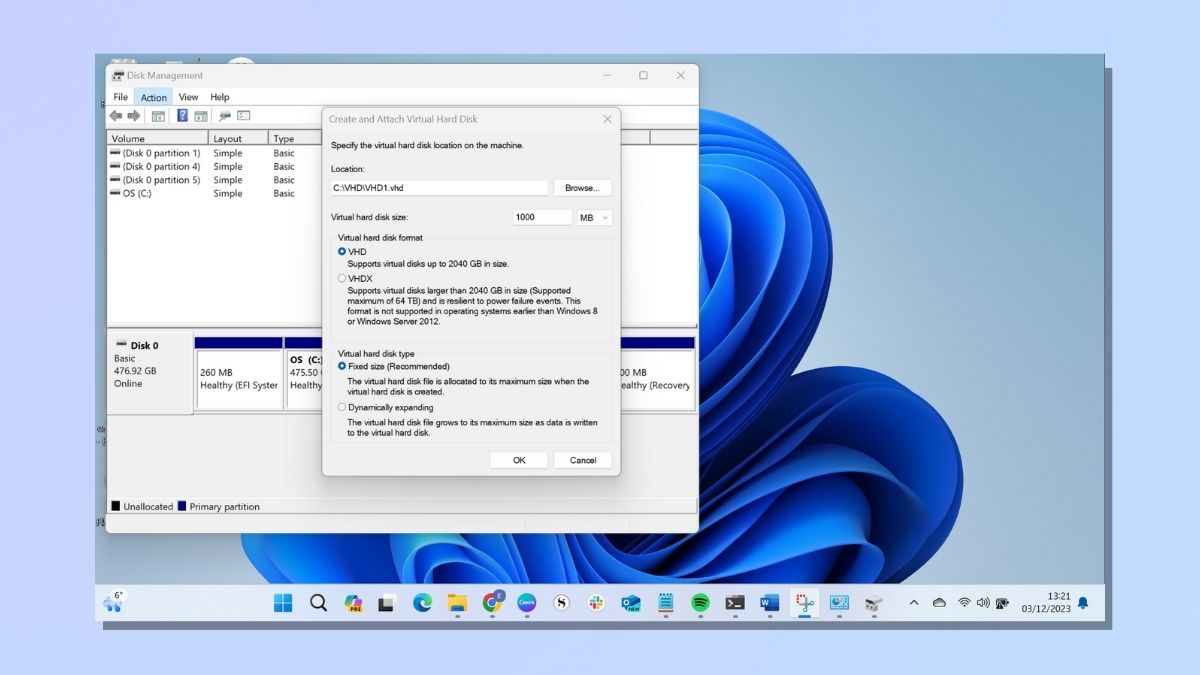
Select Action from the top toolbar and then click Create VHD (Virtual Hard Drive). This opens the Create and Attach Virtual Hard Disk window.
There are several sections you will need to complete:
1. Location
You'll need to specify where your VHD will be stored.
2. Size
You'll also need to specify the hard disk size you require. The size you need will depend on what you want to use your hard disk for.
3. Virtual Hard Disk Format
You have the choice of two formats, VHD and VHDX. VHDX is a newer format and is generally considered superior to VHD due to its larger size support, better resilience, and additional features. However, it is worth noting that VHDX may not be compatible with systems running Microsoft 8 or earlier, and non-Microsoft virtualization platforms.
4. Virtual Hard Disk Type
You can select Fixed Size or Dynamically Expanding as your VHD type. When you create a virtual hard drive with a fixed size, the entire amount of storage space is allocated at the time of creation. With a dynamically expanding disk, the virtual hard drive file starts small and grows dynamically as more data is added to the virtual machine.
Dynamically expanding disks are more flexible in terms of saving physical disk space, but performance is often better with Fixed Size. If performance and immediate reservation of space are critical, fixed size is recommended. If you want to optimize physical disk space usage and are willing to accept a potential performance trade-off, dynamically expanding disks may be suitable.
Once you have selected your choices, click OK.
4. Check your new VHD is appearing
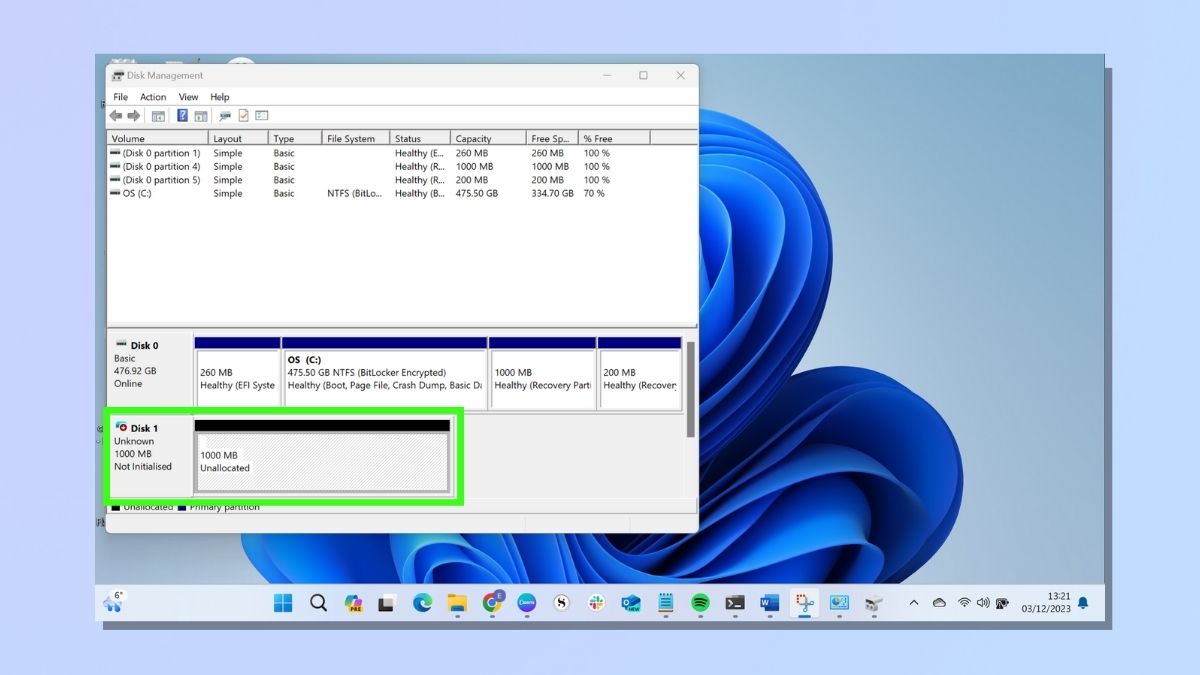
Check you can now see your VHD in the Disk management window. You should be able to see it, although at this stage the disk will be flagged as 'Not initialized.'
5. Initialize your VHD
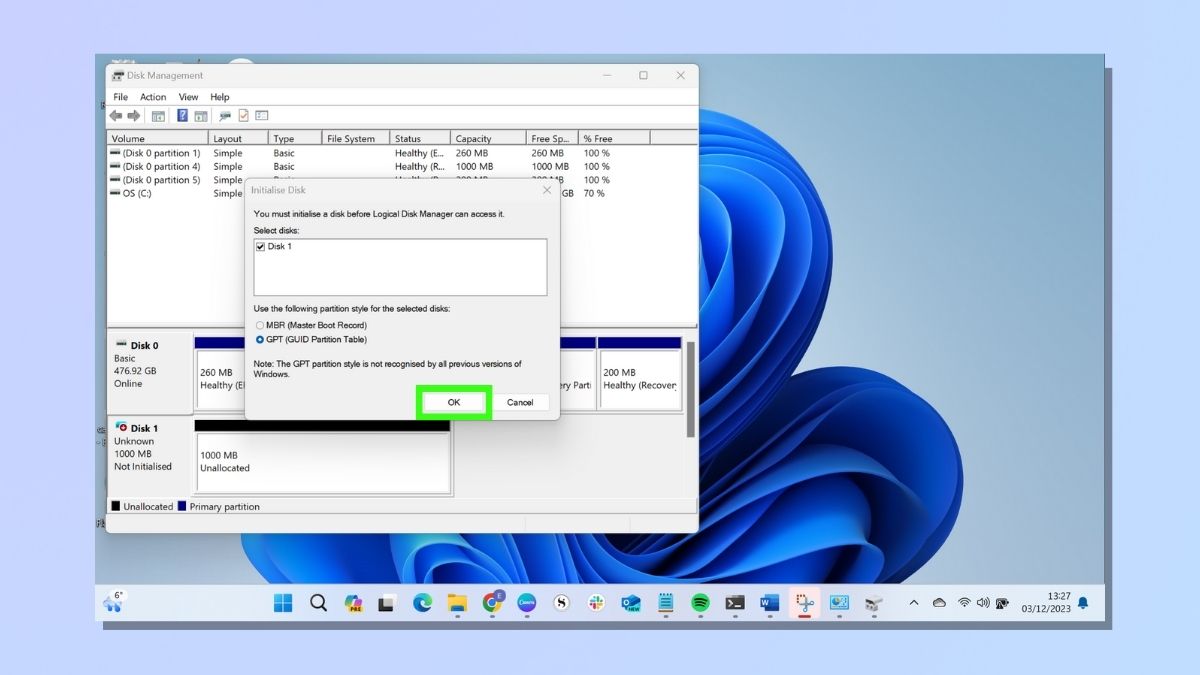
Right-click on the name of your new VHD and select Initialize disk.
This opens the Initialize Disk window. Here, you can select the partition style you wish to use from two options: MBR (Master Boot Record) or GPT (GUID Partition Table).
GPT is becoming the standard for modern systems, especially those using UEFI, due to its advantages in terms of size support, partition numbers, and data structure resilience. However, If you are dealing with an older system or require compatibility with legacy systems, MBR might be more suitable.
Make your selection and click OK.
6. Check your VHD is showing as initialized
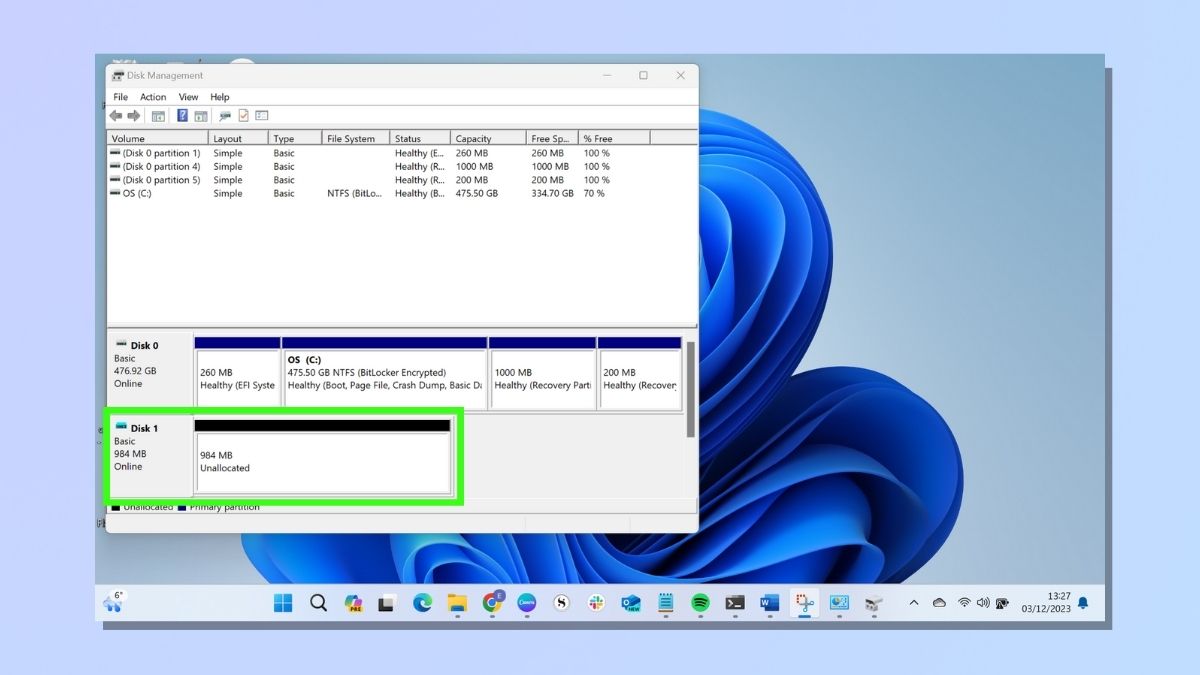
Now you have completed the initialization, check your new VHD no longer displays the message 'Not initialized' in the disk management window.
7. Partition and format your VHD
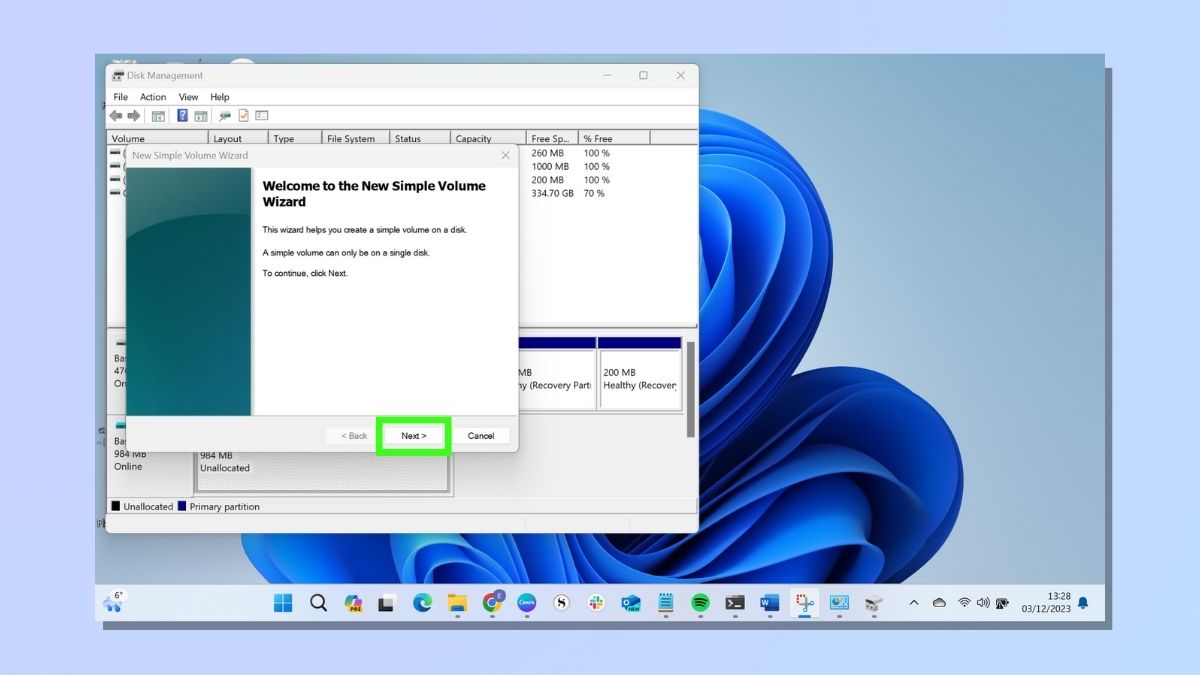
Now you've created your VHD, you'll need to partition and format the drive before you can use it to store data.
Right-click on the unallocated space and select New Simple Volume. This will start the Wizard. Click Next to continue.
8. Specify Volume Size
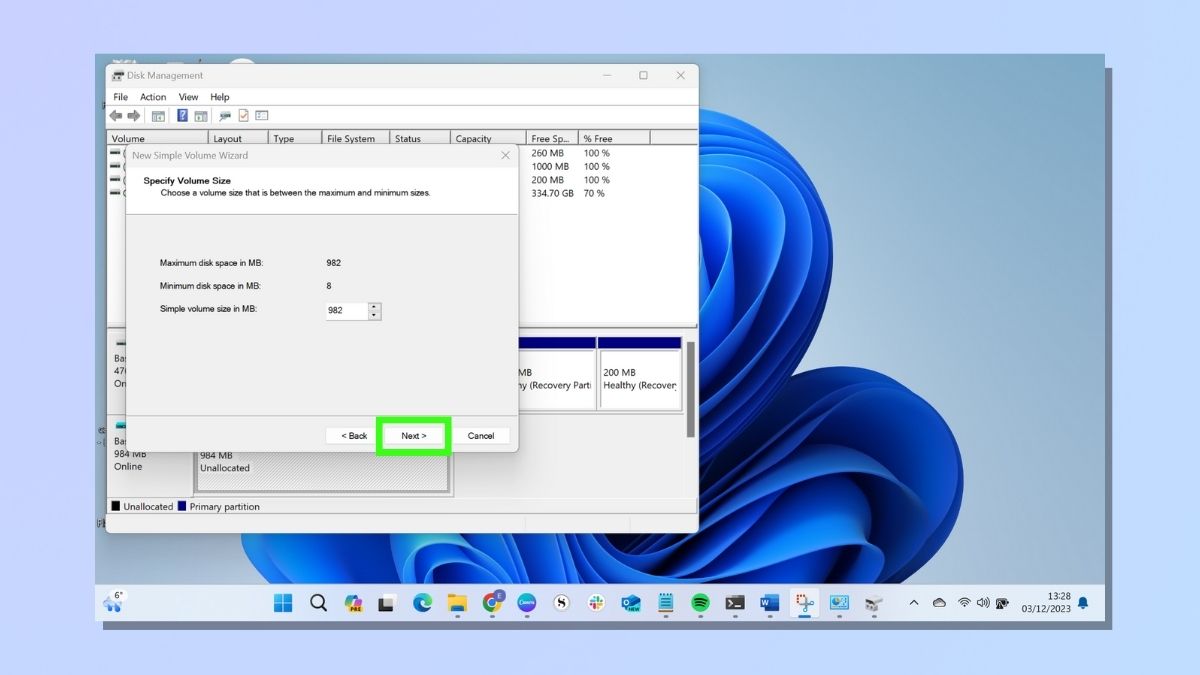
You will need to specify the volume size for your partition. You can choose to use all the available unallocated space or just part of it.
When you have completed this step, click Next.
9. Assign a drive letter or path
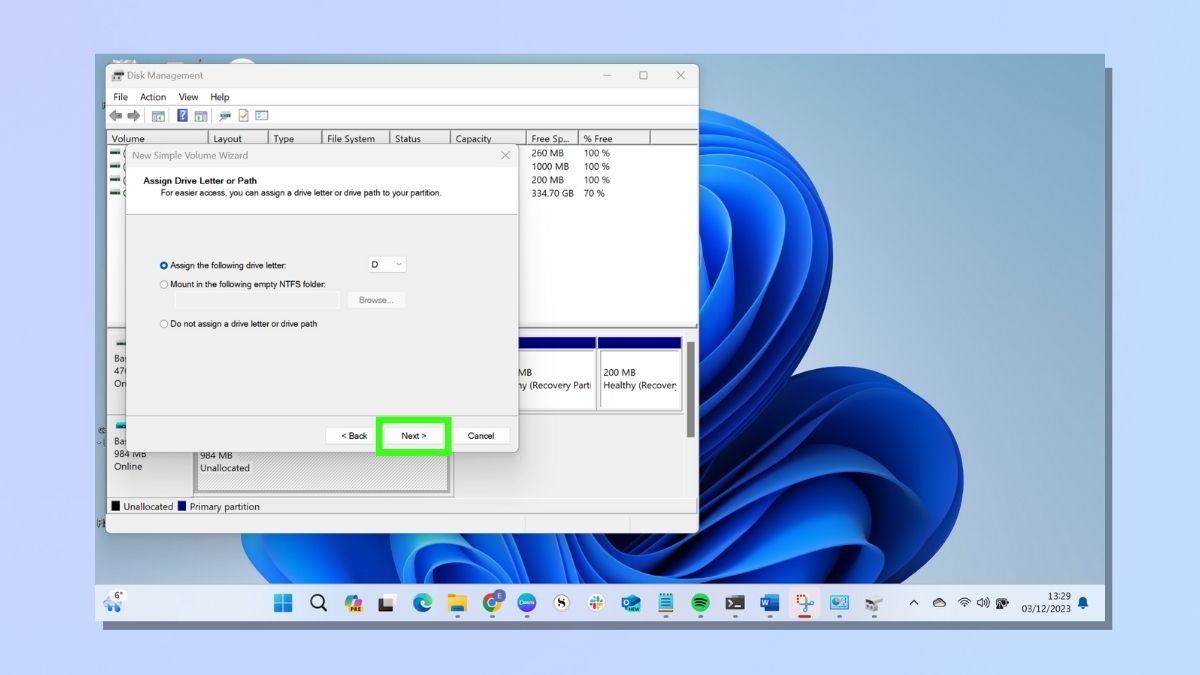
You will then have the option to assign a drive letter or path.
If you assign a drive letter to the partition, this is what you'll use to access the partition in Windows Explorer or File Explorer.
You can also choose to mount a partition to an empty folder (known as a mount point) instead of assigning a drive letter directly. This is common in server environments where administrators may prefer organizing data using mount points rather than traditional drive letters.
You can also choose not to assign a drive letter or drive path at this stage.
When you're ready, click Next.
10. Format Partition
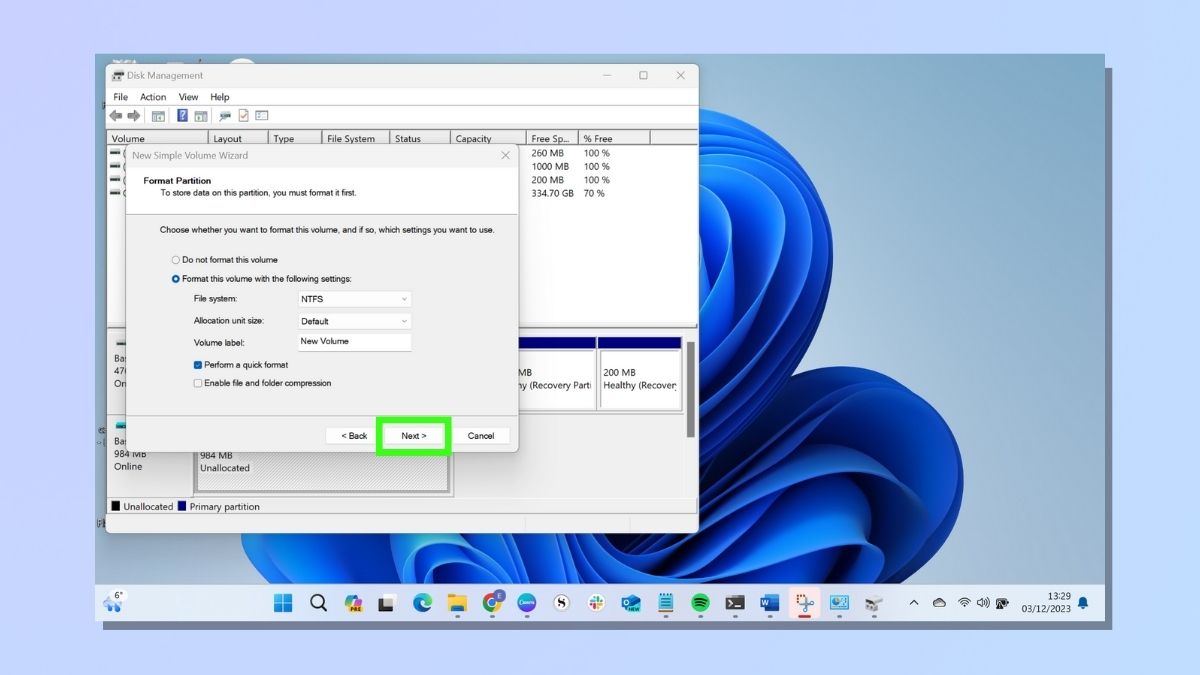
The last option in the Wizard is Format Partition. Here, you will need to set the parameters for file system, allocation unit size, and volume label. These include:
1. File System
The file system is a method or structure used by the operating system to organize and store files on the disk. Windows supports various file systems, with the most common being NTFS, exFAT, and FAT32.
2. Allocation Unit Size
The allocation unit size, also known as cluster size, is the smallest amount of disk space that can be allocated to store a file. You can select Default here for most applications.
3. Volume Label
This is the name or label you assign to the partition to help you keep track of the various partitions on your system.
You also have the option to select Perform a quick format and Enable file and folder compression. Quick Format is suitable for situations where you need to quickly prepare a disk for use and are confident that it doesn't have significant issues. The Enable file and folder compression option allows you to save disk space by compressing files and folders. This works particularly well for text-based files and documents.
When you are ready, select Next.
The last page of the Wizard shows you a list of the options you have chosen. If you're happy to continue, select Finish. Otherwise, use the Back button to make changes.
11. Check the new volume is now showing
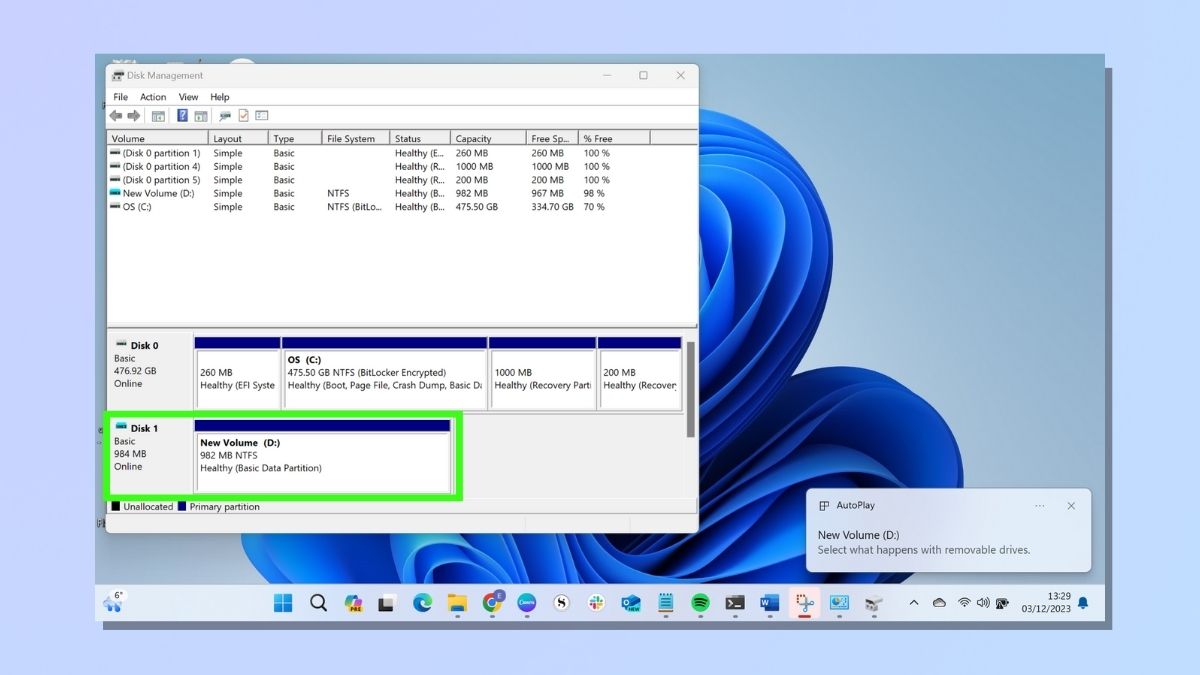
You have now completed all the steps required to create a drive partition in Windows. On the disk management window, check you now see the new partition you have created.
Congratulations, you've just unleashed the power of drive partitions on your Windows computer! Drive partitions are your secret weapon for optimizing system performance, keeping your data in check, and boosting overall system resilience.
So, what next?
You can begin transferring data to the newly created partition. This could include documents, photos, videos, or any other files you want to organize separately. You might consider installing new software or applications directly on the partition. If you're an advanced user interested in running multiple operating systems on your computer, you could use the partition to install a different operating system, creating a multi-boot configuration.
Sign up to get the BEST of Tom's Guide direct to your inbox.
Get instant access to breaking news, the hottest reviews, great deals and helpful tips.
Whether you're a casual user looking to organize files or an advanced user seeking performance enhancements, the key is to tailor your next steps to meet your specific needs and maintain an efficient and organized computing environment.
For other Windows tricks and tips, check out our guides to updating Windows, rotating the screen in Windows 11, and changing keyboard shortcuts.

Emma Street is a freelance content writer who contributes technology and finance articles to a range of websites, including Tom's Guide, Top10.com, and BestMoney. She has over 15 years of experience working in technical development within the fintech industry. When not writing about tech, Emma can be found writing romantic fiction, reviewing films, and updating her tea blog.
