You can control your iPhone using head movements — here’s how to enable it
Use Switch Control to go truly hands-free
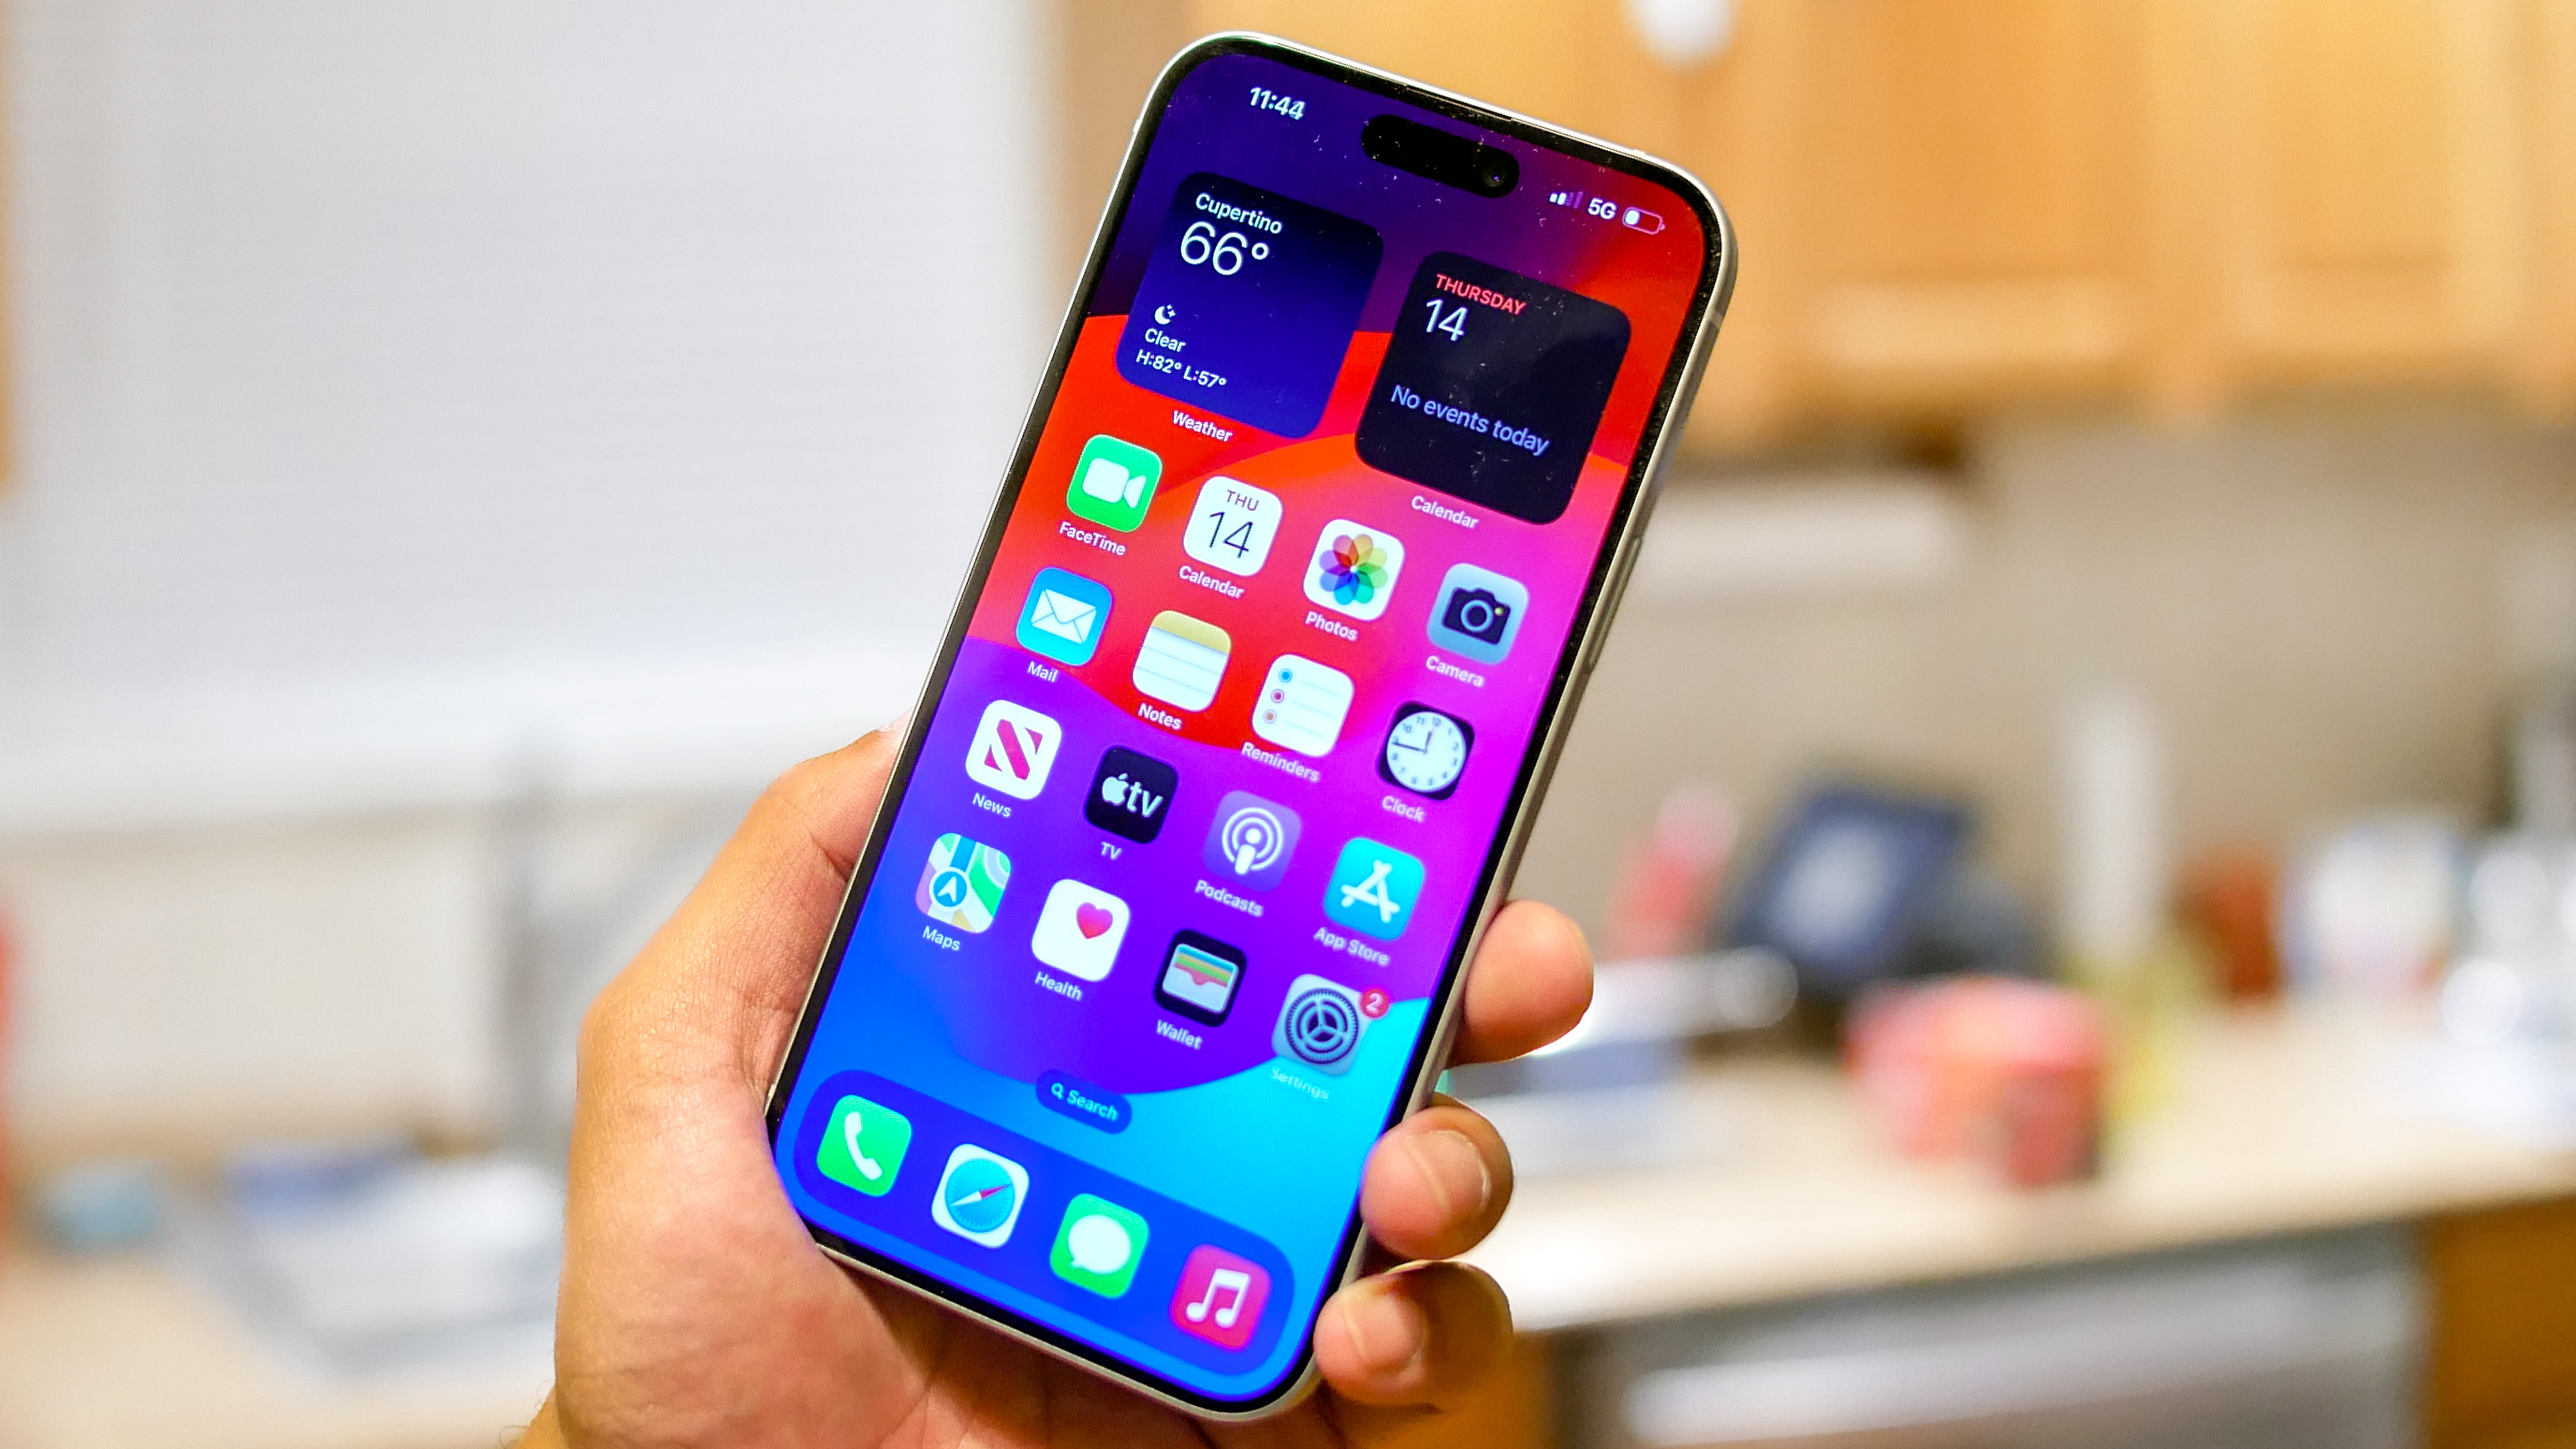
Learning how to use head movements to control your iPhone or iPad is very important for lots of people. It allows anyone unable to use their hands to navigate the screens on these Apple devices with somethings as simple as moving their head left or right. You could, for example, move your head left to go to the Home Screen or move it to the right to visit the Control Center.
In that sense, this particular Accessibility setting could potentially be of use not just for people who find it physically impossible to move their hands but to a wider audience as well. It extends the number of ways that people can use an iPhone or iPad: perhaps you have your hands full making a cake and you want to navigate the screen with head movements and even facial expressions.
With a bit of time spent setting up Switch Control and getting to the grips with the triggers, you can just get on with the task. So let’s look at how to use head movements to control your iPhone or iPad.
Configure Switch Control to use head movements
First thing's first, you need to configure your head movements.
1. Select Accessibility
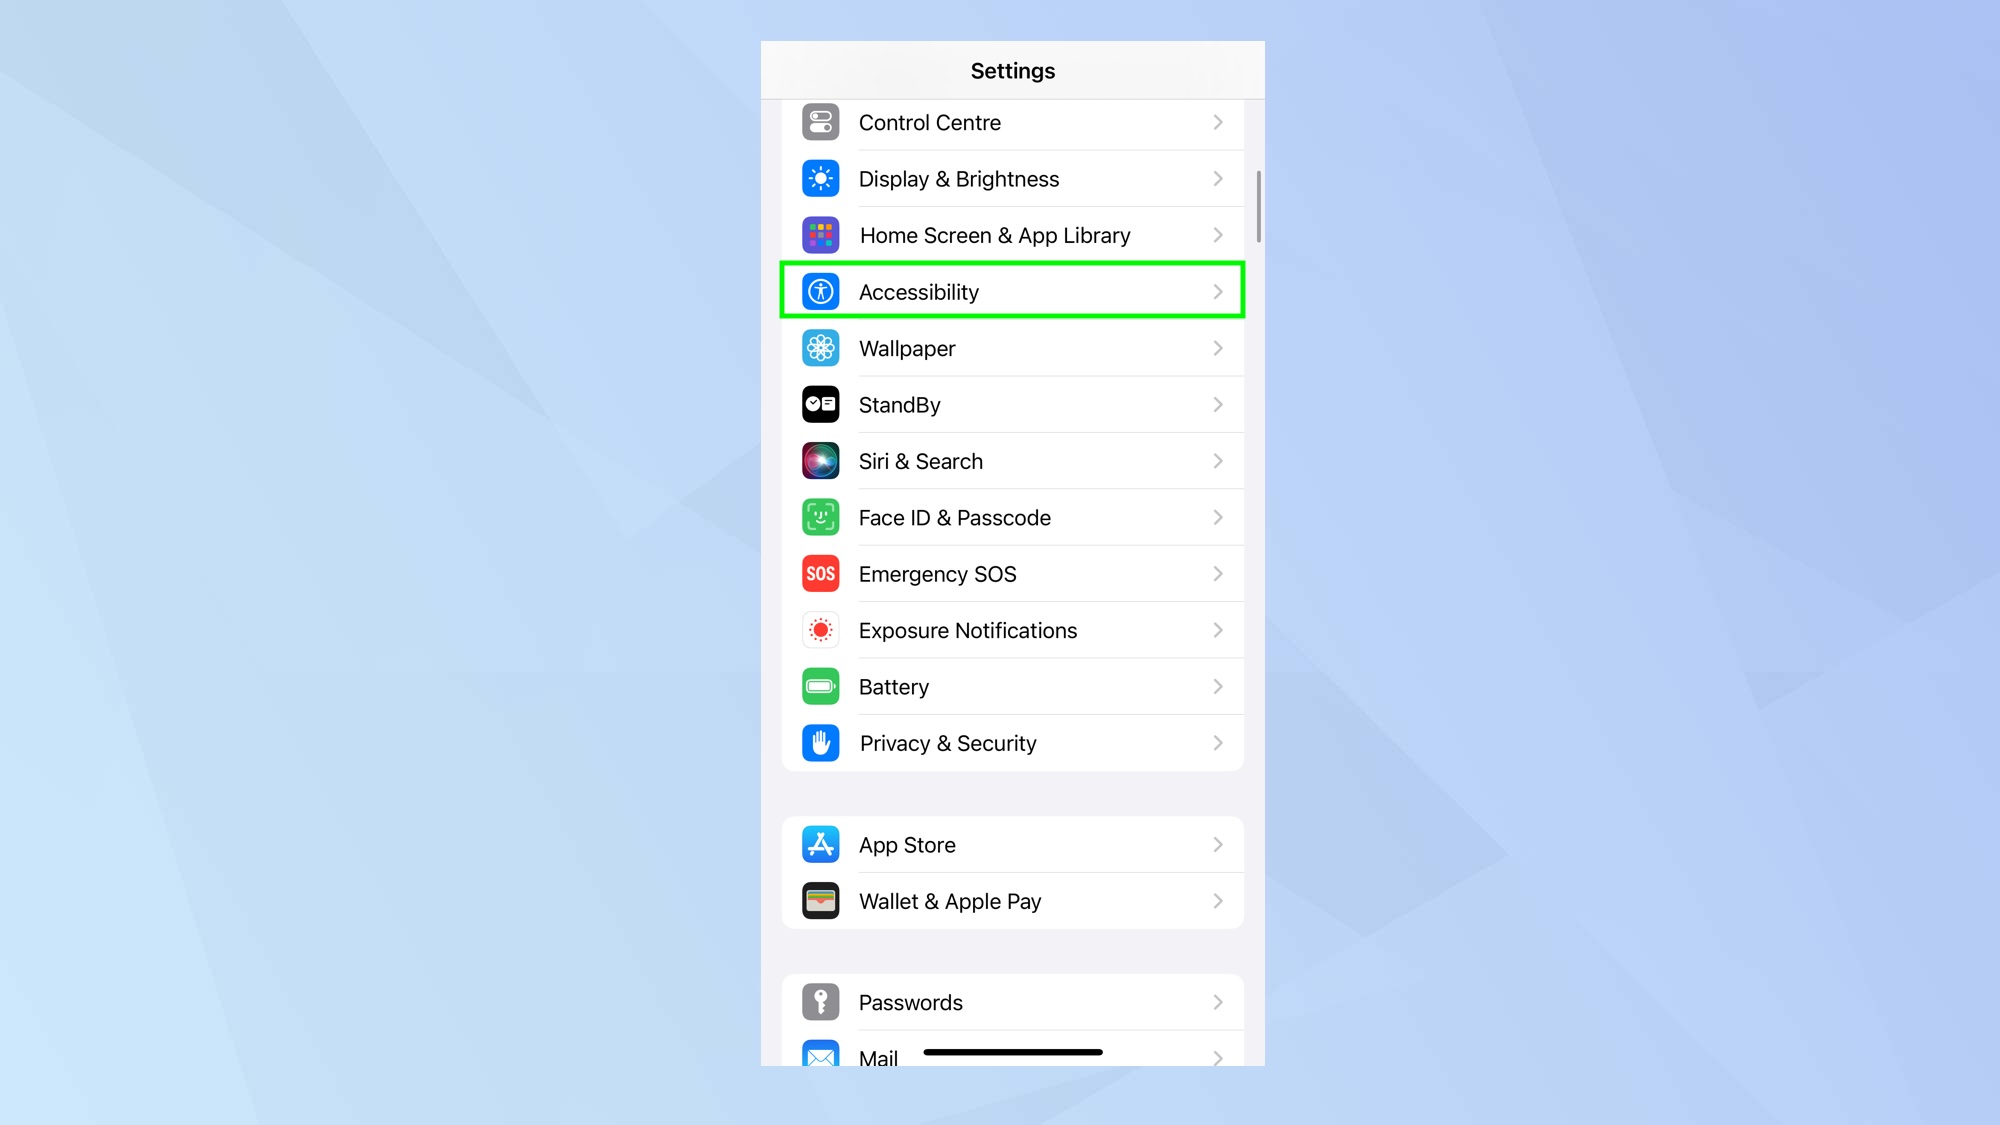
On an iPhone or iPad, open the Settings app and select Accessibility from the list of options.
2. Tap Switch Control
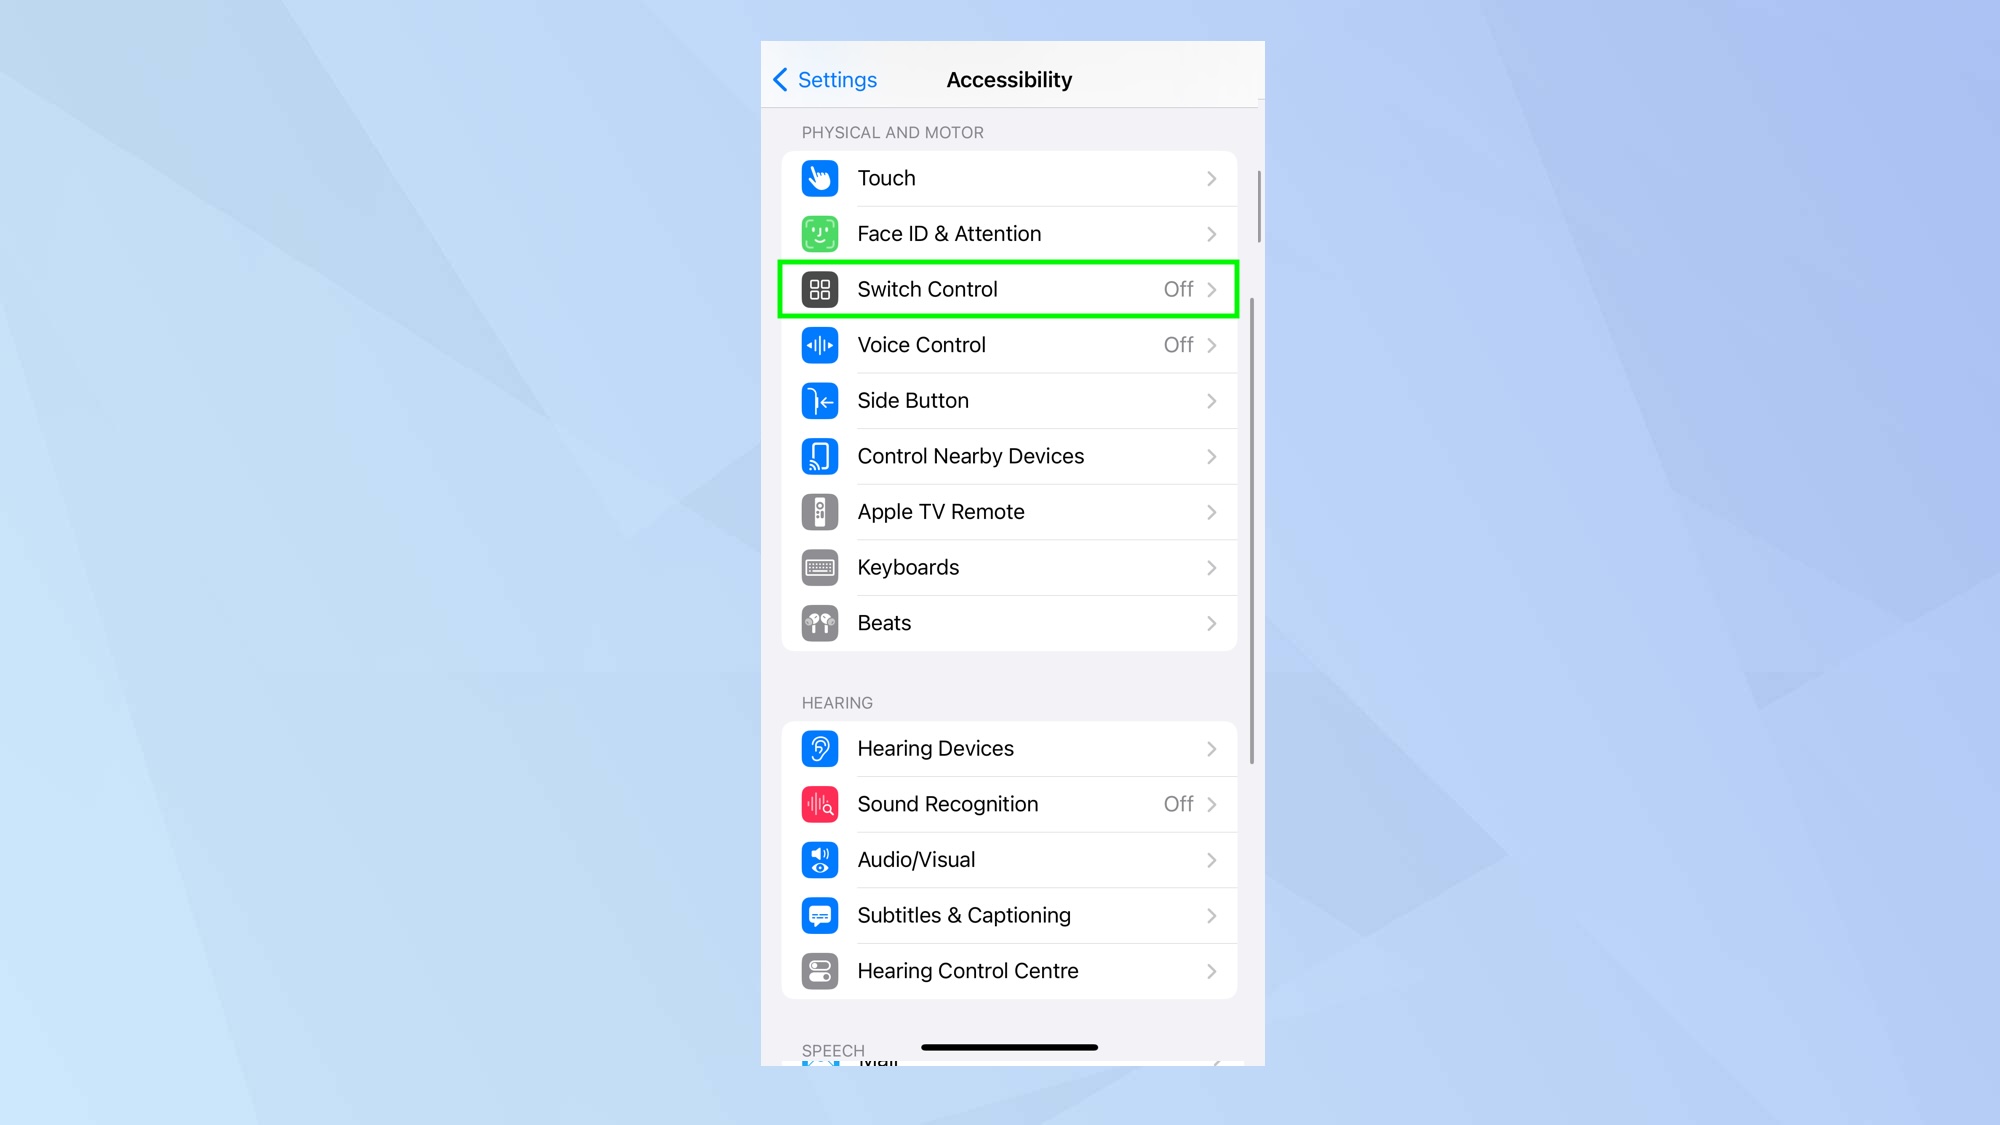
Next, scroll down to the section Physical and Motor and select Switch Control.
3. Choose Switches
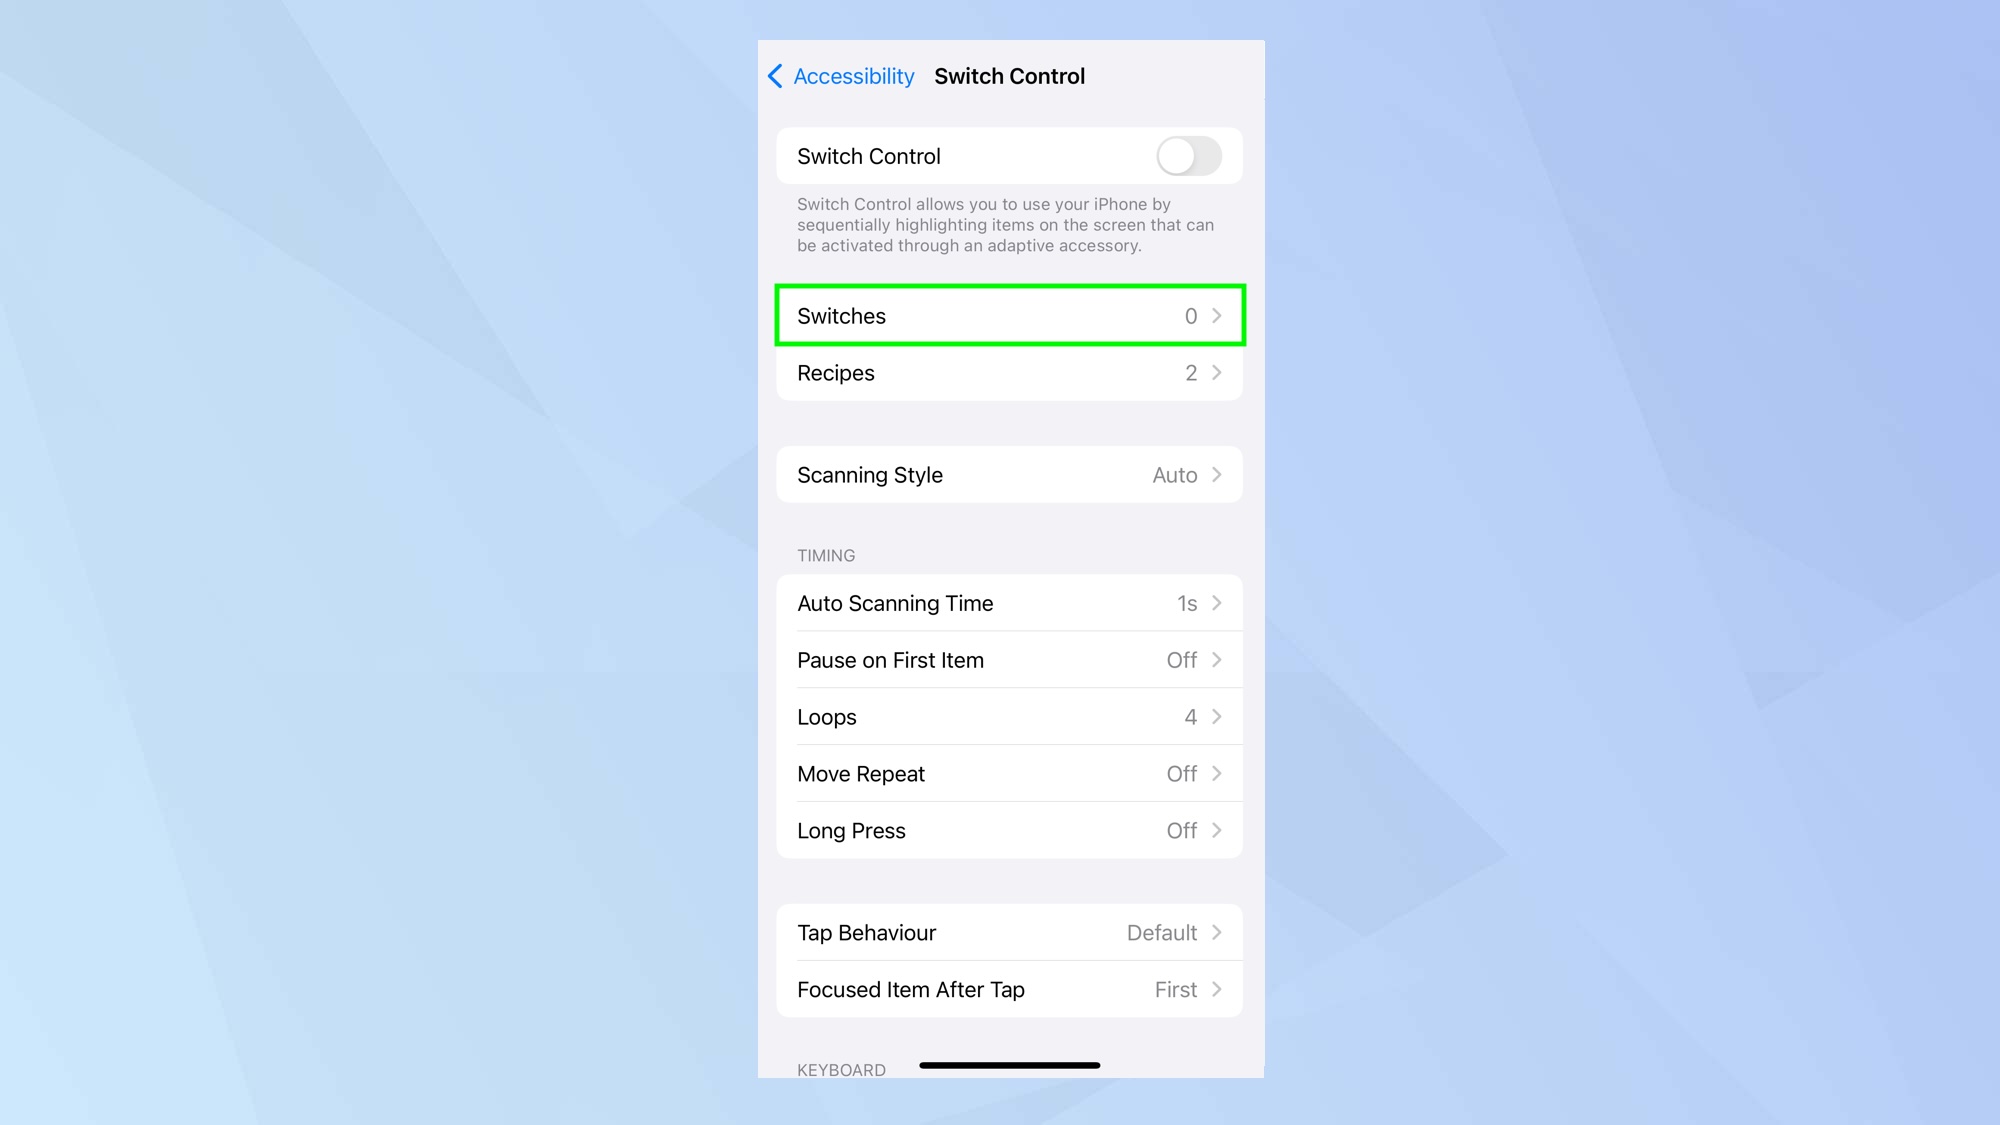
The Switch Control feature entails having to set up switches to correspond to your head movements so tap Switches.
4. Add New Switches
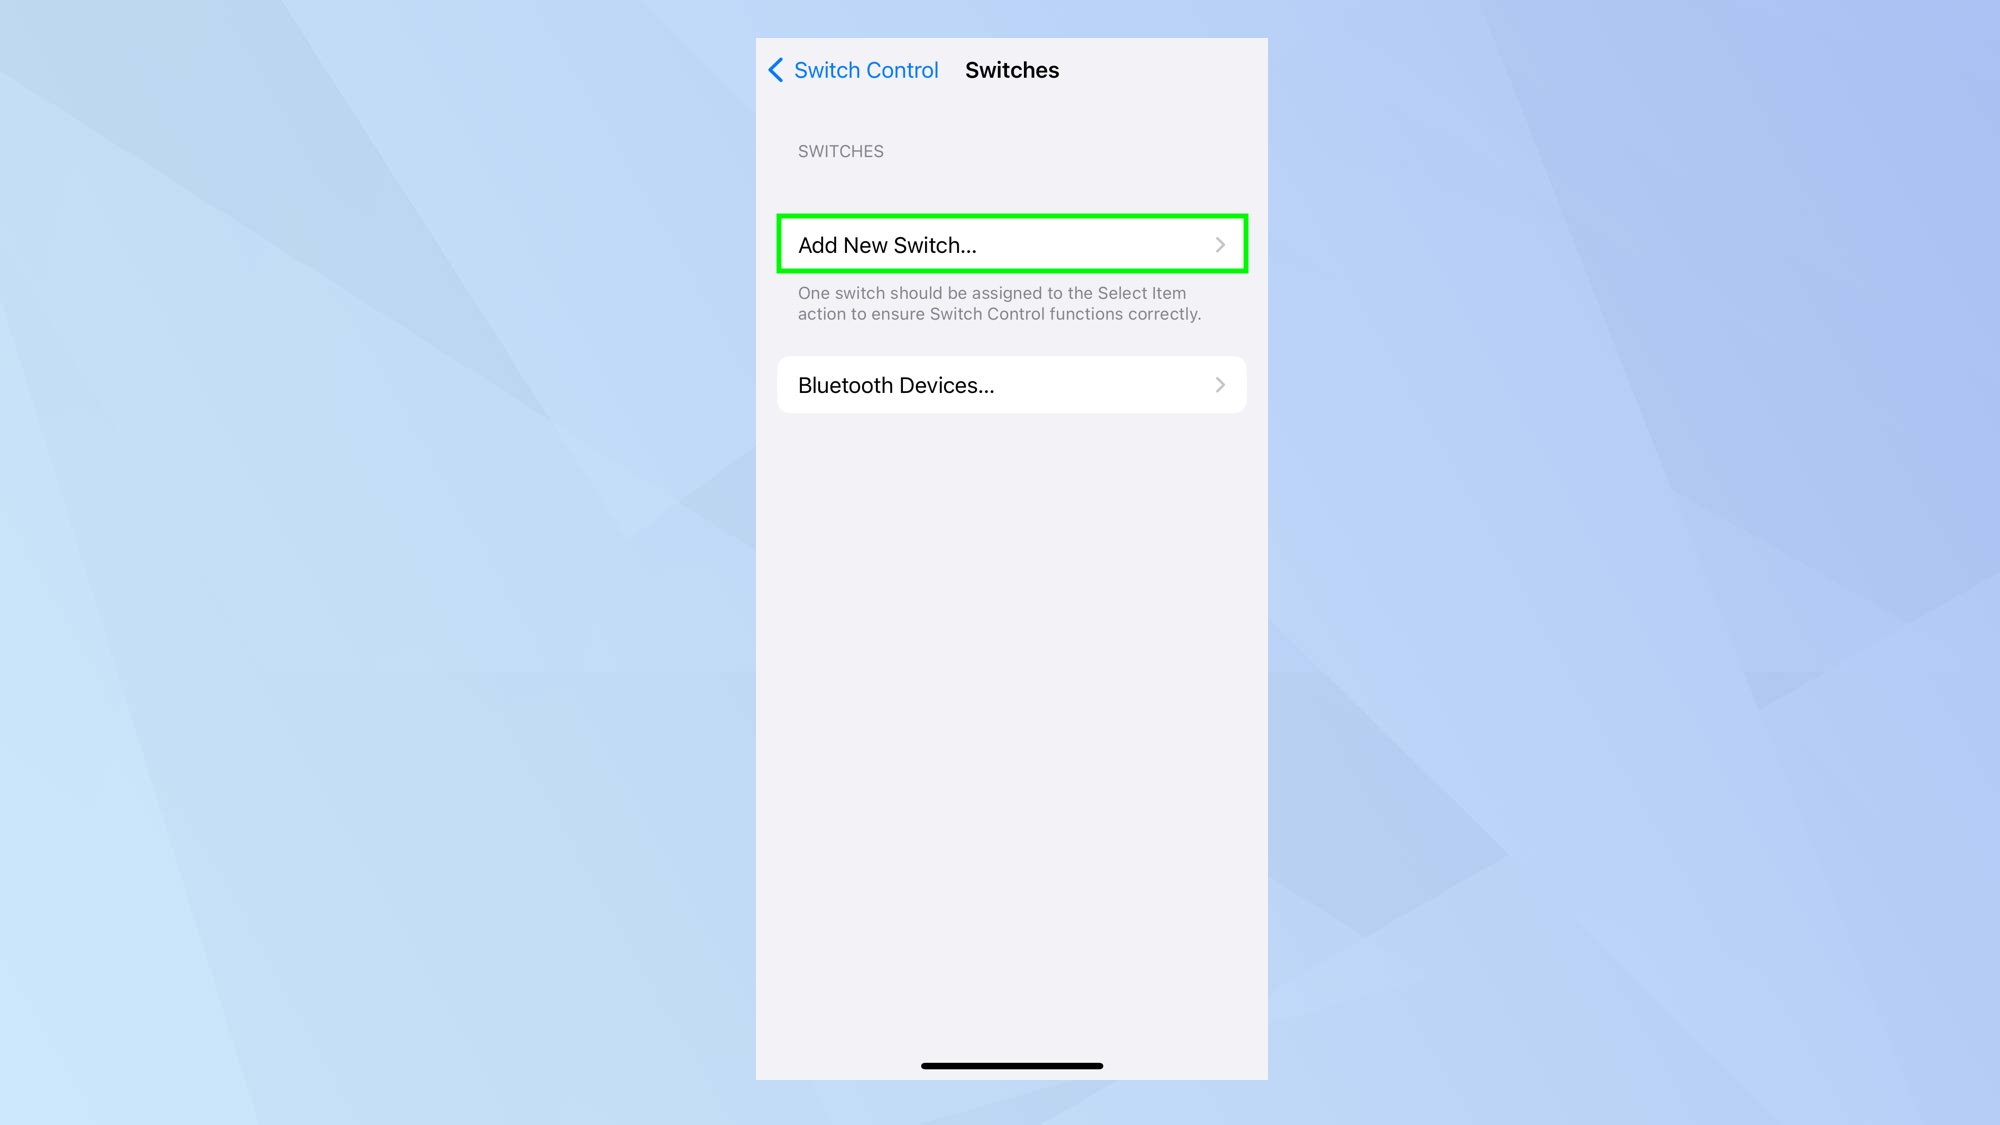
You will see that no switches are created by default so tap Add New Switch to create your first one.
5. Tap Camera
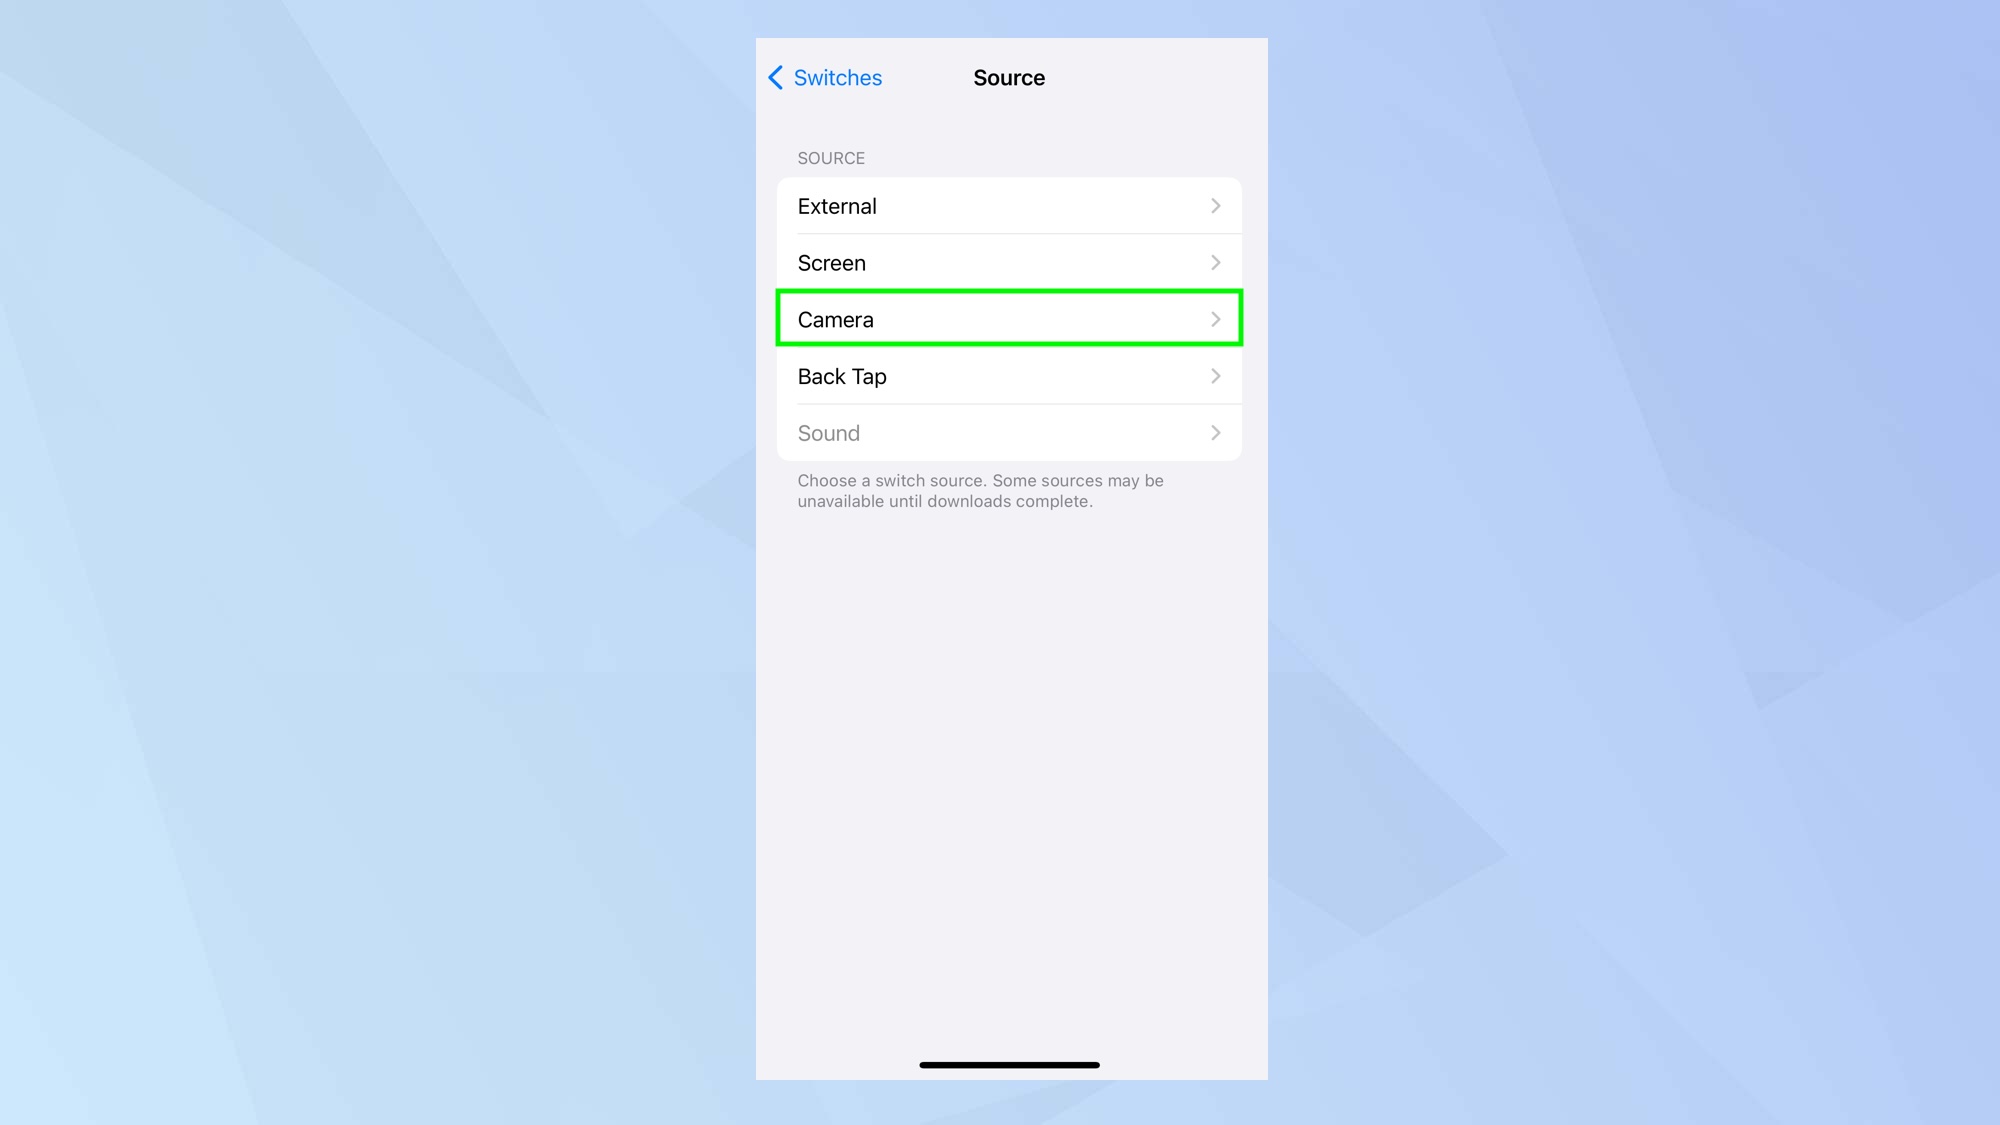
In order to pick up your head movements, your iPhone needs to see what you’re doing, so tap Camera.
6. Select a side
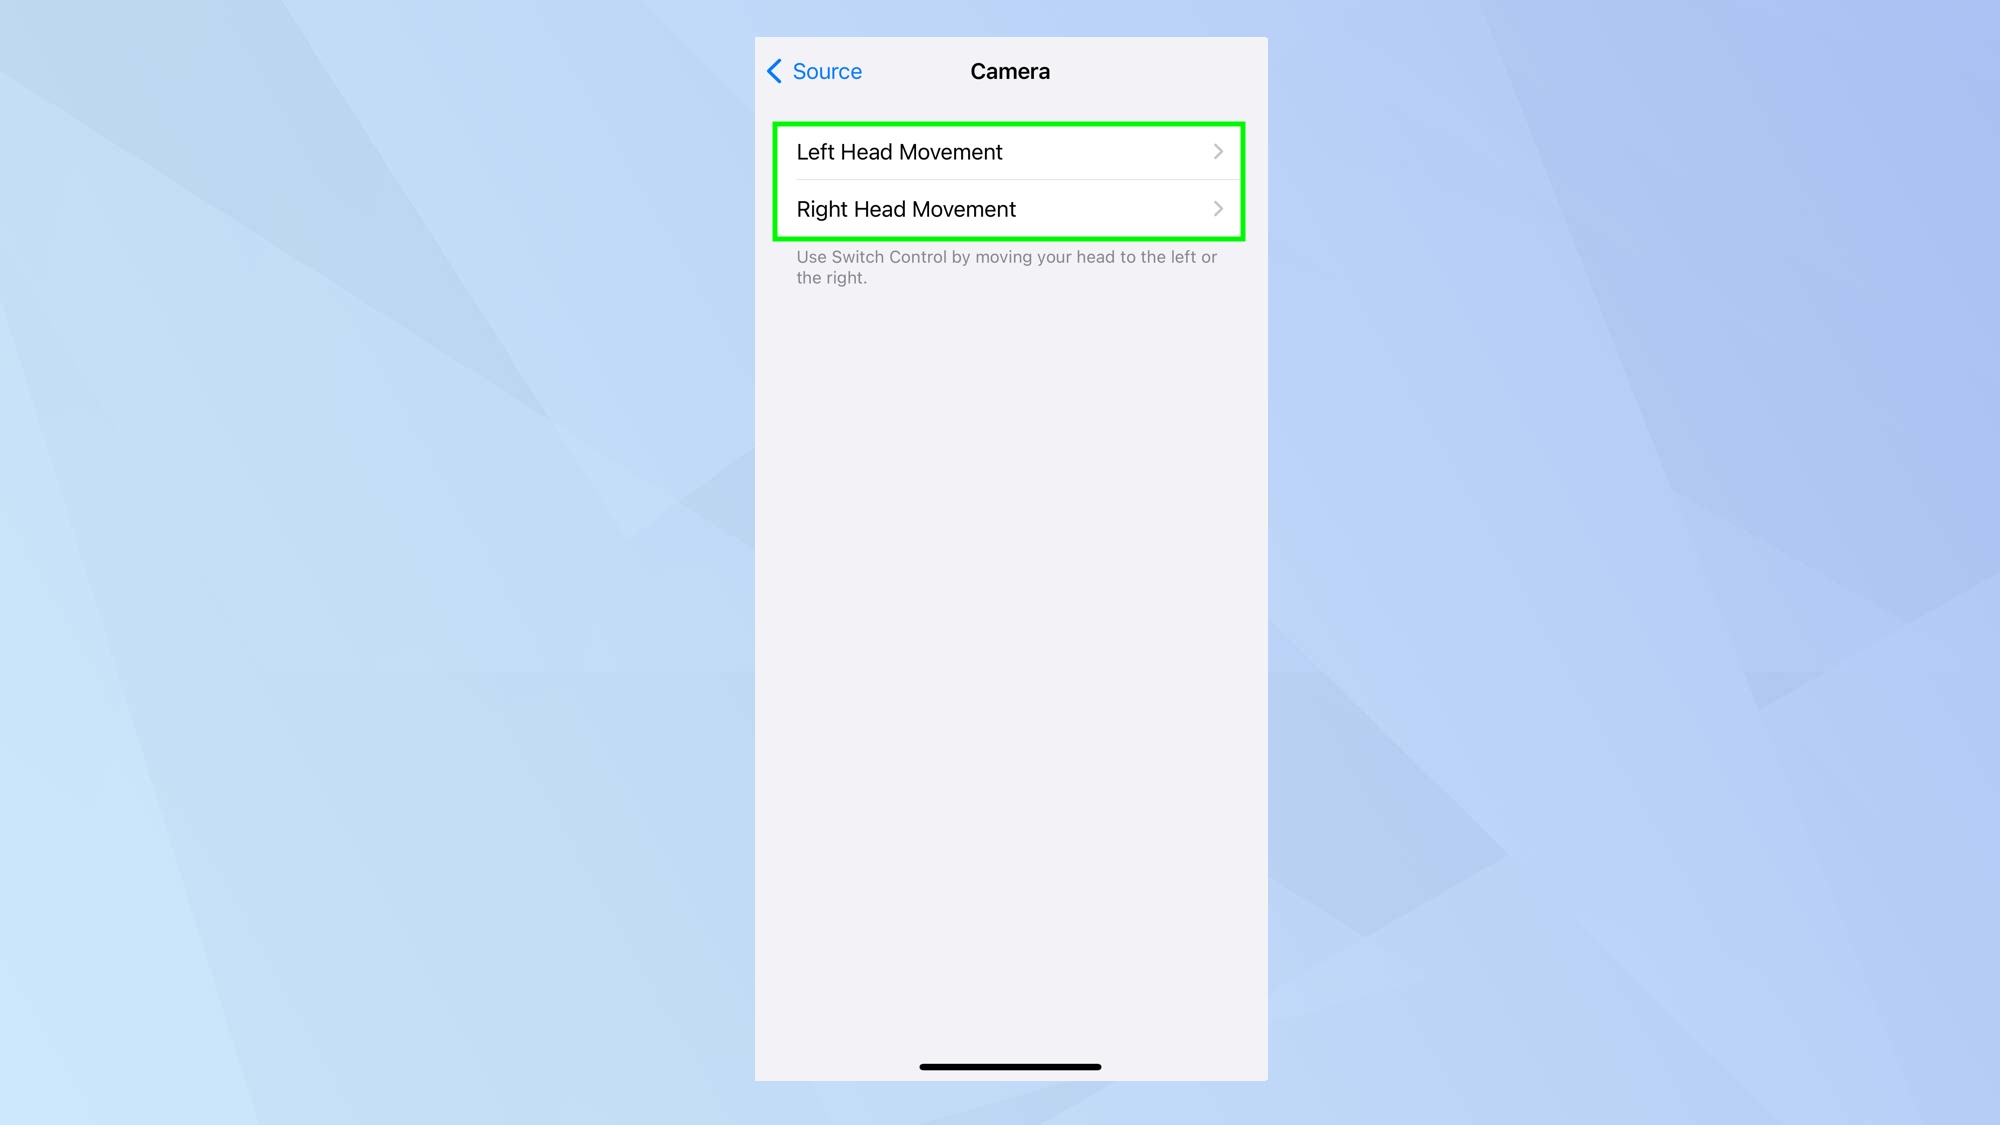
Now either tap Left Head Movement or tap Right Head Movement depending on how you want your switch to be activated.
7. Choose a switch action
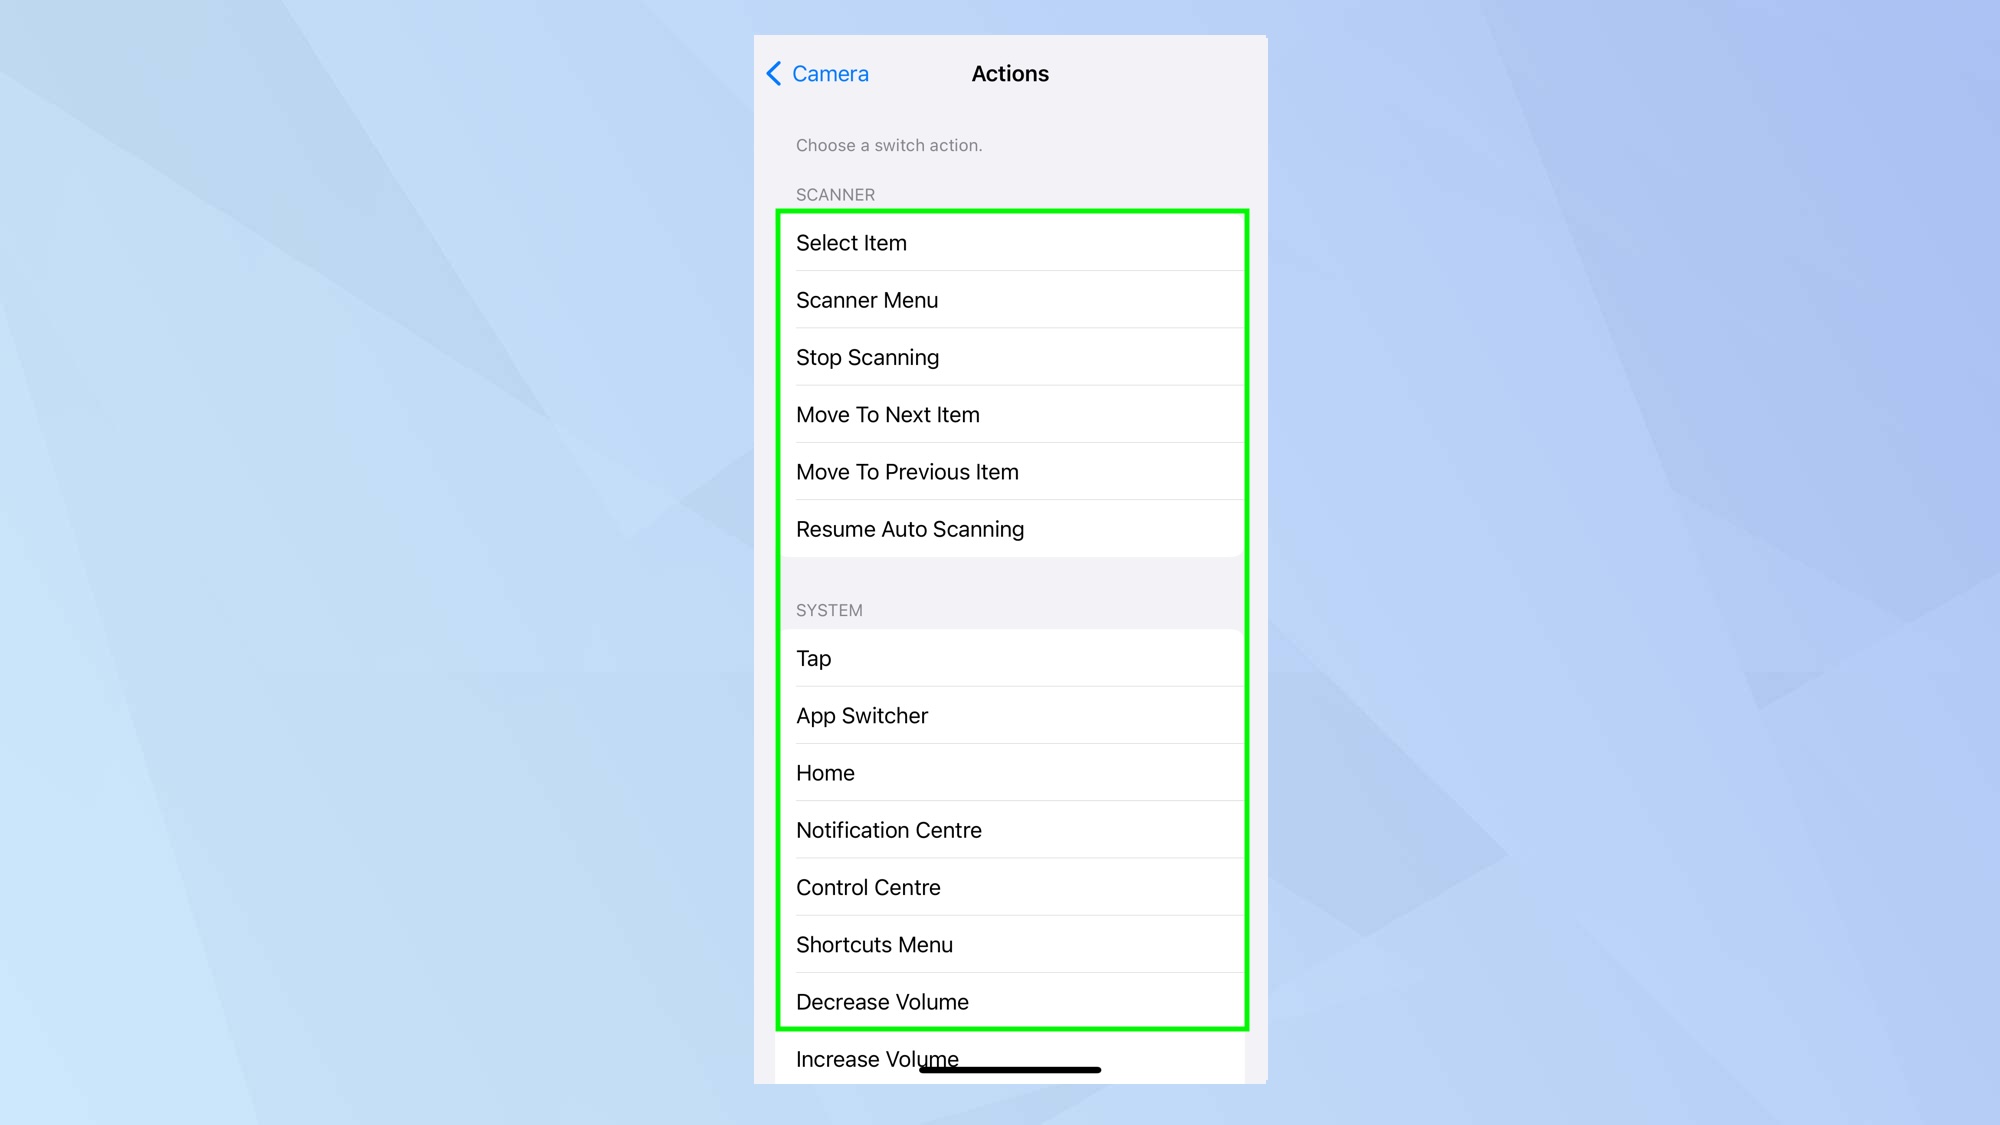
Scroll down the list of options and select a switch action that you want to correspond to the head movement you selected.
For example, you may have tapped Left Head Movement in the previous step — if you tap Home on this screen then you’re telling your iPhone that you want to go to the Home Screen when you move your head left.
If you want to assign a switch to the opposite head movement, go back to step 6.
Turn Switch Control on
You now need to turn Switch Control on. We left it off while configuring the head movements, as it's a good idea to leave it off when you make any changes to settings to avoid involuntary inputs. You can toggle Switch Control on and off whenever you please.
1. Select Accessibility

First, open the Settings app and select Accessibility.
2. Tap Switch Control

Scroll down to the Physical and Motor section and select Switch Control.
3. Toggle the switch
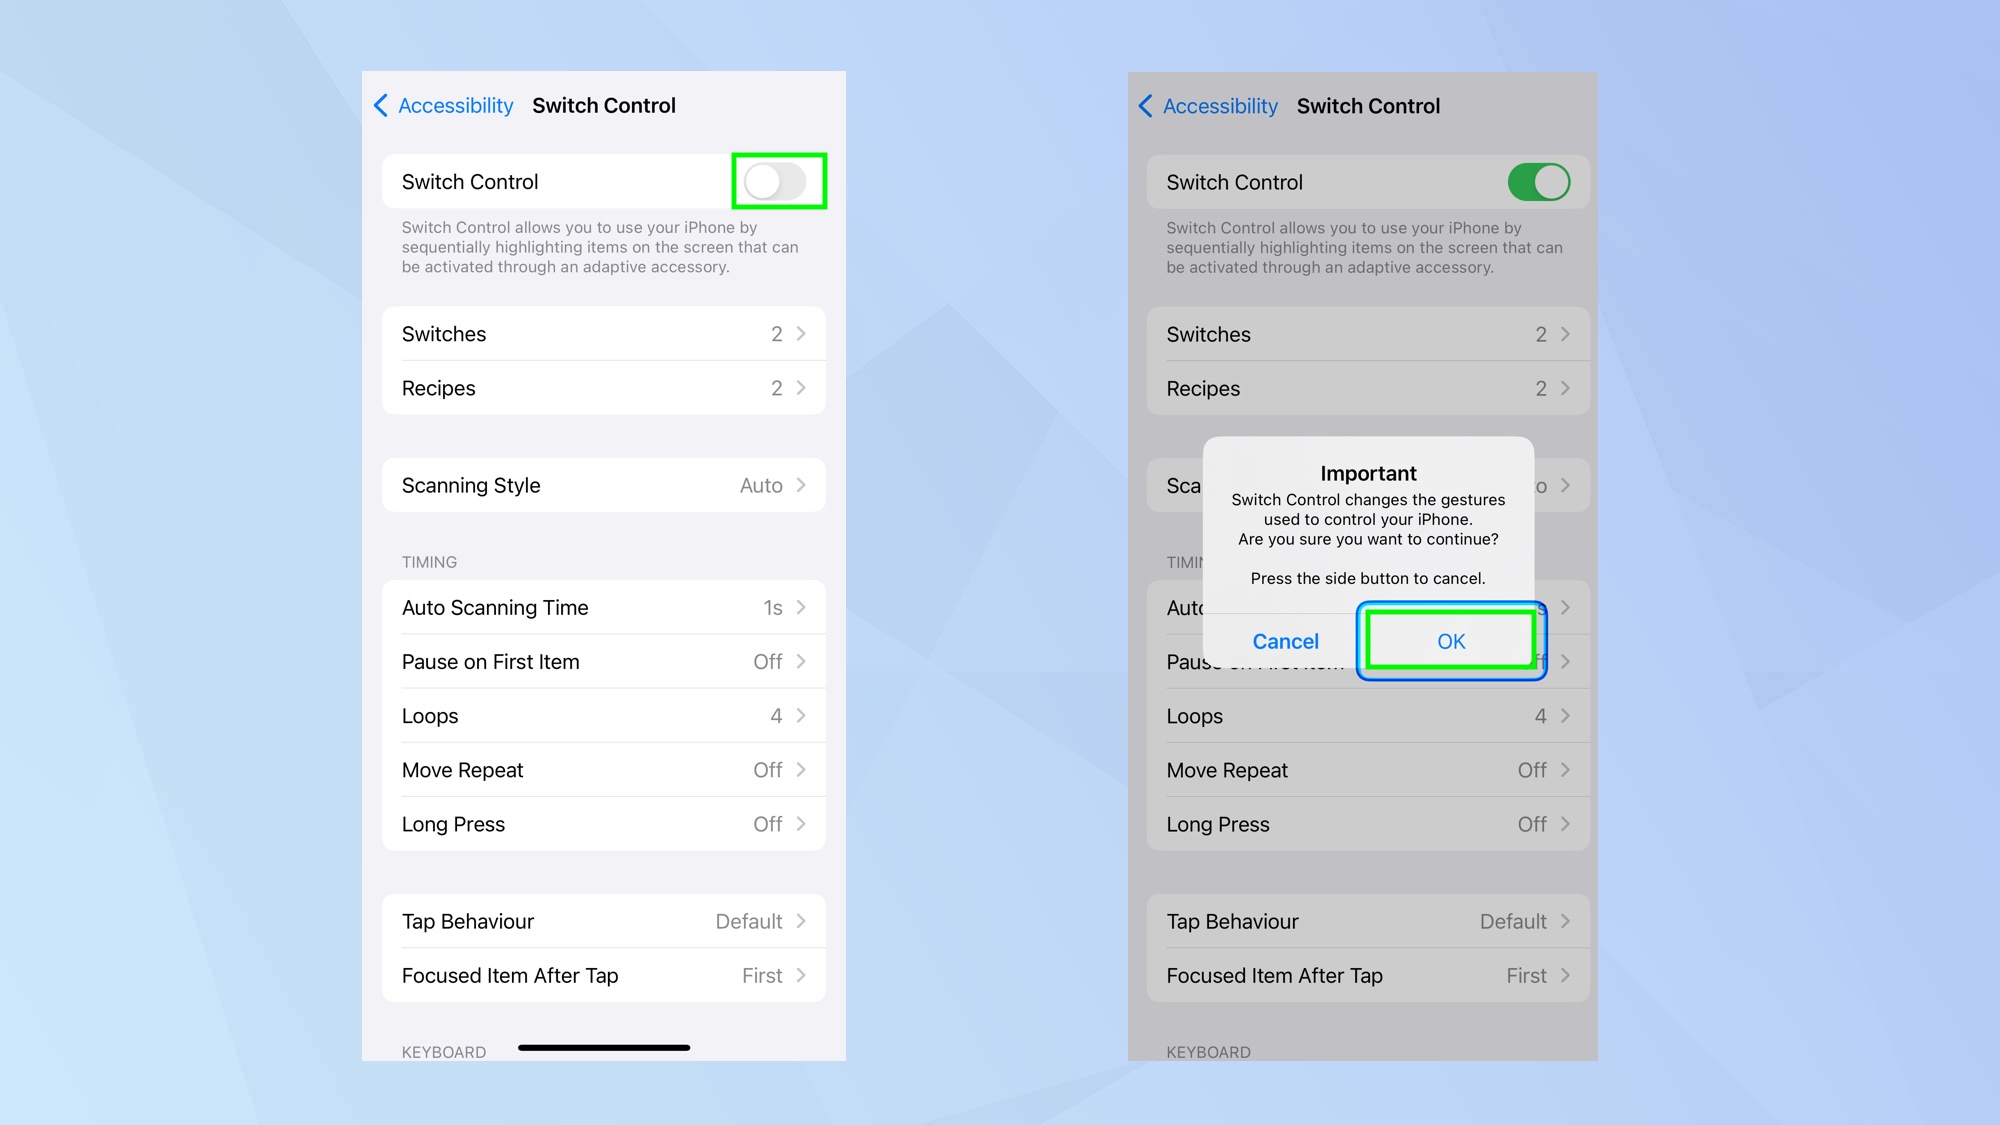
Now toggle Switch Control on and select OK to confirm that you wish to continue.
You can now move your head left and right to perform the associated action we set up in the first section.
Fine tune head movements
Now that you've set up Switch Control to work with head movements, you may want to fine tune how it works. There are a few ways you can do customize the feature to your needs or liking.
Note: these features are accessed from the Switch Control screen: go to Settings > Accessibility > Switch Control as before.
Sign up to get the BEST of Tom's Guide direct to your inbox.
Get instant access to breaking news, the hottest reviews, great deals and helpful tips.
1. Alter head sensitivity
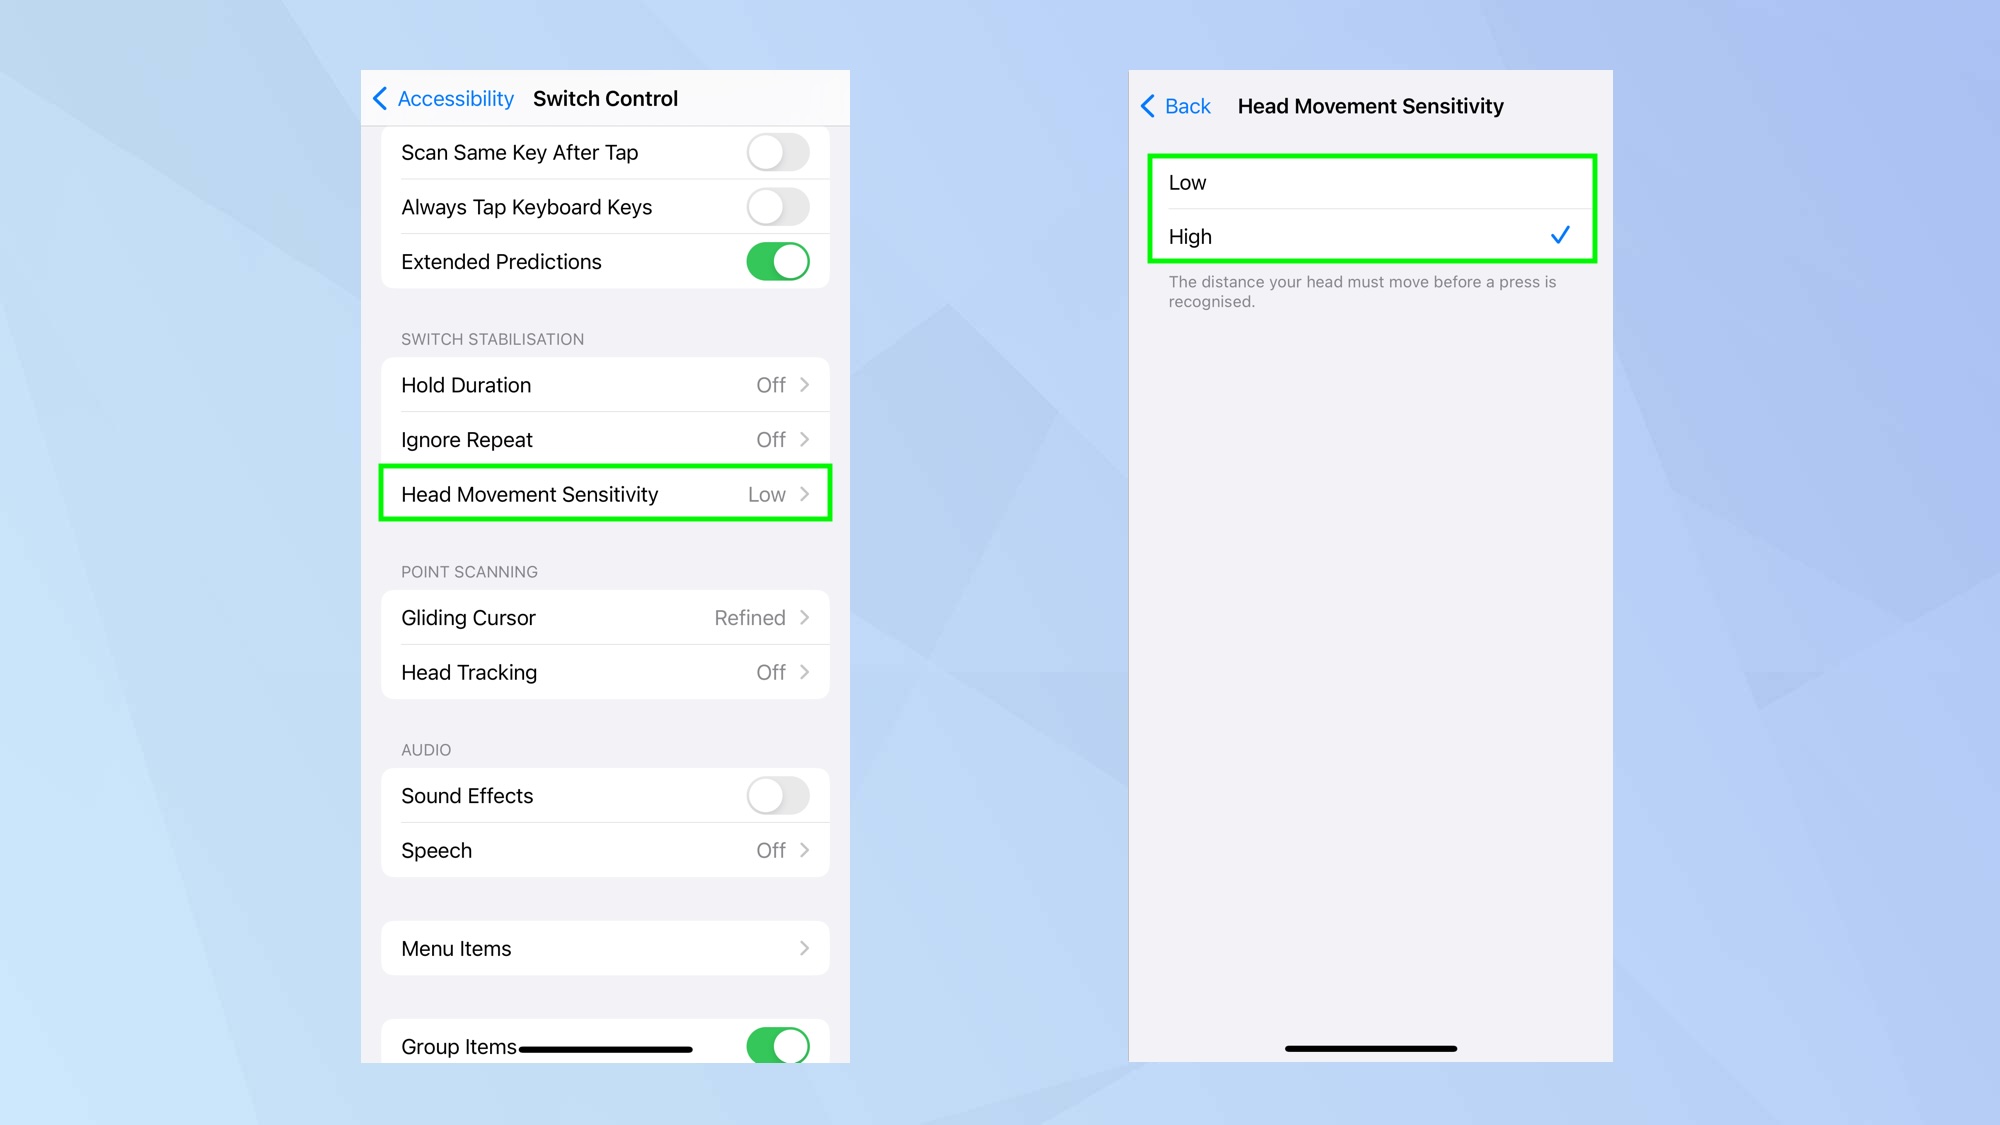
You can determine how far you want your head to move before Switch Control recognizes the movement. Look under the section called Switch Stablization and tap Head Movement Sensitivity. Now select High if you want the detection sensitivity to be high (meaning the distance you move your head needs to be slight) or select Low if you want Switch Control to activate when you move your head much further left or right.
2. Add facial movements
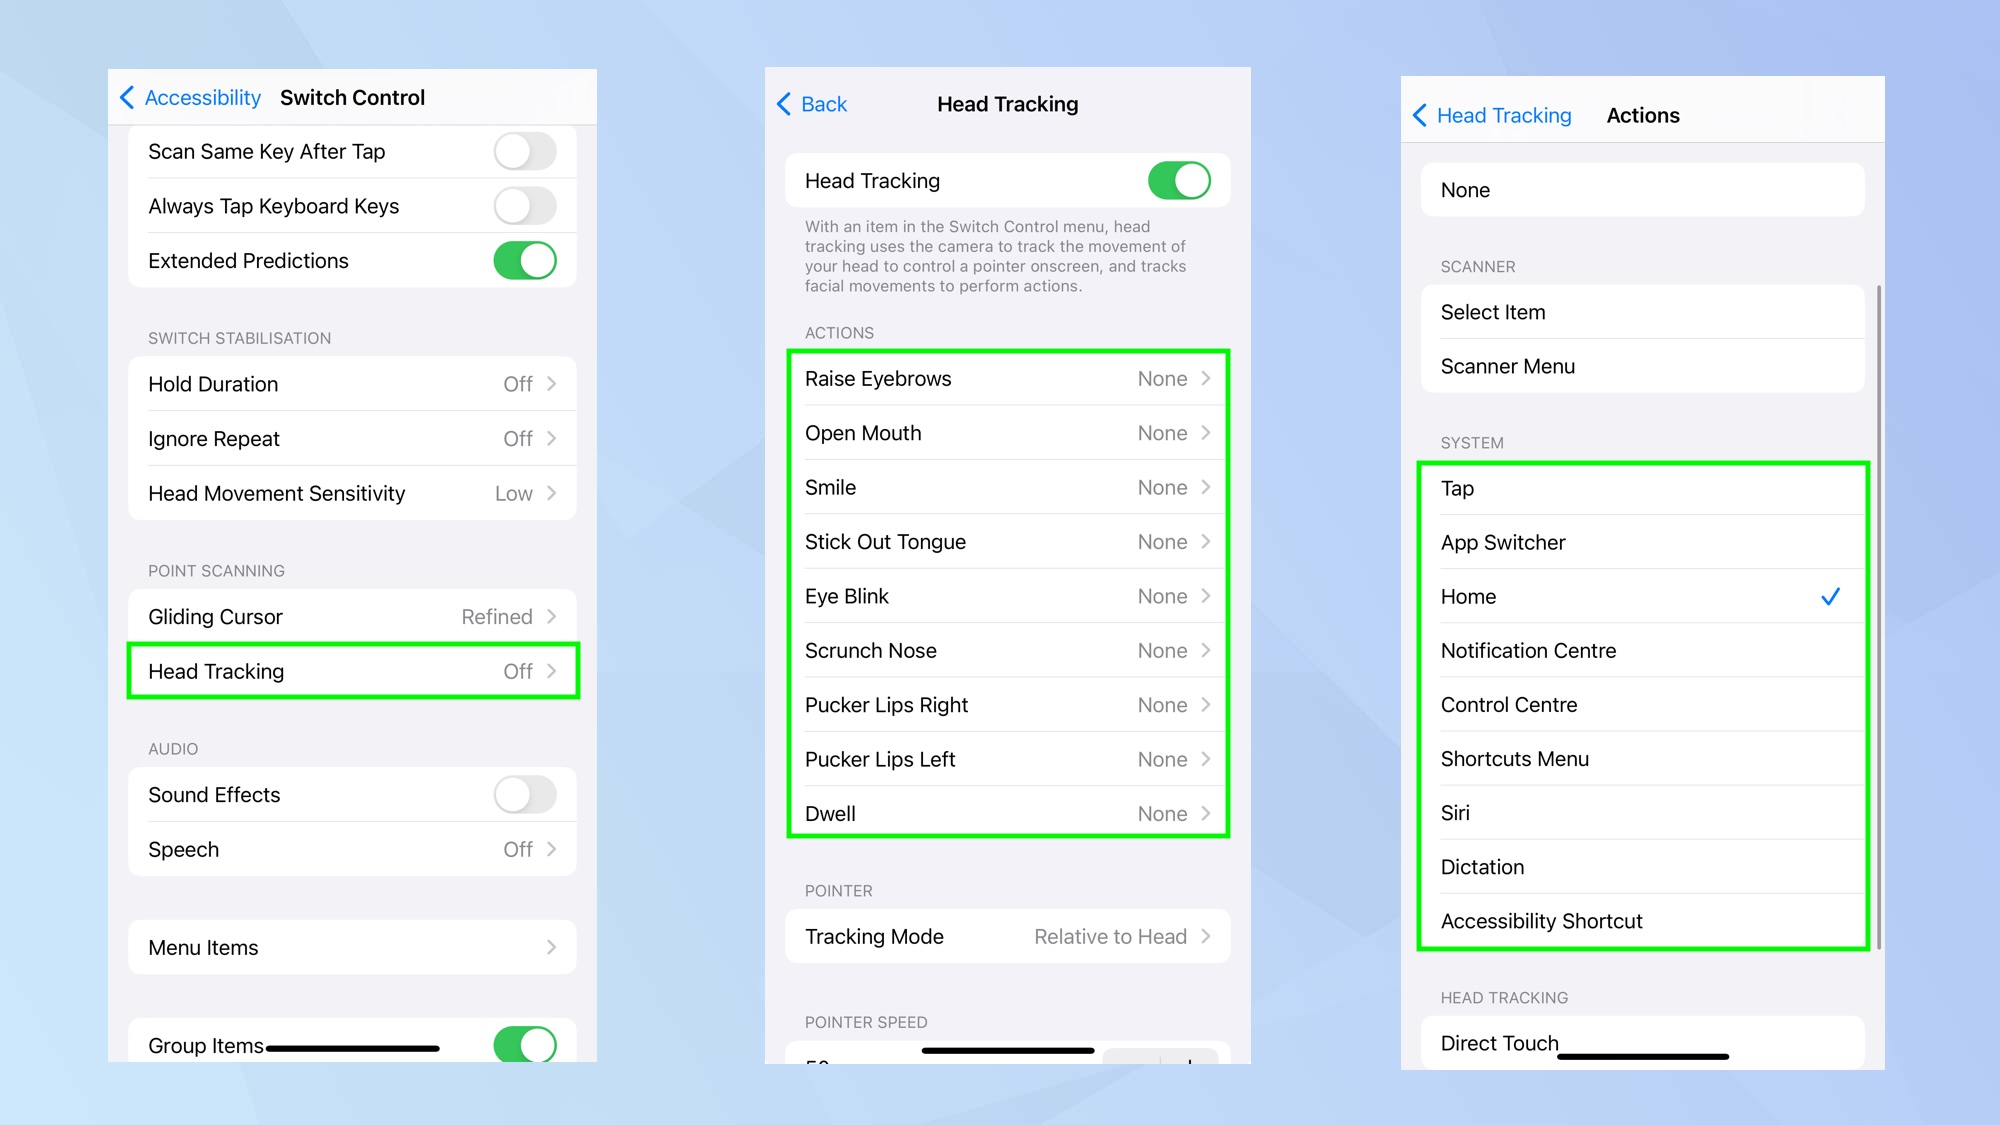
As well as assigning actions to your head movements, you can also use facial expressions to navigate your iPhone or iPad screen. Tap Head Tracking and toggle Head Tracking on. You will now be able to select a facial expression such as raise eyebrows and then choose an action for it.
3. Add payment confirmation
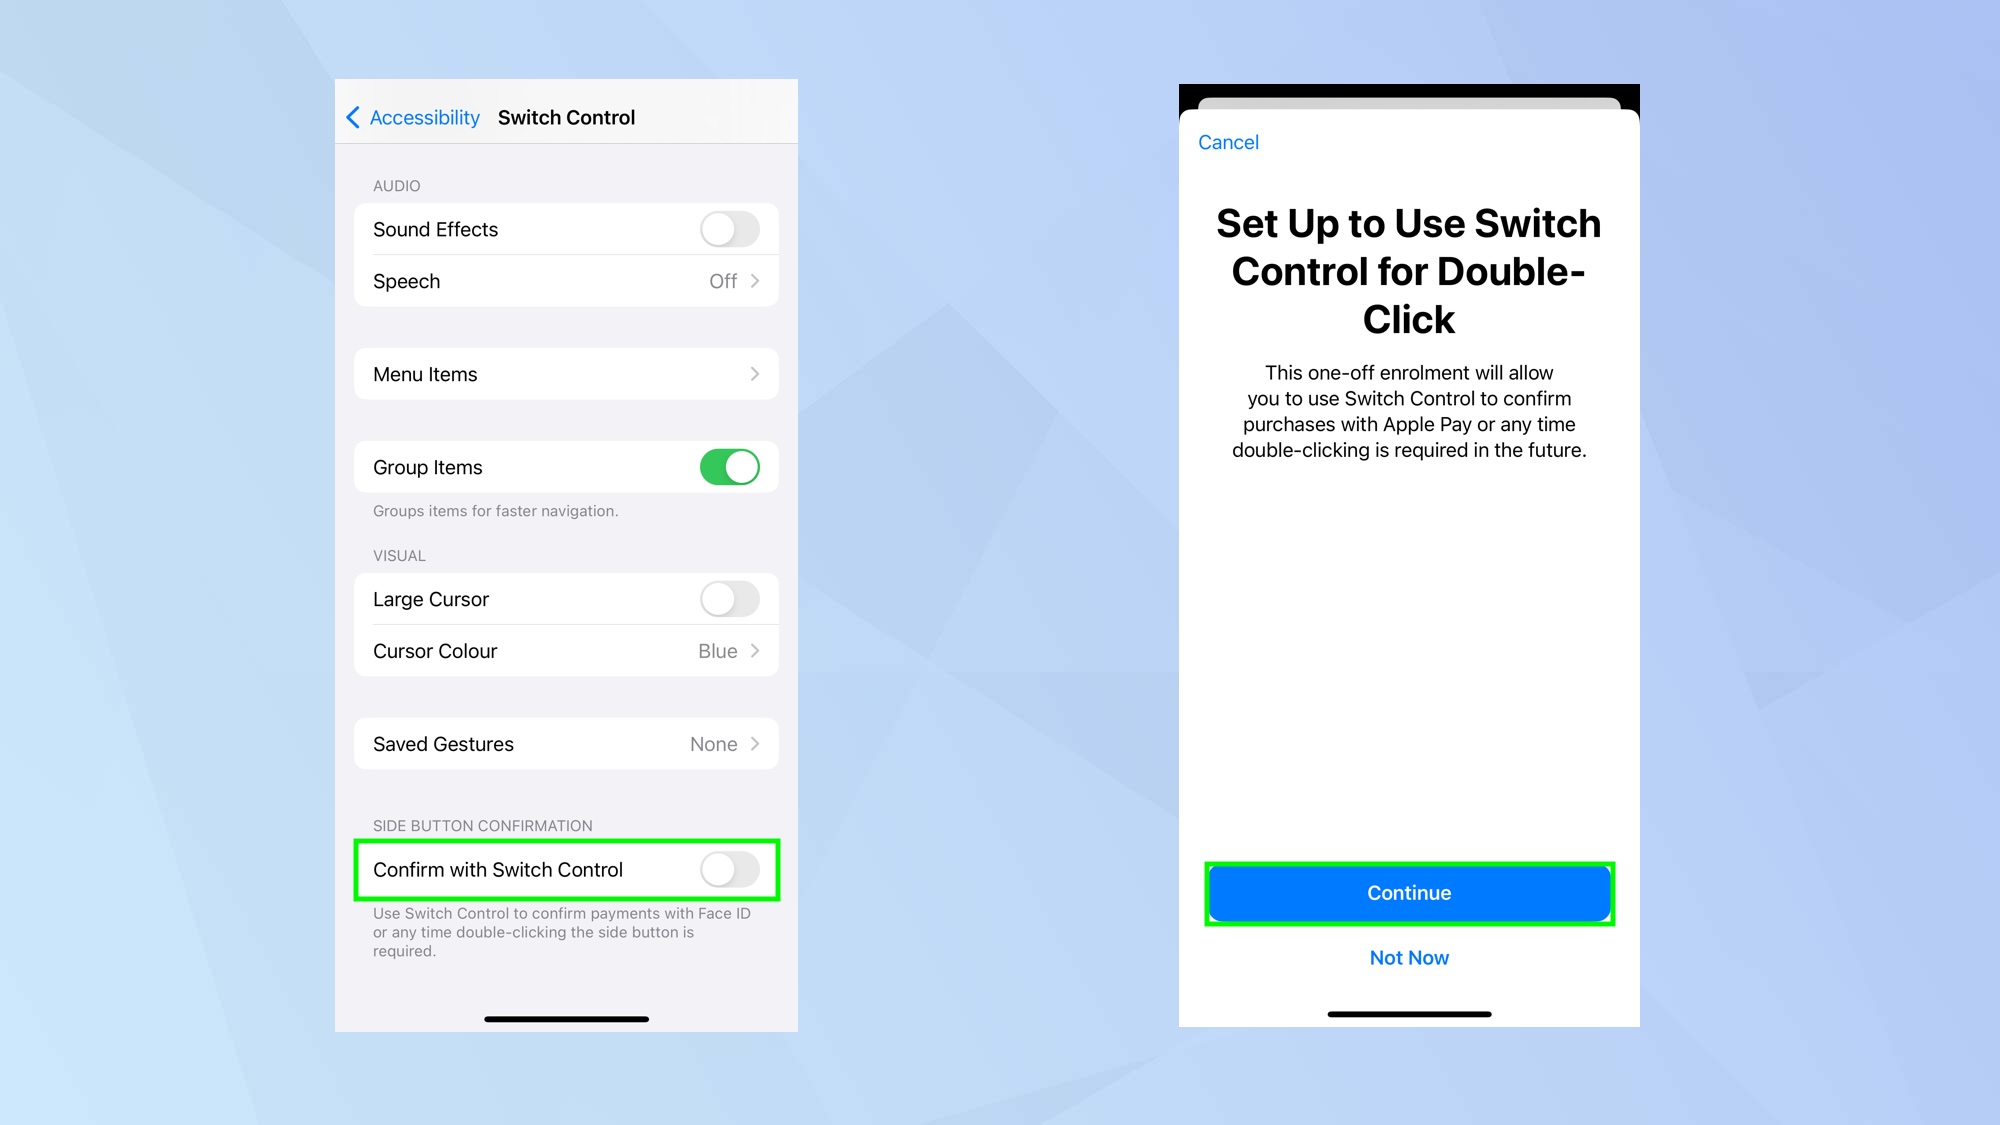
If you want to use Switch Control to confirm payments with FaceID rather than press the side-button, select Confirm with Switch Control. You will need to set up Switch Control to perform the double-click function of the side-button but tap Continue and follow the prompts.
And there you go. You now know how to use head movements to control your iPhone or iPad. But that’s not all. You can also delve into the Accessibility settings and learn how to enable reachability on iPhone to make navigating your device easier or figure out how to turn on Accessibility Shortcut on iPhone. The Accessibility options come in handy if you want to know how to get haptic feedback when using Face ID on iPhone too.

David Crookes is a freelance writer, reporter, editor and author. He has written for technology and gaming magazines including Retro Gamer, Web User, Micro Mart, MagPi, Android, iCreate, Total PC Gaming, T3 and Macworld. He has also covered crime, history, politics, education, health, sport, film, music and more, and been a producer for BBC Radio 5 Live.
