9 Android camera features that will help you take way better photos
Make the most of your phone's camera
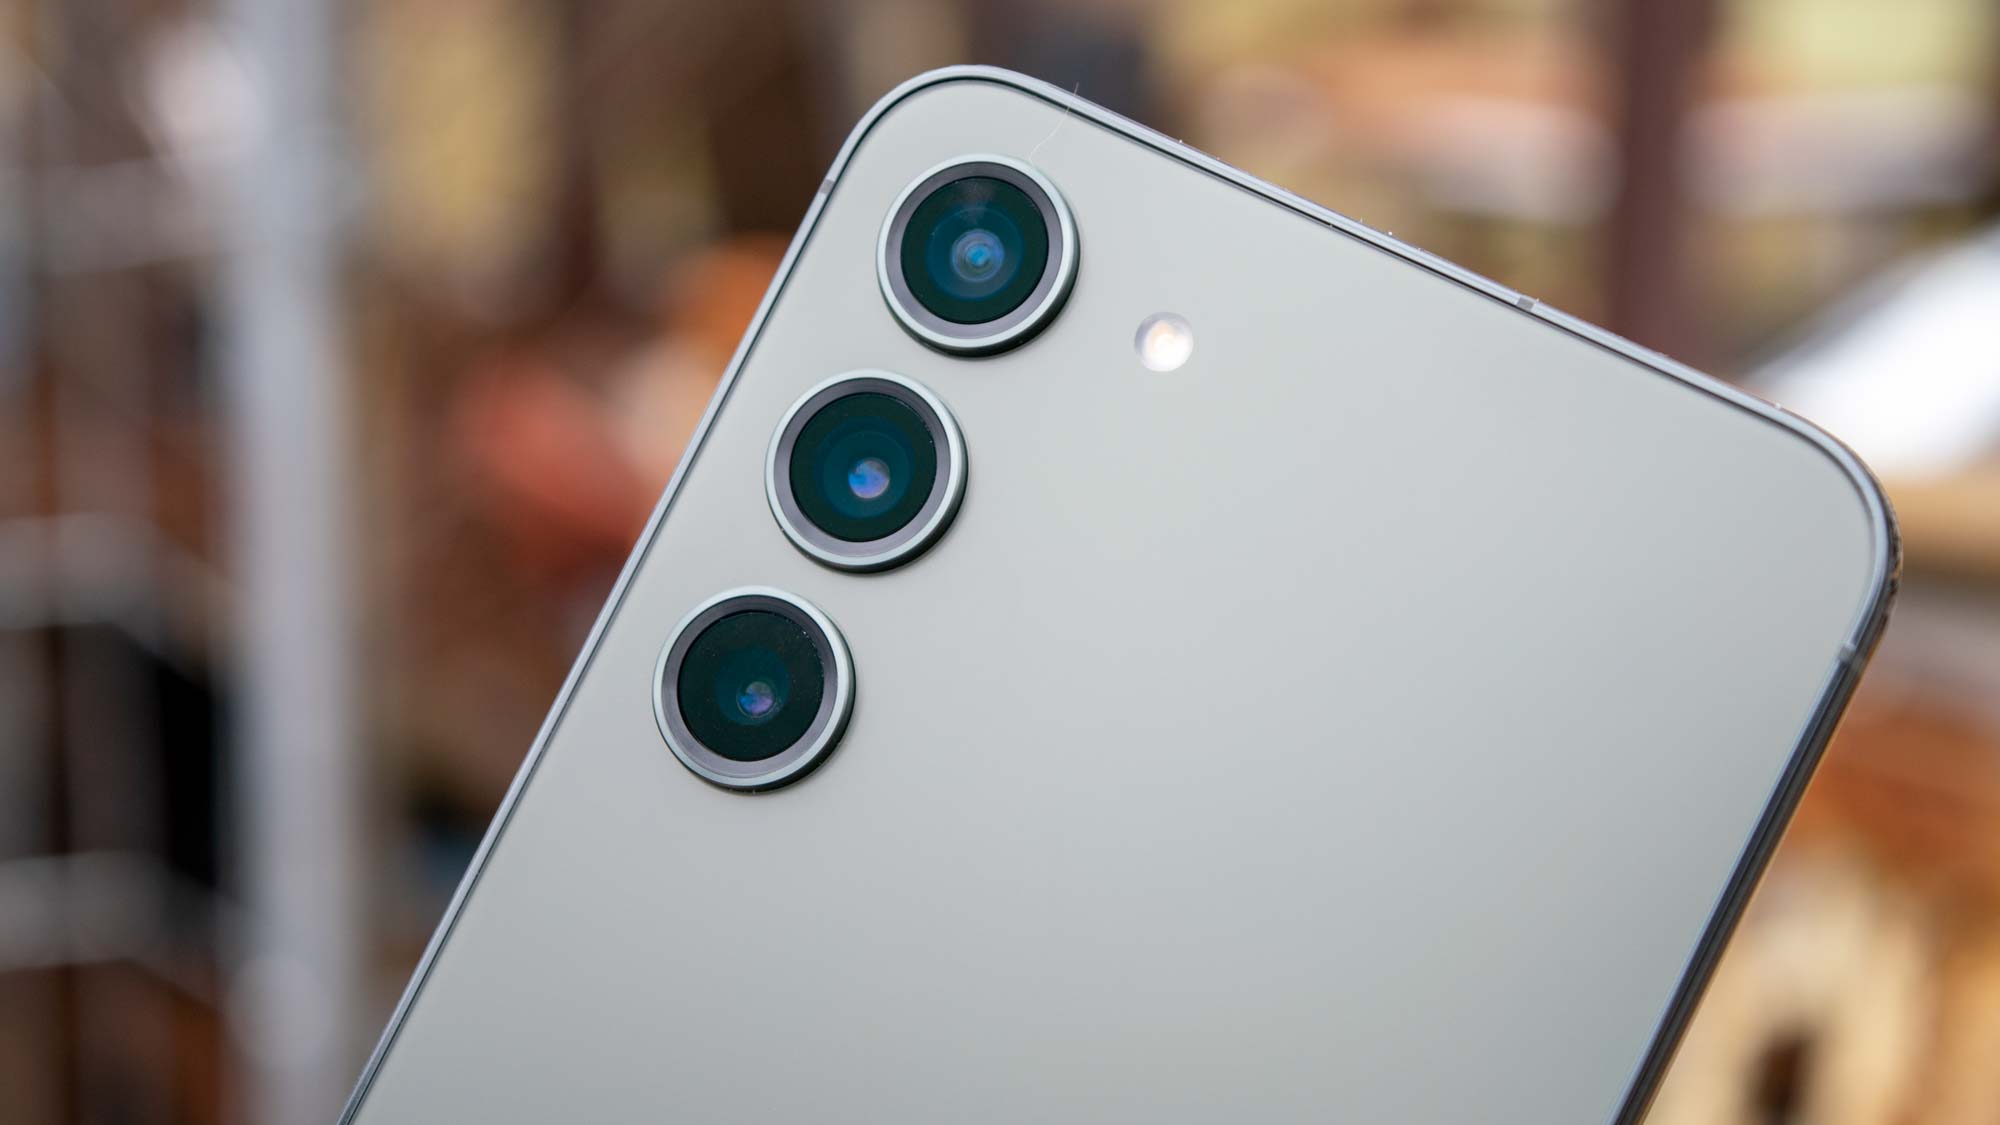
Whenever we want to capture a moment that’s special to us, we reach to our phones and open the camera. Taking the time to learn a couple of tricks that’ll improve your photos can pay off years down the line when you’re reminiscing.
If you’re not au fait with advanced photography techniques, don’t worry — your phone is capable of some high-level stuff, provided you know where to look. There’s no need to be afraid to mess with the settings either as you can easily reset the camera to default settings at the touch of a button. Check out these 9 tips to becoming a better phone photographer on your Android device.
Note: Obviously every Android phone has slightly different camera specs and software, but these features should work on the majority of Android devices. Make sure you've updated to the latest Android version. Check out how to update Android if you need some help.
9 Android camera features that will help you take way better photos
- Use the Grid Guide
- Enable Quick Launch
- Quickly share and edit
- Enable Pro mode
- Turn on automatic HDR
- Film in Slo-Mo
- Use 10-Bit color
- Use Portrait mode
- Enable RAW mode
1. Use the Grid Guide
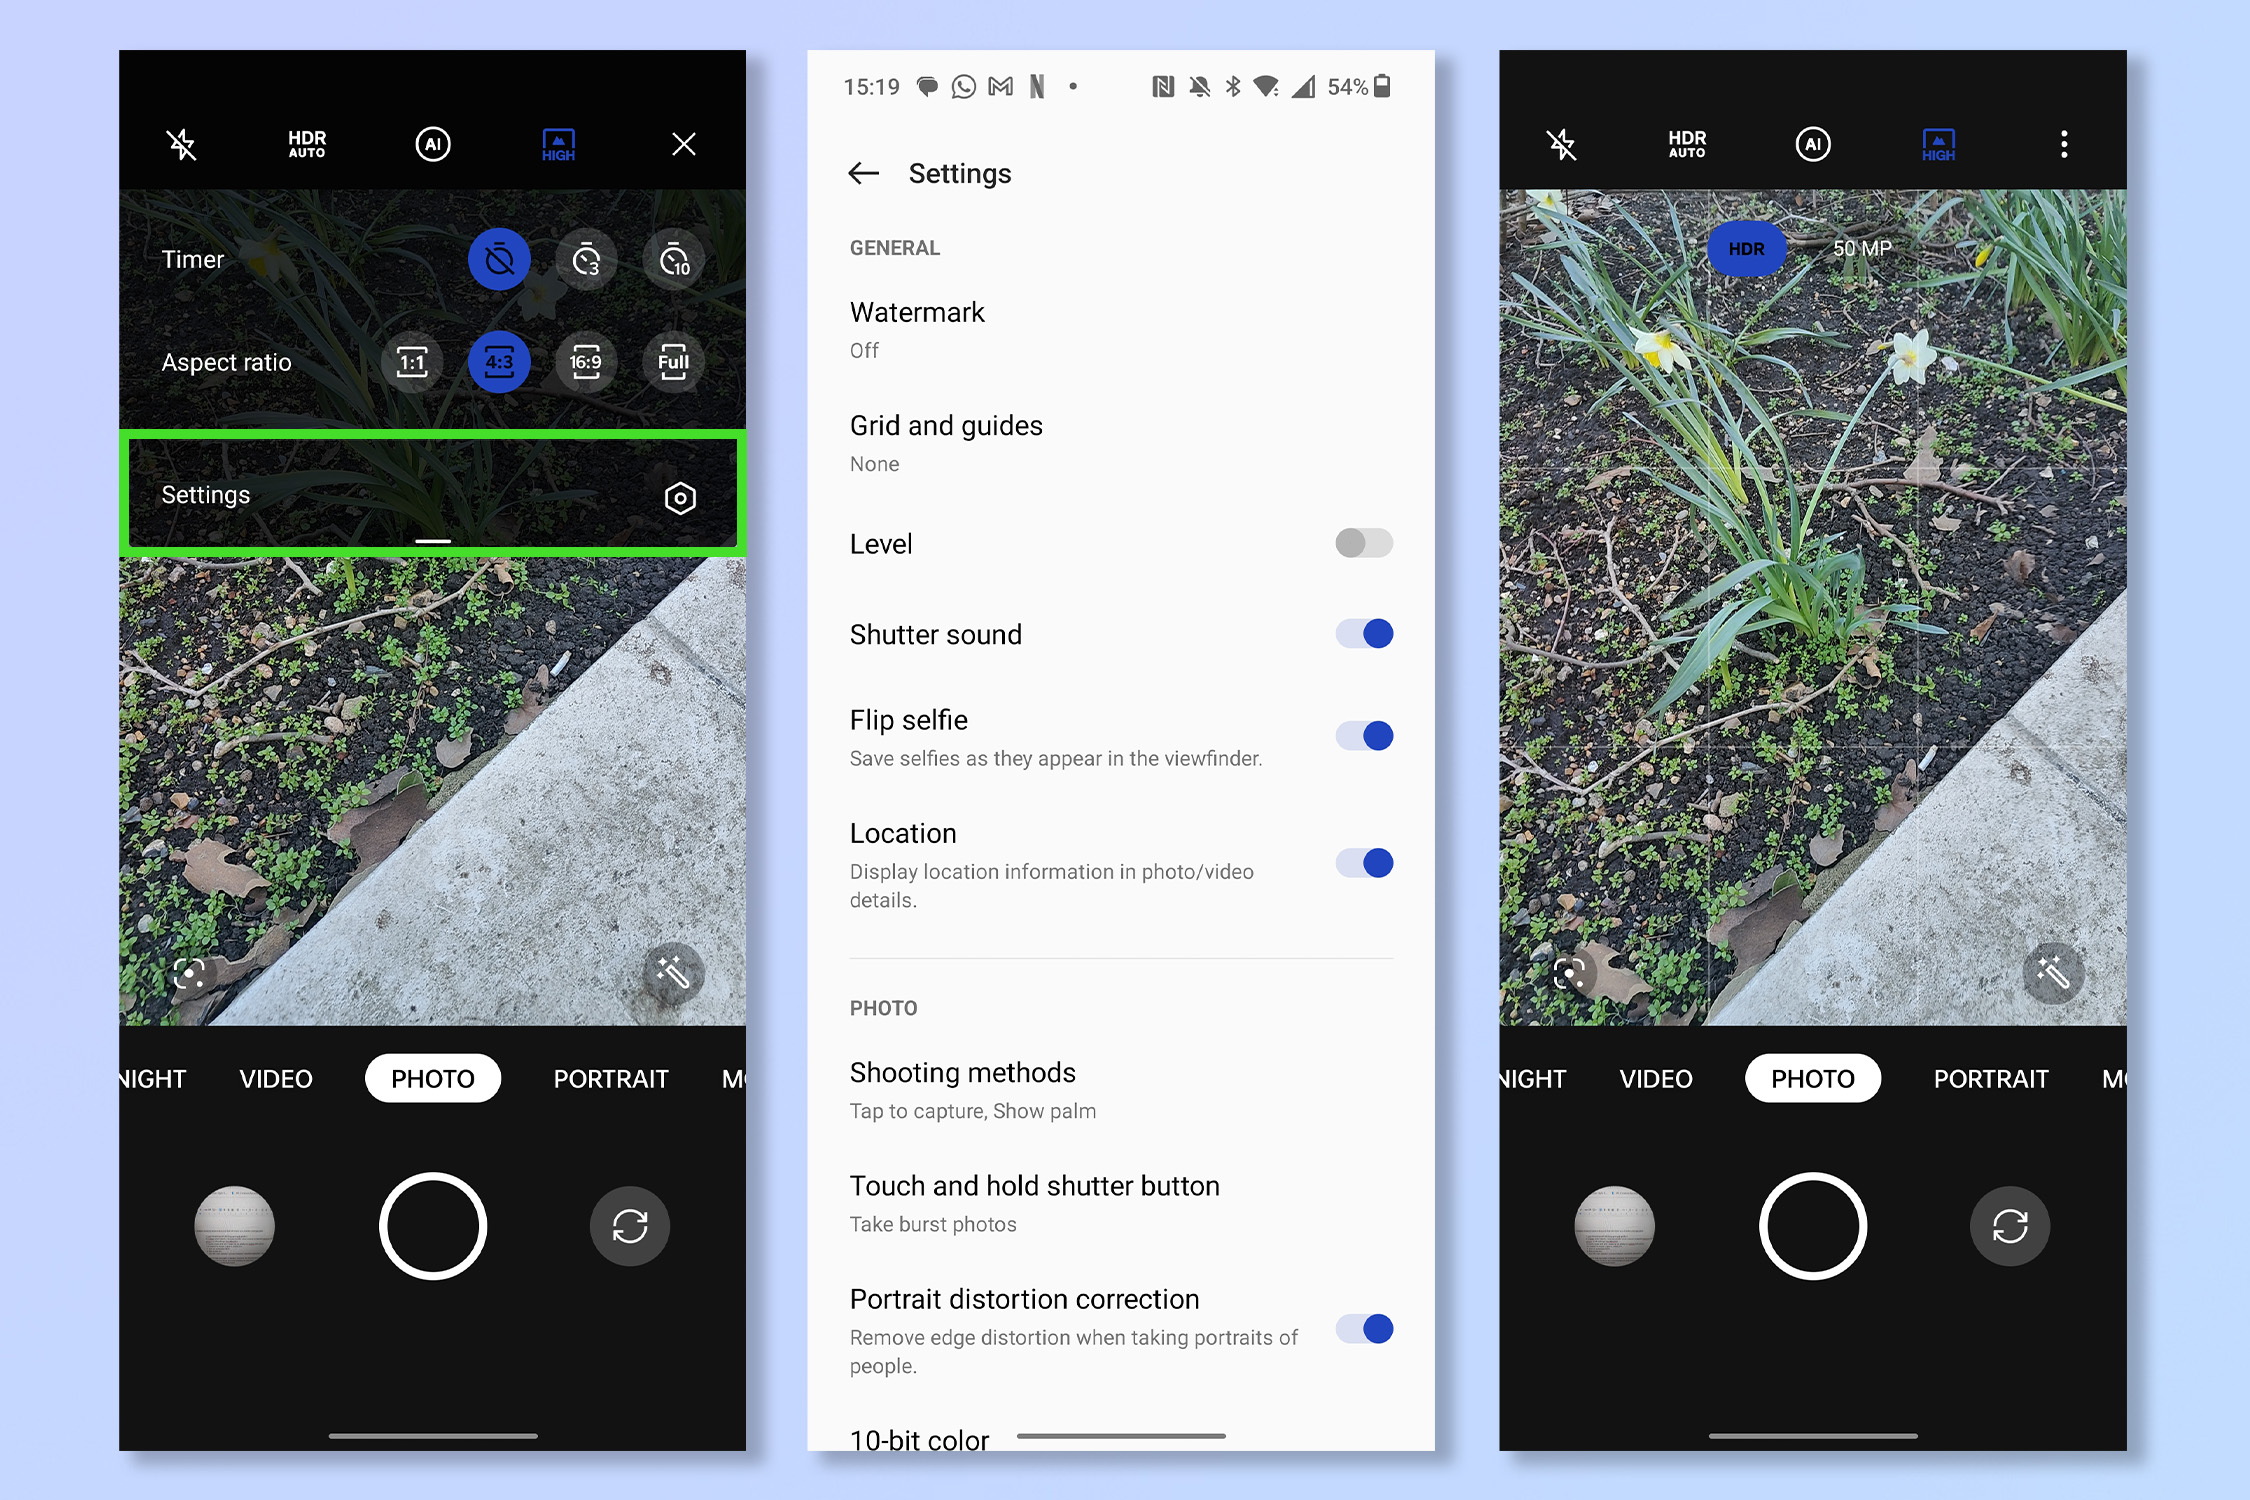
Using a grid is a great way to ensure you get the composition of your photos just right. Working to a grid can help you create more interesting compositions when the subject is at the intersection of multiple lines and not just square in the middle of the shot. Your phone should feature a 3x3 grid, which among other things can help you use the "rule of thirds" rule and position subjects one third way into frame.
Open the camera app and then open the camera Settings. You should see a section for Grid and guides. Toggle on Grid.
2. Quick launch
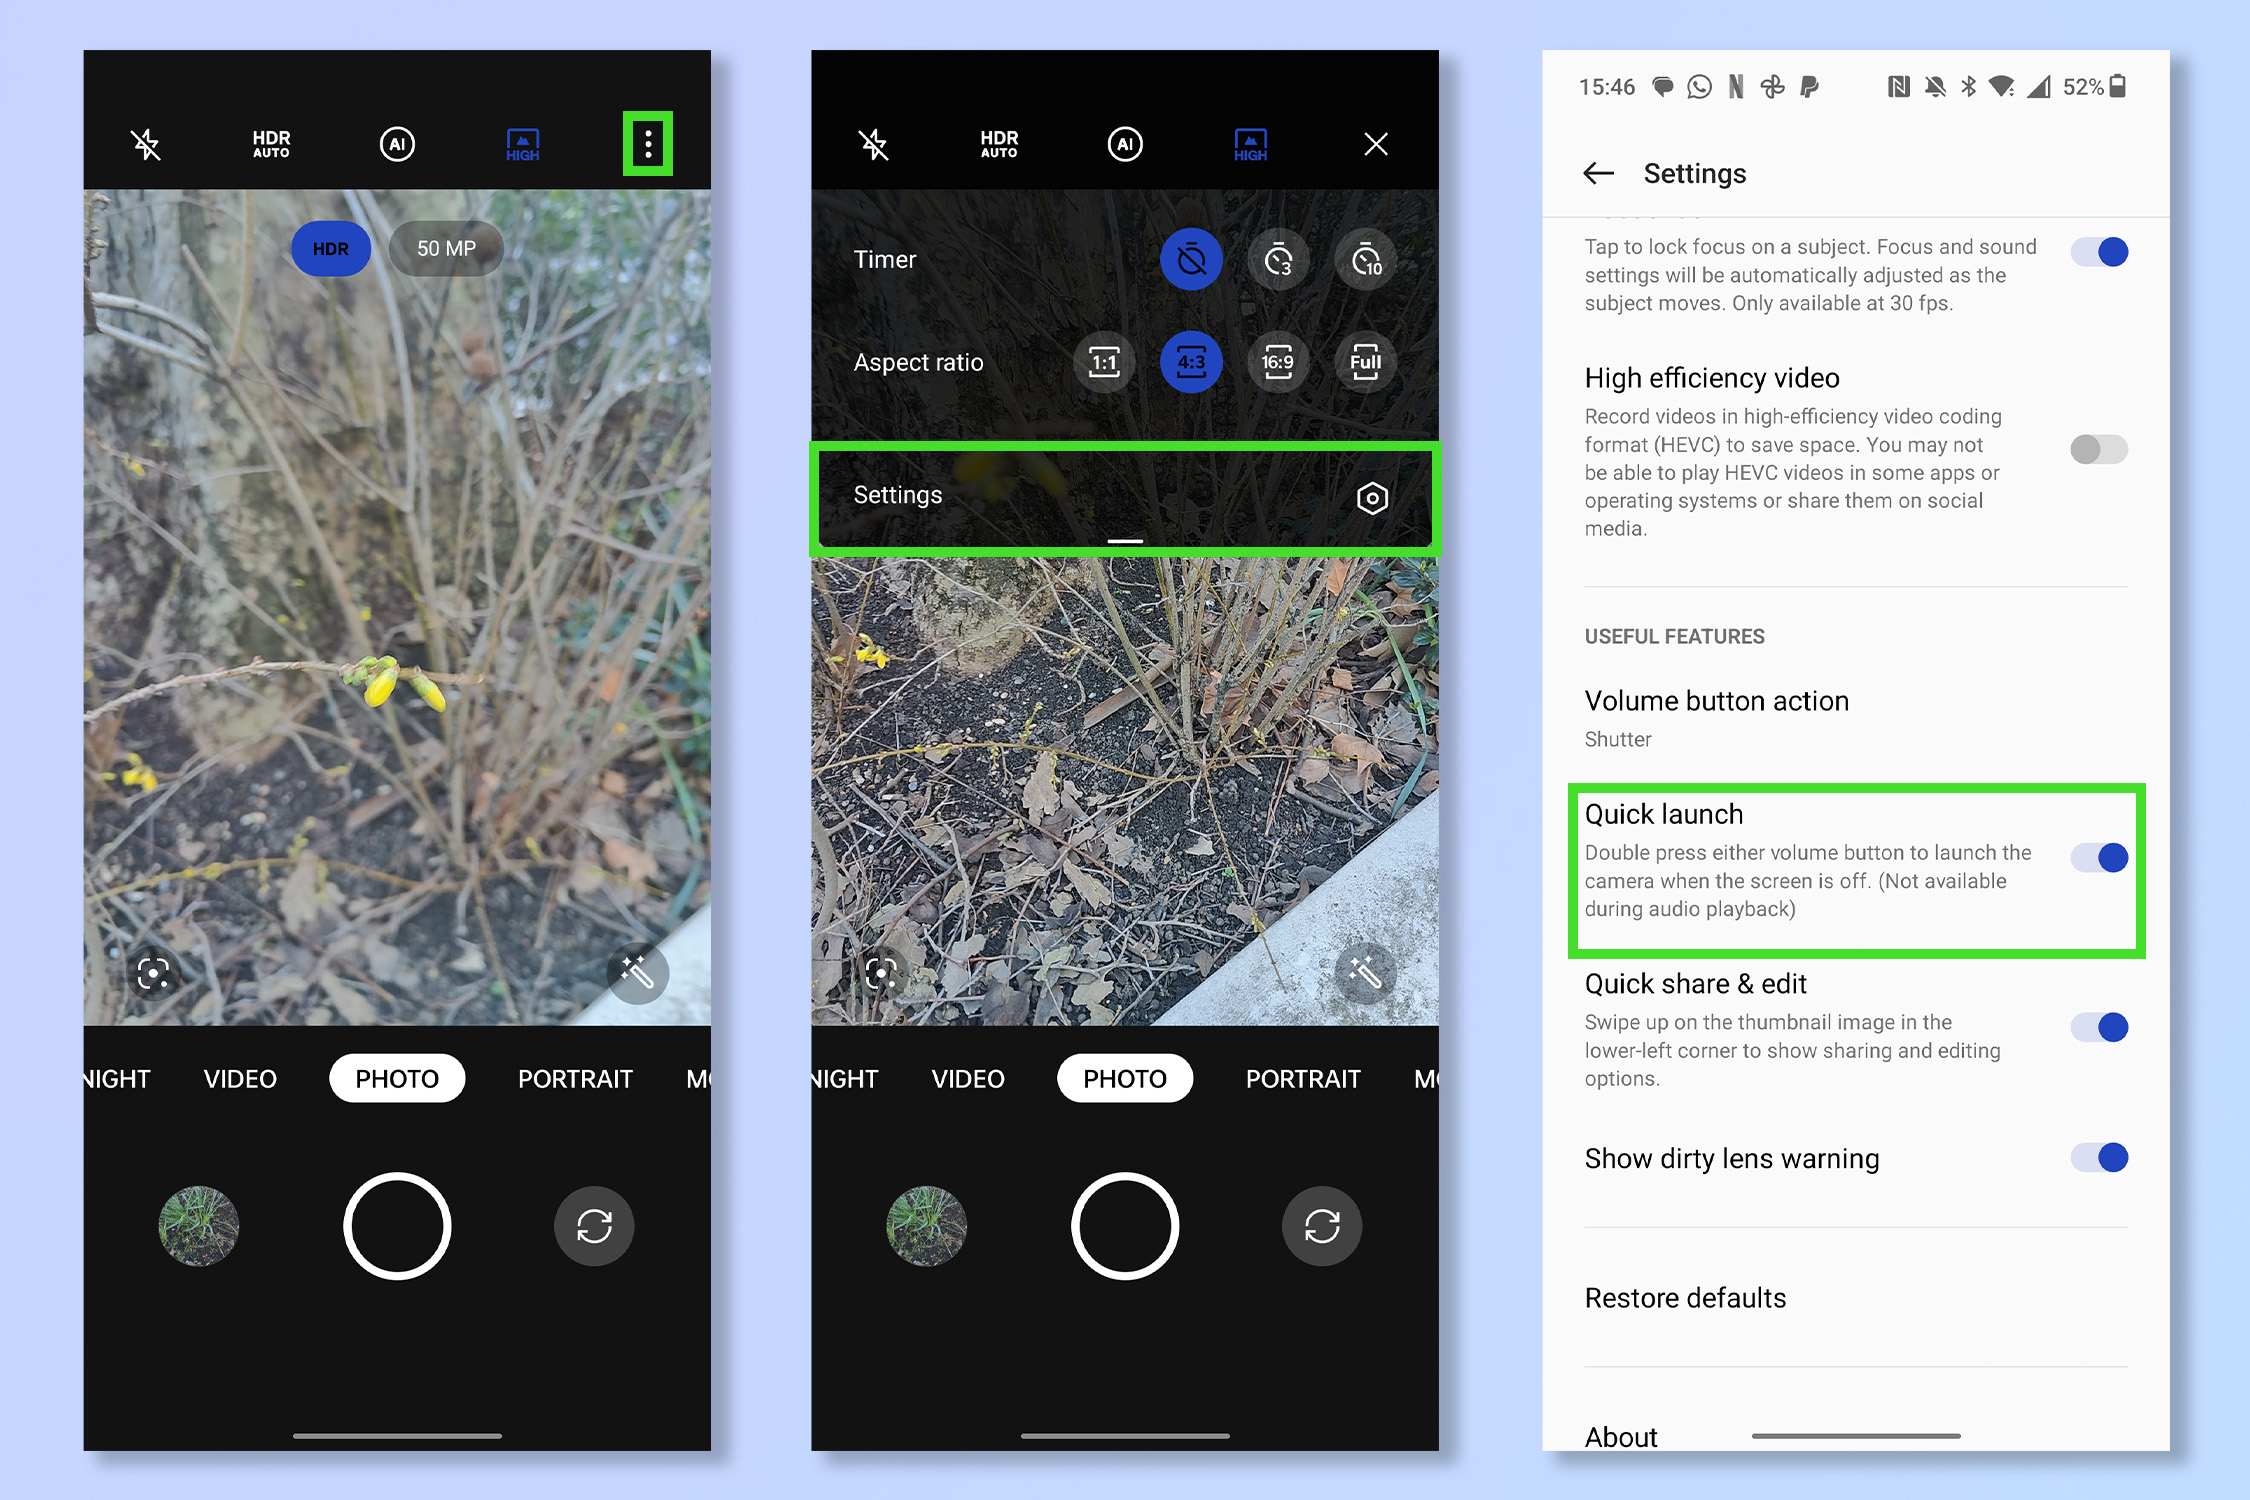
Photos are all about capturing moments, but equally that means you only have a moment to unlock your phone, find the camera app and take the photo. With Quick Launch, you’ll never miss a shot again. This feature enables near-instant access to your phone’s camera, once activated all you have to do is double-tap a volume button, and even if your phone is locked, it will jump straight to the camera.
Open your Camera app's settings and toggle on Quick Launch. Now, to take a photo, you'll just need to press the volume button twice quickly.
3. Quick share and edit
In the social media era, we want to share and edit photos quicker than ever. Luckily your Android phone has you covered. You can share the photo you just took, and edit it, in seconds.
In the camera app, swipe up on the camera roll in the bottom left corner. Tap share to share to a variety of places or tap edit to make some quick tweaks to your picture first.
4. Enable Pro mode

If you know what you’re doing when it comes to photography, or you want to learn, try turning on Pro mode. This lets you adjust manually a host of camera settings that your phone will normally take care of for you automatically. If you want to adjust the shutter speed, ISO and white balance settings this is the setting for you.
To enable Pro mode, open the Camera app and change the camera mode to More, then tap Pro. The new settings will appear at the bottom and top of the screen.
5. Turn on automatic HDR
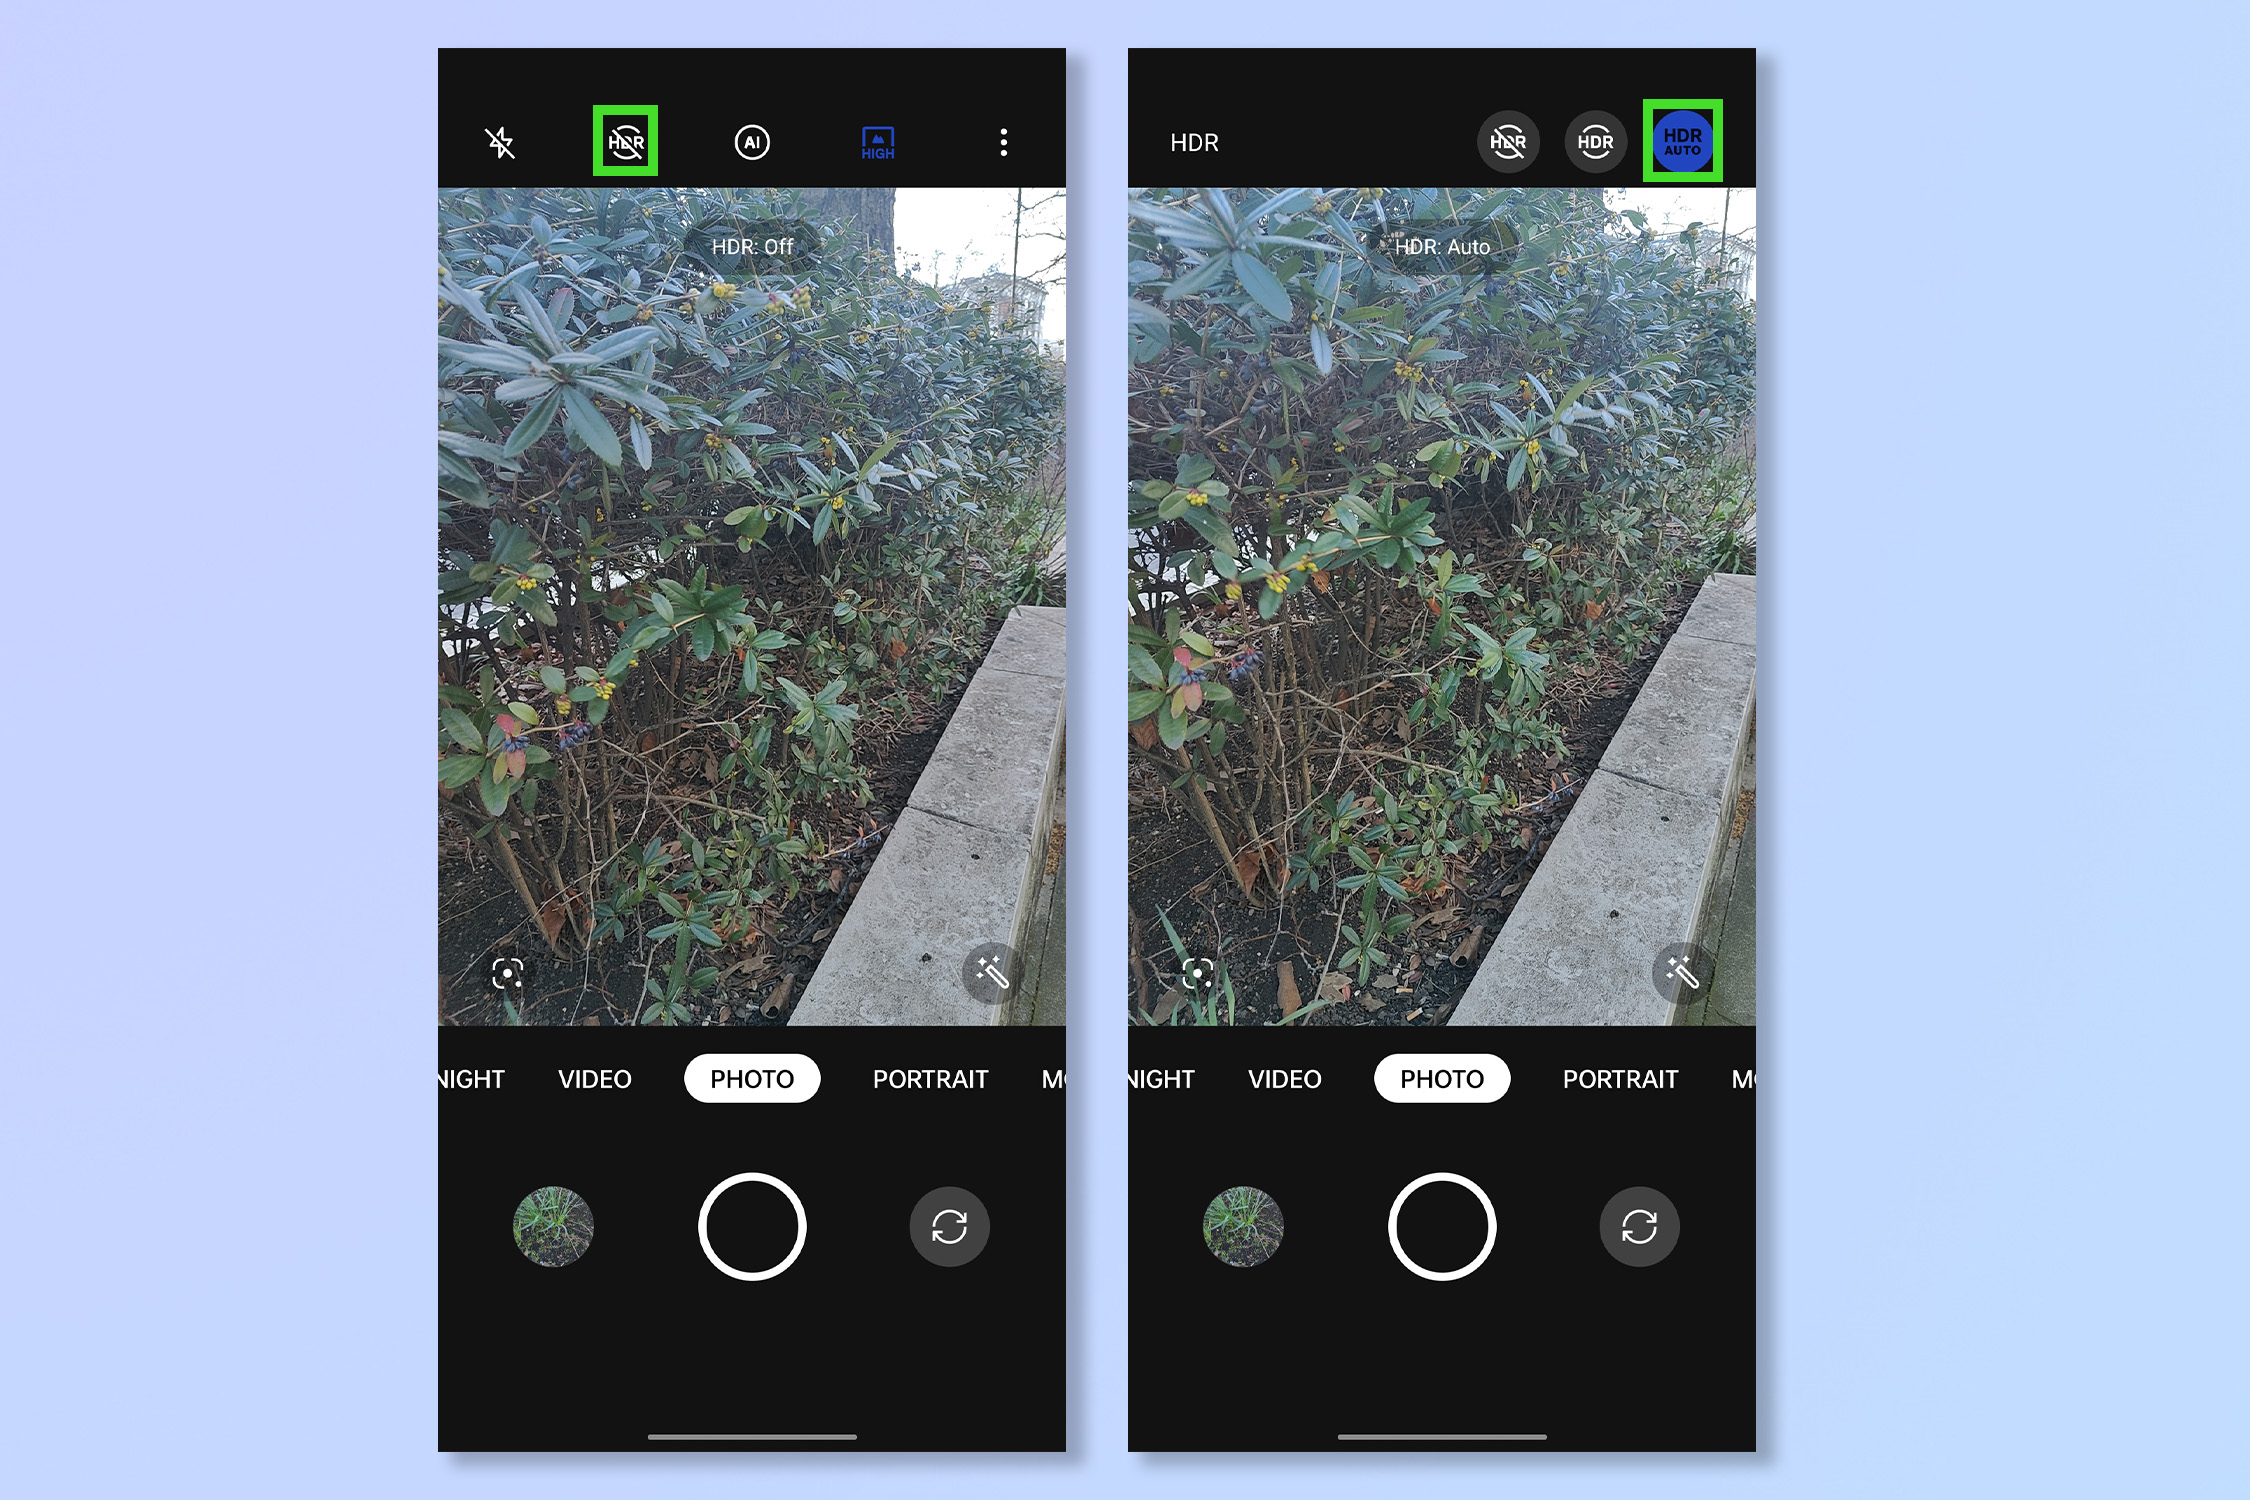
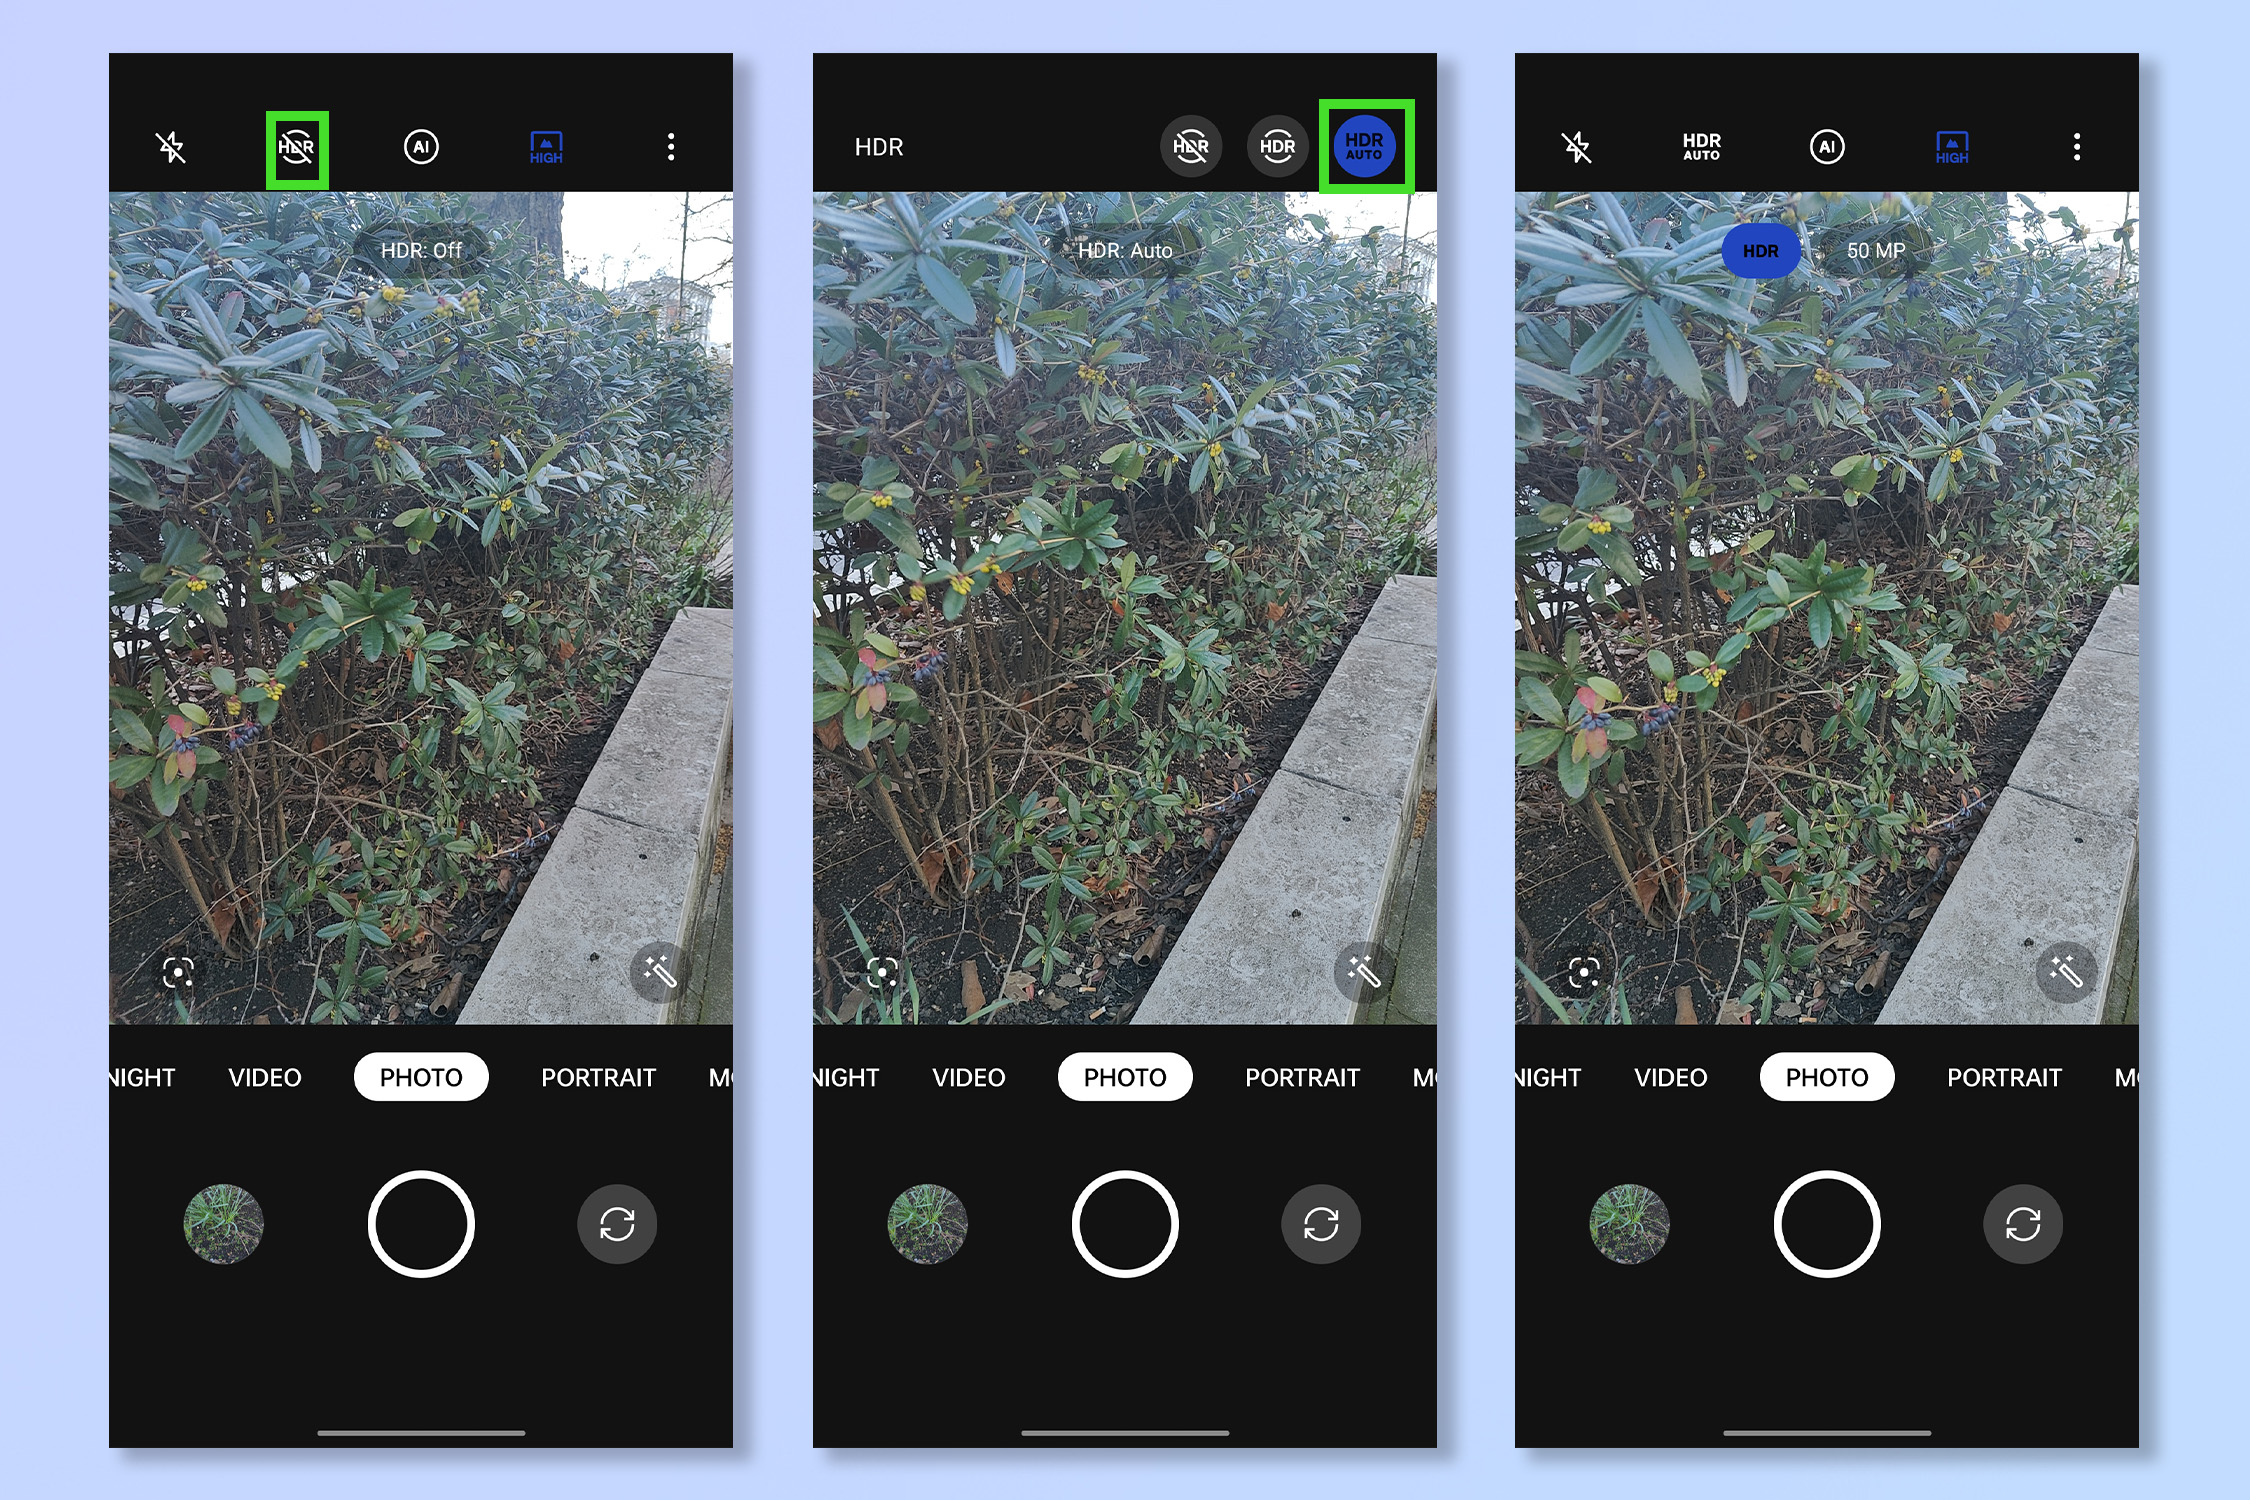
Knowing when to use High Dynamic Range or HDR is another way to get the most from your phone’s camera. It’s a great way to capture wider dynamic ranges than your camera can in just one shot. HDR won’t always be what you need however and if you’re not a photography expert luckily your phone can enable or disable HDR as it sees fit if you enable automatic HDR.
Open the Camera app, tap the HDR icon (It should be next to the flash controls) and tap HDR Auto.
6. Film in Slo-Mo
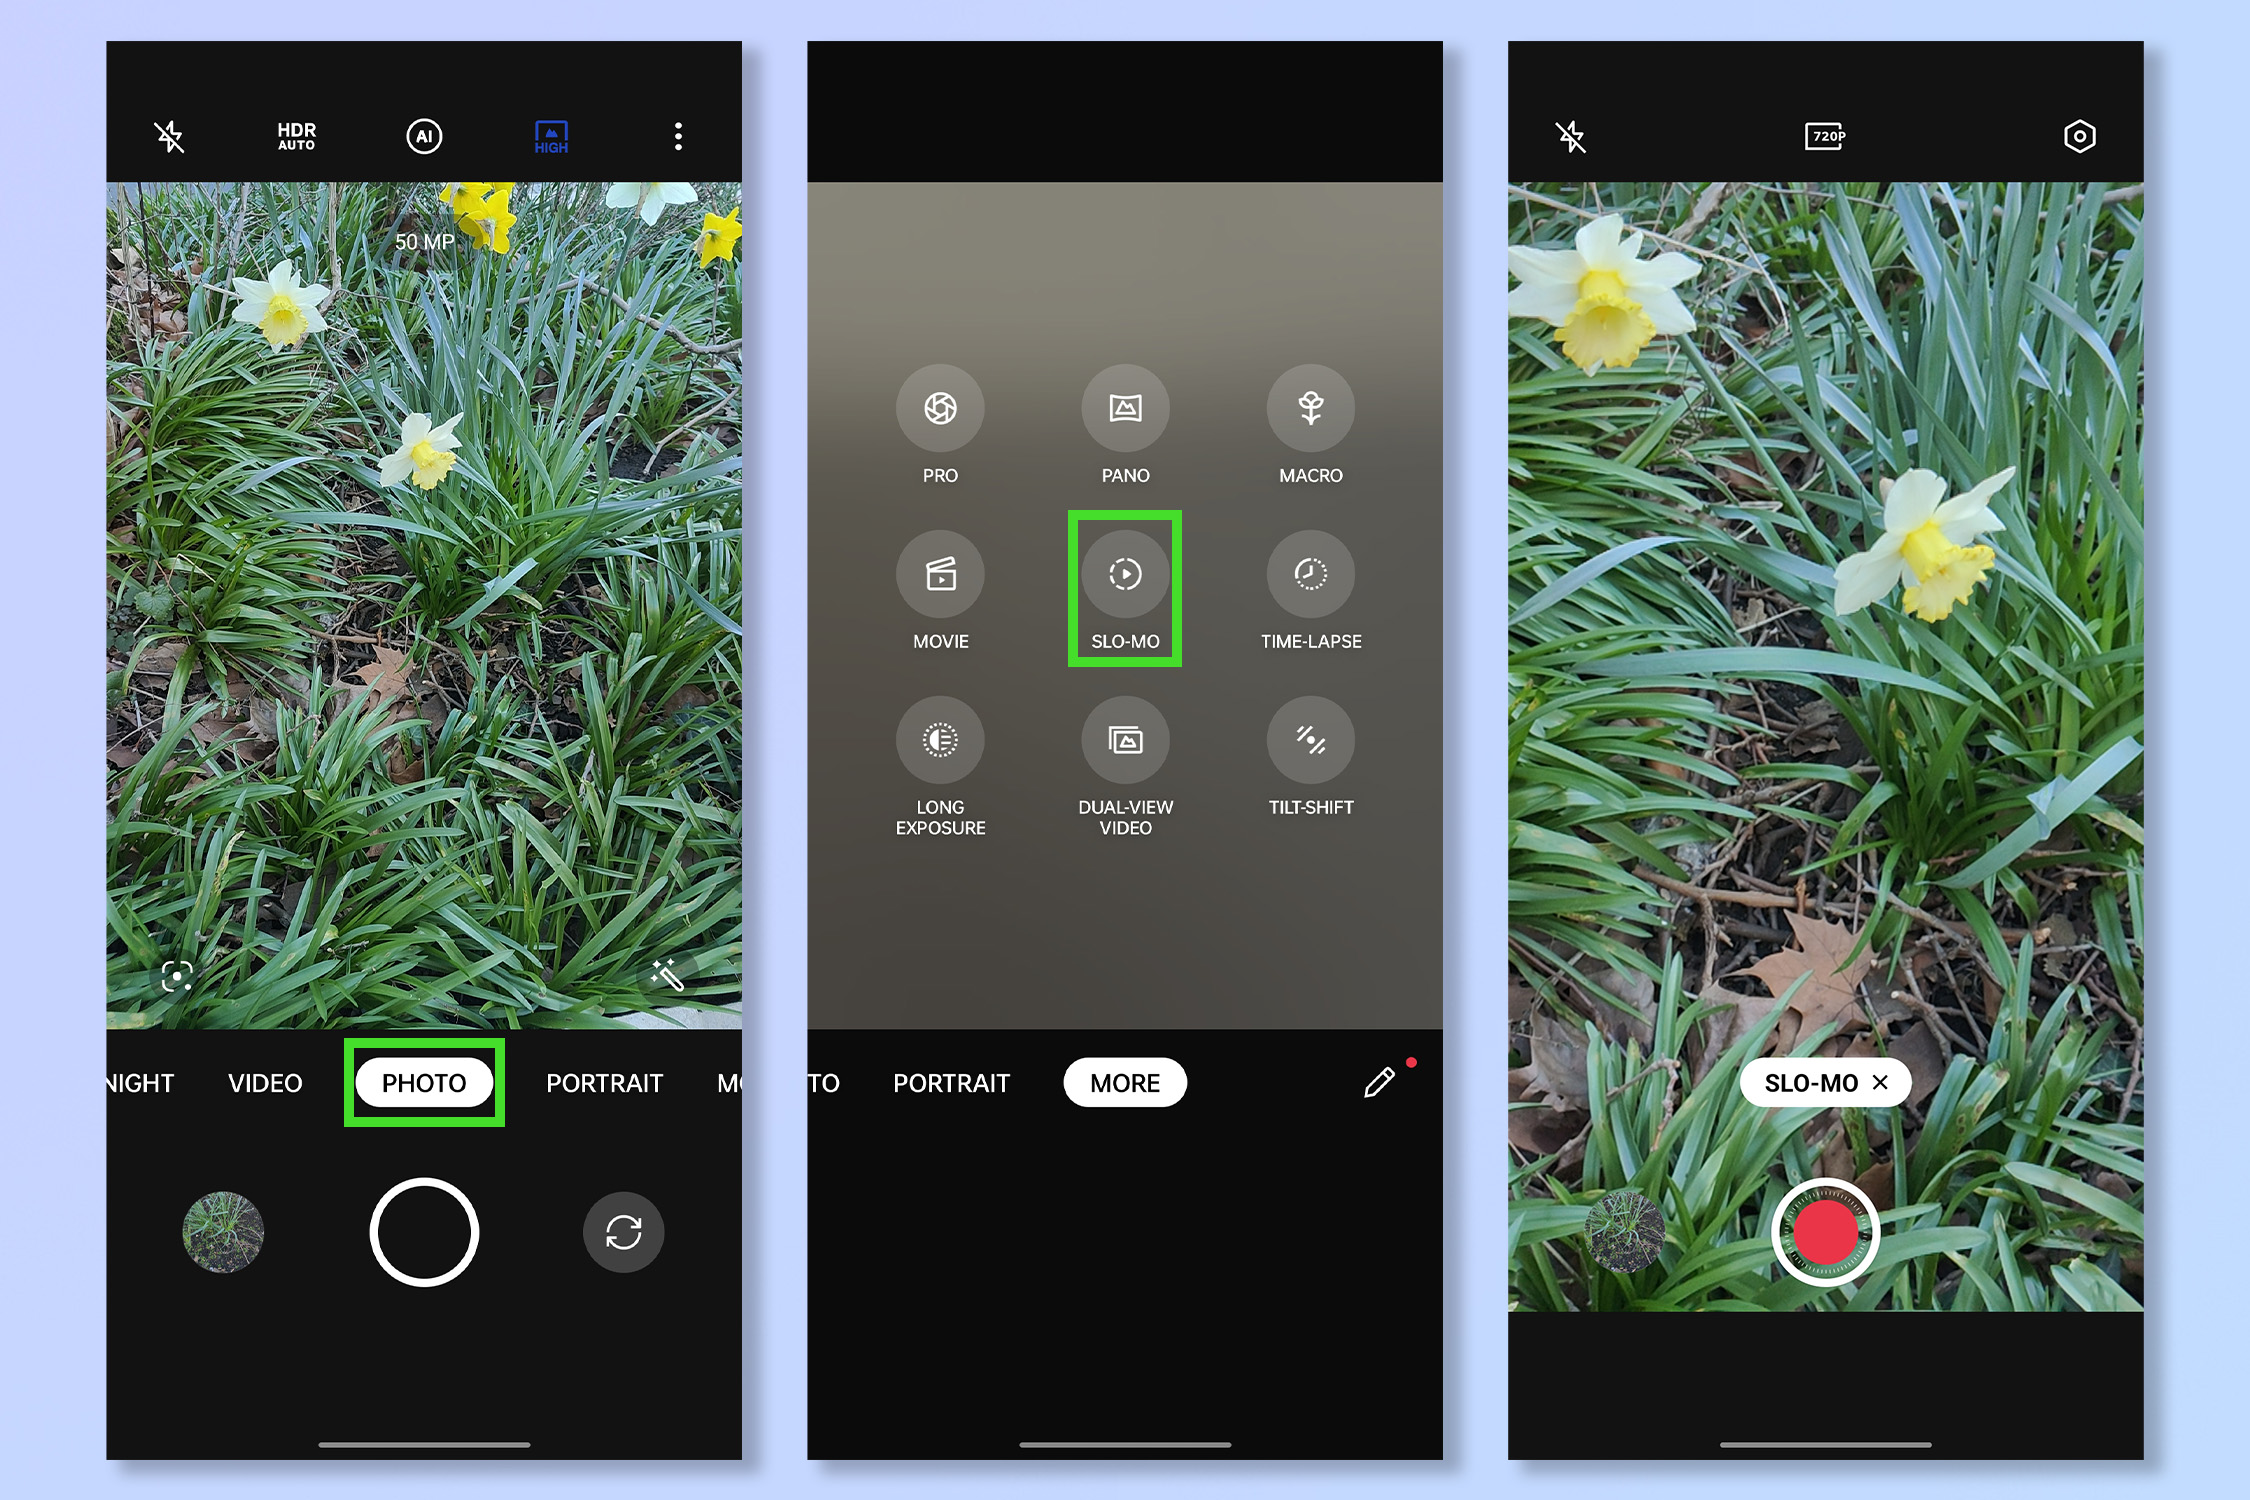
The settings on your phone can also help your video skills. Slow motion used to be reserved for 80s action movies, but now you can harness its power for yourself to create beautiful cinematic videos. But don’t go exploding anything just so you can walk away from it in slo-mo.
Open the Camera app and change the camera mode to More, then tap Slo-mo. After that, just record like a normal video and watch it back at a snail’s pace.
7. Enable 10-bit color
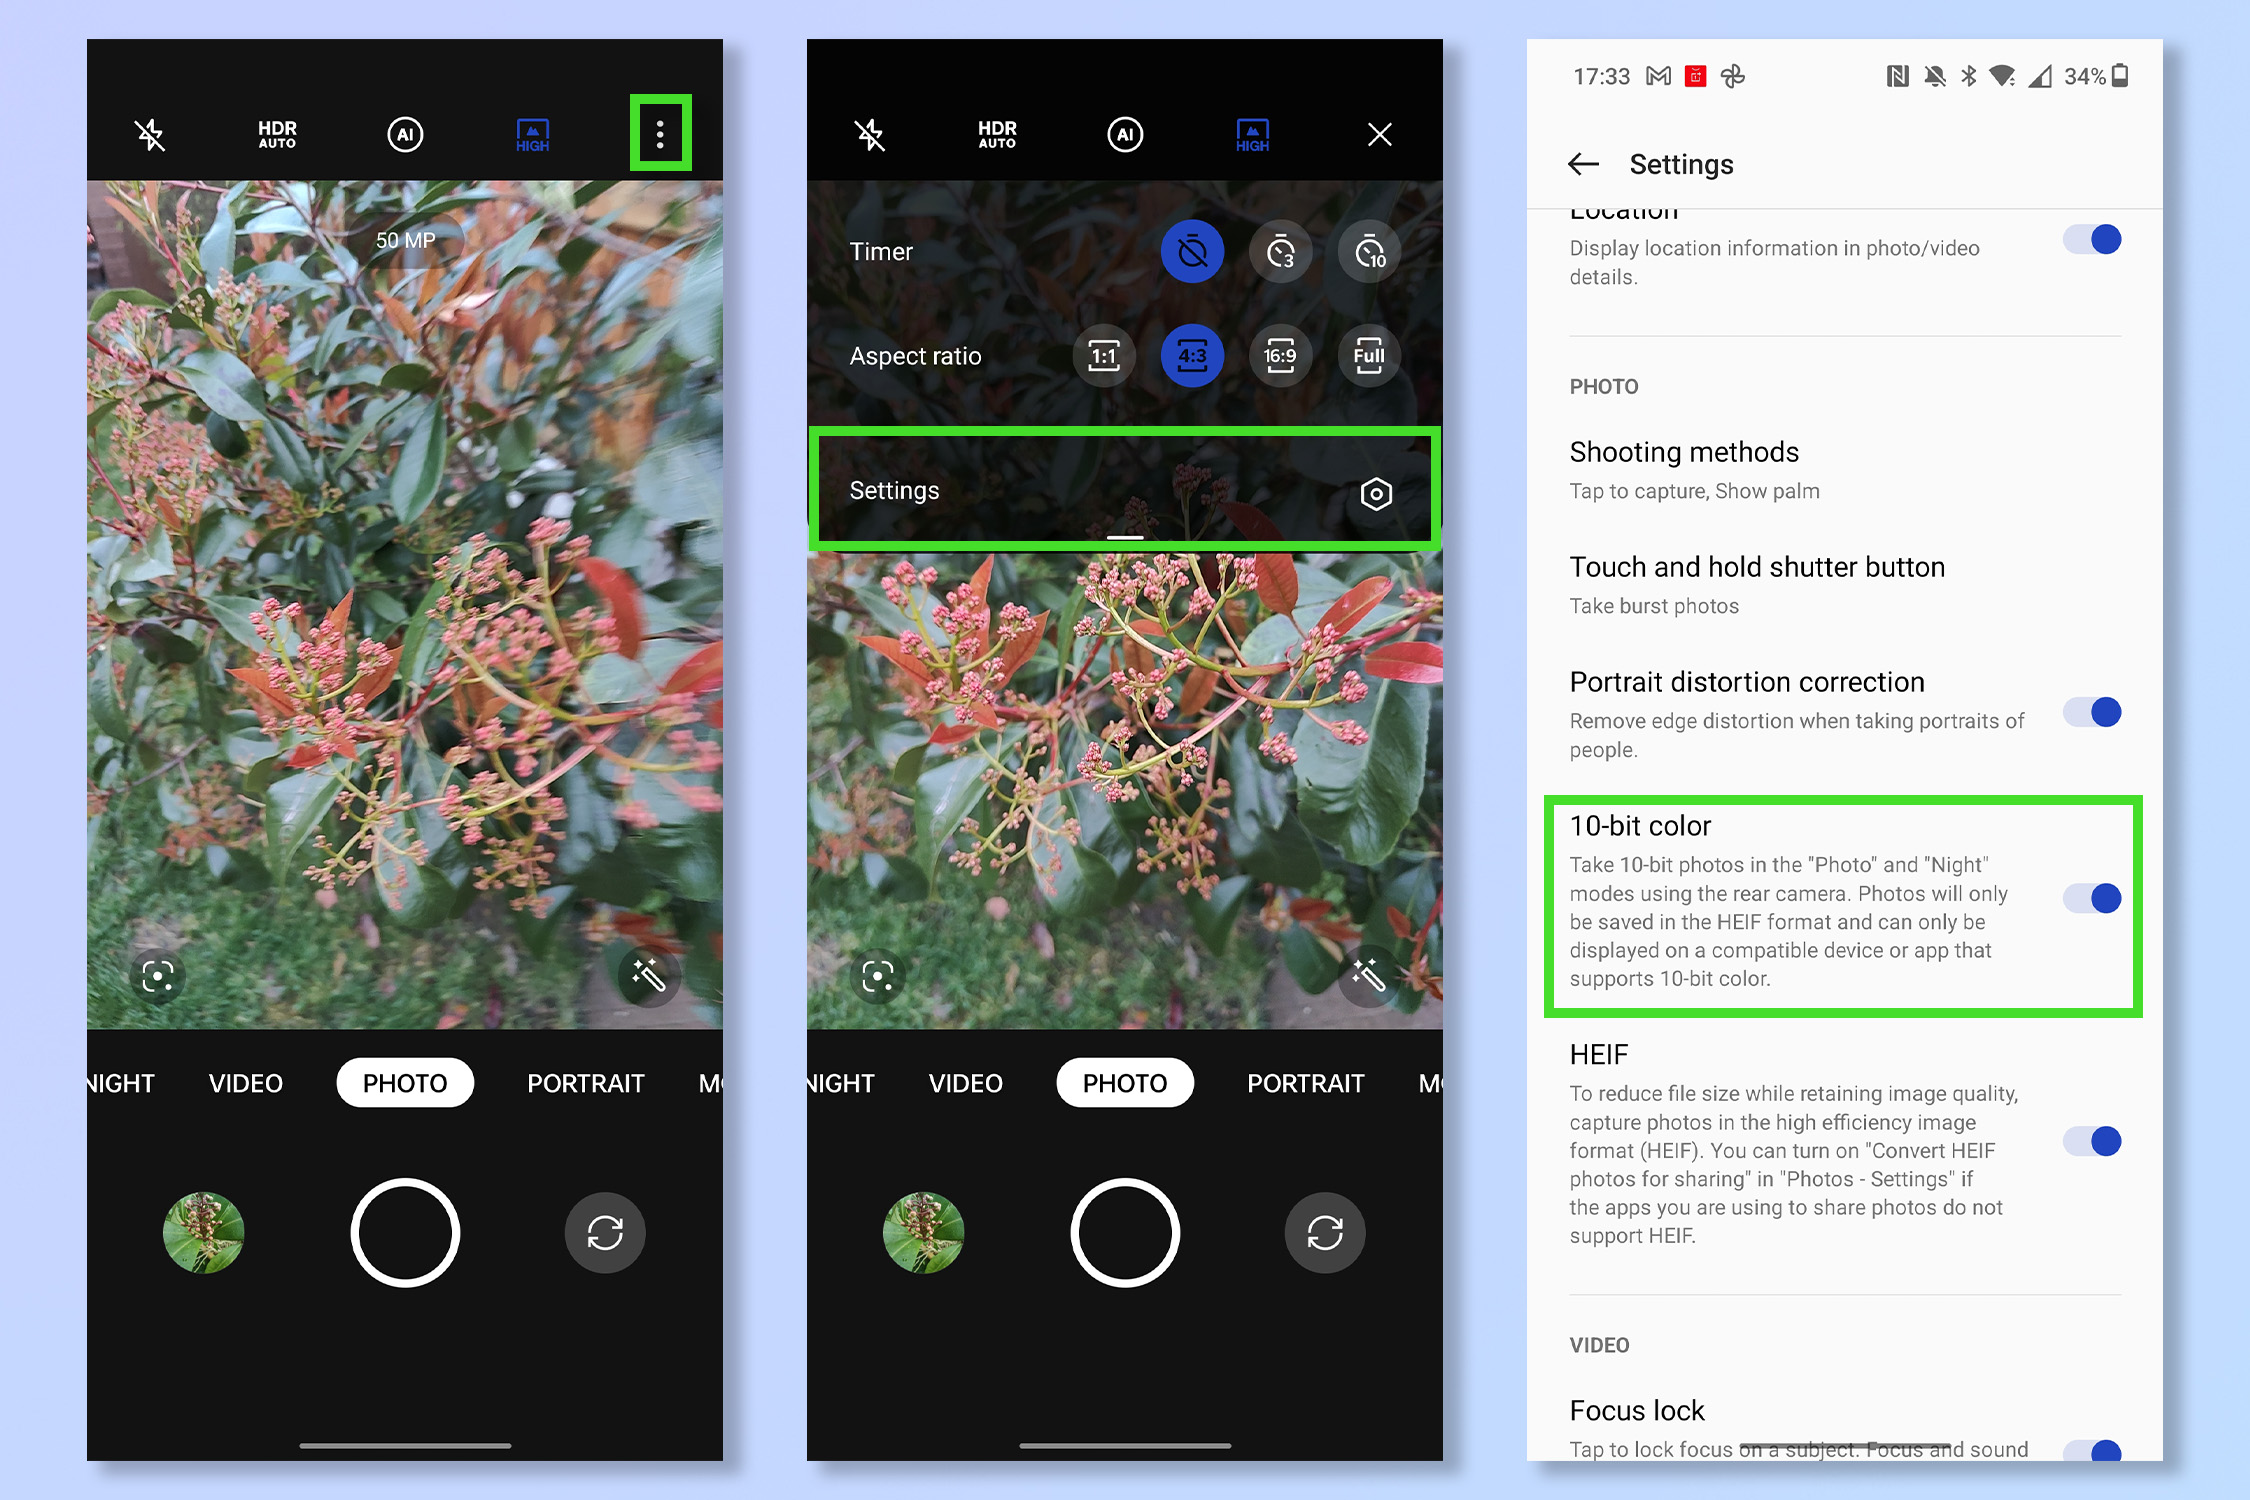
To capture more color detail, you should enable 10-bit color. 10-bit color enables your phone to capture over 1024 tones of each primary color — so 1024 shades each of red, green and blue. This results in images with over a billion unique colors, compared to 256 tones and 16.7 million colors on regular 8-bit images. This effectively gives your images greater color depth and makes them more accurate to real life, as well as giving you more flexibility in post-production. What's more, it takes seconds to activate, so that’s a whole lotta colors for little effort. These files will take up more storage space than 8-bit photos, but apart from that, what’s not to like?
To enable 10-bit color, open the camera app and tap Settings, then tap 10-bit color to enable it.
See our full guide on how to enable 10-bit photos and videos on Android.
8. Use Portrait mode
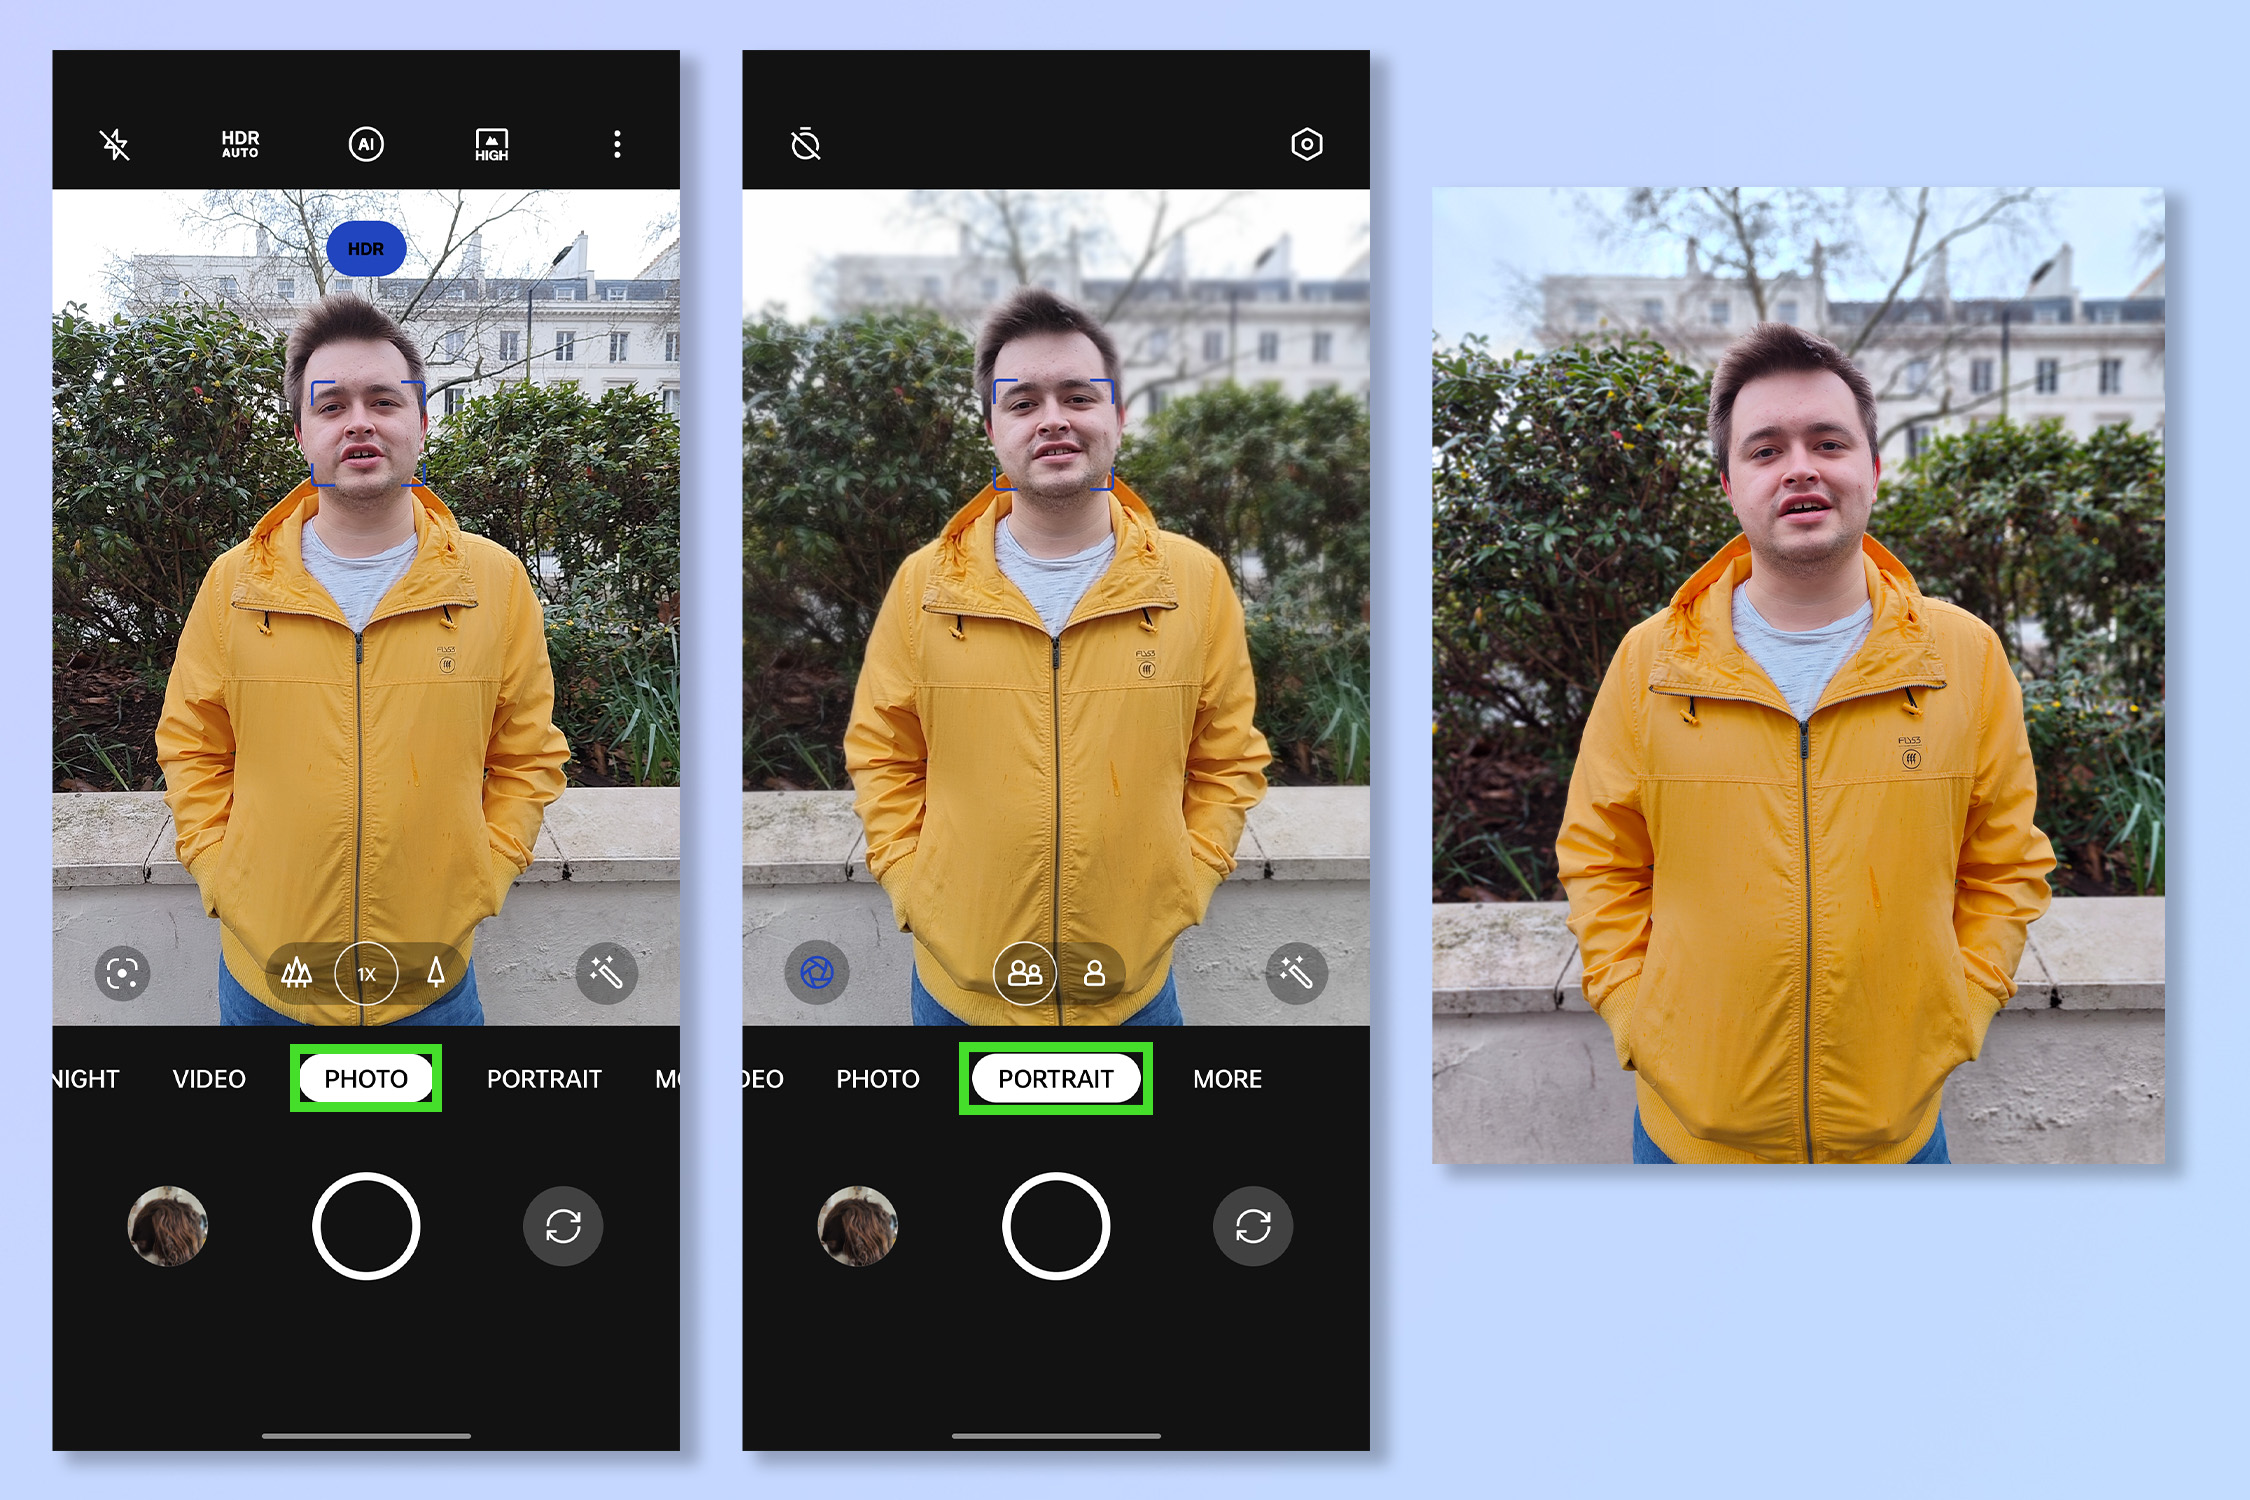
If you’re looking to take pictures of people, particularly individuals, then portrait mode is essential. This feature artificially blurs the background of a shot to get the awesome ‘bokeh’ effect, meaning that the person in shot is isolated from their background and really pops. If you’re looking for a new profile picture or ID card, this is the setting to use on your phone.
To enable Portrait mode, open the camera app and then tap Portrait, then take the shot as usual.
9. Enable RAW mode
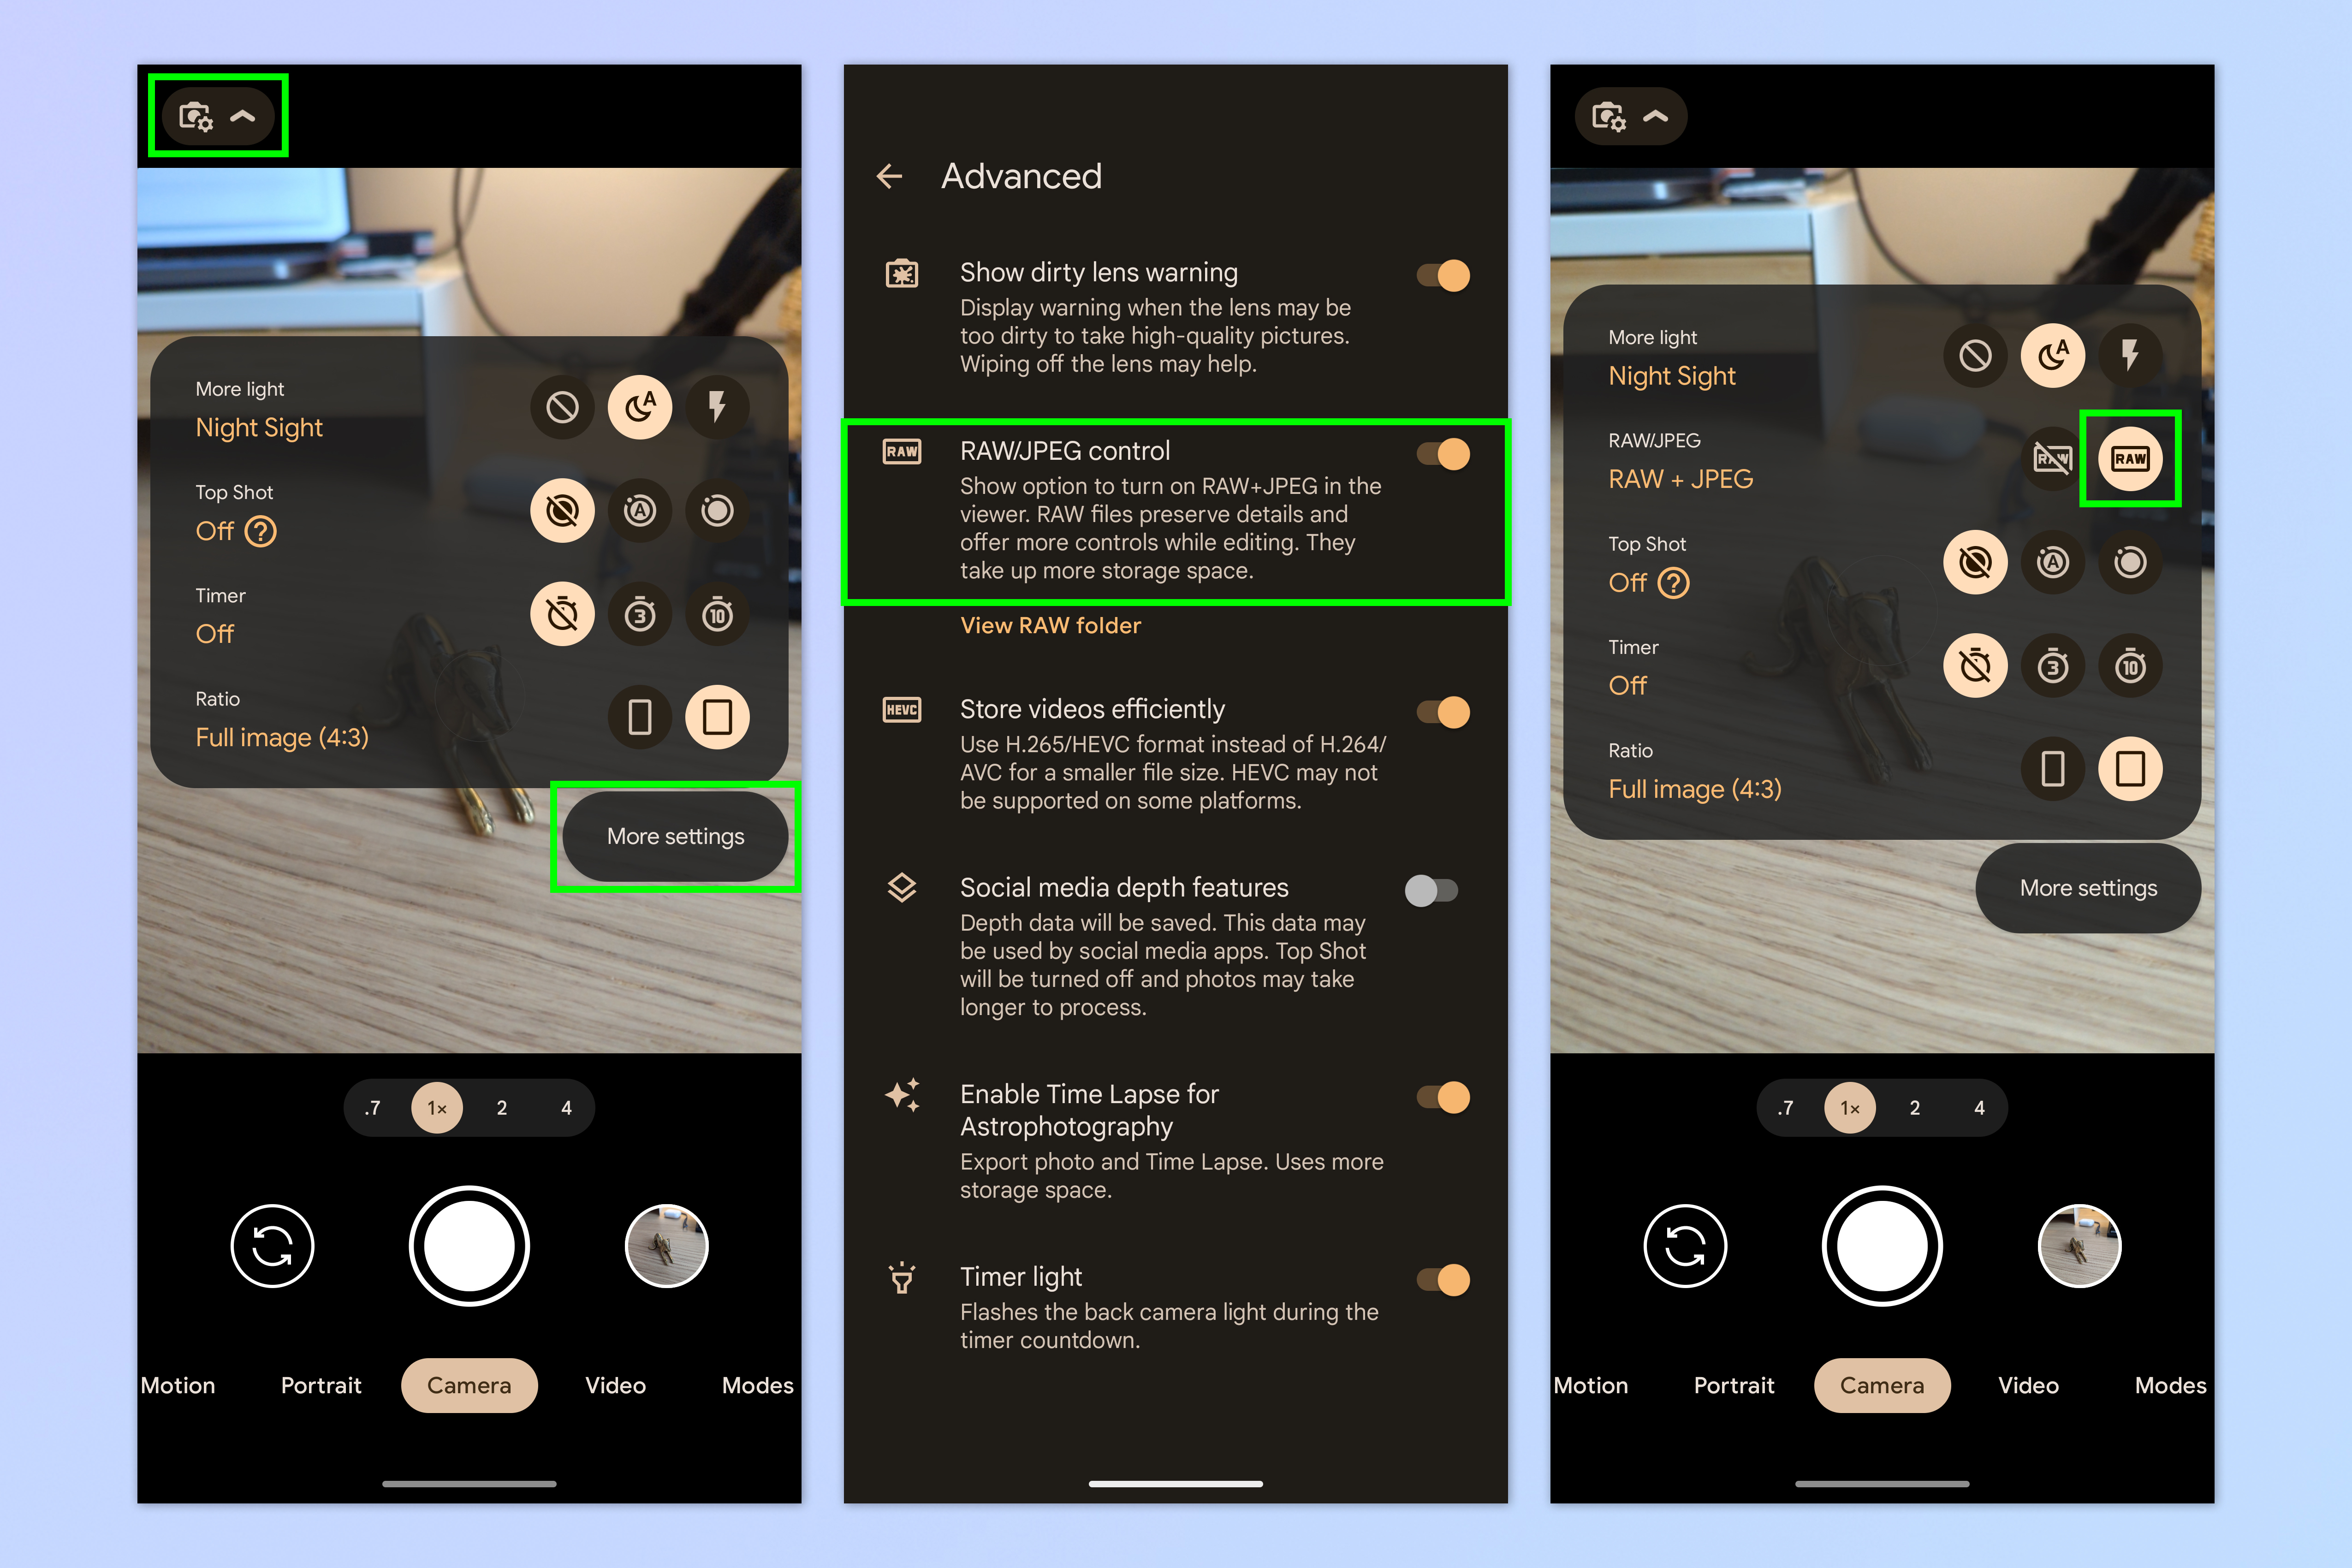
Unlike JPEGs, RAW photos are uncompressed and free from in-camera processing. While the latter results in RAW images at first appearing duller than regular images, the aim is to edit them later. See, RAW files contain more image data, allowing for higher image quality and greater flexibility when editing them later on. RAW photos are, however, considerably larger than their regular counterparts, so keep an eye on your storage when shooting in this mode and consider investing in one of the best cloud storage services for photos. Most phones with RAW mode enabled will give you the option (or perhaps only allow you) to take both a JPEG and RAW version on each shot, further increasing the storage you’ll use.
Right, now you’re all set up, go and take some pictures! To reset your camera to default and undo any changes you've made, open the Camera app, tap Settings and then tap Restore defaults (steps and wording may vary slightly between devices).
If you think you might need a hardware upgrade first check out the best camera phones to help take some pictures to be proud of. If you’re looking to become an Android know-it-all then take a look at how to transfer data from Android to Android, how to check Android battery health, or read these Android features you should be using to become the ultimate power user.
Sign up to get the BEST of Tom's Guide direct to your inbox.
Get instant access to breaking news, the hottest reviews, great deals and helpful tips.
Andy is a freelance writer with a passion for streaming and VPNs. Based in the U.K., he originally cut his teeth at Tom's Guide as a Trainee Writer before moving to cover all things tech and streaming at T3. Outside of work, his passions are movies, football (soccer) and Formula 1. He is also something of an amateur screenwriter having studied creative writing at university.
