10 iPhone camera tips that will make you a better photographer
iPhone photographer? These are the hidden features you need to know
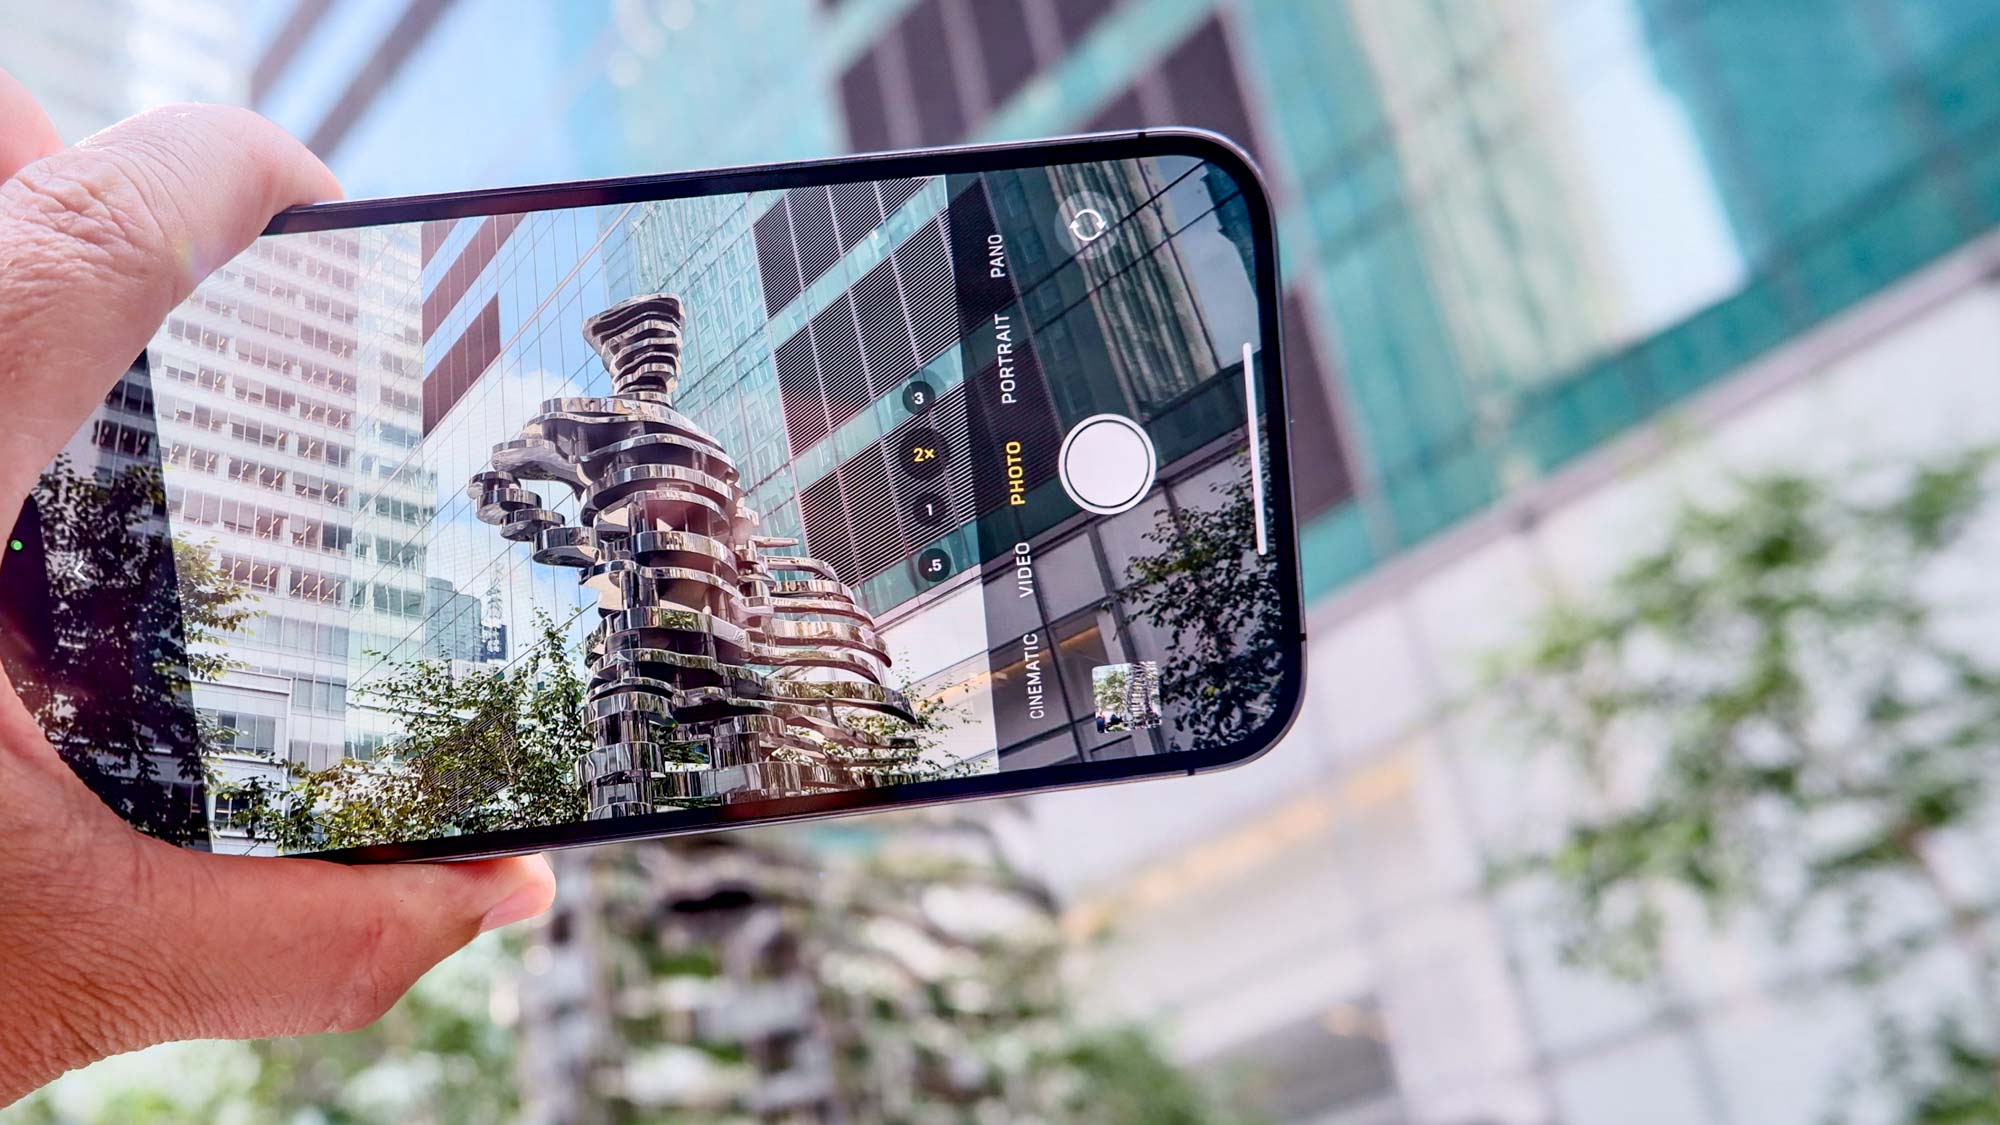
iPhones are known for being among the best camera phones around. And it's partially because they pack in so many camera features to help you take better shots.
A lot of these features are hidden within settings menus, or their uses aren't obvious, so we've decided to round up our favorites here, as a sort of one-stop-shop to help you improve your iPhone photography.
While you may know about some of the features below already, we're willing to bet at least one or two will be new to you. So read on to see 10 iPhone camera features that will make you a better photographer.
10 iPhone camera features to make you a better photographer
Note: some of these features are currently only found on the iPhone 14 Pro and iPhone 14 Pro Max. We'll highlight where that's the case, and have also made sure to include plenty of features available on older models.
1. Take photos in ProRAW format
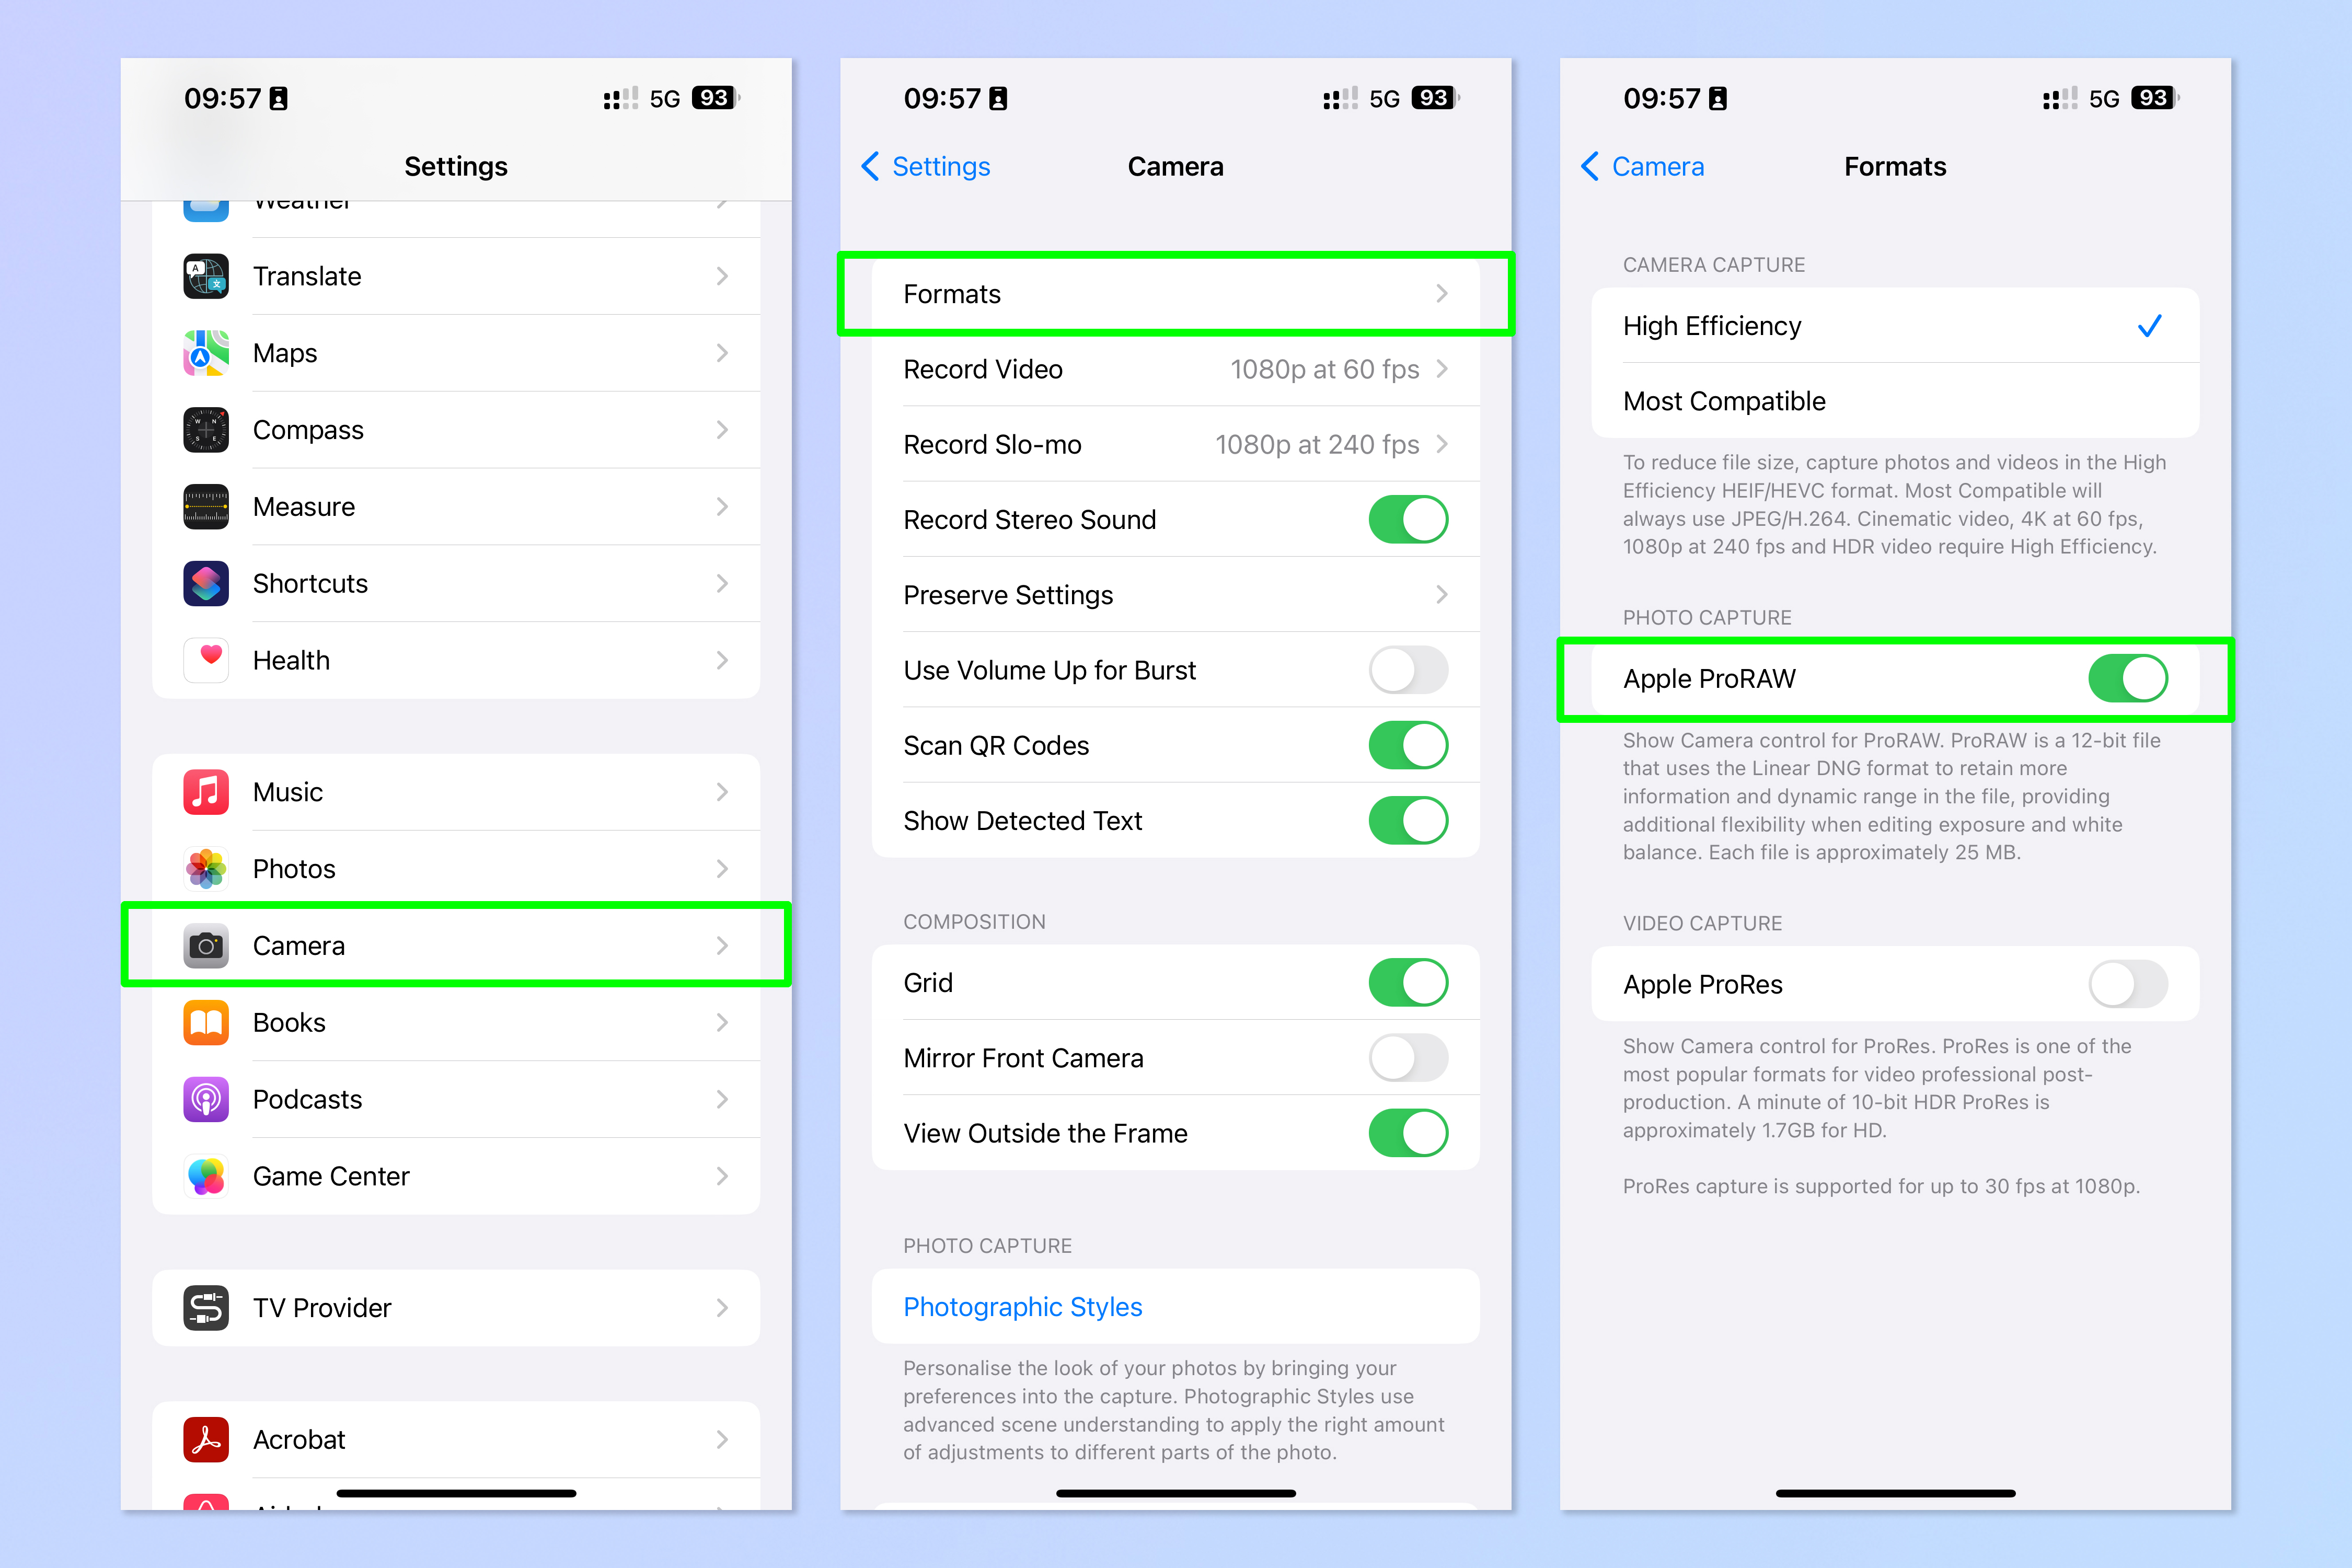
By default, your iPhone takes photos in Apple's HEIC format. This format is great for saving space, but like a JPEG, it compresses the image and gives you less flexibility to adjust the exposure and color of the image in post production. If you like to edit your photos in one of the best photo editing apps, you'll definitely want to know how to take RAW photos on iPhone. RAW photos in Apple's ProRAW format are uncompressed, giving you much more flexibility in the edit. Be warned though, this makes your image file sizes much larger, especially on the 48MP iPhone 14 Pro and Pro Max.
To shoot in ProRAW format:
1. Open Settings and tap Camera, then tap Formats and toggle on Apple ProRAW.
Sign up to get the BEST of Tom's Guide direct to your inbox.
Get instant access to breaking news, the hottest reviews, great deals and helpful tips.
2. Shoot at maximum resolution
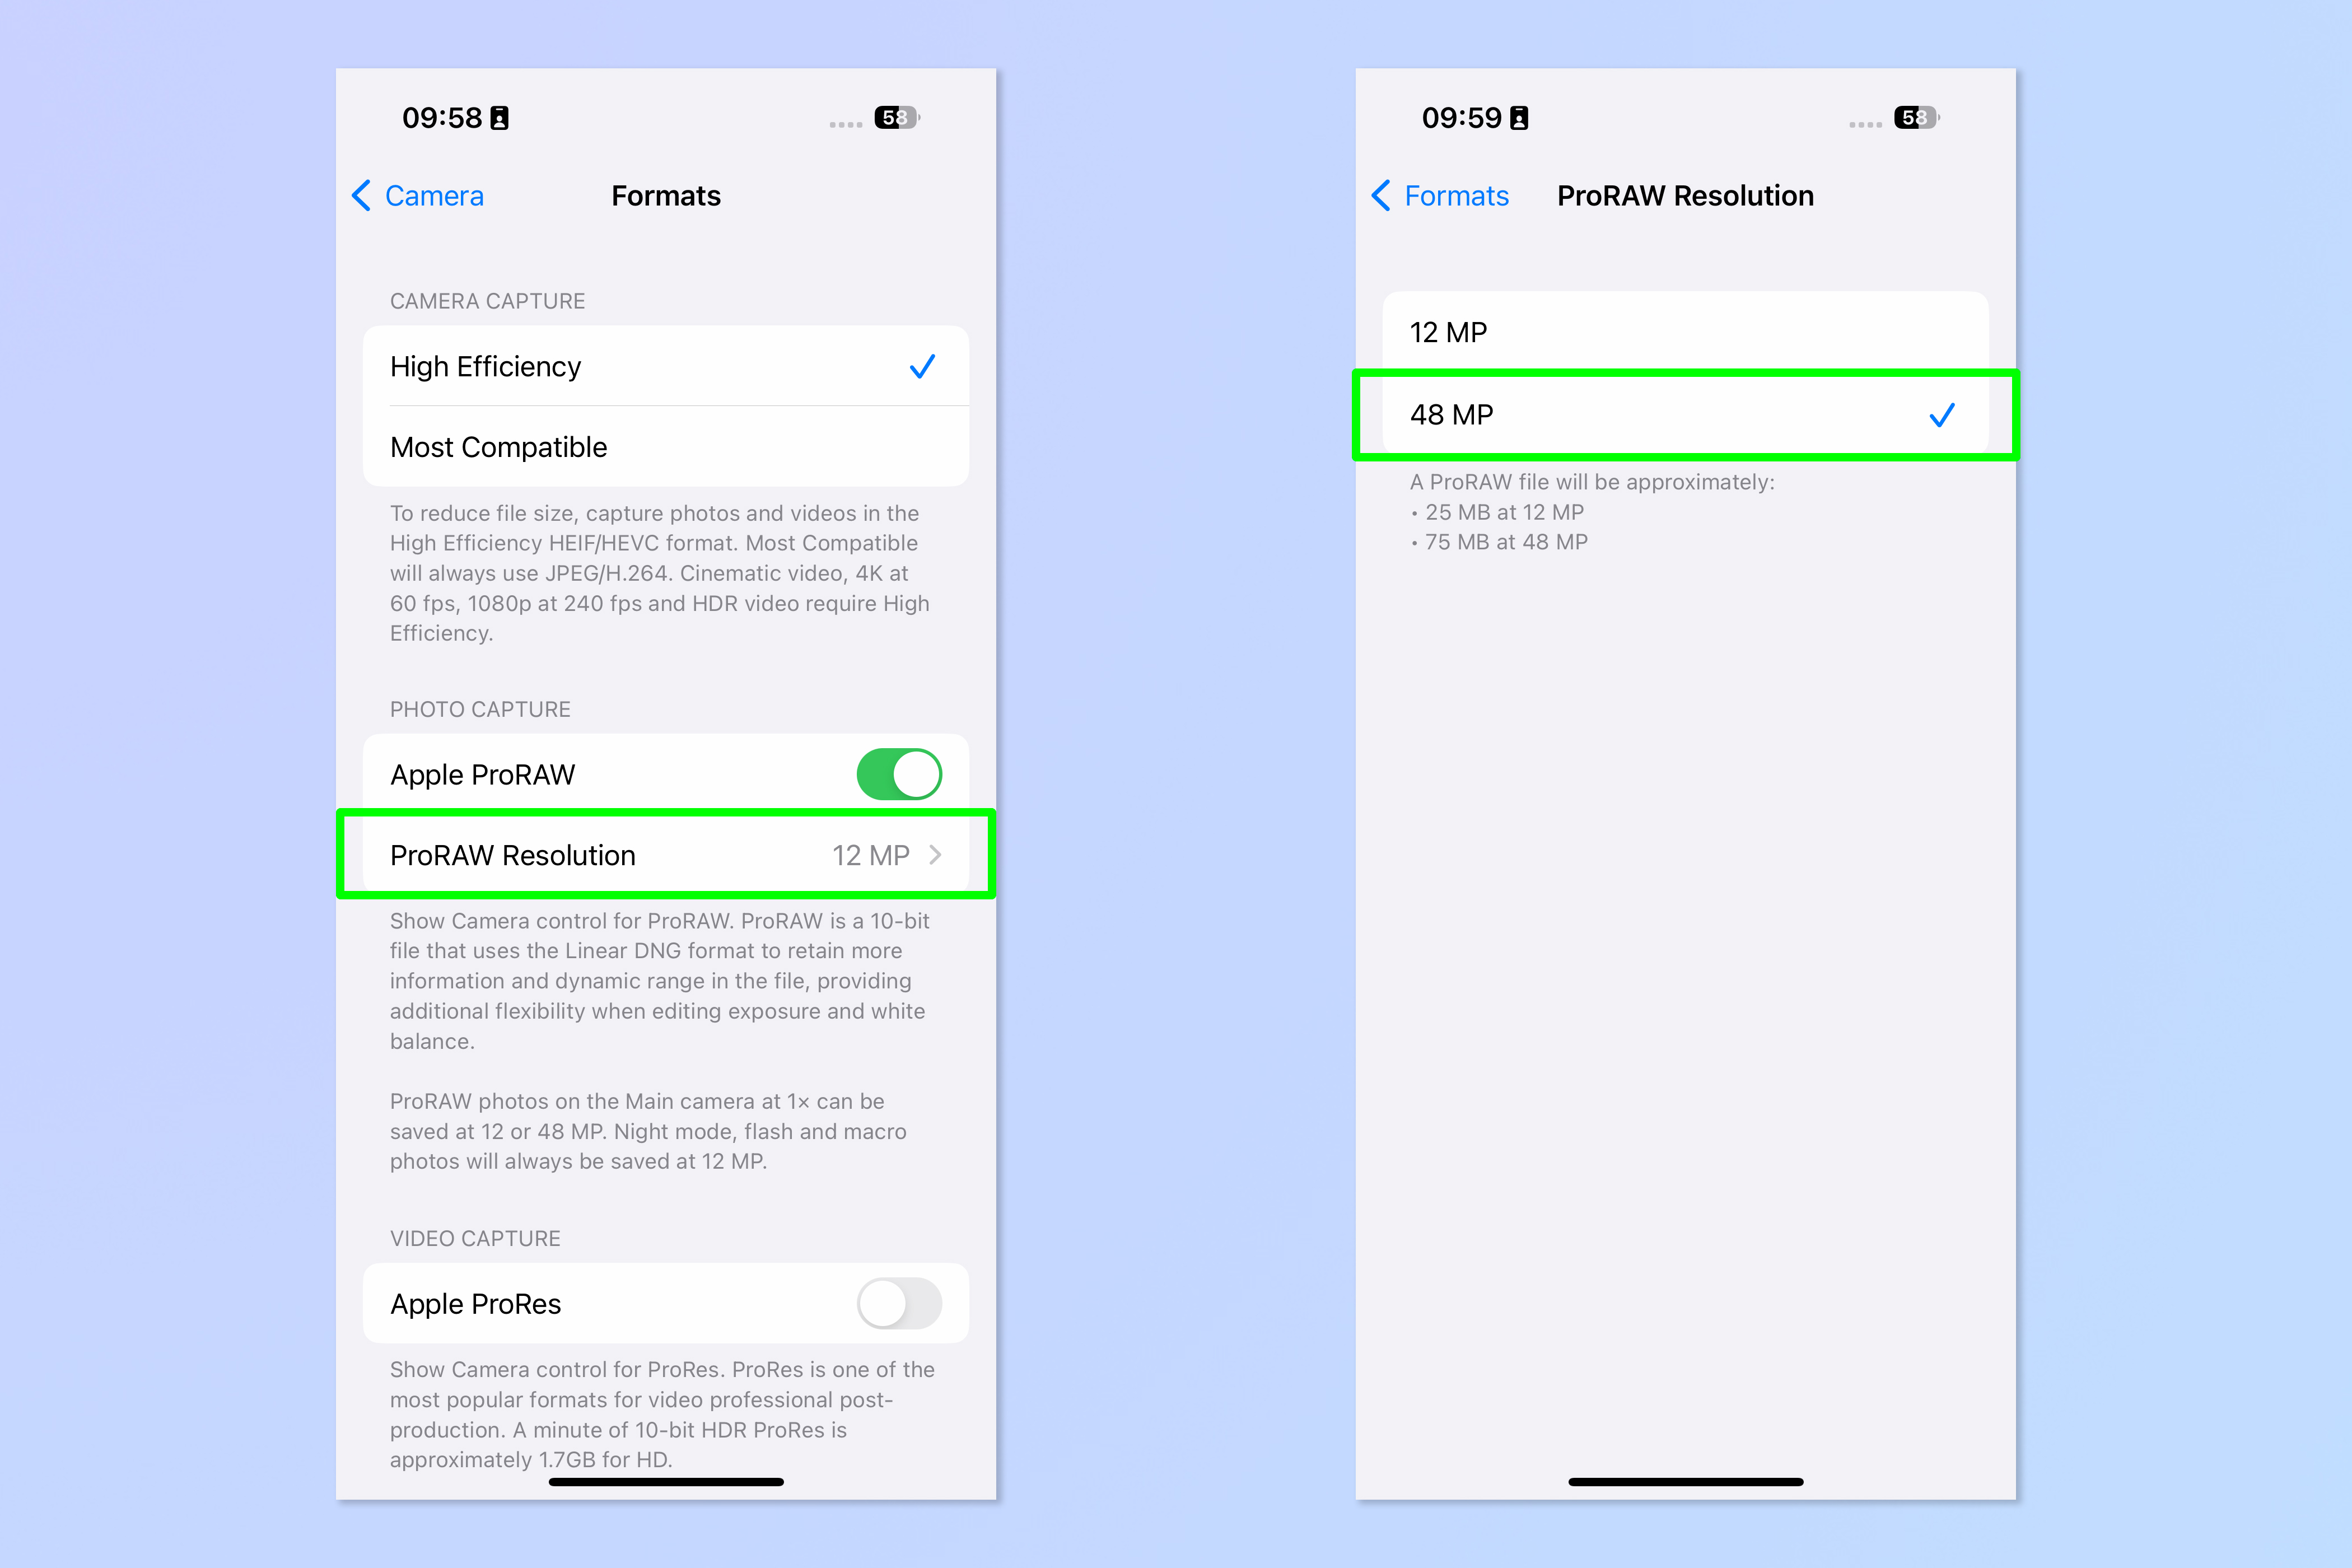
If you're using an iPhone 14 Pro and shooting in ProRAW, you'll want to use the maximum resolution of the 48MP sensor. By default, your iPhone will be using 12MP when shooting in ProRAW. When you set your iPhone to capture 48MP, you'll capture much more detail in your photos. As well as producing sharper images, this will also let you crop into photos more without losing detail, again giving you more flexibility when editing.
To shoot at 48MP on the iPhone 14 Pro:
1. Enable ProRAW using the steps above.
2. Now tap ProRAW Resolution, then tap 48MP.
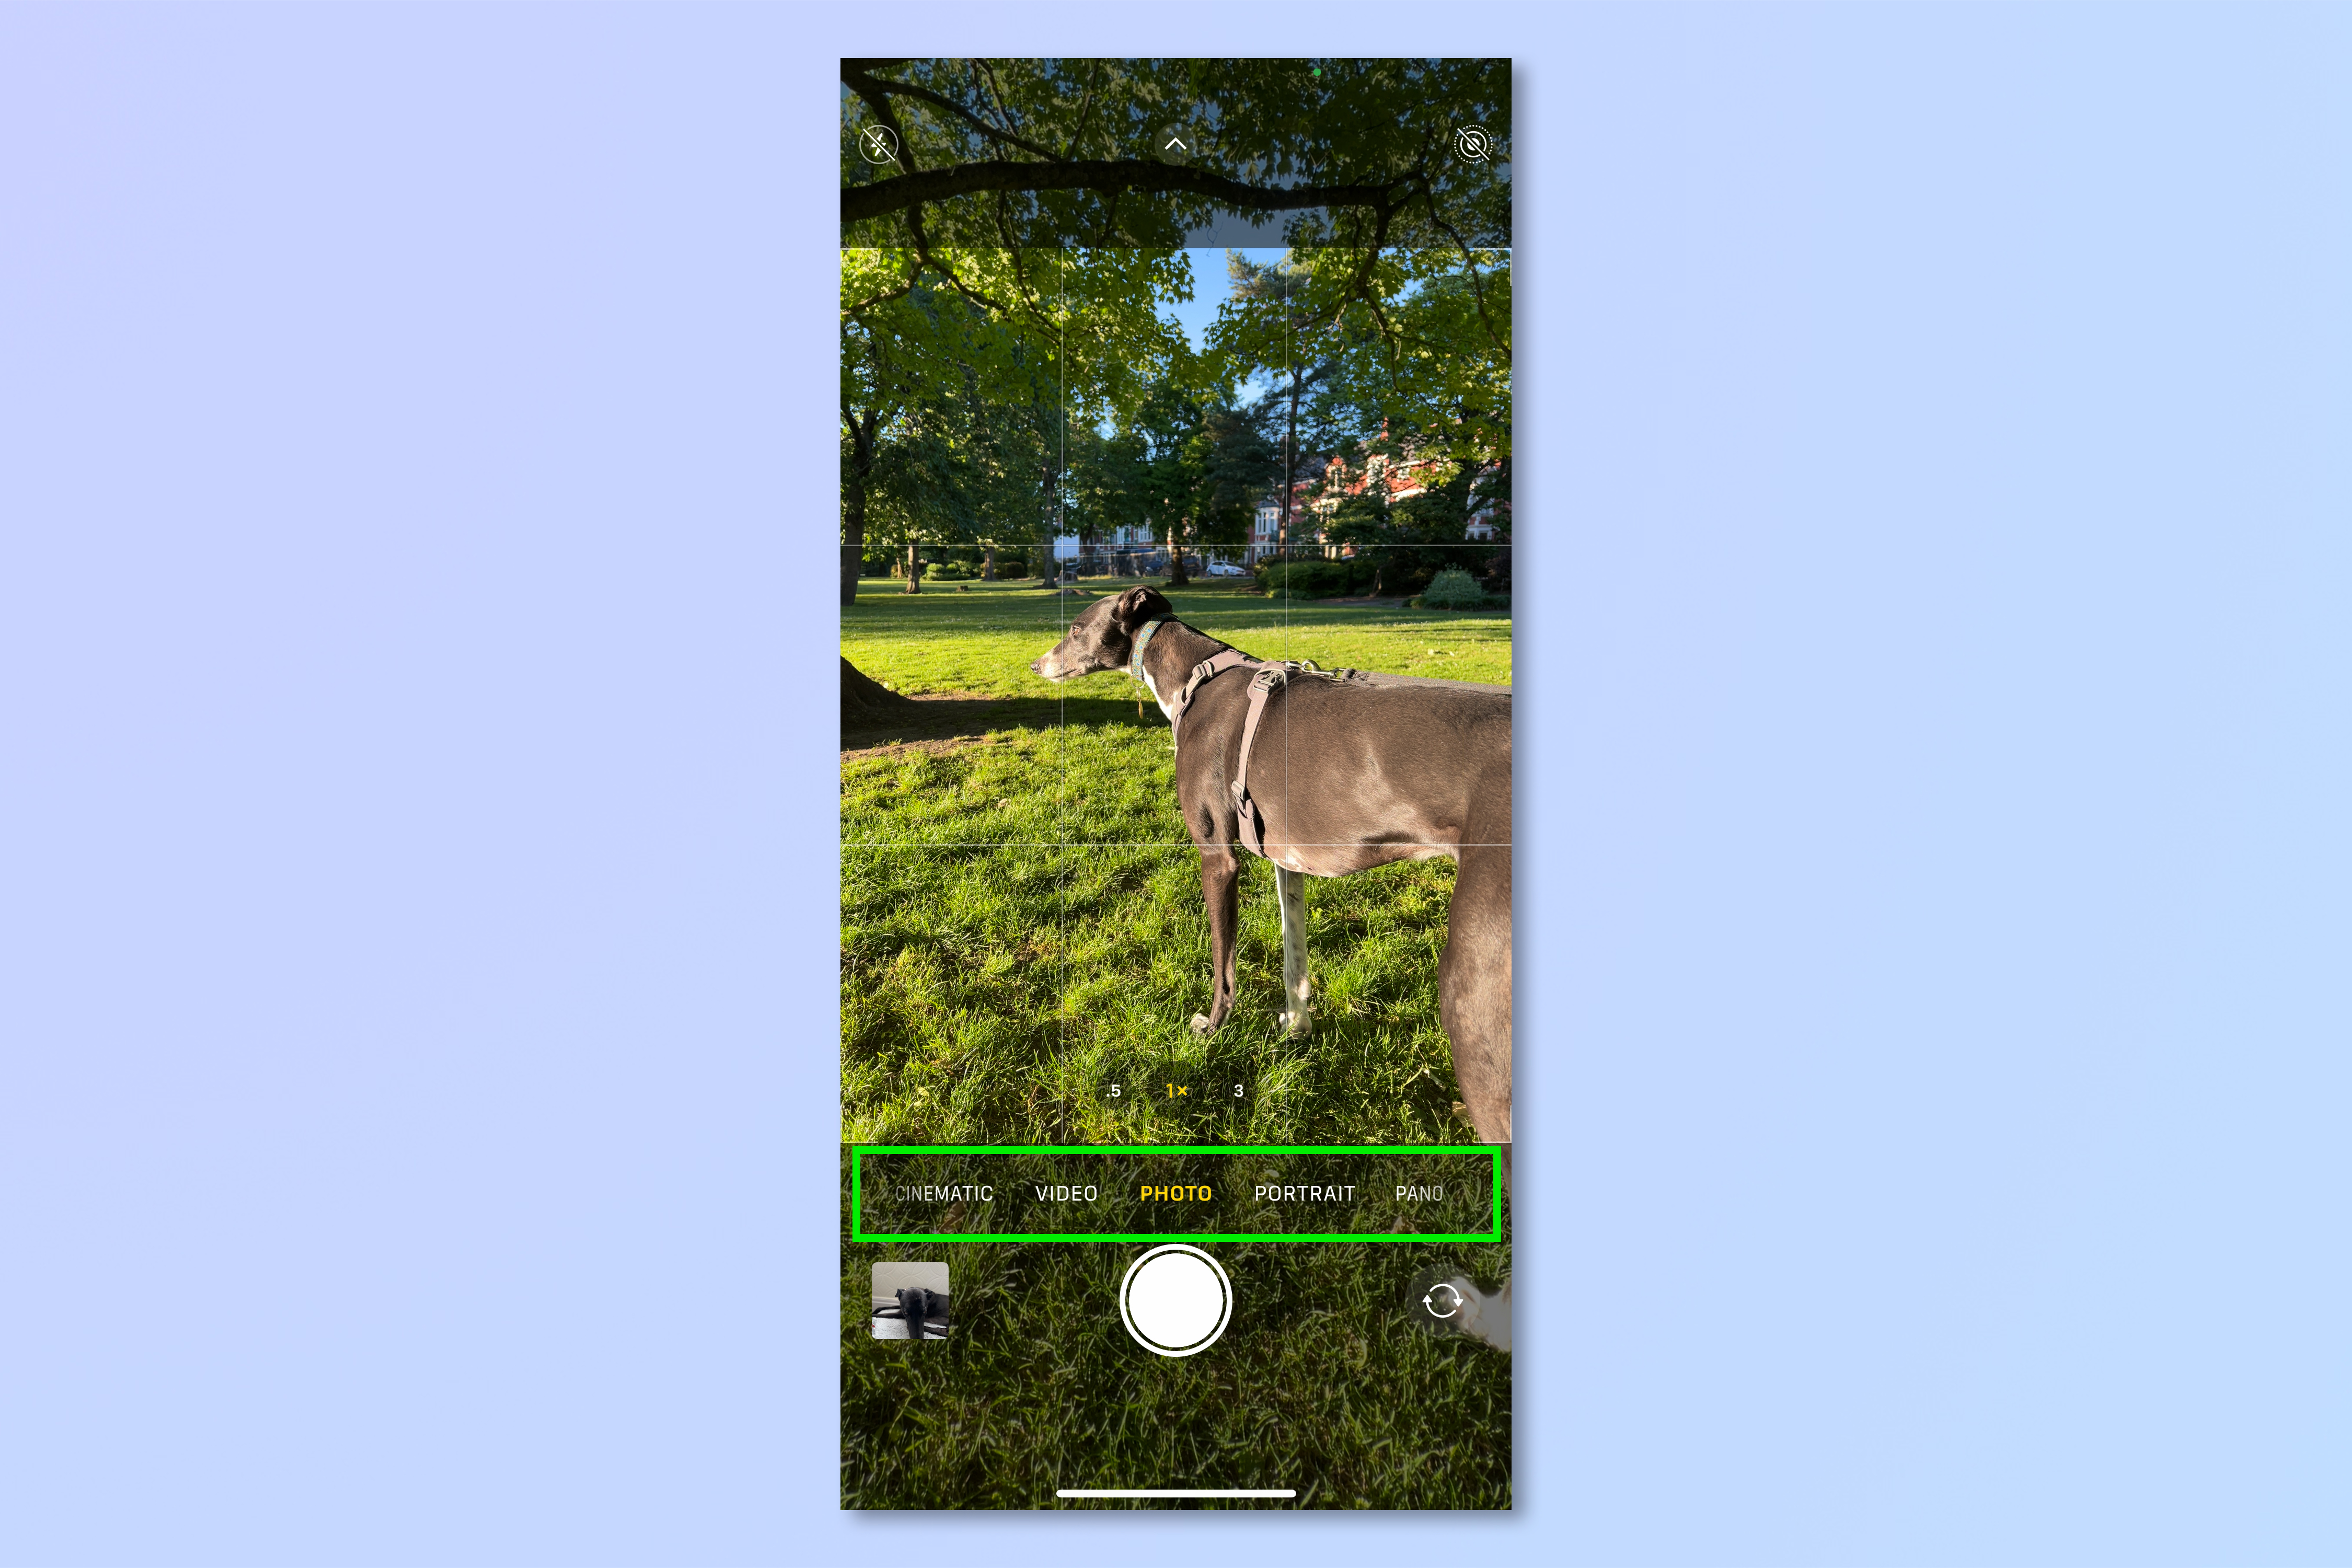
3. Use Portrait mode for (you guessed it) portraits
You probably already know that your iPhone has a dedicated mode for shooting portraits which. But do you actually use it? It's easy to forget to switch to Portrait mode when you whip out your iPhone to take a quick picture in the moment, but doing so can help you get much more flattering portraits and selfies.
To enable portrait mode:
1. Open the Camera app and swipe left to Portrait mode.
4. Control depth of field in Portrait mode
Once you've got Portrait mode enabled, it makes sense to use its features. Probably the most dramatic effect you can apply in portrait mode is a thin depth of field. This isolates your subject by blurring the background, ensuring all the focus is on them. You're not actually changing the depth of field by reducing aperture — your iPhone is actually just applying blur — but the effect on the end result is similar, and makes for more professional looking portraits.
To apply a thin depth of field to a portrait:
1. Switch to Portrait Mode using the steps above.
2. Tap the f icon, top right, and adjust the slider to control the blur.
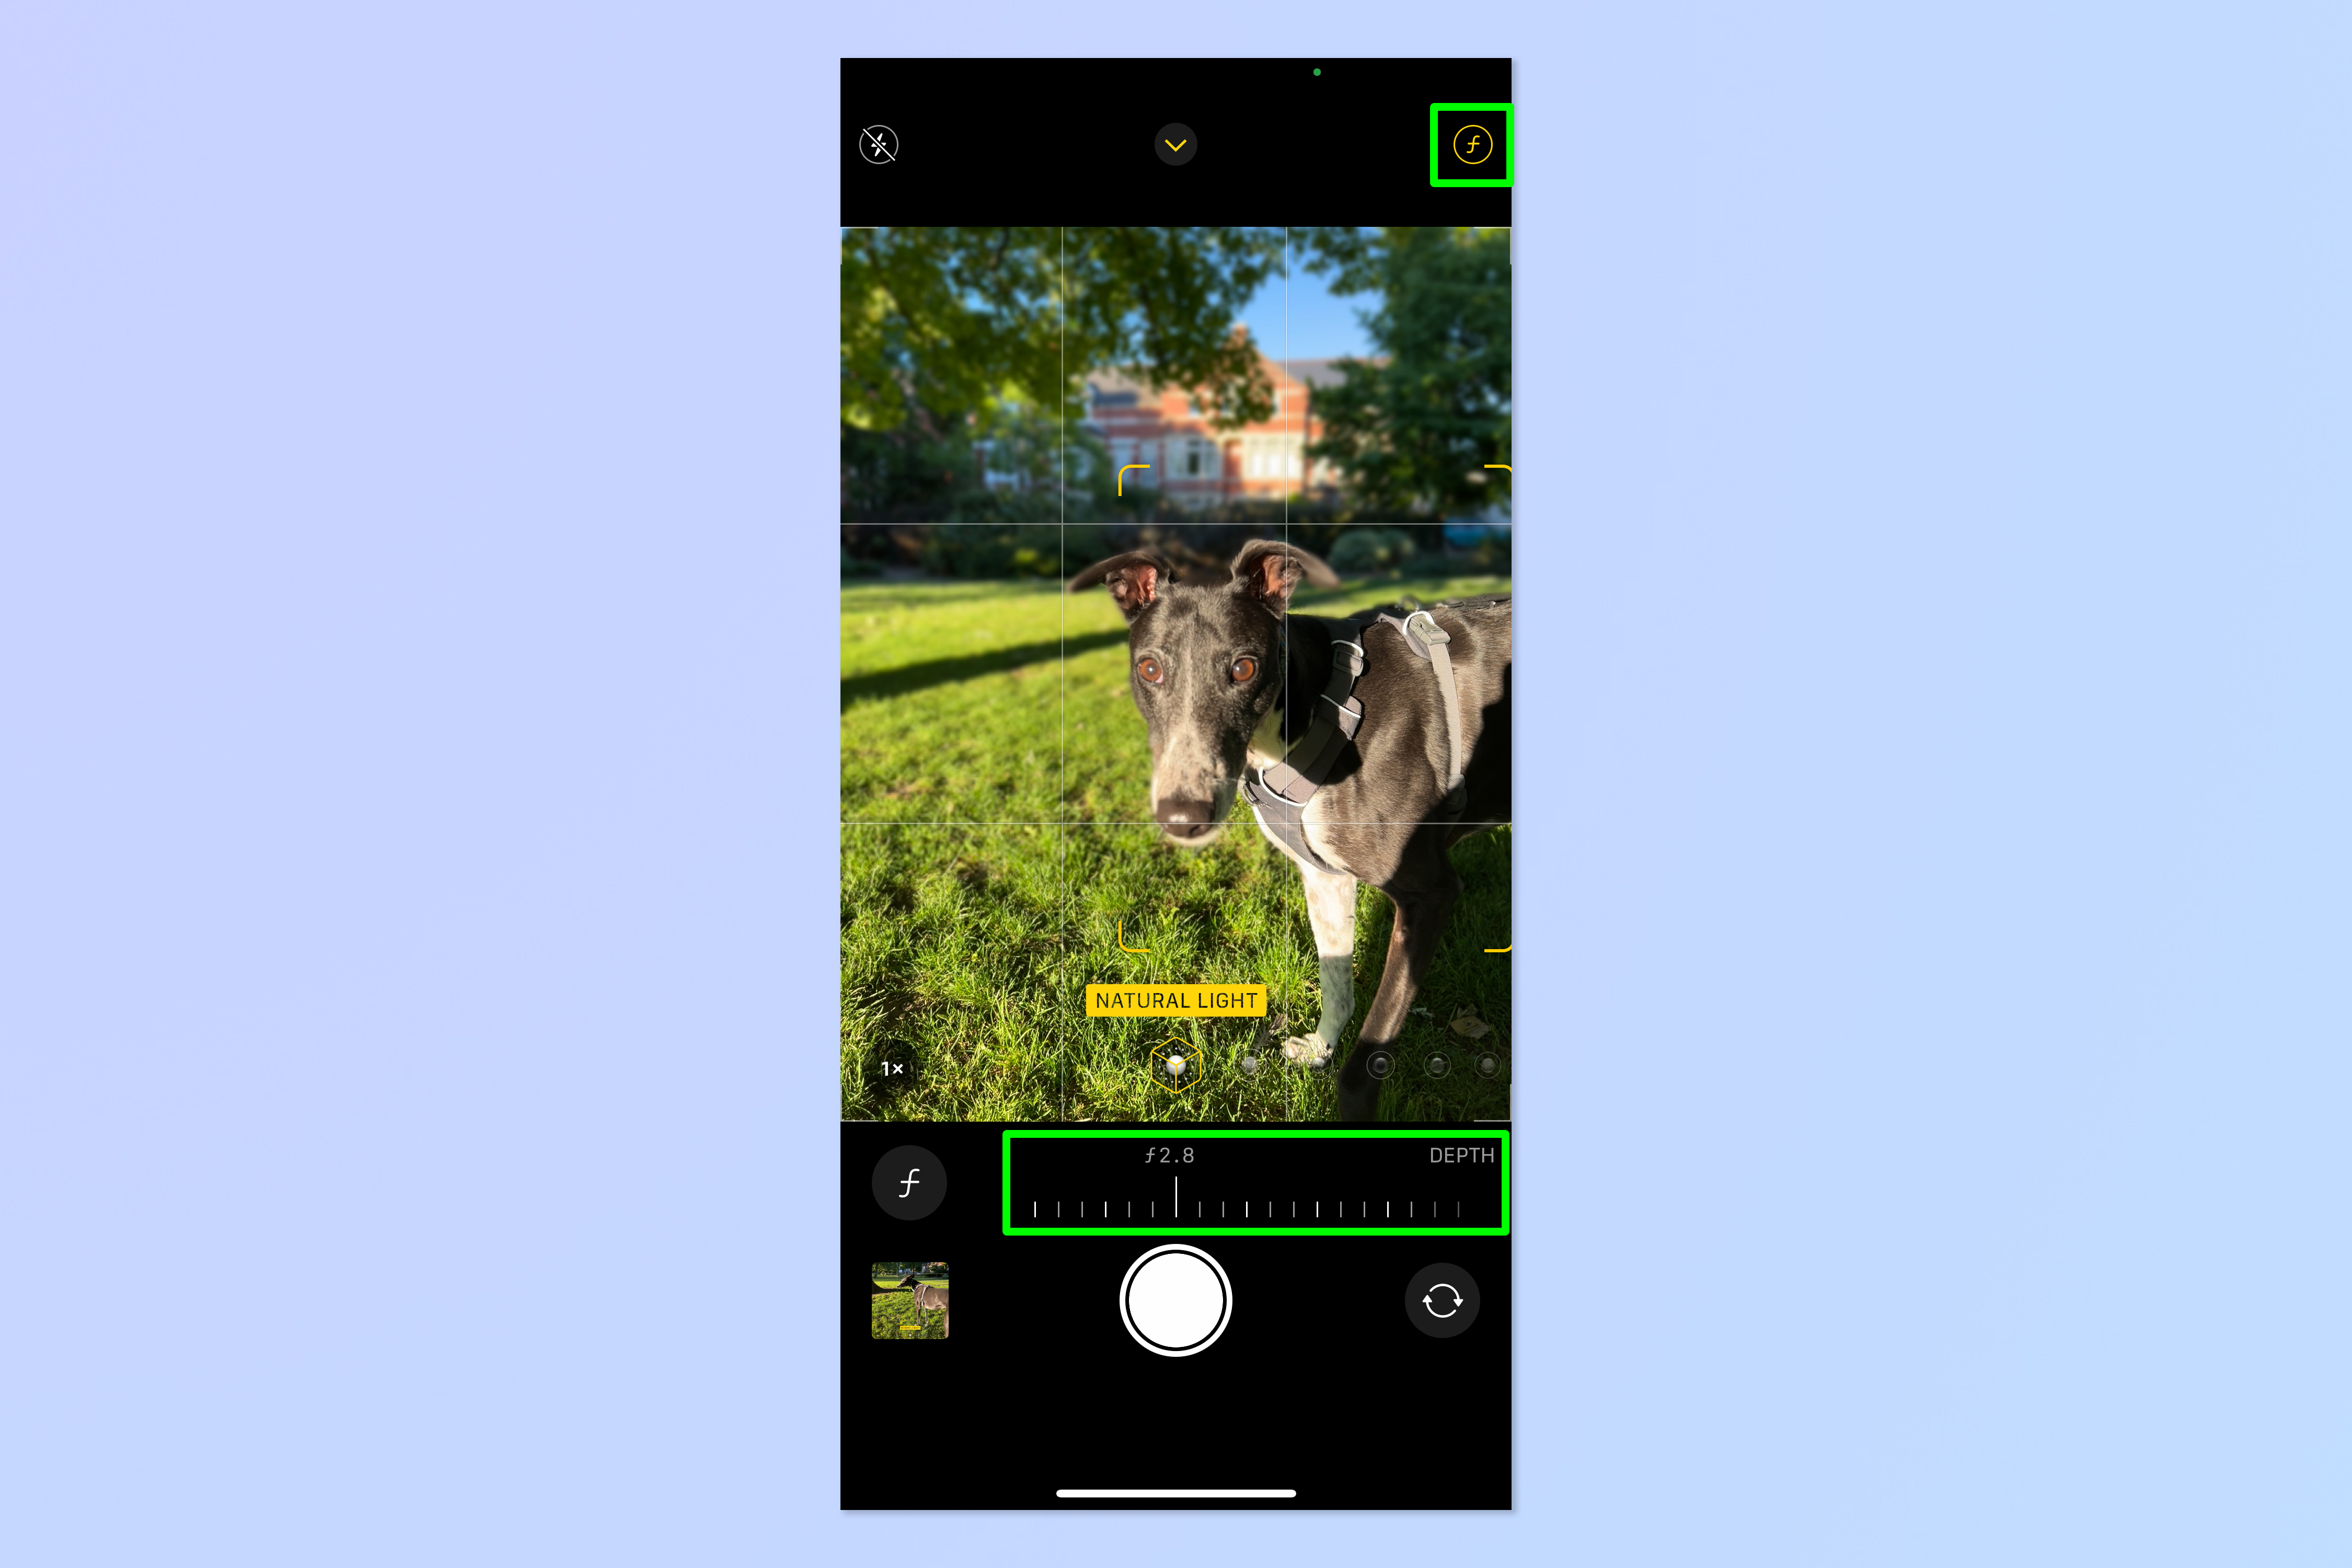
Read our full guide on how to blur the background of iPhone photos.
5. Use Portrait lighting
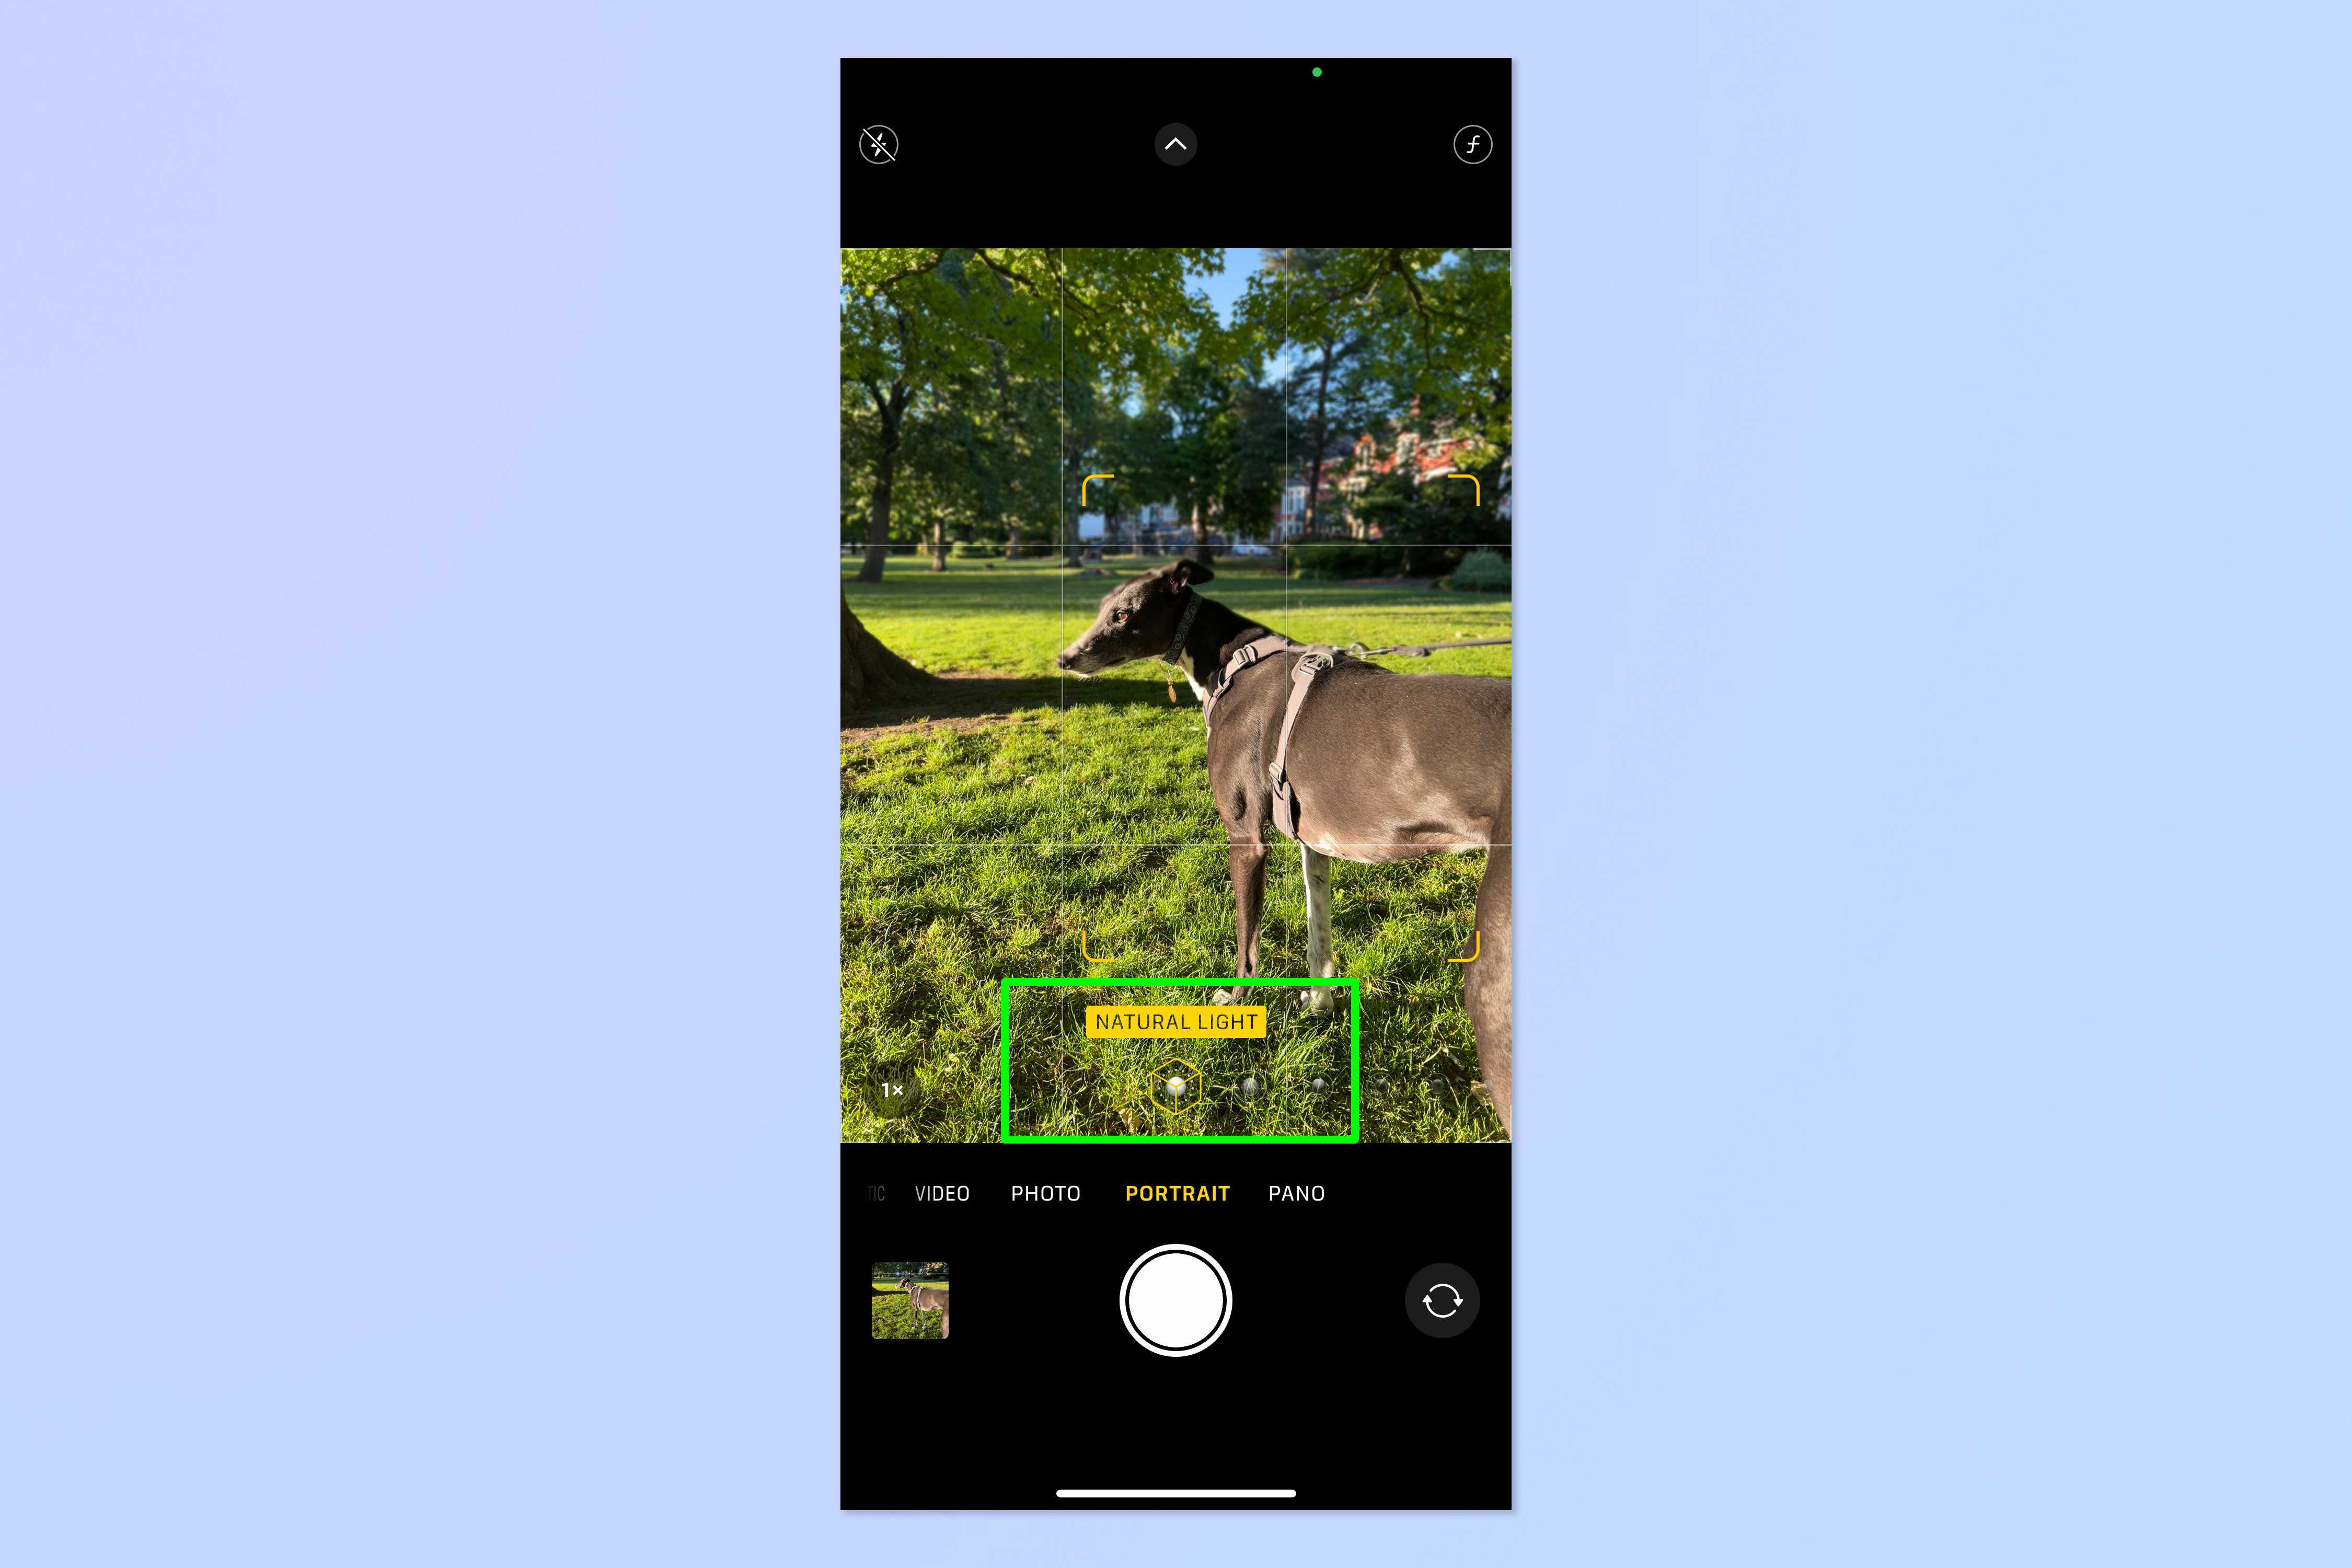
Another huge change you can make to your portraits is to alter the lighting effects. In Portrait mode, your iPhone lets you select different lighting modes to control the mood and atmosphere of your images. These range from brightening facial features, to applying dramatic shadows and isolating your subject with a stage light.
To use Portrait lighting:
1. Switch to Portrait Mode using the steps above.
2. Tap Natural Light to open the lighting panel and tap a lighting style.
6. Mirror the selfie camera
Ever noticed that your iPhone selfies look a little different to how you look in the mirror? This is because your iPhone flips the image you take with the front camera. What you see in a selfie is the true representation of what you look like to others, but it may be a little weird given it's not what you see in the mirror.
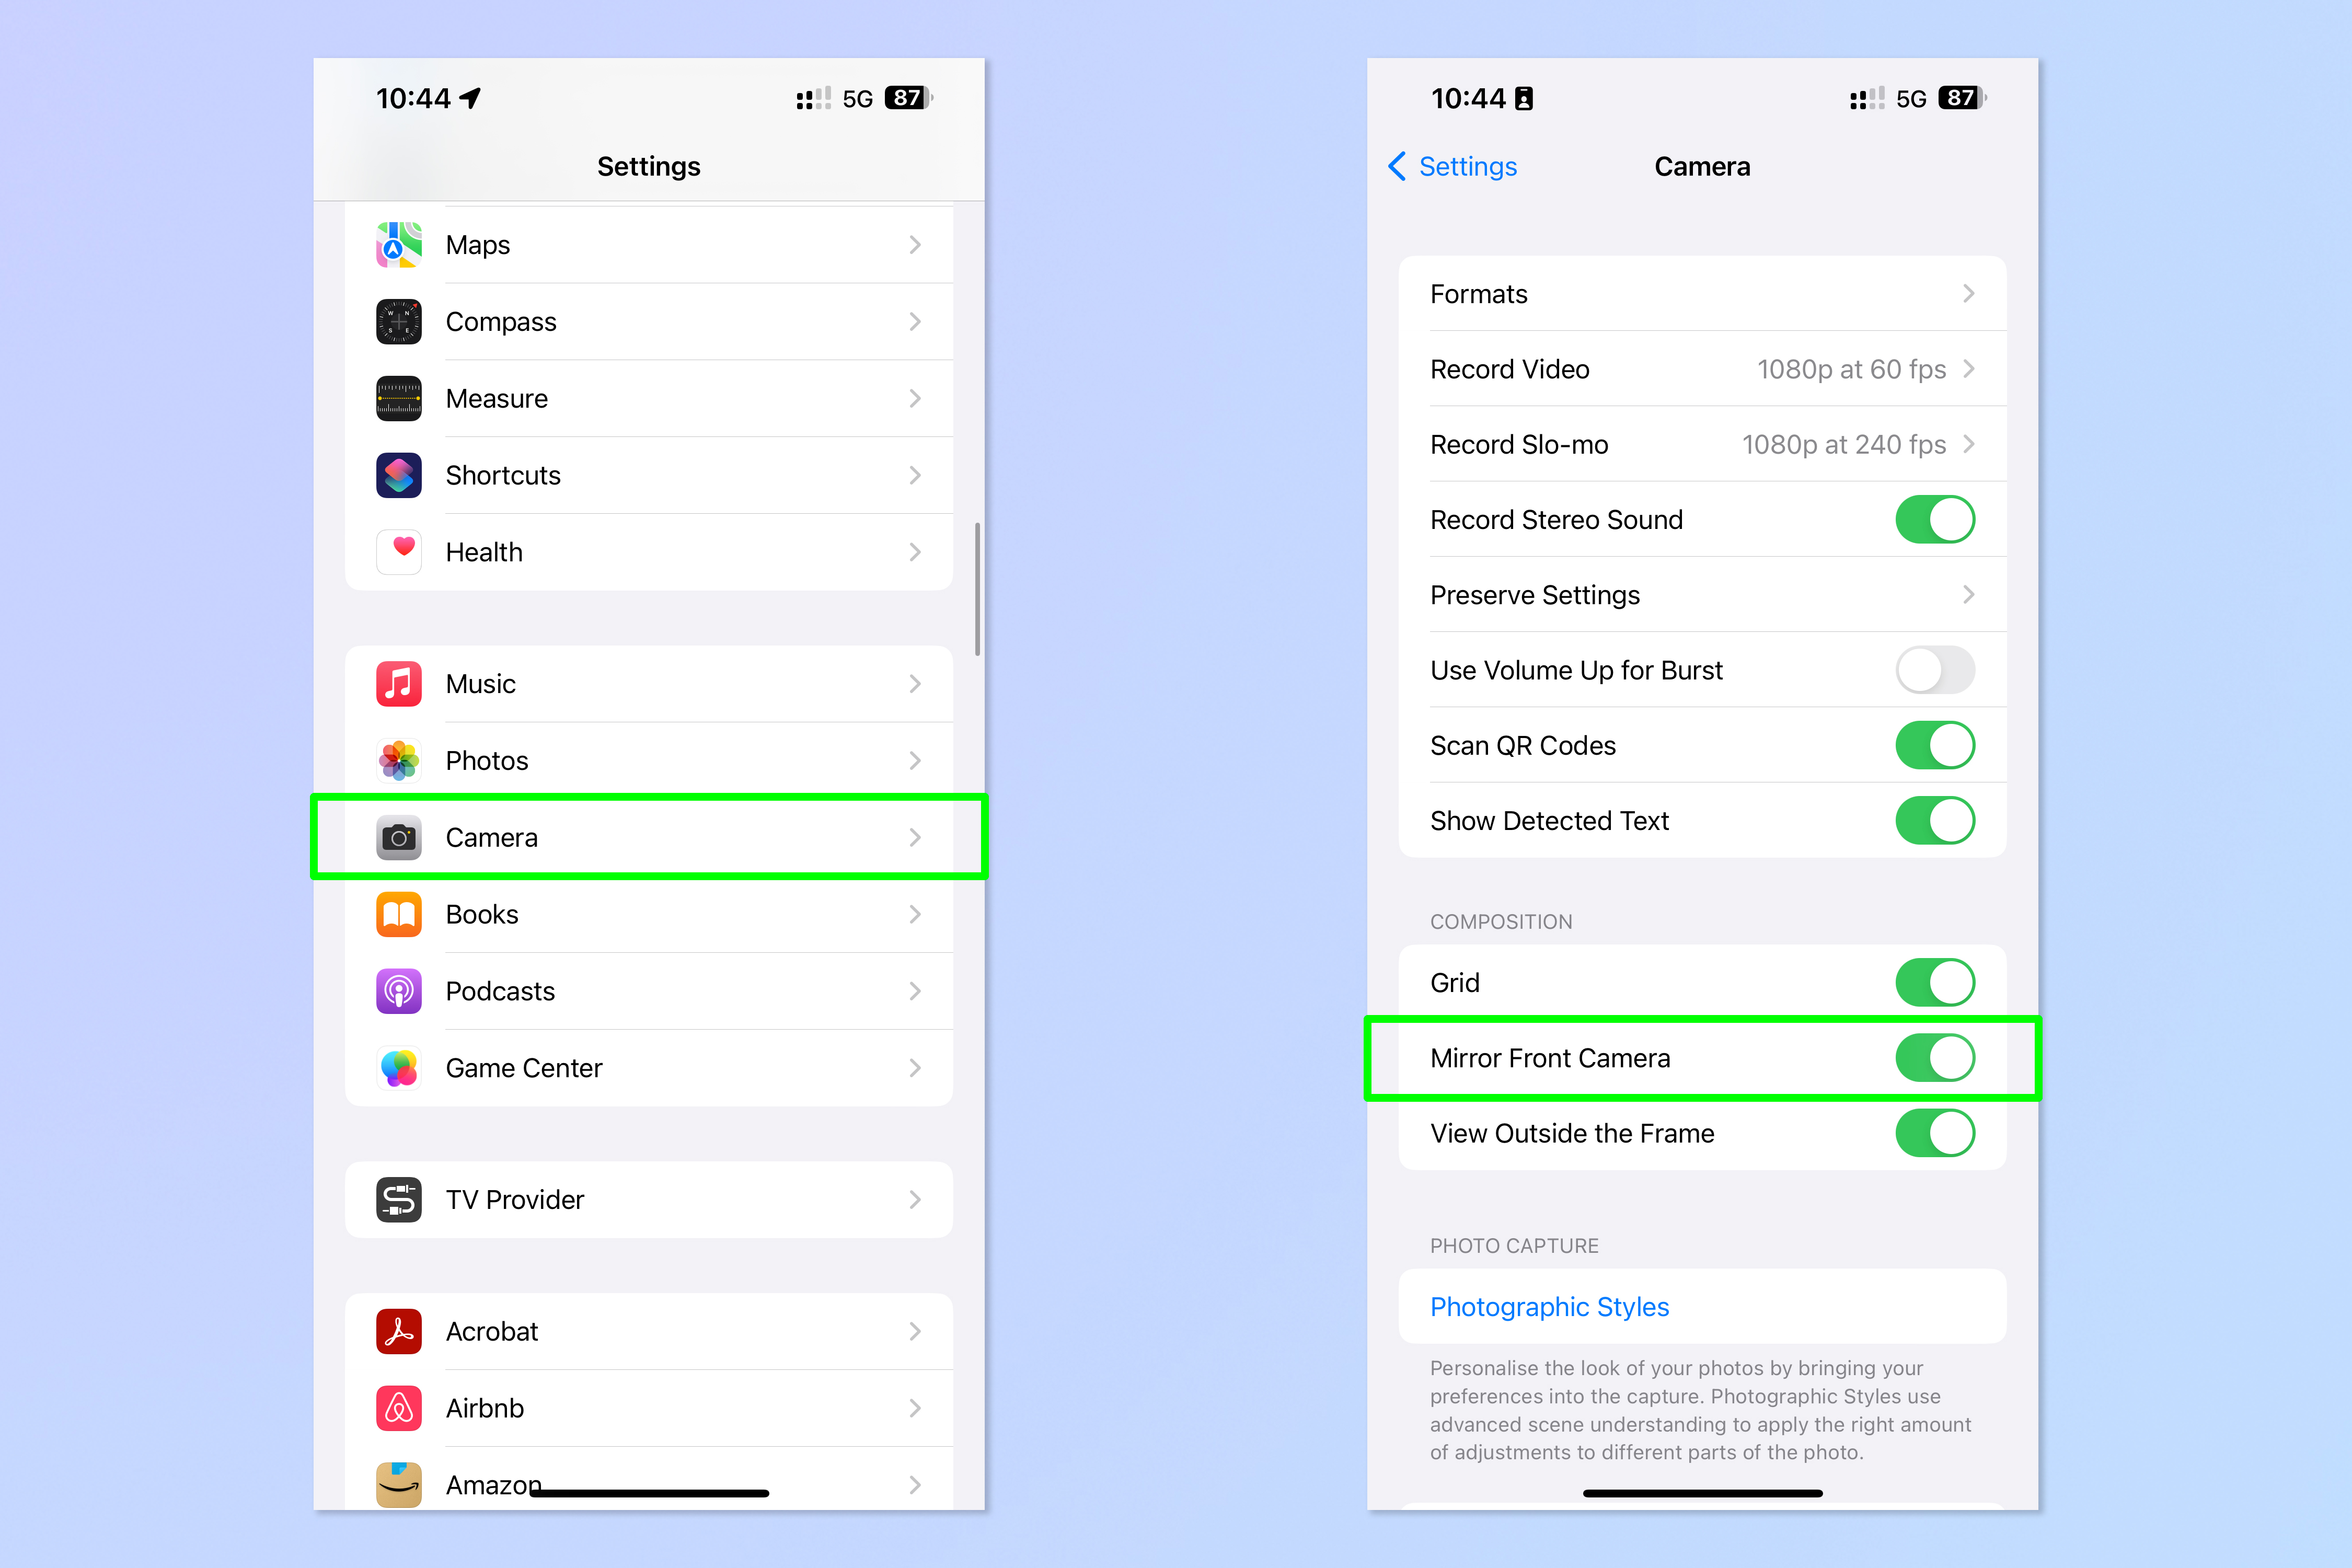
Flipping your selfies makes a big difference to the look of your them, and if you prefer the mirror version, you'll definitely want to learn how to mirror the front camera on iPhone.
To mirror your iPhone selfies:
1. Open Settings and tap Camera, then toggle on Mirror Front Camera.
7. Disable the automatic macro camera
The macro camera found on the iPhone 13 Pro and iPhone 14 Pro models is great for capturing close up detail. However, it does have a tendency to jump into macro mode when you don't want it to, restricting the control you have over your camera. Thankfully, you can disable the automatic macro camera by enabling Macro Control, which applies a button to your camera for you to toggle the auto macro camera. In effect this works like a macro toggle. Get close to a subject and toggle auto macro mode on and your iPhone will immediately switch to macro mode.
To disable the automatic macro camera:
1. Open Settings and tap Camera, then tap Macro Control.
2. In your Camera app, tap the macro button, bottom left, to toggle auto macro mode on and off.
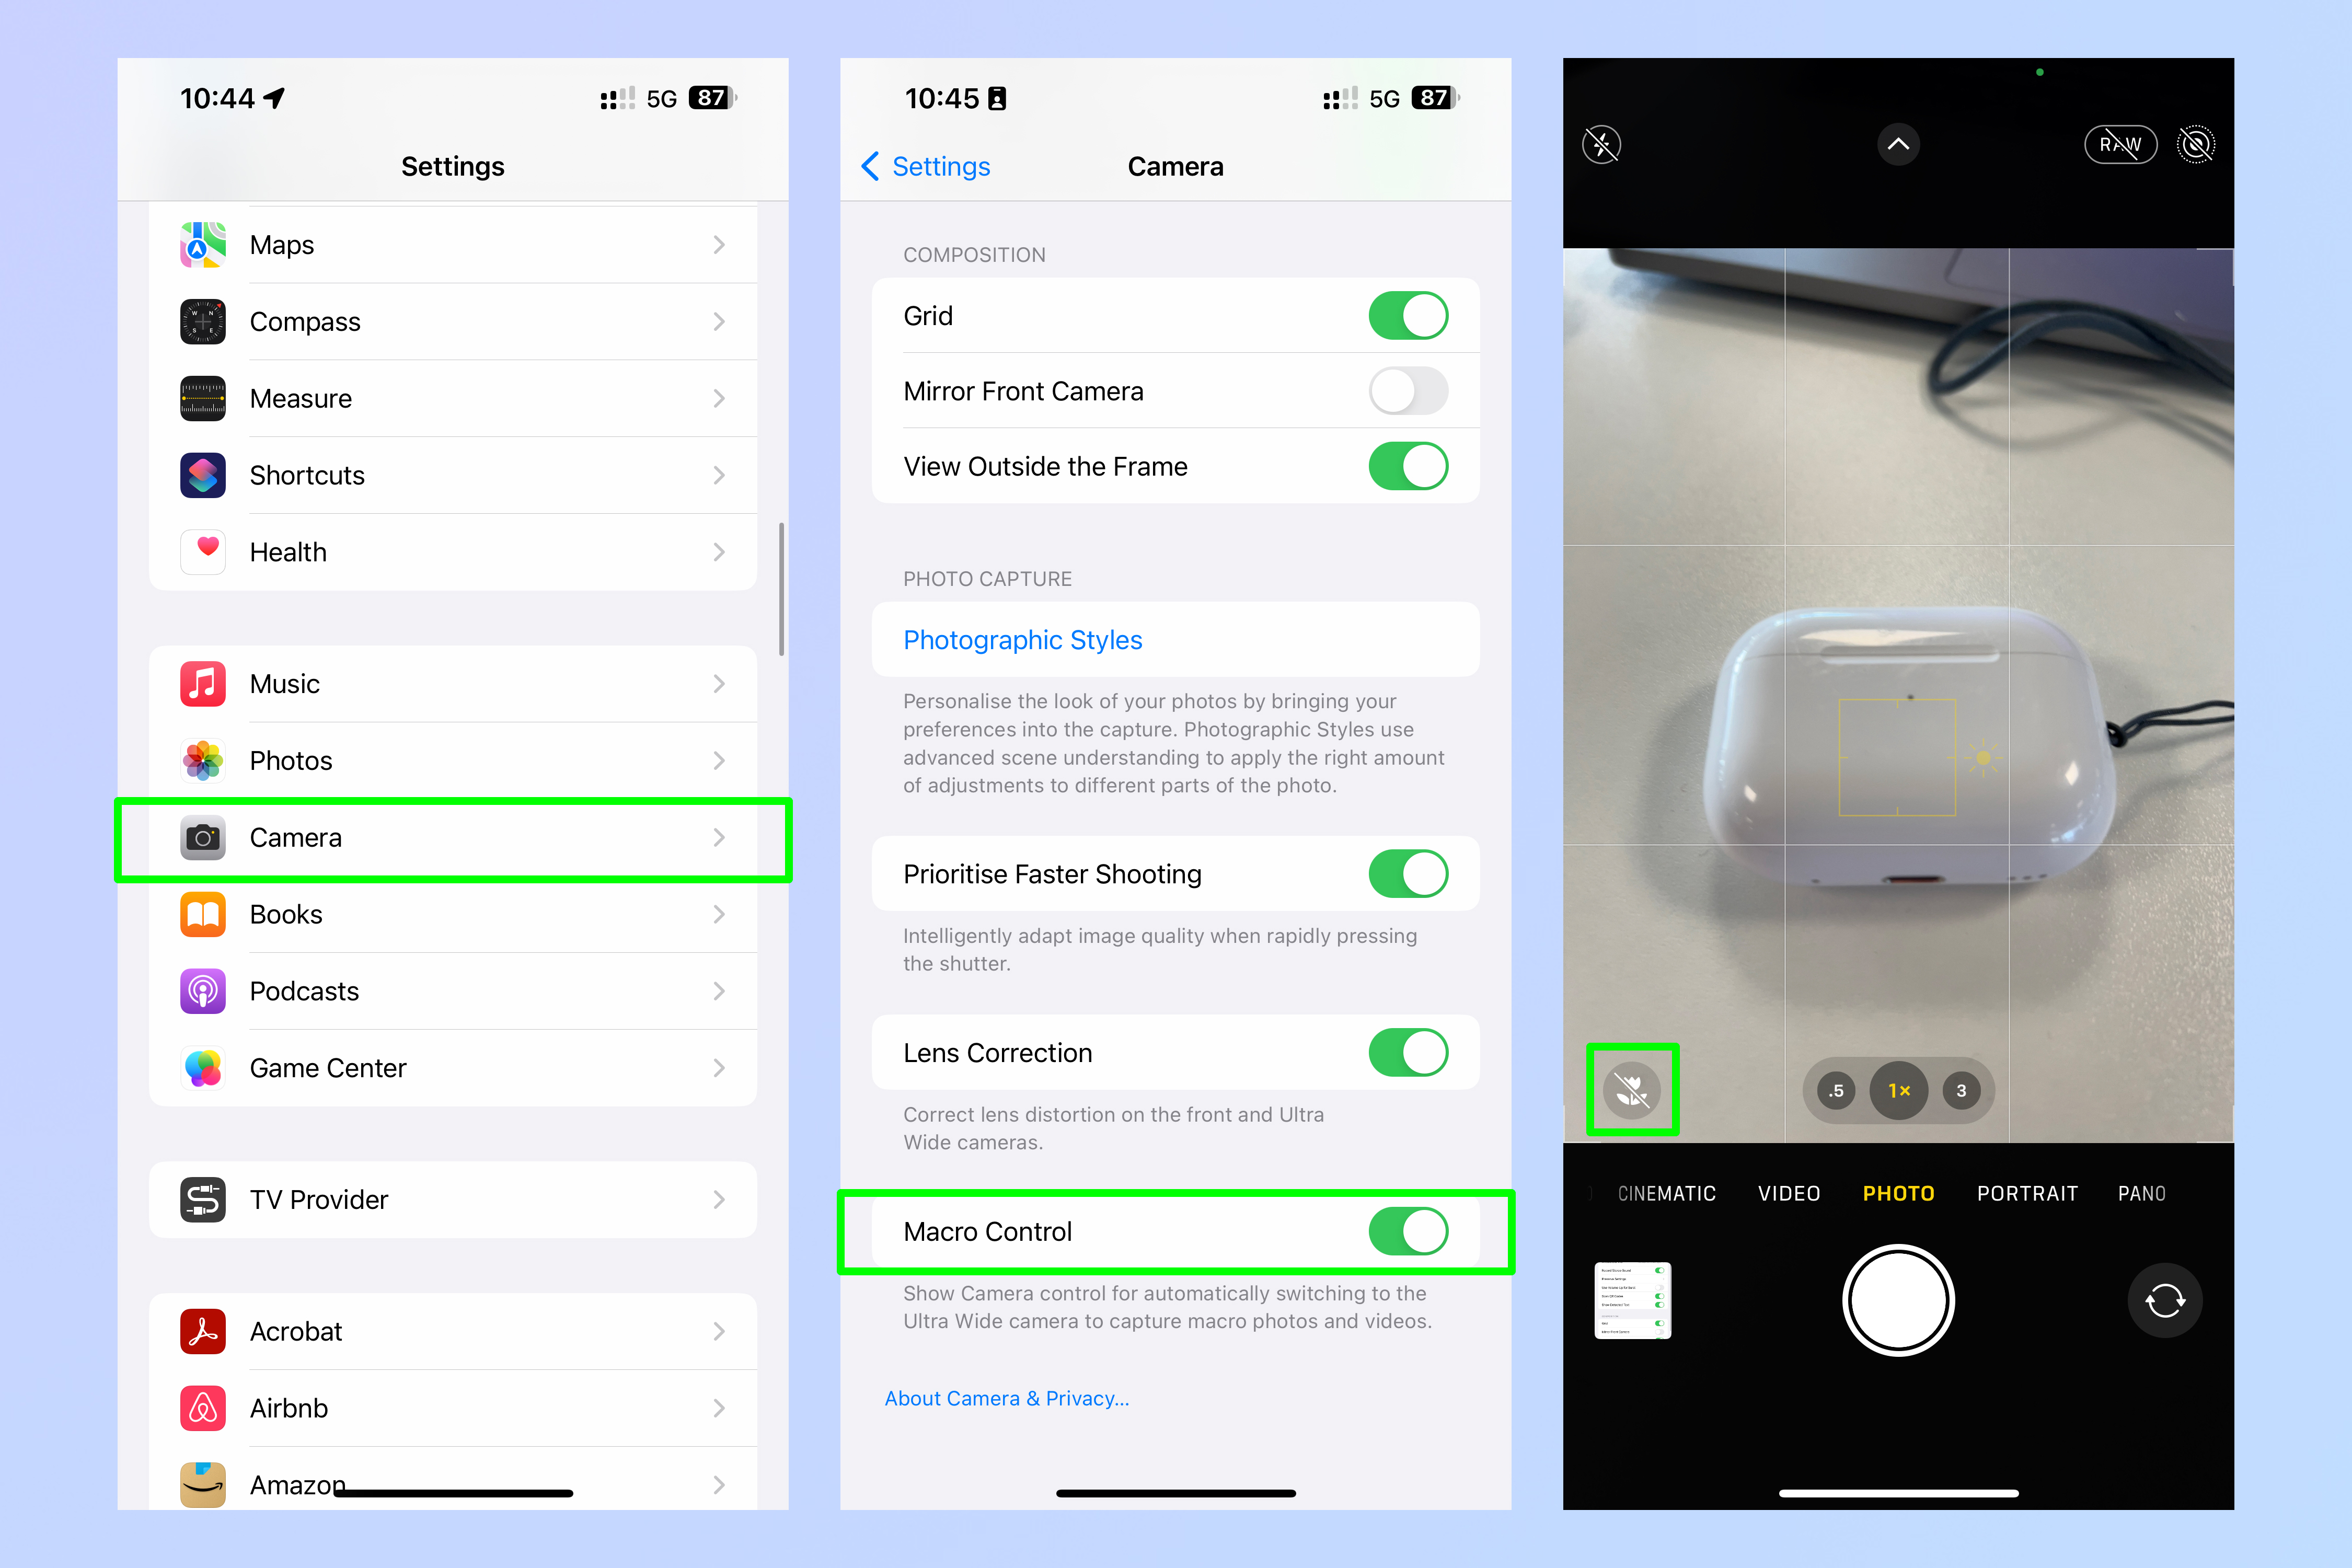
Read our full guide on how to disable the auto macro camera on iPhone.
9. Enable lens correction
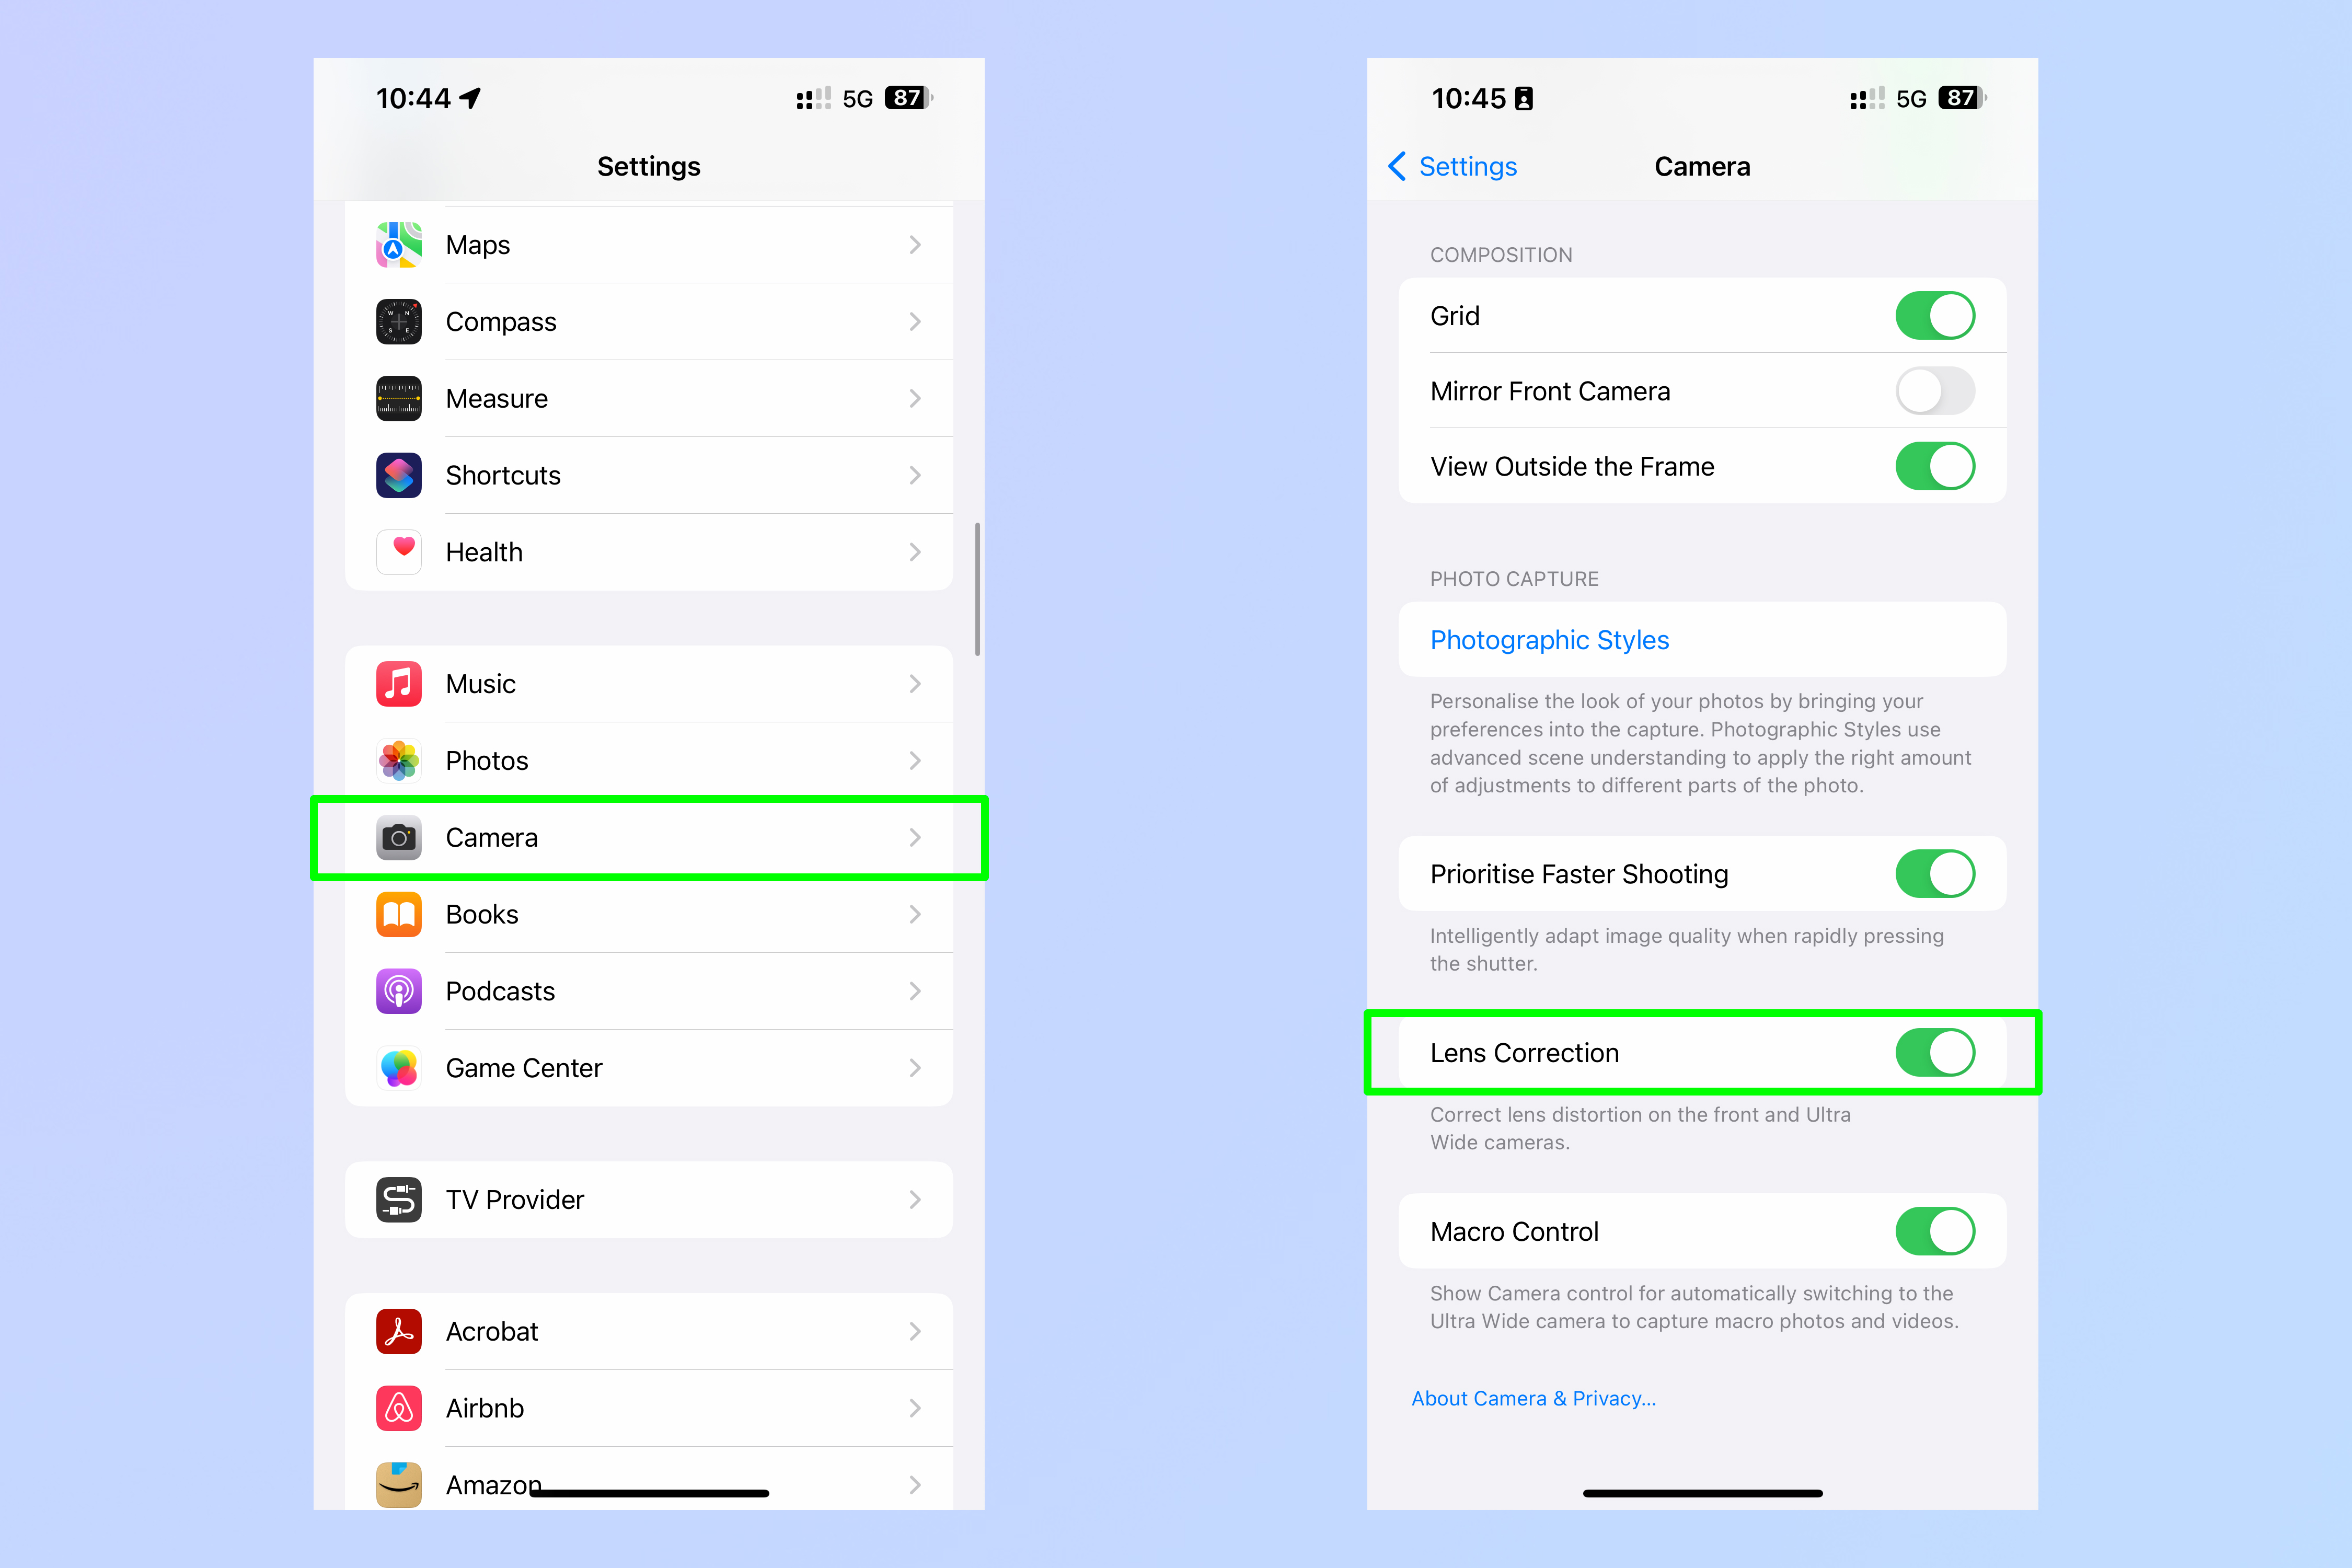
Different lenses distort an image in different ways. Wide angle lenses like your iPhone's front camera and wide angle rear camera tend to cause something called barrel distortion. Barrel distortion causes anything straight to bend outwards to wards the edge of the frame, resulting in a fish-eye effect. Thankfully, this can often be corrected using either the best photo editing software, or in-camera. Your iPhone can correct wide angle distortion itself, but you need to make sure lens correction is turned on.
To enable lens correction:
1. Open Settings and tap Camera, then toggle on Lens Correction.
9. Preserve your settings when you exit the camera
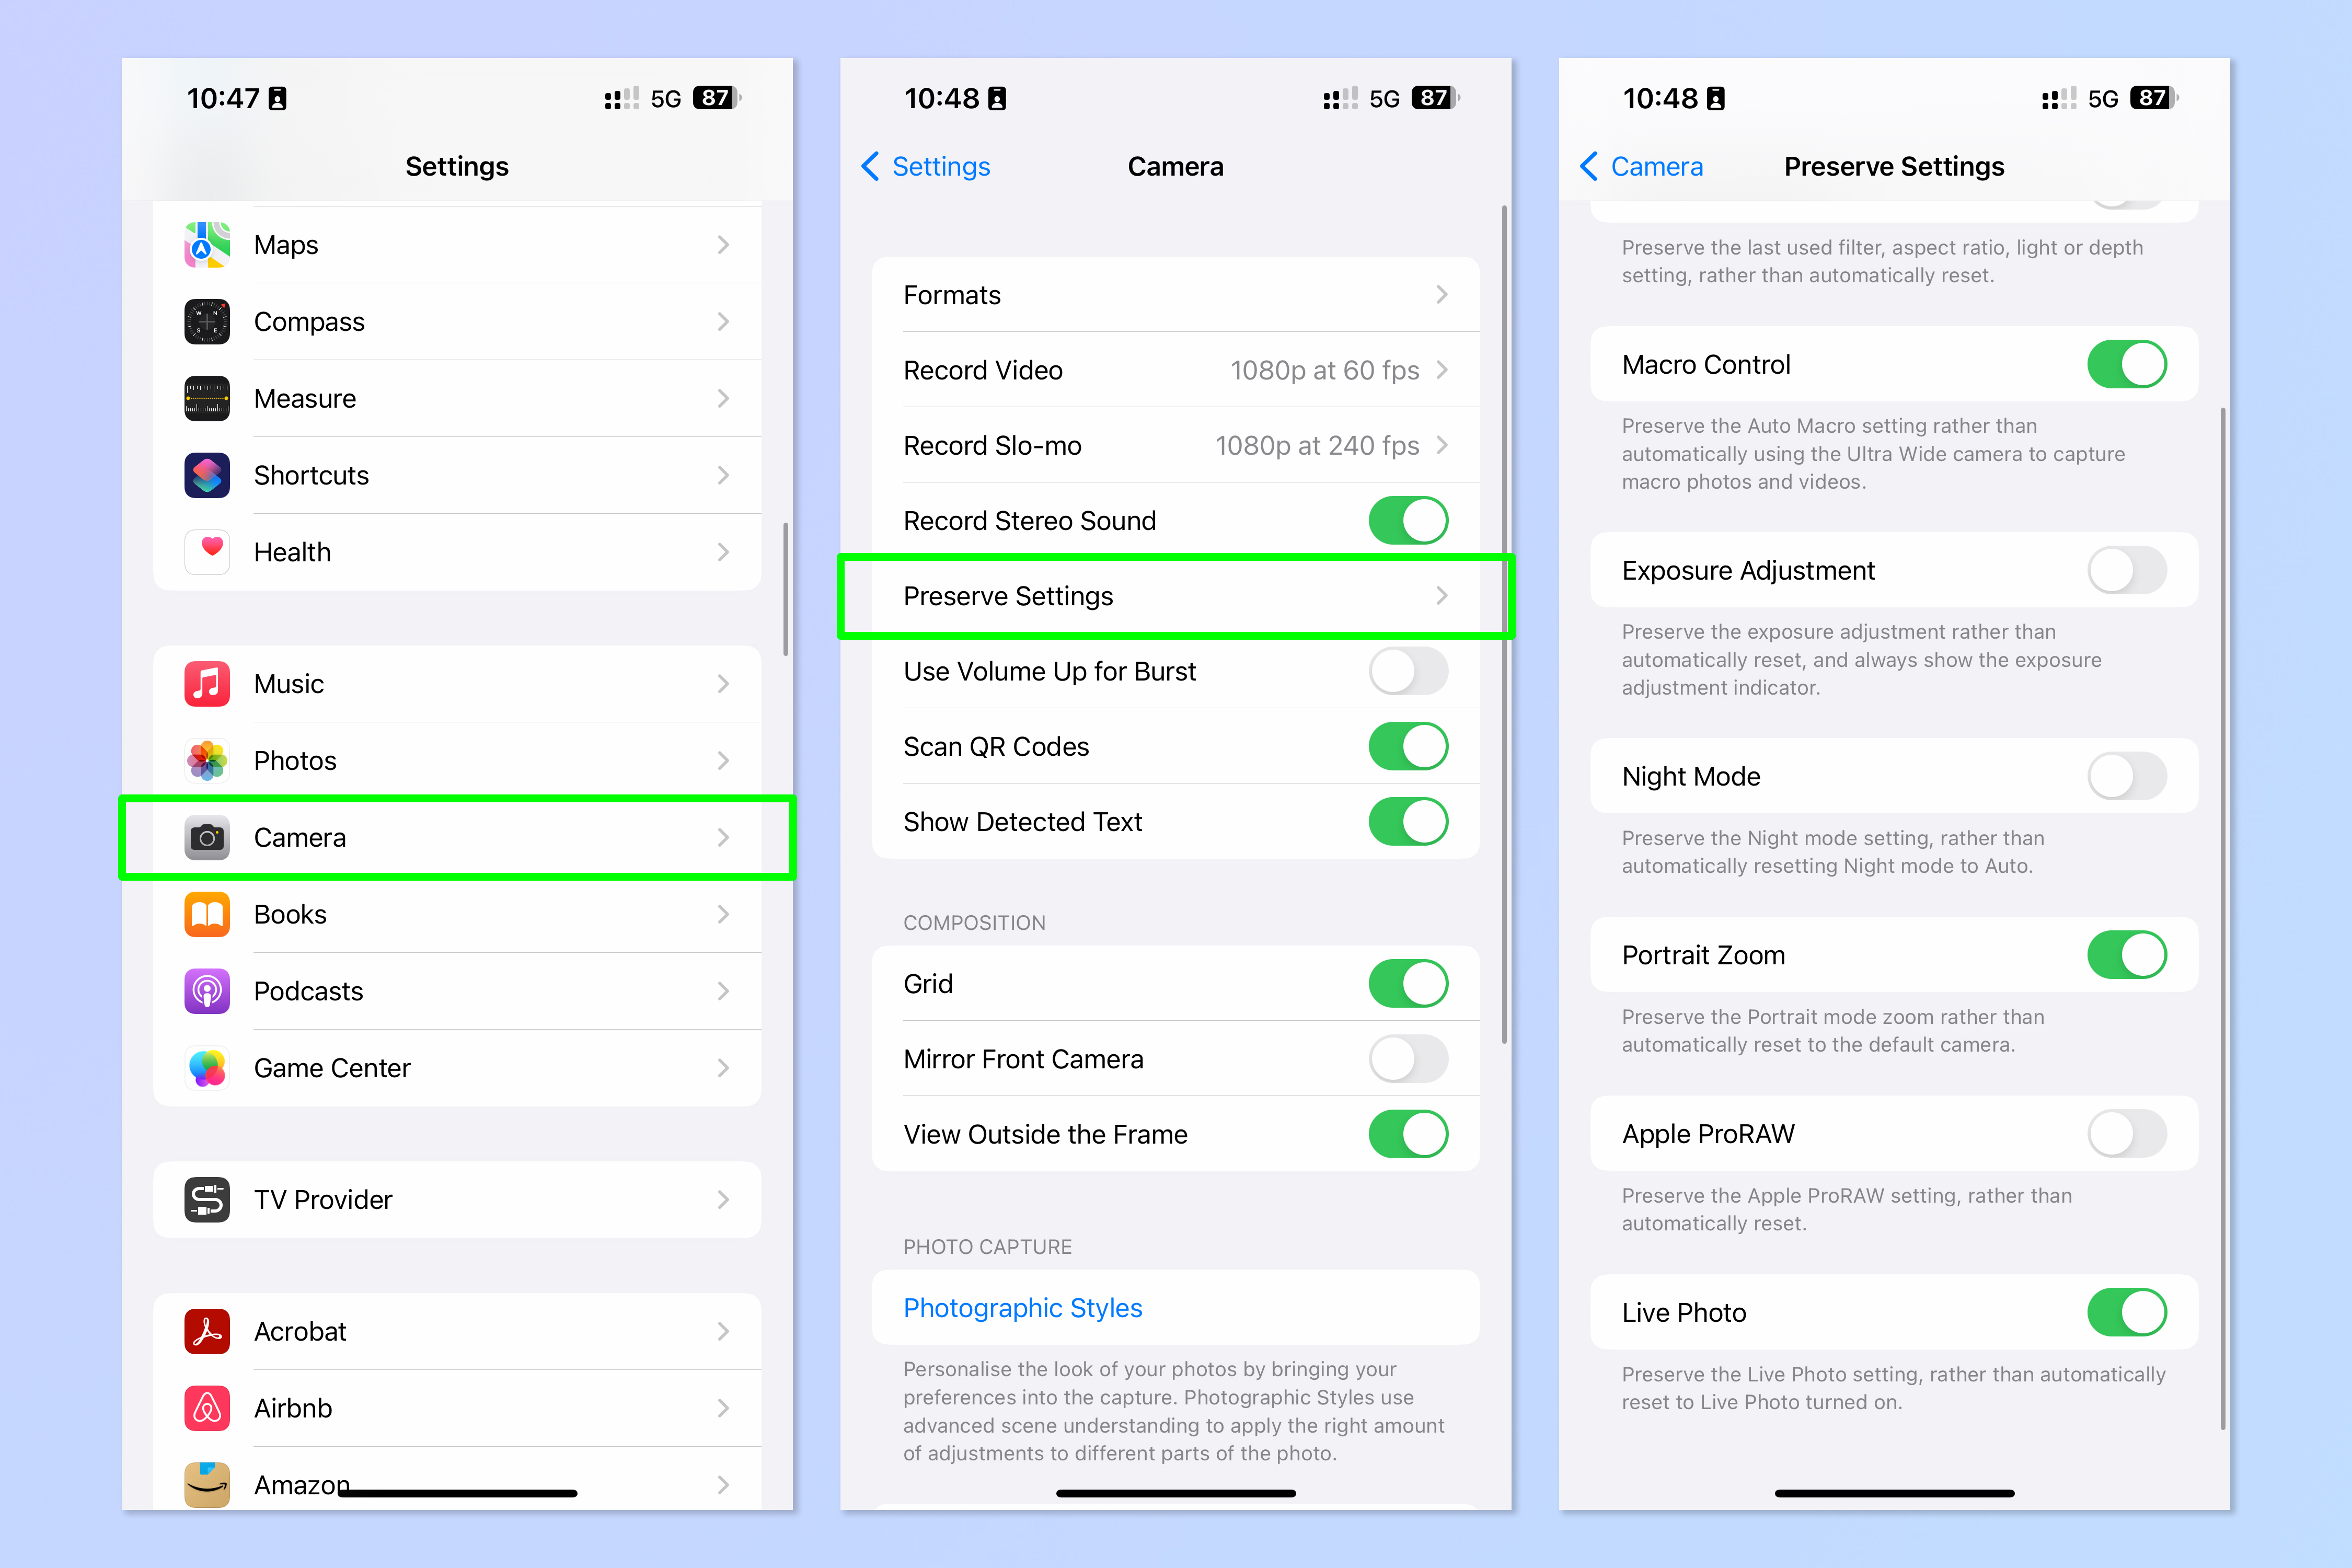
There's no point putting in all the effort to customize your camera just how you like it if every time you close the app, all the changes are wiped. By default, that's what your iPhone does. It'll default you back from ProRAW to HEIC, flip you back to auto macro mode and more! This sucks, so it's important to tell your device to preserve your camera settings when you close the app.
To preserve camera settings:
1. Open Settings and tap Camera, then tap Preserve Settings and toggle on the settings you'd like to stay the same when you close the app.
10. View outside the frame
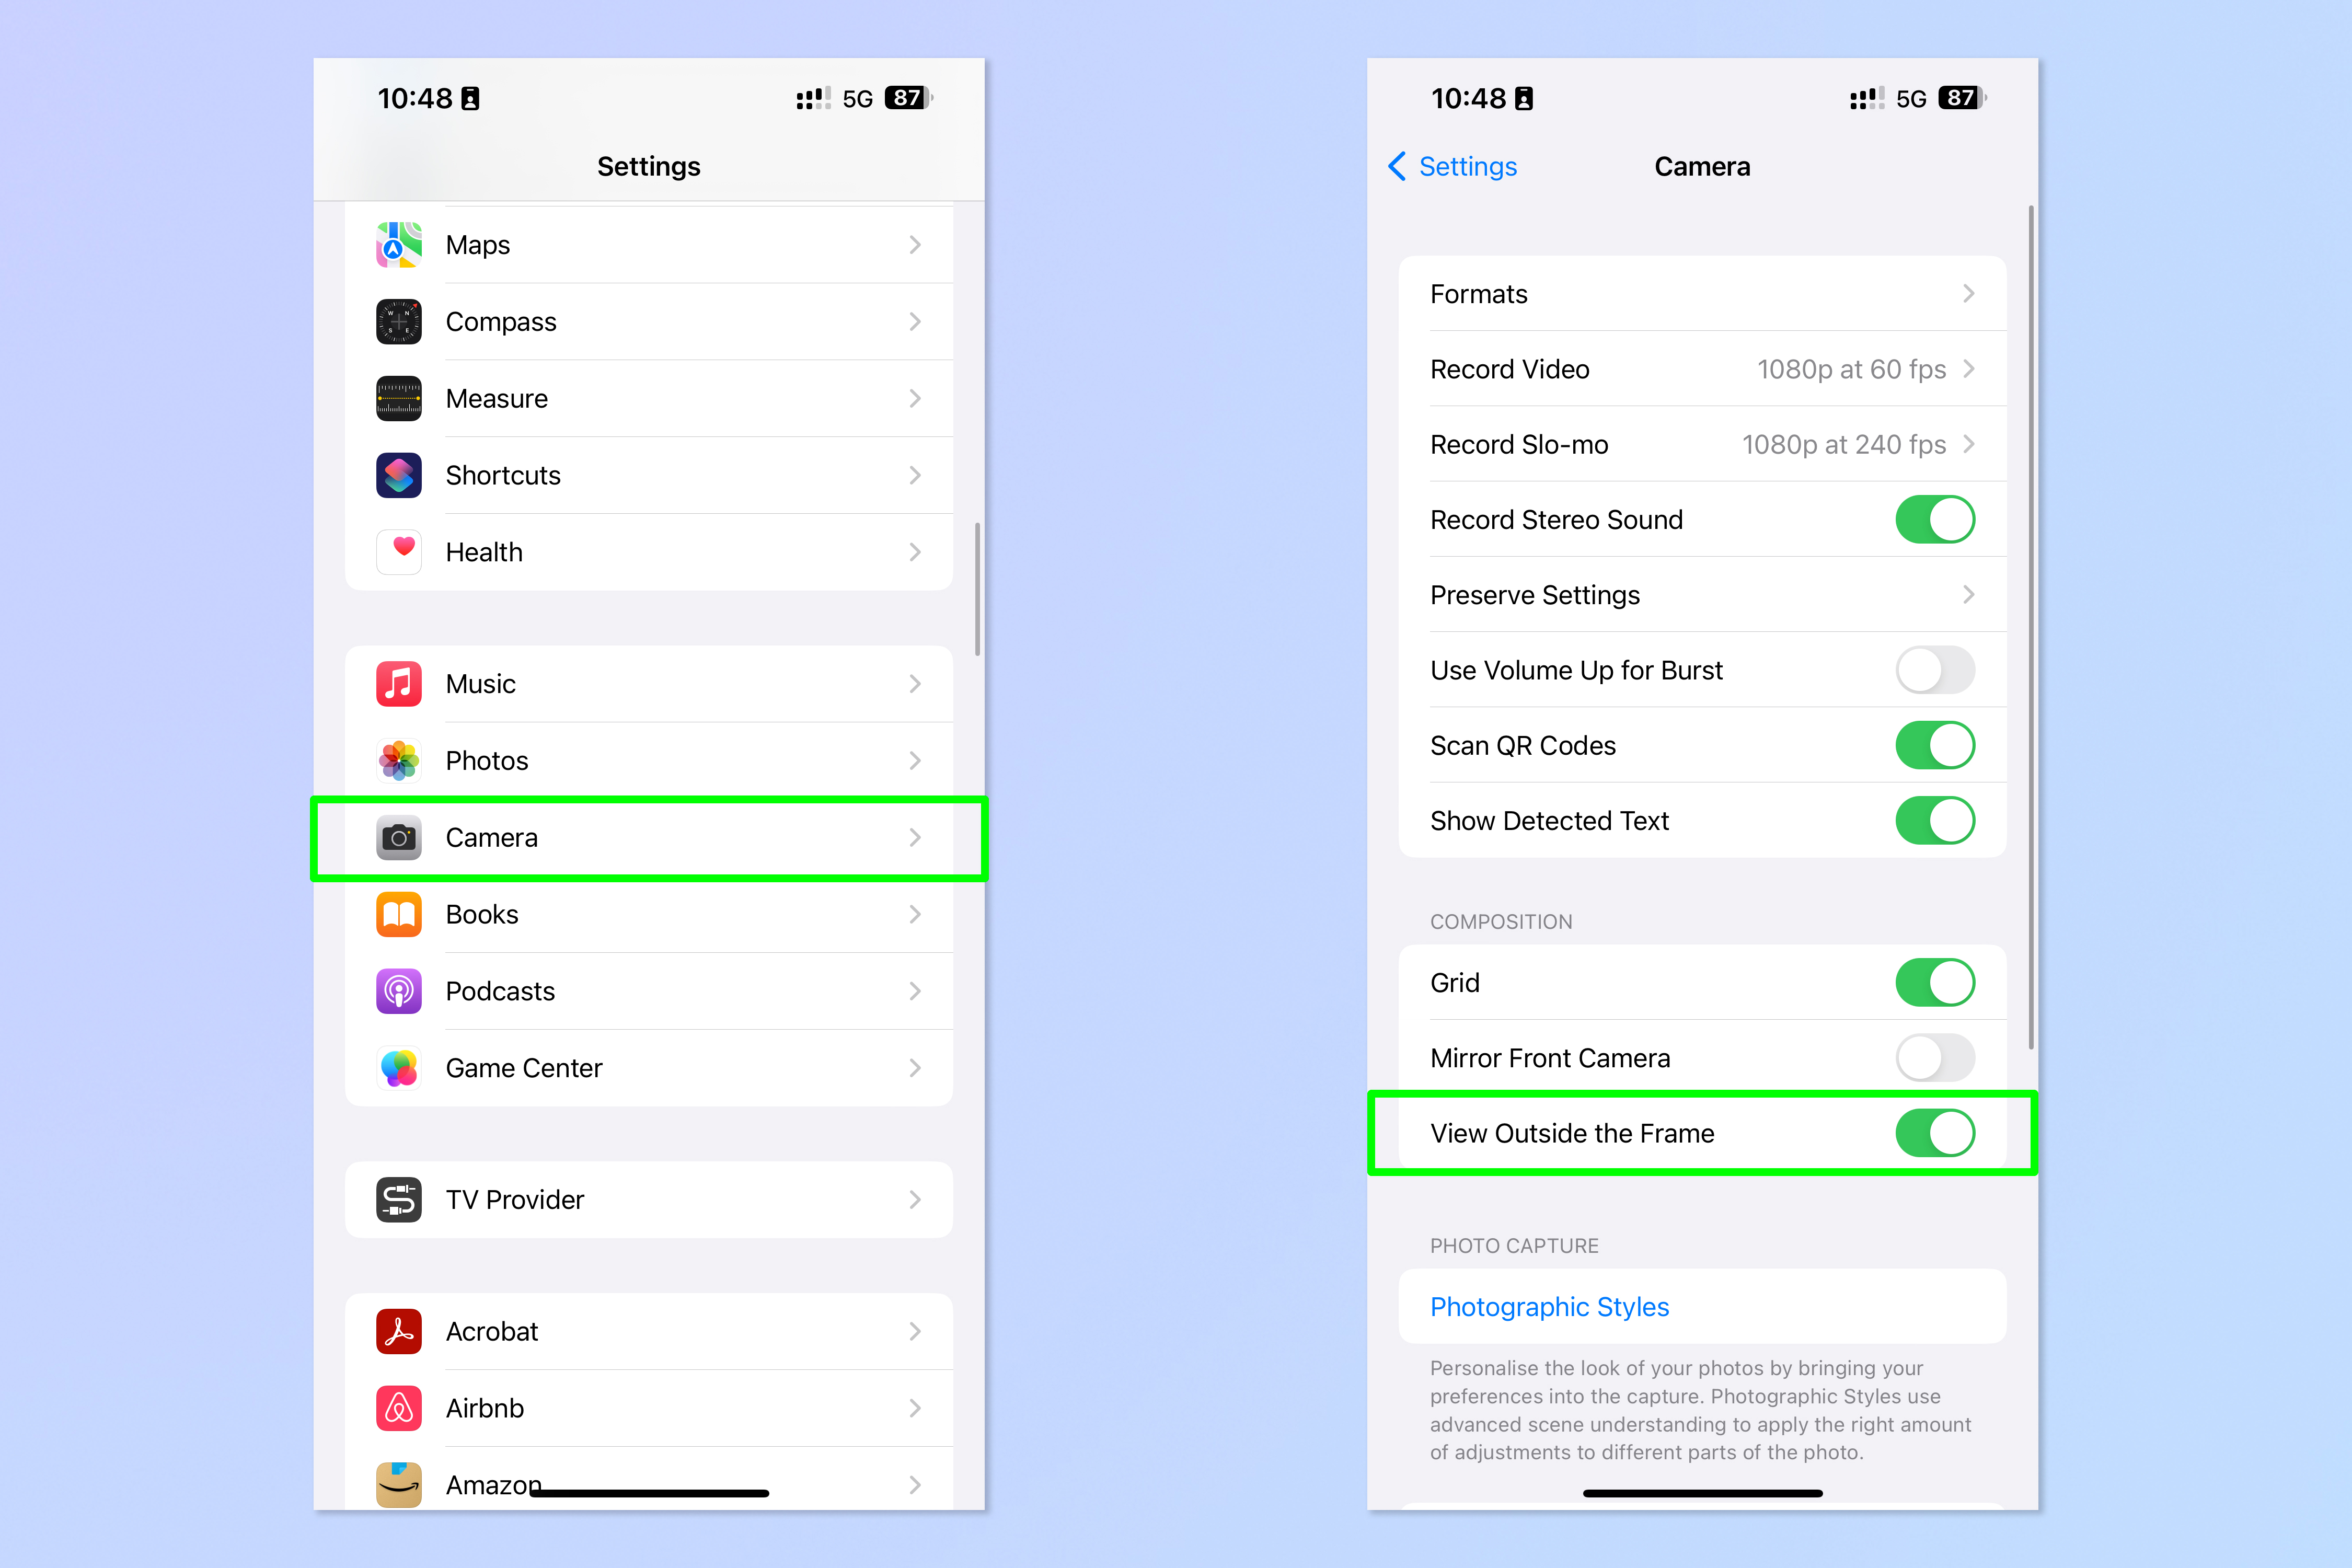
Modern iPhones with multiple cameras have a nifty trick up their sleeves: if you're taking a photo with the main camera, they can use the wide angle camera show you a wider preview than you can otherwise see on the screen. This is super useful for helping you tweak the composure of your images, allowing you to see outside the frame for context.
To view a wider frame:
1. Open Settings and tap Camera, then toggle on View Outside the Frame.
You're now armed with some tips to help you improve your iPhone photography. We also have more roundups like this, including the 11 iPhone hacks TikTok taught Tom's Guide, and 7 iPhone calculator features you need to be using. We can also teach you loads of iPhone tips with our individual tutorials, including how to transfer data from iPhone to iPhone, how to clear RAM on iPhone and how to use the built-in sleep timer on iPhone.
Next up: make sure you have the functions you need at your fingertips by learning how to customize Control Center on iPhone.

Peter is a Senior Editor at Tom's Guide, heading up the site's Reviews team and Cameras section. As a writer, he covers topics including tech, photography, gaming, hardware, motoring and food & drink. Outside of work, he's an avid photographer, specialising in architectural and portrait photography. When he's not snapping away on his beloved Fujifilm camera, he can usually be found telling everyone about his greyhounds, riding his motorcycle, squeezing as many FPS as possible out of PC games, and perfecting his espresso shots.
-
USAFRet Reply
Or Canon/Fuji/Sony.kep55 said:If you want a real camera to take decent photographs, buy a Nikon.
But yes, a real camera.
