Little changes can go a long way to helping you create the perfect desk setup for your needs and workflow. However, sometimes you need to start from scratch if you want to take your desk setup in a completely different direction and that’s exactly what I did here.
I’ve put together a lot of different desk setups over the years as it’s something I really enjoy doing. Likewise, it’s also an excellent way to showcase all of the work I put into reviewing the best standing desks. I also enjoy trying out other home office accessories like desk mats, monitor stands, mechanical keyboards, headphone stands, docking stations, monitor light bars and more.
For the most part, many of the desk setups I build involve multiple monitors like when I tried out three different stacked monitor setups or more recently, when I ditched my ultrawide display for a more traditional dual-monitor setup. This time around, though, I wanted to do something completely different.
Instead of adding gadget after gadget to my desk, I went with a less-is-more approach to truly lock in on the task at hand. From the desk to the monitor and even the accessories, I wanted something really clean with as few distractions as possible. Sure, there were some slight hiccups along the way but I couldn’t be happier with how my latest desk setup turned out.
Here’s everything you need to know about the gear I picked, why I chose it and hopefully some inspiration if you too are looking to give your own desk setup a complete productivity-focused makeover.
Desk Setup Gear List
- Oakywood Standing Desk Pro: from $1,199 @ Oakywood
- LG DualUp monitor: was $699 now $620 @ Amazon
- Hemudu Tall Monitor Arm: was $35 now $23 @ Amazon
- BenQ ScreenBar Halo: $179 @ Amazon
- Oakywood Desk Shelf: was $149 now $199 @ Oakywood
- Oakywood Dual Laptop Dock: $79 @ Oakywood
- Keychron K17 Pro: was $123 now $105 @ Amazon
- Elecom IST Trackball Mouse: $36 @ Amazon
- Uplift Desk Headphone Stand: from $45 @ Uplift Desk
- Turtle Beach Atlas Air gaming headset: was $179 now $143 @ Amazon
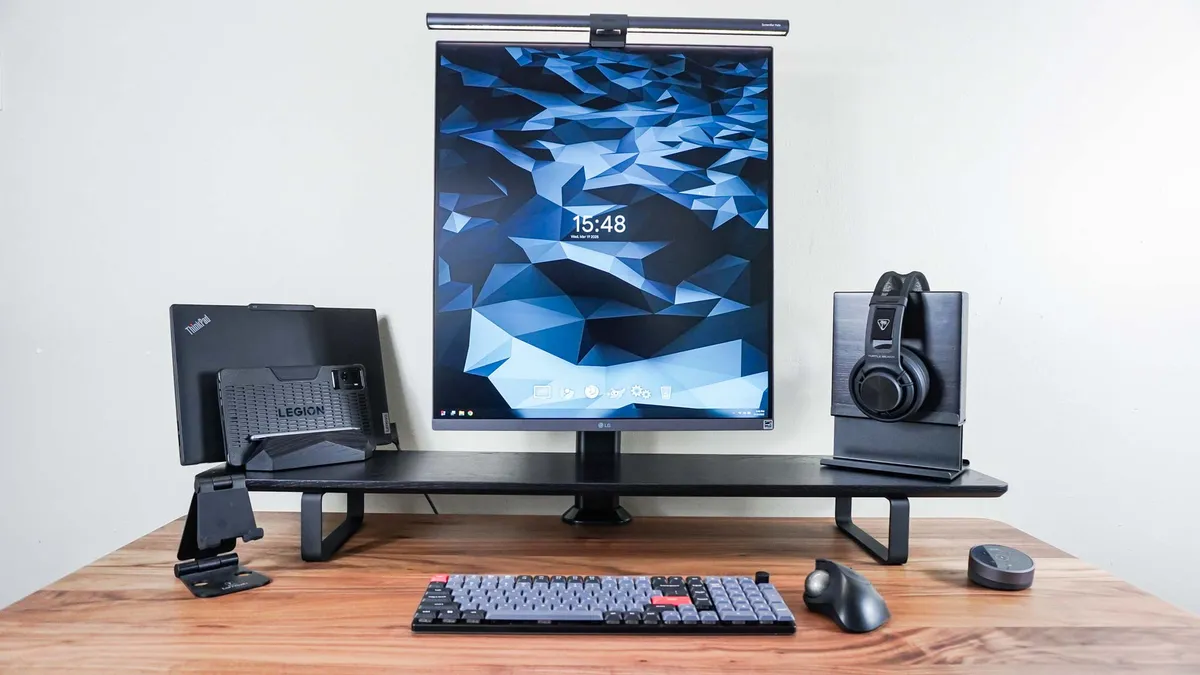
A handcrafted workspace

I’m going to let you in on a little secret. When I call in a new desk for review, I go out of my way to pick the cheapest option. Not only is this what most people will inevitably end up getting but I truly believe that you can get a fantastic standing desk that will serve you well for years to come without spending more than $500. Okay, maybe $500 and change, but you get the point. Now with the desk pictured above, this wasn’t really an option.
I guess you could say that at this point, I’m obsessed with desk setups. When I’m not building them or writing about them, I watch a lot of content around them on YouTube and one brand kept coming up: Oakywood.
I was initially attracted to their desk shelf and other accessories (more on that later) but when they asked me about trying out one of their desks, I happily said yes.
After requesting the Oakywood Standing Desk Pro for a review back in October of last year, it finally showed up at my door at the beginning of this month, in a wooden crate no less. You see, unlike every other desk I’ve built, this one’s top is custom-made in the small Polish town of Ciche but I’ll save the rest of Oakywood’s story for my full review.
So why this desk for a locked in desk setup? Easy, at a desk this nice with a handmade walnut top, I don’t see myself eating or otherwise wasting time. Its simple yet stunning aesthetic isn’t distracting and I really like how instead of a keypad with buttons, it uses a paddle-style controller like the one on the Branch Duo standing desk I reviewed.

The controller used in the Oakywood Standing Desk Pro has another trick up its sleeve though. At the back, there’s a small button that when pressed starts the Bluetooth pairing process. This isn’t the first connected desk I’ve reviewed — that honor goes to the Realspace Smart Electric Desk — but it has a much simpler and cleaner implementation.
You can use the paddle to adjust the desk’s position and once you configure your preferred sitting and standing heights, a double press automatically switches between the two. Pressing a button on most other desks does the same thing but reaching over and doing a quick double tap on the paddle really helps give me that locked in feeling.

As Oakywood uses parts from LINAK in this desk, you use its Desk Connect app for pairing and programming. The app itself is clean and minimal and I like how it has a built-in standing reminder functionality. One of the hardest parts of switching from one of the best desks to a standing desk is getting used to working while standing and something like this really helps with that.
Now that we have the foundation for this desk setup, it’s time to get on to the other thing that really makes it stand out: the monitor.

Vertical by design

If you’re reading this, chances are it was like the monitor that caught your eye and for good reason, there’s never been a display quite like this one. It’s the LG DualUp and even among the best monitors, it stands on its own due to its unique 16:18 aspect ratio.
The idea behind it is simple. Instead of a stacked monitor setup with two separate displays and their bezels getting in the way, LG put the equivalent of two 21.5-inch monitors into a single screen. The company also went the extra mile by packing in plenty of ports (two HDMI ports, a DisplayPort and a USB-C port with power delivery) and adding speakers.

Although you can use it with two computers simultaneously thanks to its built-in KVM switch, I’m purposely not making use of this feature for my locked in desk setup. I’ve also decided to forego using LG’s included ergo stand for my favorite monitor stand from Hemudu. Fortunately, the company also makes an extra tall version of its clamp-on monitor stand ($32, Amazon) which is perfect for the LG DualUp’s extended height.

The LG DualUp’s unique aspect ratio isn’t ideal for watching videos or playing games which is specifically why I picked it for this desk setup. However, it’s perfect for coding, content creation or in my case, editing. It’s a great display for writing too if you can do so off the top of your head.
Personally, I’ve become spoiled by my ultrawide monitor and when I write, I like to do so in one Chrome window running Google Docs on the right and have either a product page in another window or even the photos I’ve taken for an article on the left for inspiration.

Everything in its place

A clutter-free desk is one of the easiest ways to avoid distractions while working, so I picked accessories that prioritized this when putting this desk setup together. However, I also wanted to have everything I needed within reach and set up in such a way that I could easily tuck things away when I needed extra desk space.
While the Oakywood Desk Shelf I tried out last year serves as the centerpiece for the top of this desk setup, I’ve added a few other accessories to make the most out of the extra width I get by using the LG DualUp instead of a more traditional monitor.
On the left, I have Oakywood’s Dual Laptop Dock in black ($89, Oakywood) and inside it, my trusty ThinkPad is plugged into the monitor via USB-C. The dock’s second slot is taken up by the Lenovo Legion Tab 3 I picked up with my own money after it completely won me over at CES this year.
Though I normally would have used one of the best mini PCs for a setup like this, I specifically chose my ThinkPad as it isn’t powerful enough to run games but is great for work.
On the right, I have a headphone stand from Uplift Desk with a Turtle Beach Atlas Air gaming headset. Besides being made out of actual desk samples, I love the extra width this headphone stand gives you and how its legs provide plenty of space for storing small accessories.

For example, I have the USB dongle for the headset out of view on top of its back legs. Even though it’s one of the best gaming headsets, the Atlas Air works great as a normal pair of headphones and for those times when I do need to hear what’s going on, its open-back design is perfect for this.

Like the desk I’m currently trying out, Oakywood’s desk shelf is on the expensive side because it’s handmade too. It doesn’t have a shelf for your laptop like another one I recently tried out but for the purpose of this setup, it’s perfect.
I have plenty of room to slide my mouse and keyboard underneath it and there’s also space on the sides for my phone stand and for the controller to the BenQ ScreenBar Halo I have on top of the LG DualUp.
I’ve got to admit, once I started using shelves like this in my desk setups, it’s hard to go back to building or using one without a desk shelf. They give you plenty of extra storage space which is almost necessary with most standing desks since very few of them have shelves. If they do, they’re usually on the smaller side too and are mainly for storing one of the best laptops or a tablet along with smaller accessories like USB flash drives.
The same can be said for monitor light bars. Though the one in this desk setup is BenQ’s flagship model, they can be had for quite a lot cheaper like the Quntis RGB Pro+ I tried out a while back.
Not only do they light up your workspace but they add some extra personality and quite a few — like this BenQ and the Quntis one above — have a second light at the back that casts a nice glow on your wall.
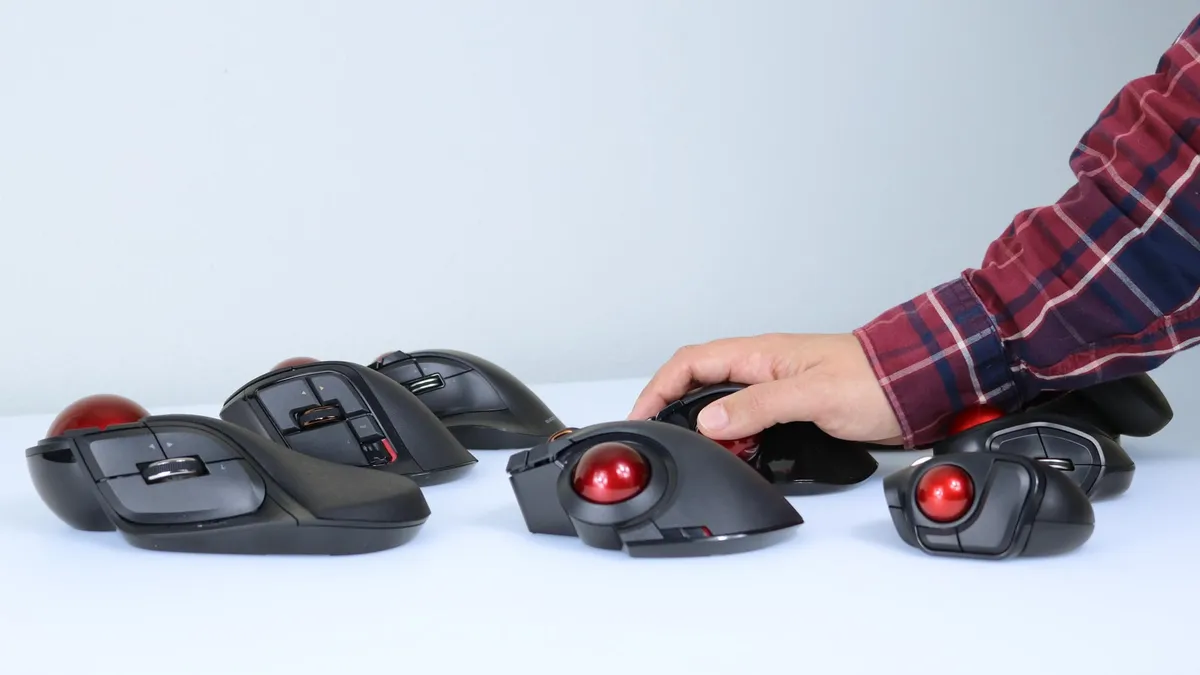
Maybe it’s a recurring theme at this point but when I like an accessory, I tend to go all in and that’s exactly what I’ve done with trackball mice over the years. The first one I tried years ago was the Logitech MX Ergo but then I stumbled upon the Japanese trackball maker Elecom and I haven’t looked back.
Like others, I used to think the Logitech MX Master was the be all end all when it came to productivity-focused mice. After using a trackball for the last seven years though, I’ve really come to appreciate their improved ergonomics, how well they work in tight workspaces (think airplane traytable) and how I no longer have to use a desk mat in my setups unless I absolutely want to.

What I love about Elecom’s trackball mice is that they all have plenty of extra buttons you can completely customize using the company’s Mouse Assistant software. Case in point, I have copy and paste, enter and delete programmed to the extra buttons on every Elecom trackball I use and this saves me quite a bit of time each day.
So I’ve walked you through the gear in this setup and why I picked it. Now, here’s what it was like to work at one of the most unique desk setups I’ve ever built.

Truly locked in

From the moment I sit down at this desk setup and wake my laptop from sleep, it’s go time. I didn’t put my usual go-to webcam — the Obsbot Meet 4K — on top of the monitor light bar as I don’t plan on joining any video calls at this desk. Instead, it’s a place to edit reviews and other stories that I’ve already got laid out in a Google Doc.
The LG DualUp’s taller screen is perfect for this and unlike with a regular monitor positioned vertically, there’s plenty of extra space on the sides to bring up the Workspace extension I use for adding links to stories. I also like the fact that I can see the whole front page of Tom’s Guide without having to scroll and just about an entire news story with minimal scrolling.
While I could have one window or app open at the top and another on the bottom, I’ve been using this desk setup with a one thing at a time approach. This also means there’s no switching between two windows — alt-tabbing if you will — and I don’t have Gmail or Slack open in another tab either. Remember when I said distraction-free setup, well I meant it.

If I do want to quickly jot something down, I have the Legion Tab Gen 3 right there with Lenovo’s Tab Pen Plus. I gave up paper years ago in favor of typing but to avoid ending up with loads of Chrome tabs, picking up this tablet and making a quick note has worked really well for me so far.
Just like on every other tablet I use, I have this one configured so that I don’t get any annoying notifications and when I set it up, I didn’t just make a straight copy of all of the apps straight from my phone. Instead, I cherry picked a handful of my favorite ones which I use alongside Google’s suite of productivity tools.
Don’t worry, though, I have something big — and a bit different — planned for this tablet in the near future.
Not your typical desk setup
Now I know most people aren’t in the position I’m in where I get to cycle through different desks and put together desk setups as part of my job. However, that shouldn’t hold you back in the slightest if you want to build or even just temporarily try out a locked in desk setup yourself.
The great thing about desk setups is that they’re constantly evolving and once you master, or at least pick up a few cable management tricks, you shouldn’t have any trouble breaking one setup down and putting another together. And if you pick a monitor, computer and other gear that’s versatile enough, you can rearrange things easily to fit any kind of desk setup whether it’s for gaming or productivity.
In the same way with the rest of your home office, you want to sit down and plan things out before you add anything to your cart. That way, you can pivot to a different kind of desk setup if need be plus, you can pick up one of the best office chairs, a desk and all of your accessories when they go on sale.
Like with my other setups, I’ll probably end up breaking this one down in a few weeks or maybe even months. For the time being though, it’s the perfect refuge for when I just want to get some editing done without any distractions or temptations taking me out of the zone.
More from Tom's Guide

You must confirm your public display name before commenting
Please logout and then login again, you will then be prompted to enter your display name.