15 top Windows 11 tips everyone needs to know
Become a Windows 11 power user with these simple tips
Whether you're a lifelong PC user or you just got your first Windows 11 laptop, there are a few things you can do to make it a little more capable, comfortable and easy to use.
I know because I've been using the latest version of Windows since it was in beta, and when I wrote my Windows 11 review I was a little underwhelmed by how the finished product failed to live up to Microsoft's hype.
But it was still a decent operating system when it launched in 2021, and in the years since the company has put in work to shore up its deficiencies and make it (generally) better and easier to use.
That said, there are still a lot of recommendations I make when helping a friend or family member get acquainted with Windows 11 for the first time. And with Windows 10 reaching its end of life in 2025, I think there are going to be lot of people getting to grips with Windows 11 for the first time this year.
That's why I collected my top 15 Windows 11 tips together in one place. These tips can help you be happier, more comfortable and more productive, making your time on even the best Windows laptops and desktops that much better.
Got any of your own Windows 11 tips? Please feel free to leave them in the comments.
Get cozy with keyboard shortcuts
Windows 11 keyboard shortcut | Command |
|---|---|
Windows key + A | Open Quick Settings |
Windows key + Z | Open Snap Layouts |
Windows key + Alt + B | Enable/disable HDR |
Windows key + , | Temporarily "peek" at desktop |
Windows key + E | Open File Explorer |
Windows key + M | Minimize all windows |
Windows key + Shift + M | Restore all minimized windows |
Windows key + L | Lock your PC |
Windows key + X | Open Quick Menu (same as right-clicking Start) |
Windows key + Left/Right arrow | Snap active window to left/right half of screen |
Windows key + 1, 2, 3 etc | Launches whatever is pinned to your taskbar in the 1st, 2nd, 3rd...etc. position |
Windows 11 has a massive list of keyboard shortcuts you can use to instantly launch apps, commit actions and generally get things done a lot faster than if you used the mouse.
You don't need to learn all of them (and trust me, you don't want to) but there are at least a few dozen that I find super useful for helping me get things done as efficiently as possible.
Sign up to get the BEST of Tom's Guide direct to your inbox.
Get instant access to breaking news, the hottest reviews, great deals and helpful tips.
There are one or two very specific keyboard shortcuts farther down in this list, but I wanted to take a moment to list my favorite and most-used keyboard shortcuts in the chart above for easy reference.
Become a power user with PowerToys
Back in the early days of Windows Microsoft used to sell add-on packs that had a bunch of new features and tools for power users.
Those days are behind us now, thankfully, as all Windows updates and upgrades are free—including PowerToys, a bundle of extras that you can use to do some frankly incredible things in Windows 11.
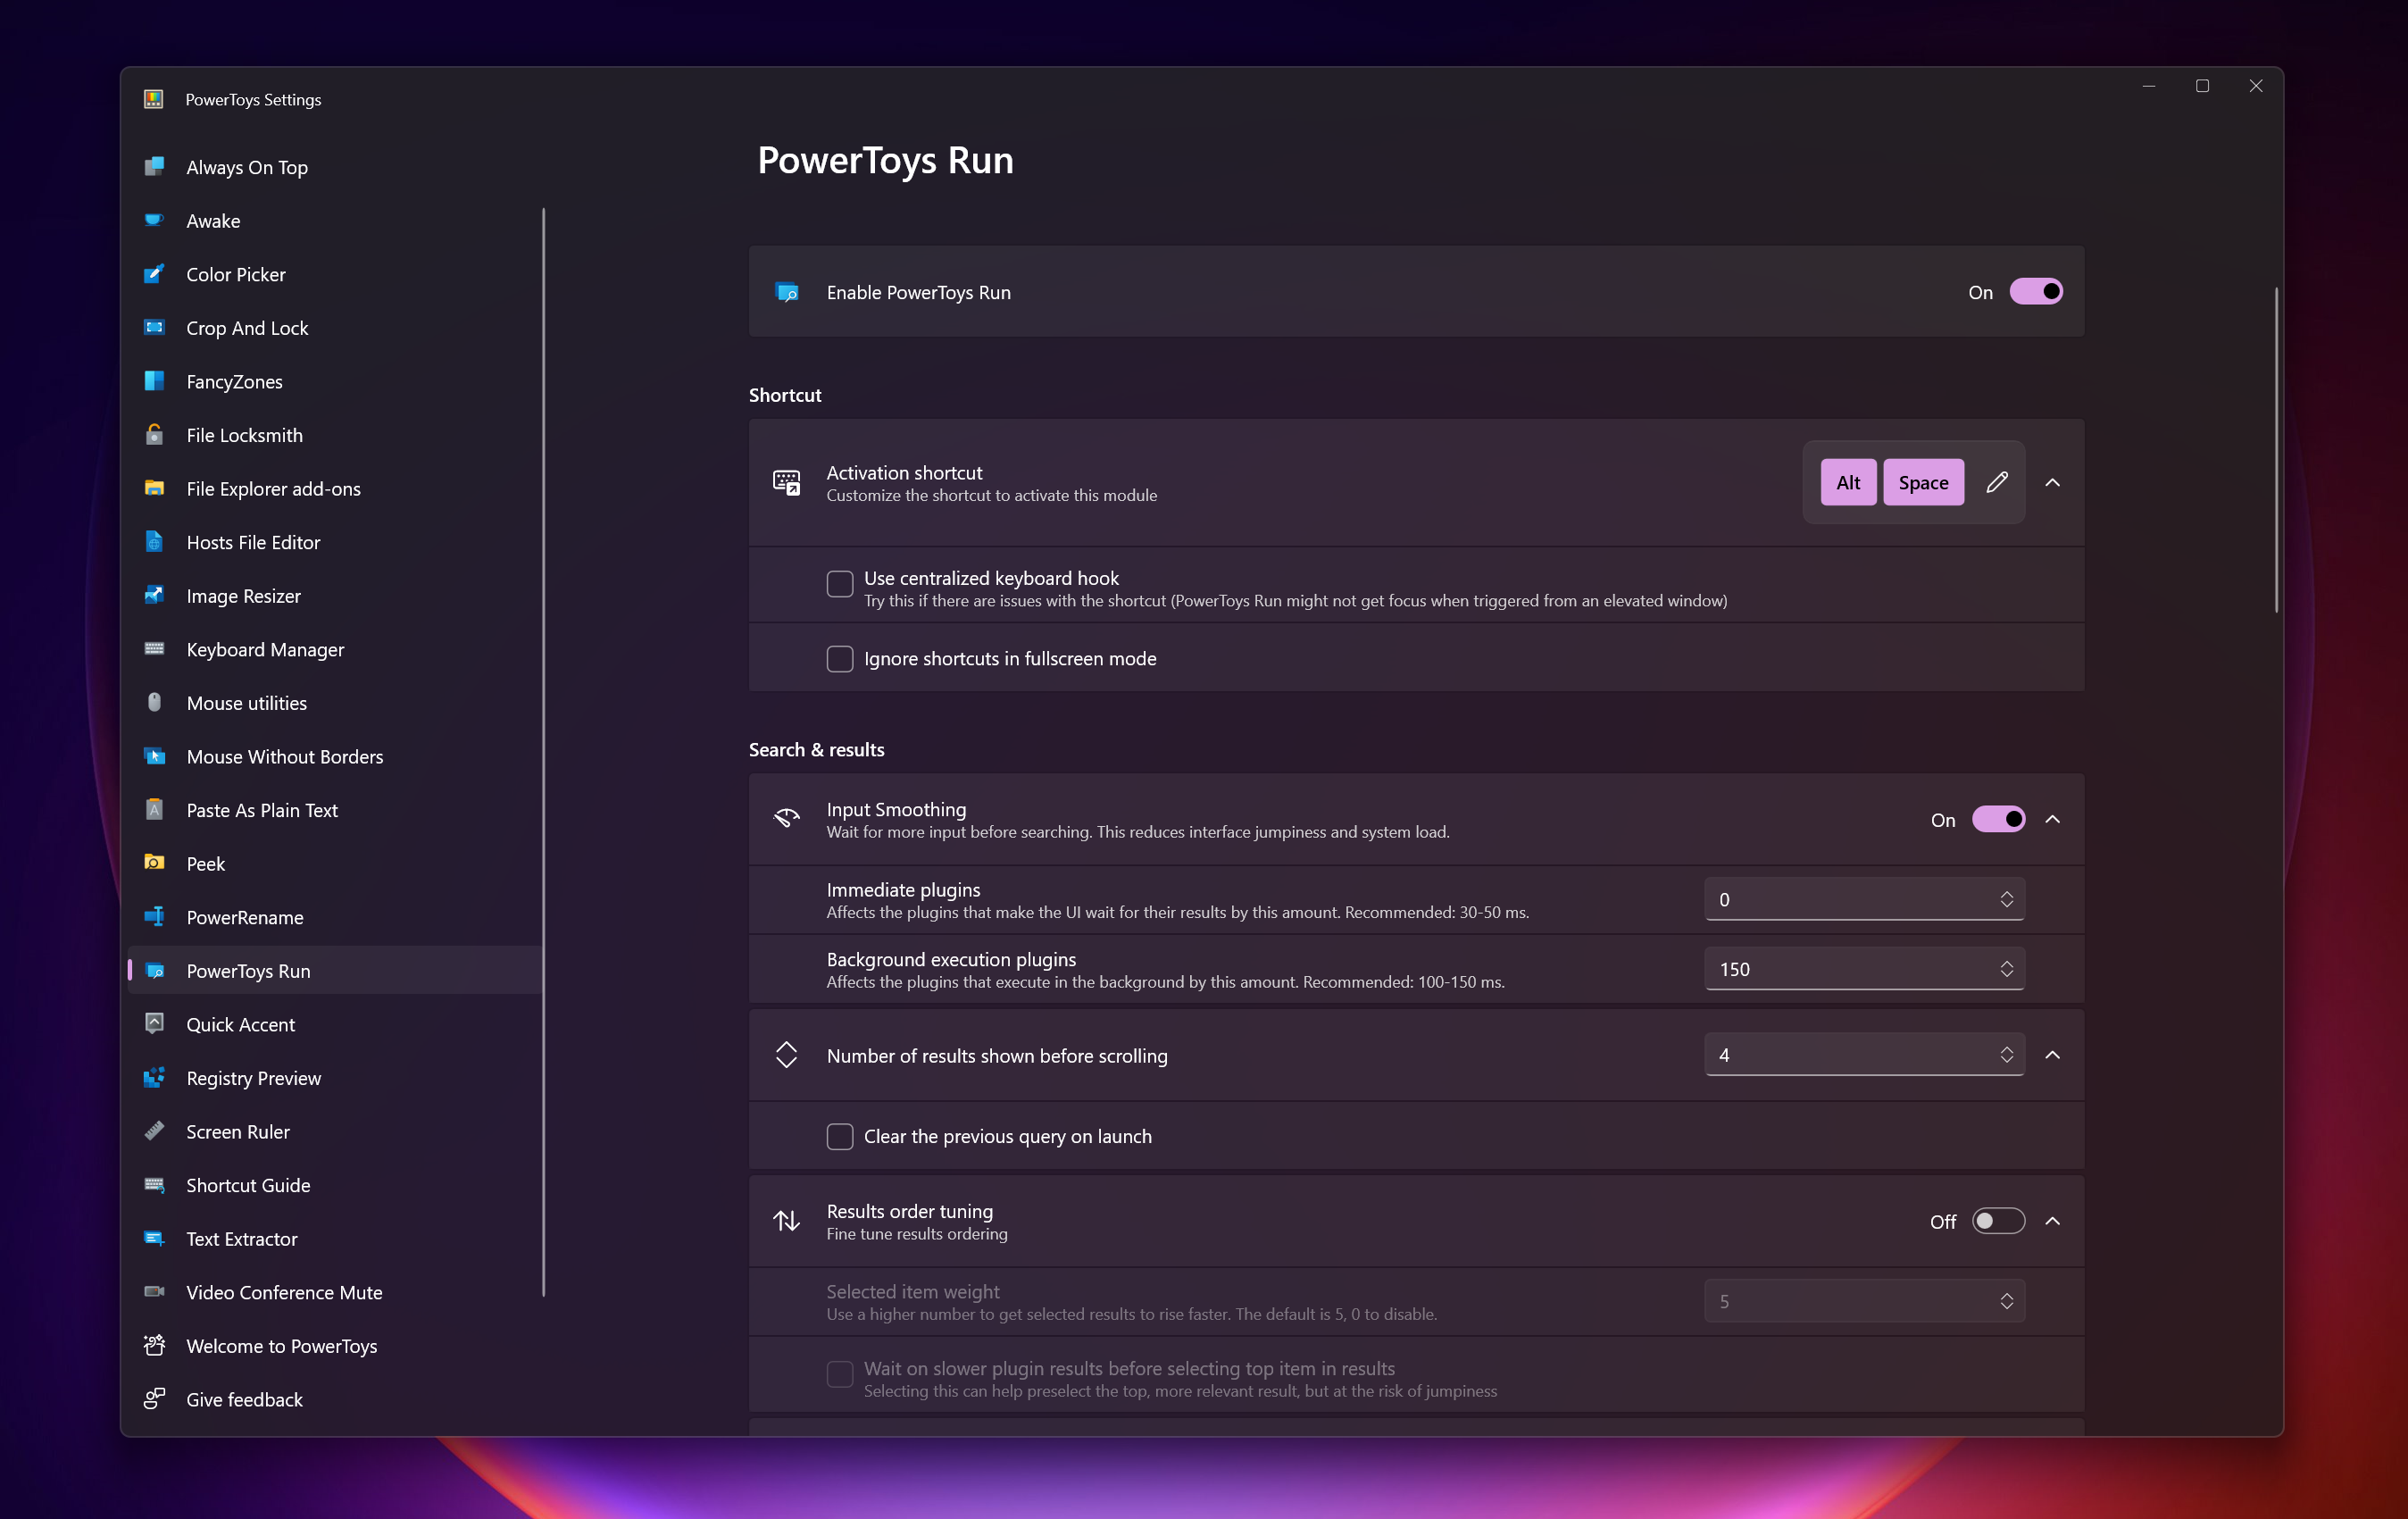
You can download PowerToys from the Microsoft Store app (check out our guide to how to get PowerToys in Windows 11 for step-by-step guidance) and there are loads of cool tools to play with inside. One of my favorites is PowerToys Run (pictured above), a supercharged version of the Windows Run command that works a lot more like the Spotlight Search in macOS by allowing you to type in natural language.
Windows will then try to find what you're looking for, whether that's an app you want to run on your PC, a file hidden in a folder somewhere or a key website somewhere on the web.
There are lots of other PowerToys that replicate or improve upon features in competing operating systems too, like Mouse Without Borders, which lets you use one mouse across multiple PCs the same way you can use a single mouse across multiple Macs and iPads with Universal Control.
Or try Shortcut Guide, which makes it easy to quickly summon a customizable guide to keyboard shortcuts so you don't have to keep referring to Microsoft's (or my) lists of shortcuts.
Use Windows 11 Voice Access for extra productivity with no hand strain
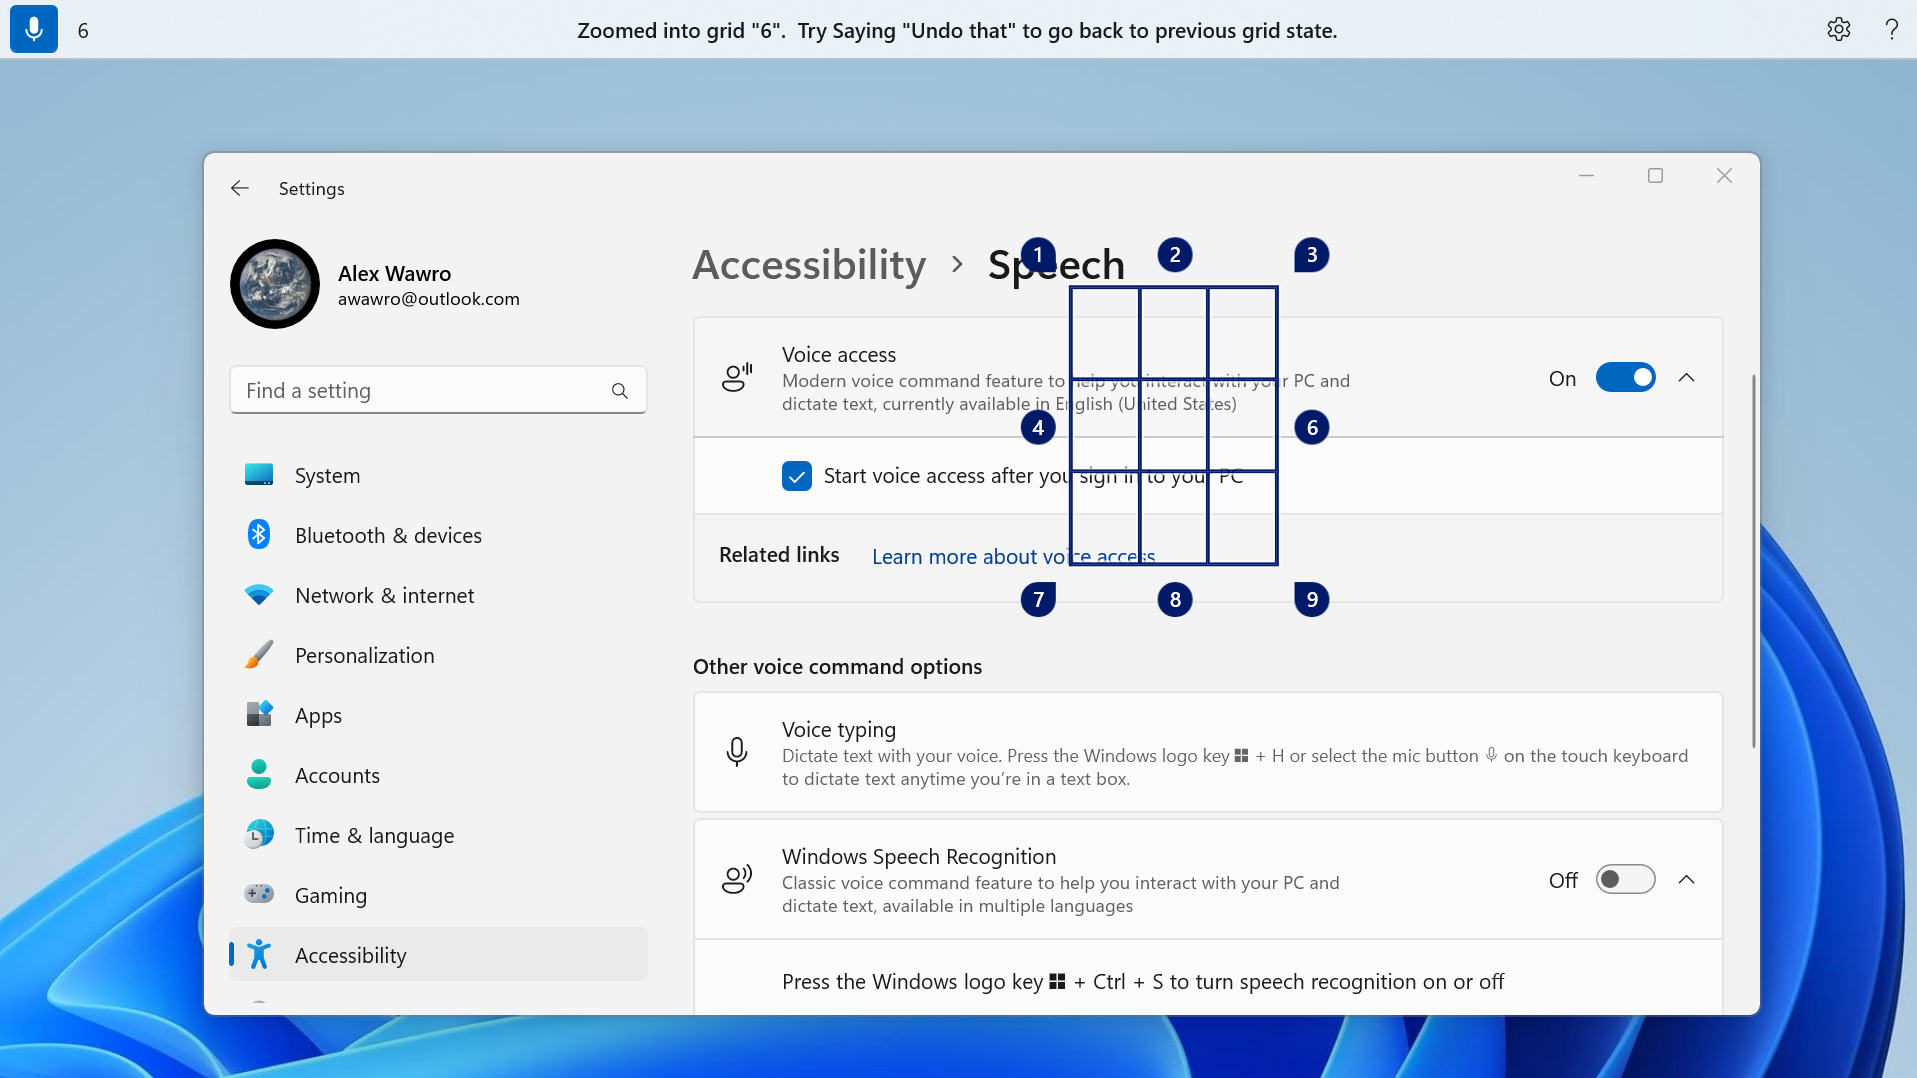
Windows has had various forms of voice-to-text typing and voice controls for some time, but with Windows 11 Voice Access I think Microsoft has achieved a new level of utility that makes it worth using for everyone, not just folks who have a hard time typing.
Of course, Voice Access is even more valuable for those of us who have compromised hands and wrists or otherwise have a hard time using a traditional PC because it lets you do the lion's share of your Windows work without using your hands.
Once you get comfortable using Voice Access you can not only talk to your PC to tell it what to type, you can tell it to launch or close programs, click buttons on websites, enter text and other data in website fields and generally get a lot done without touching the keyboard. It feels kind of futuristic, too, like you're talking to one of the Esper supercomputers in Blade Runner.
Windows 11 Voice Access has been a game-changer for how I work, and it's now built right into the latest versions of the operating system, so you should be able to find it by just hitting the Start button and typing "Voice Access", then launching it from the search results. For more guidance and tips, check out our guide to how to use Windows 11 Voice Access to tell your PC what to do.
Take advantage of Clipboard history
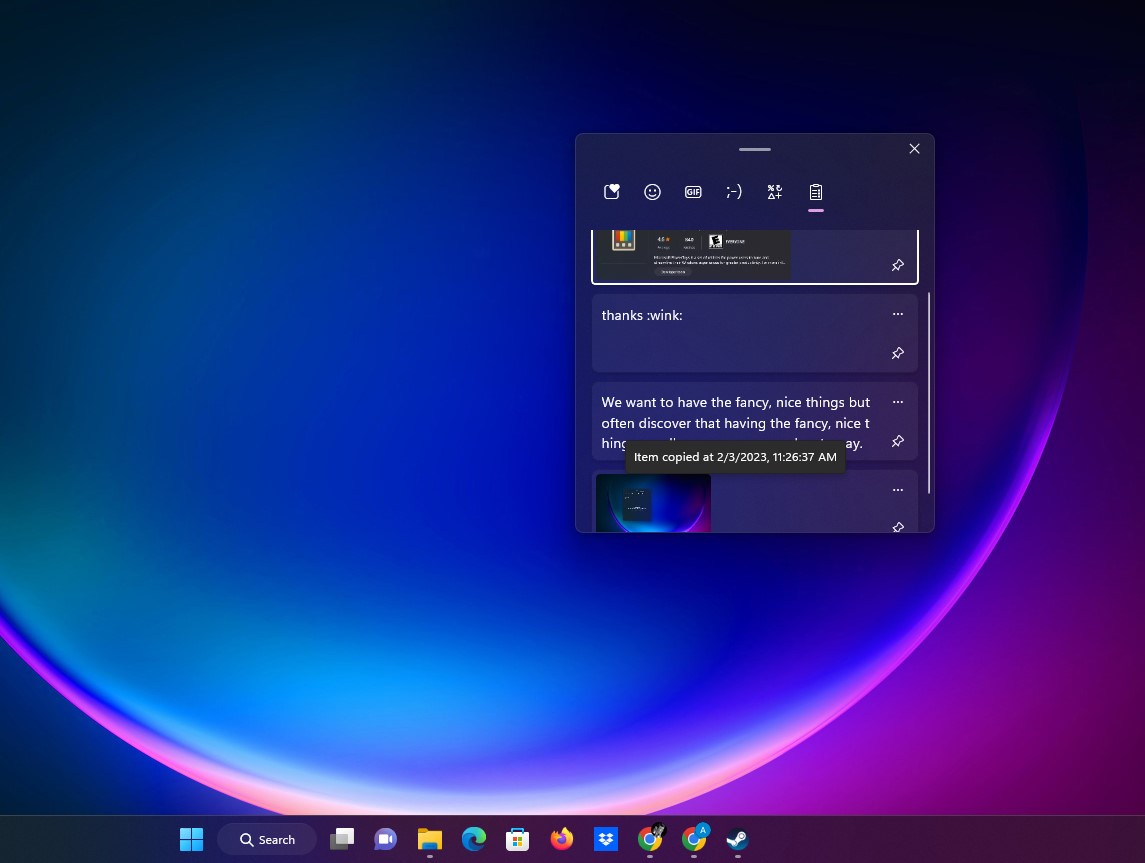
I don't know about you, but I spend a lot of my workday copying and pasting text, images and files across various projects I'm working on within Windows 11.
That's why I was so happy when I discovered the Clipboard history, which is exactly what it sounds like: a historical log of everything you've copied to the Windows clipboard recently.
You can access it by simply hitting the Windows key + V keyboard shortcut, at which point the little window will appear with a reverse chronological log of everything you've copied (you may have to hit the "Turn on" button first to turn it on).
Try it and you'll see not only is the clipboard history in this little app, it also has tabs for pasting in emoji, GIFs, special characters and more.
Save power and money with Energy Saver
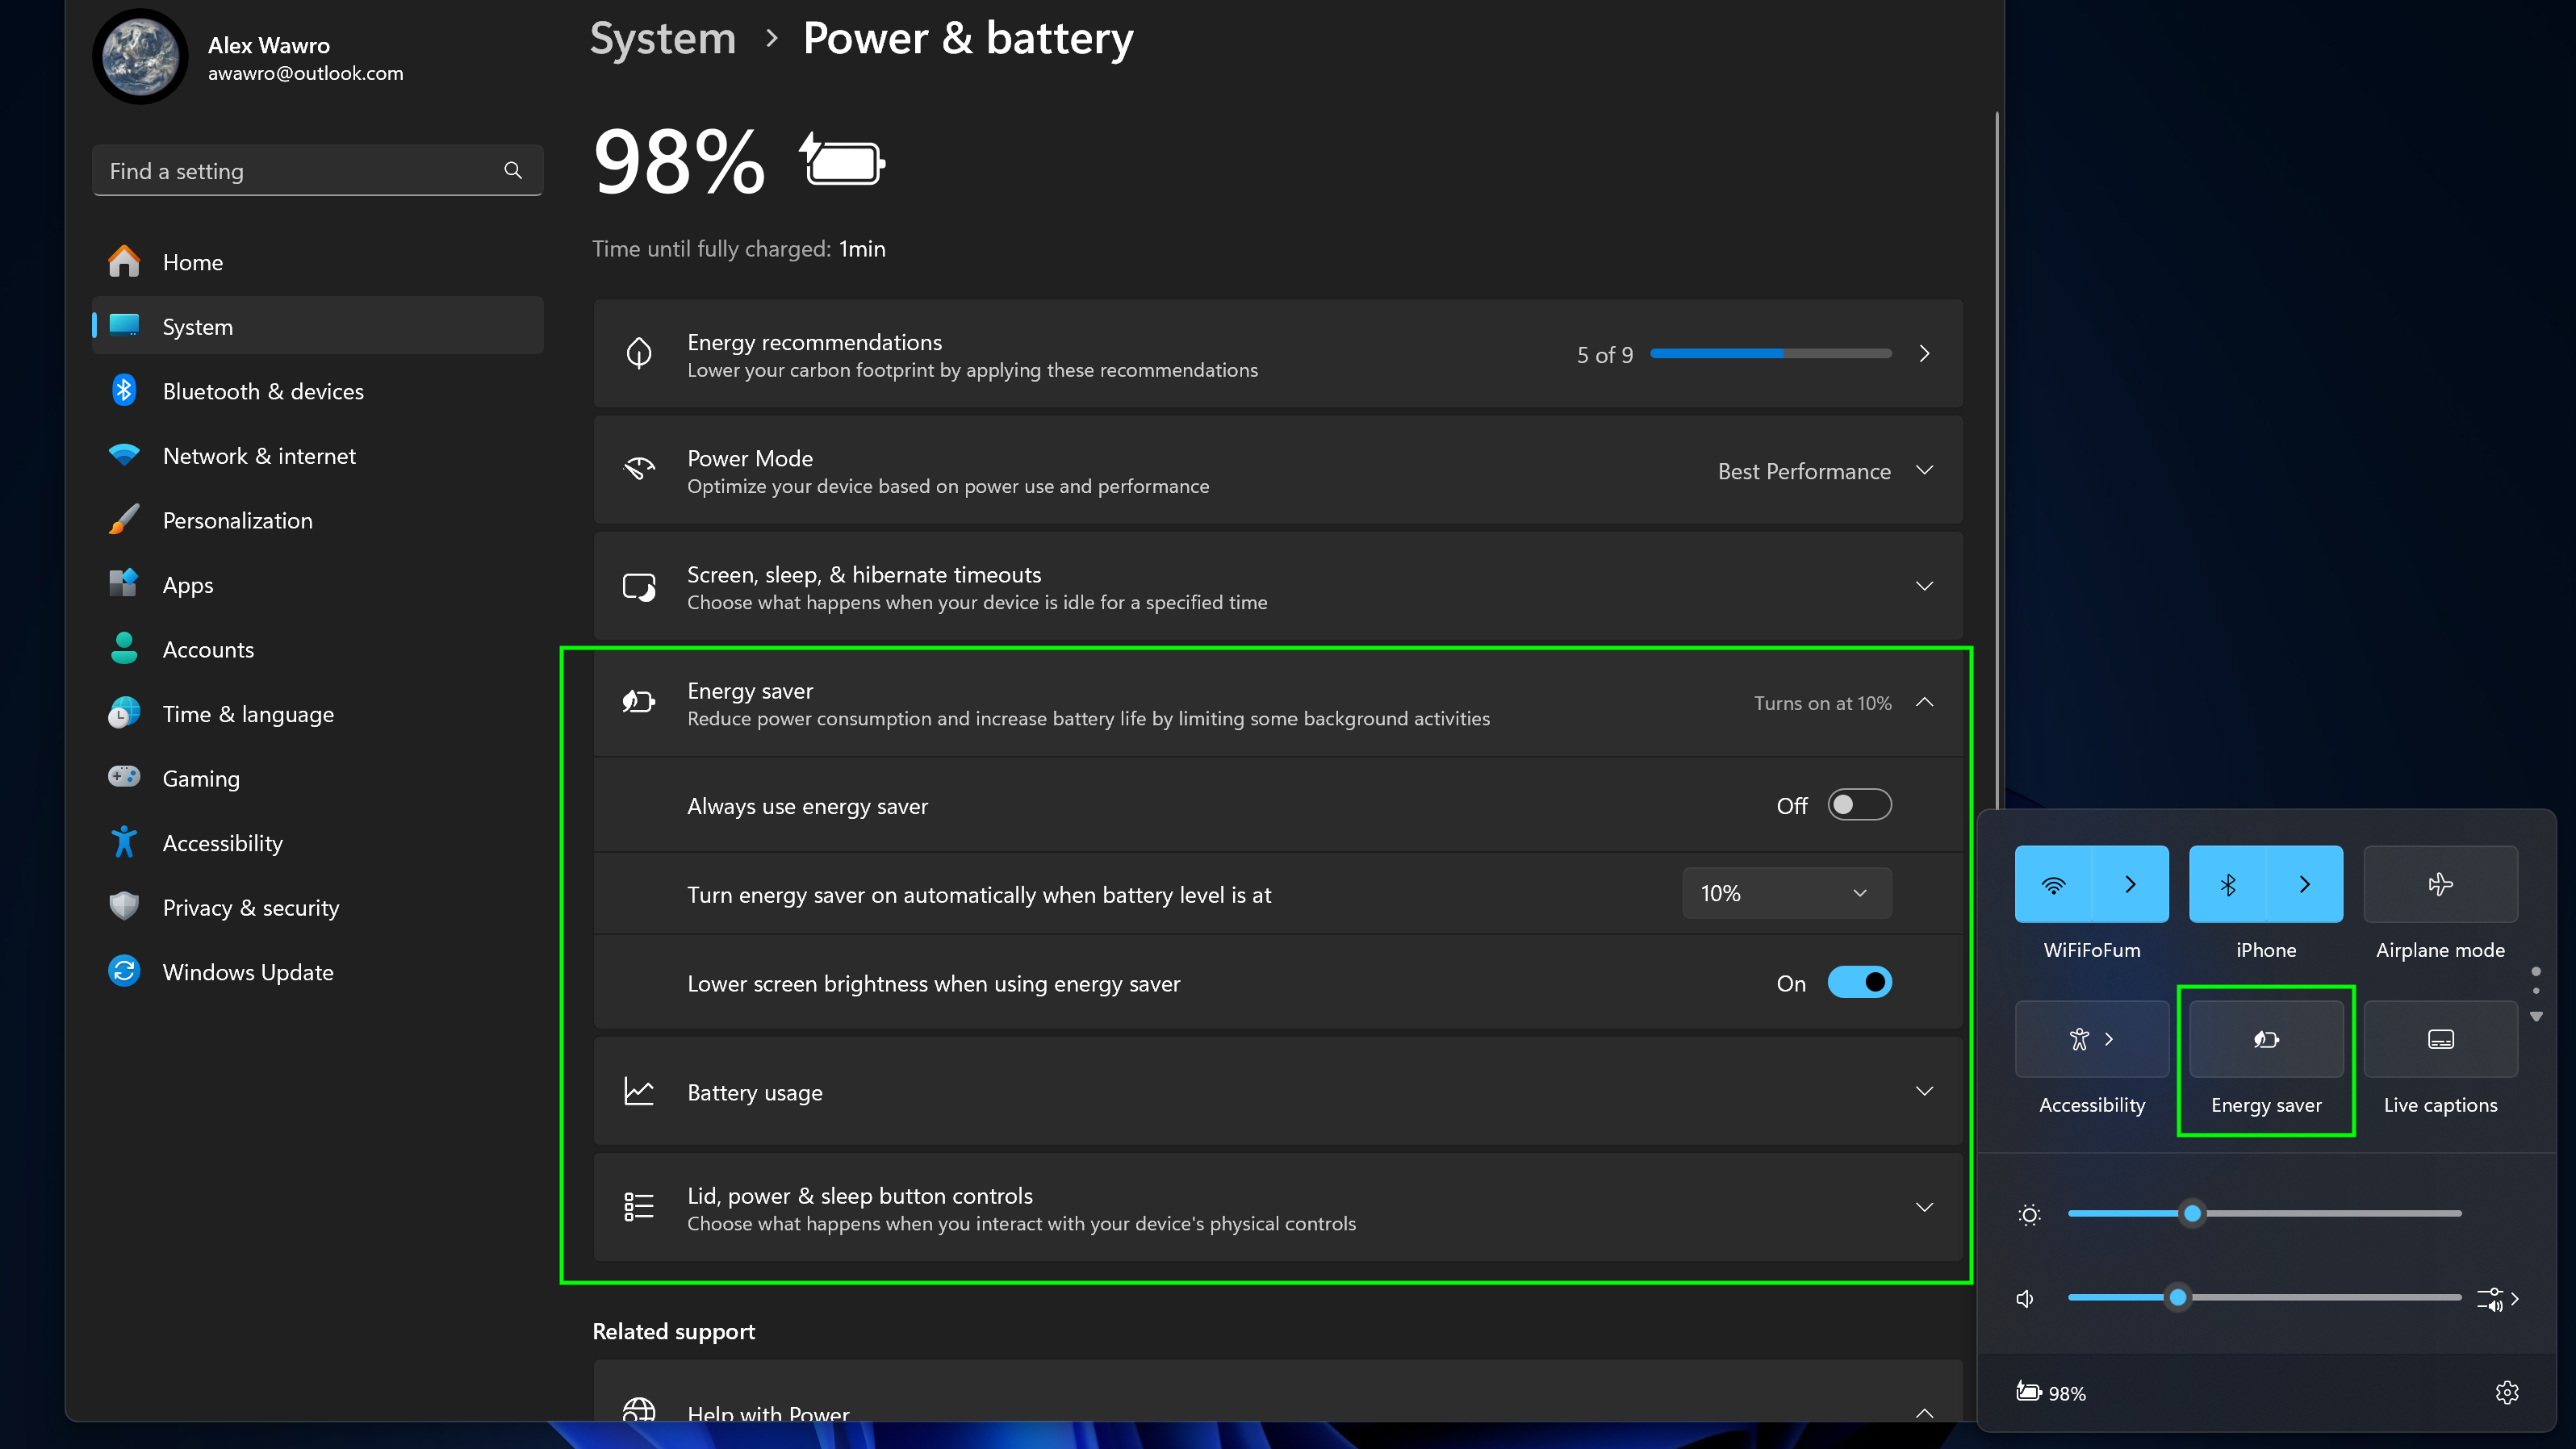
Windows laptops have had some sort of "battery saver" power mode that conserves power for at least a decade, but recently Microsoft built that feature up into a new "Energy Saver" power mode that you can use on both laptops and desktops.
The value is obvious if you're on a laptop that's running low on juice, because enabling Energy Saver mode lowers the rate at which your machine consumes battery power.
But the fact that you can now use it on Windows 11 desktop PCs means you can fine-tune your PC's power draw to some extent, which can save you hundreds of dollars on your power bill in the course of a year. You can also dig into the System > Power > Energy recommendations subsection of the Windows 11 Settings menu for more guidance on how to cut down on your power bill.
To enable or disable Energy Saver, just open your Quick Settings menu by clicking the system tray on your taskbar or hitting Windows key + A.
Get to grips with God Mode
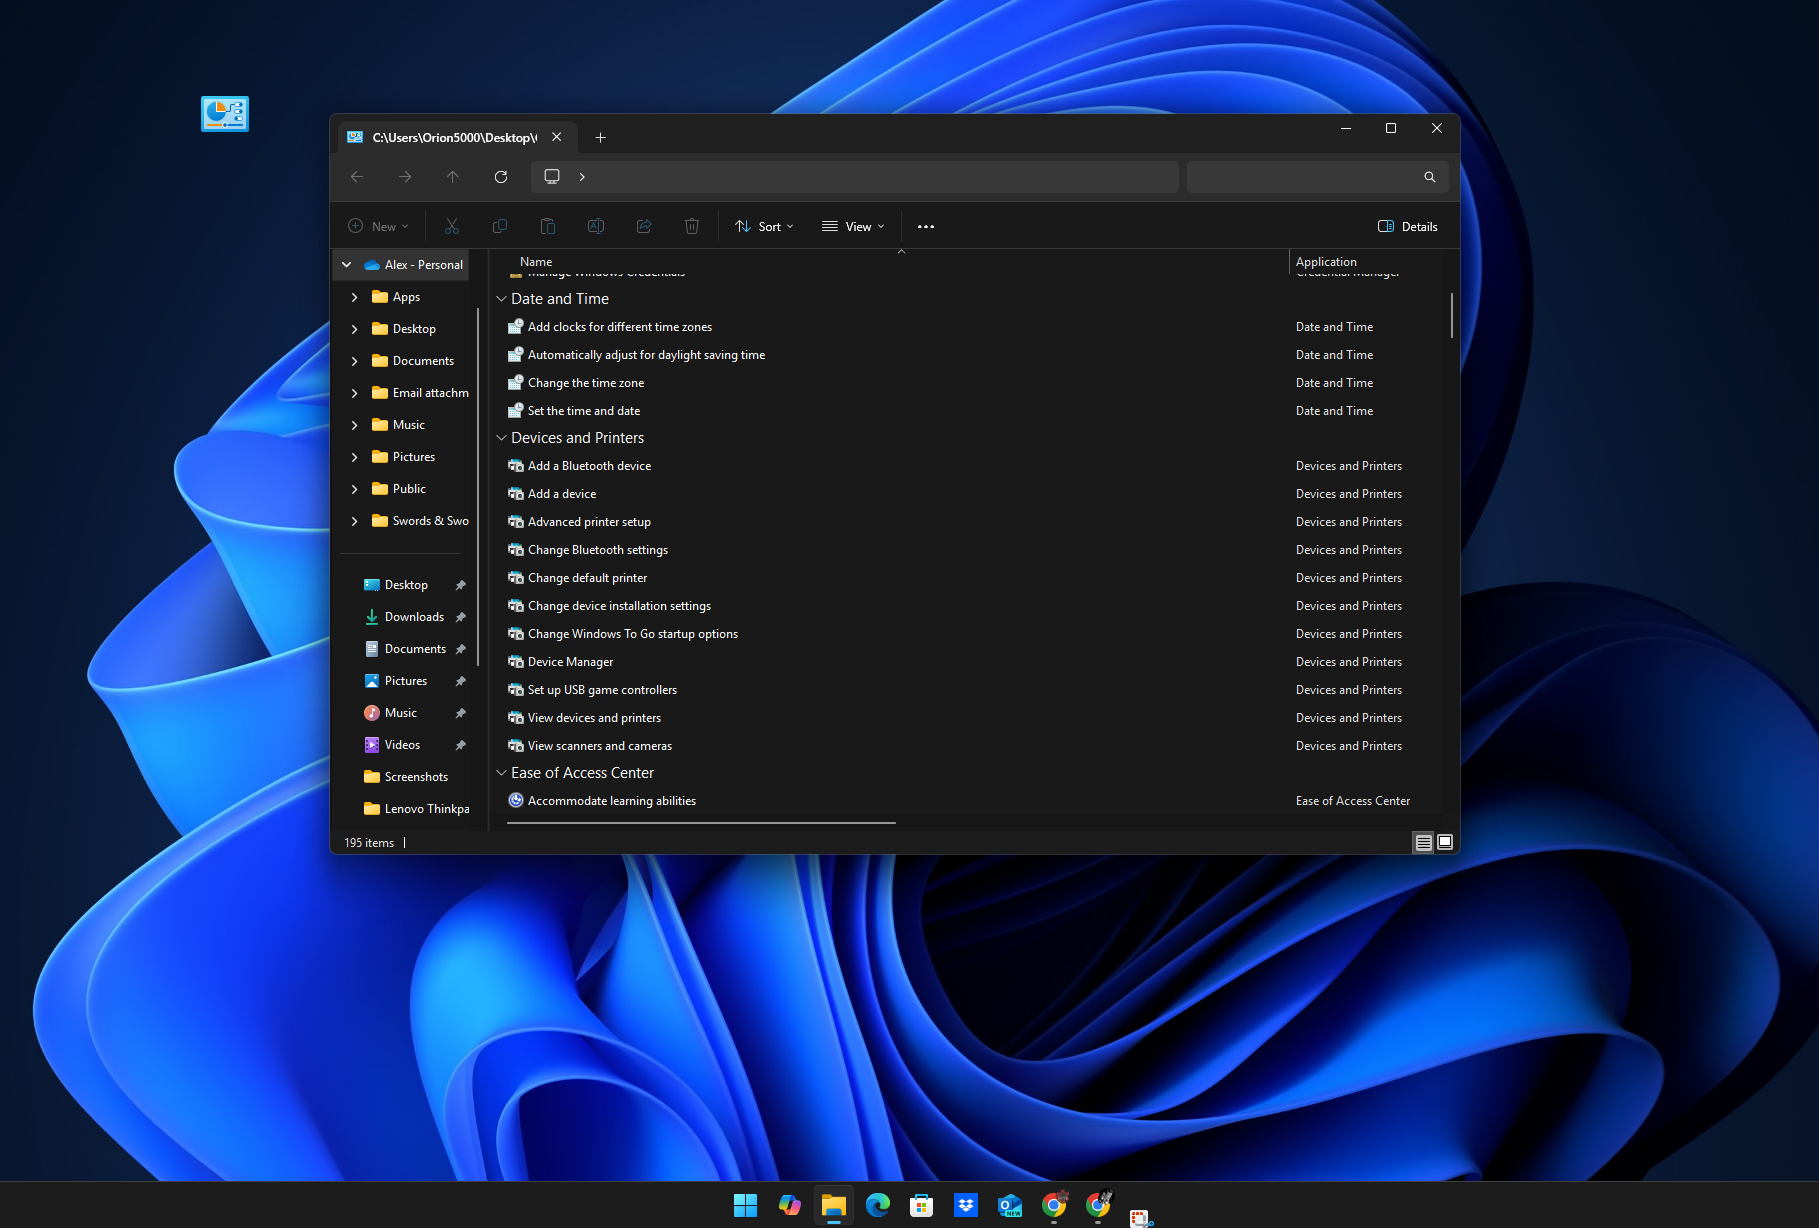
If you don't feel powerful enough in Windows 11 after downloading PowerToys, it's time to try God Mode.
"God Mode" in Windows 11 is actually a semi-secret list of shortcuts that let you do a lot of things inside Windows without having to dig through menus. They're very useful for creating shortcuts to do things like create a restore point for Windows, creating or deleting new user accounts, show hidden files and folders and more.
But it's a little tricky to access God Mode, because you have to create a new folder on your Windows desktop and then rename it to a very specific weird string of characters: GodMode.{ED7BA470-8E54-465E-825C-99712043E01C}
Once you do that a little control panel icon will appear on your desktop, and you can open it to see a list of dozens and dozens of shortcuts to key Windows features. It's a tricky process, so make sure to consult our guide to how to enable God Mode in Windows if you have any questions!
Save your most-used files as Favorites in File Manager
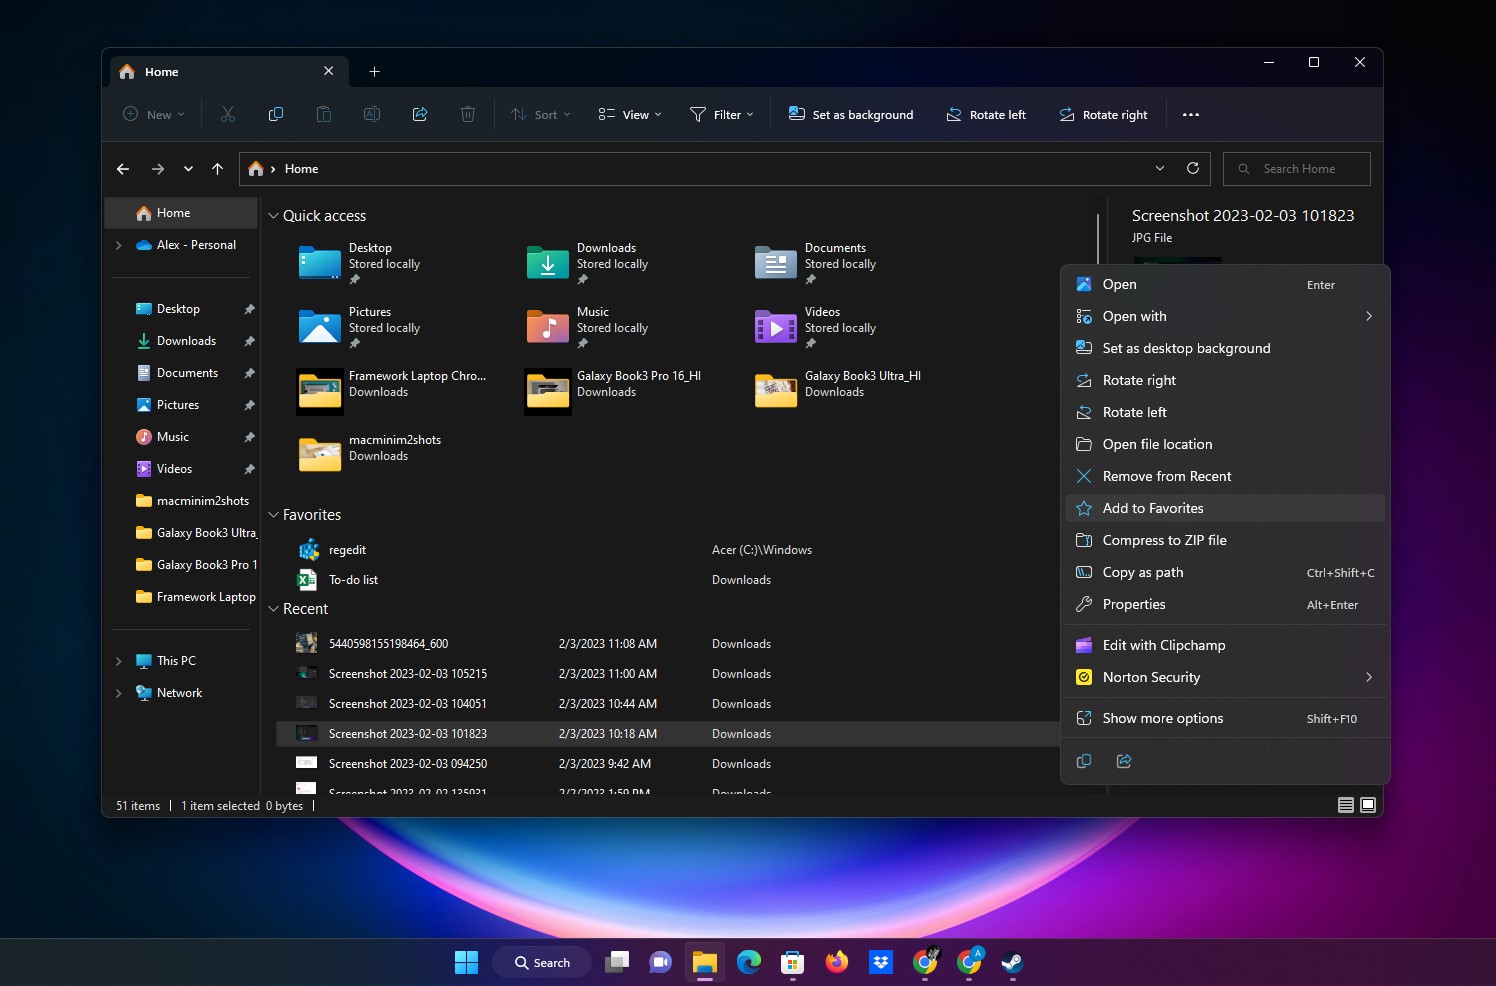
This feature wasn't in Windows 11 at launch, but less than a year in Microsoft gave File Explorer a makeover and added some useful new features that made it a lot more versatile.
One my faves, pardon the pun, is the ability to right-click any file and select Add to Favorites in the context menu.
That will ensure that file appears in a special "Favorites" section of the File Manager Home screen every time you open the app. I use this for key work documents and regularly-used templates, but you can use it however makes sense for your workflow.
Try the Xbox Game Bar
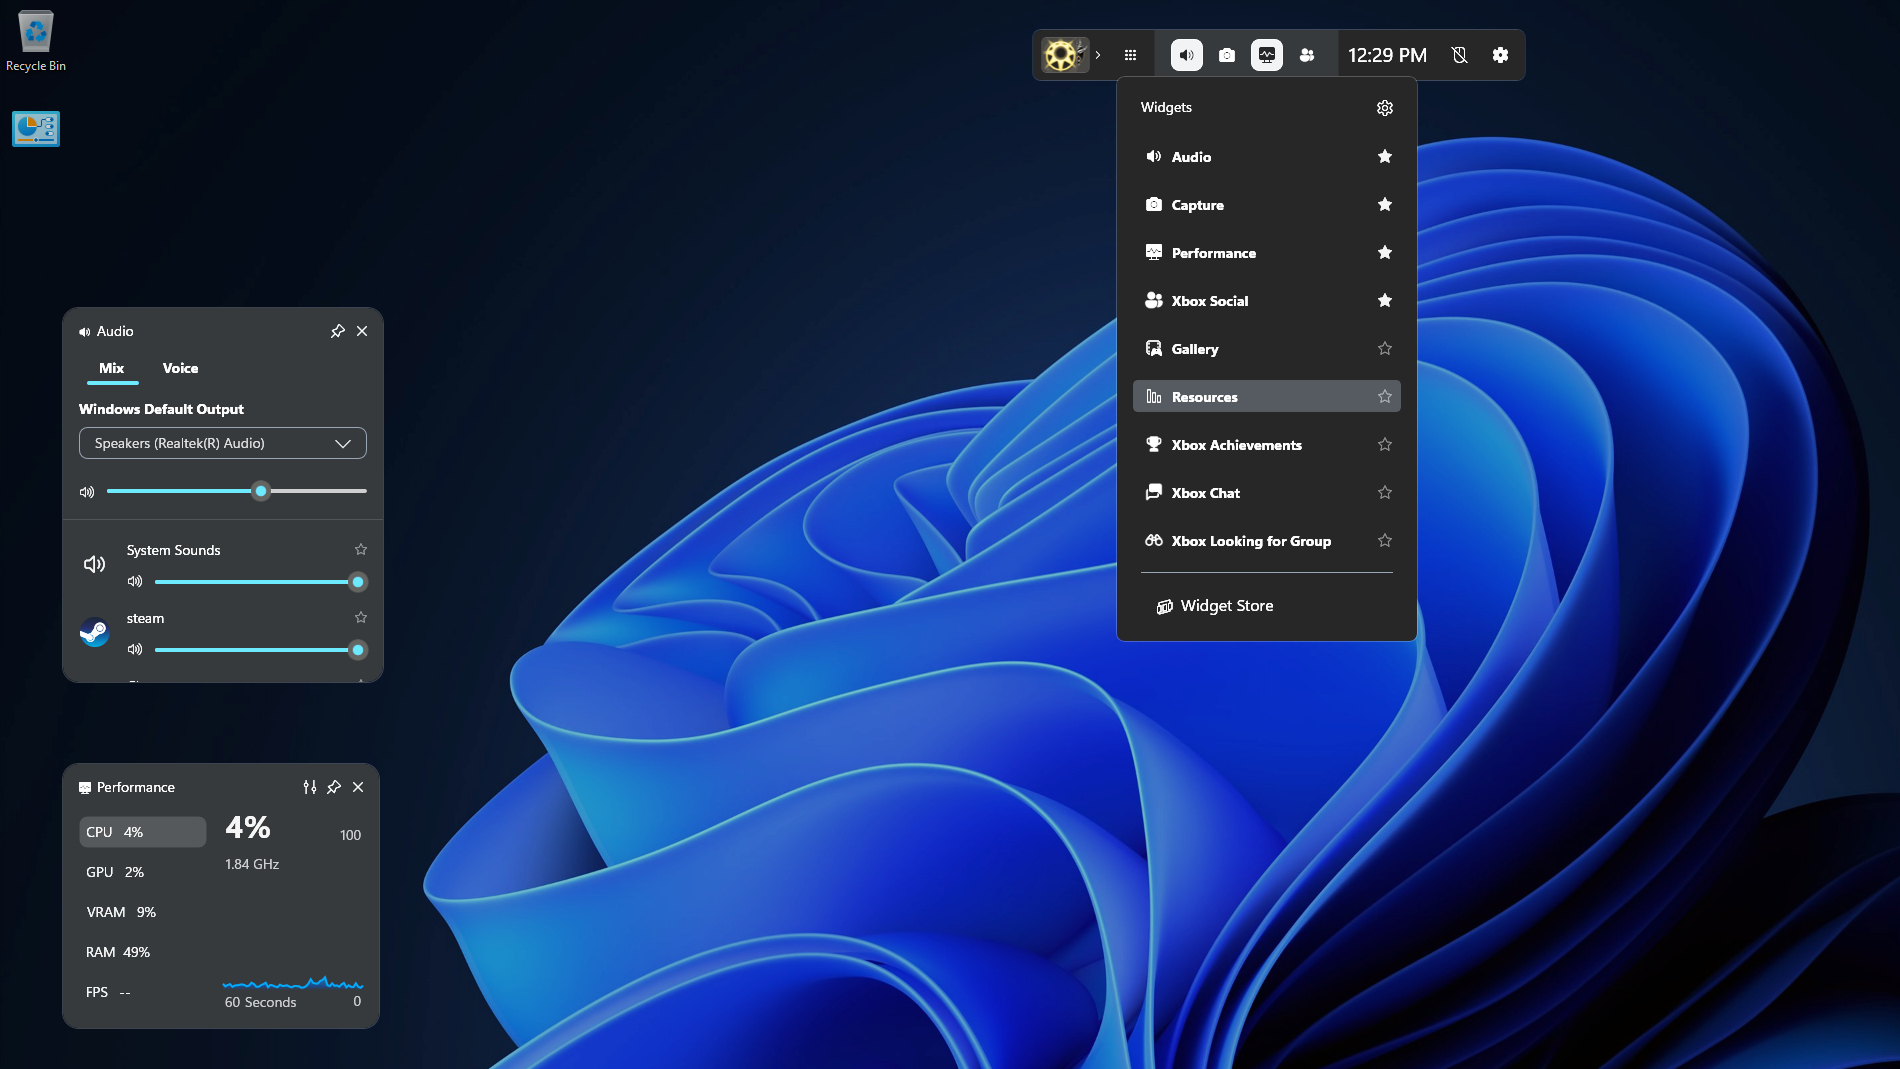
If you play games on your Windows PC you should check out the Xbox Game Bar, a built-in feature that you can summon by hitting the Windows key + G keyboard shortcut.
Doing so brings up an overlay that has key widgets for PC gaming, including an audio control widget for controlling key details like volume levels, which mic and speakers you're using and more.
There's also a performance monitor, a screenshot widget, and even a full Widget storefront where you can download additional tools like a Spotify widget, a Razer Cortex widget and even widgets designed to help you in specific games like Valorant.
Microsoft has done a lot to improve this feature since it debuted, so give it a try next time you're gaming.
Take advantage of Focus assist
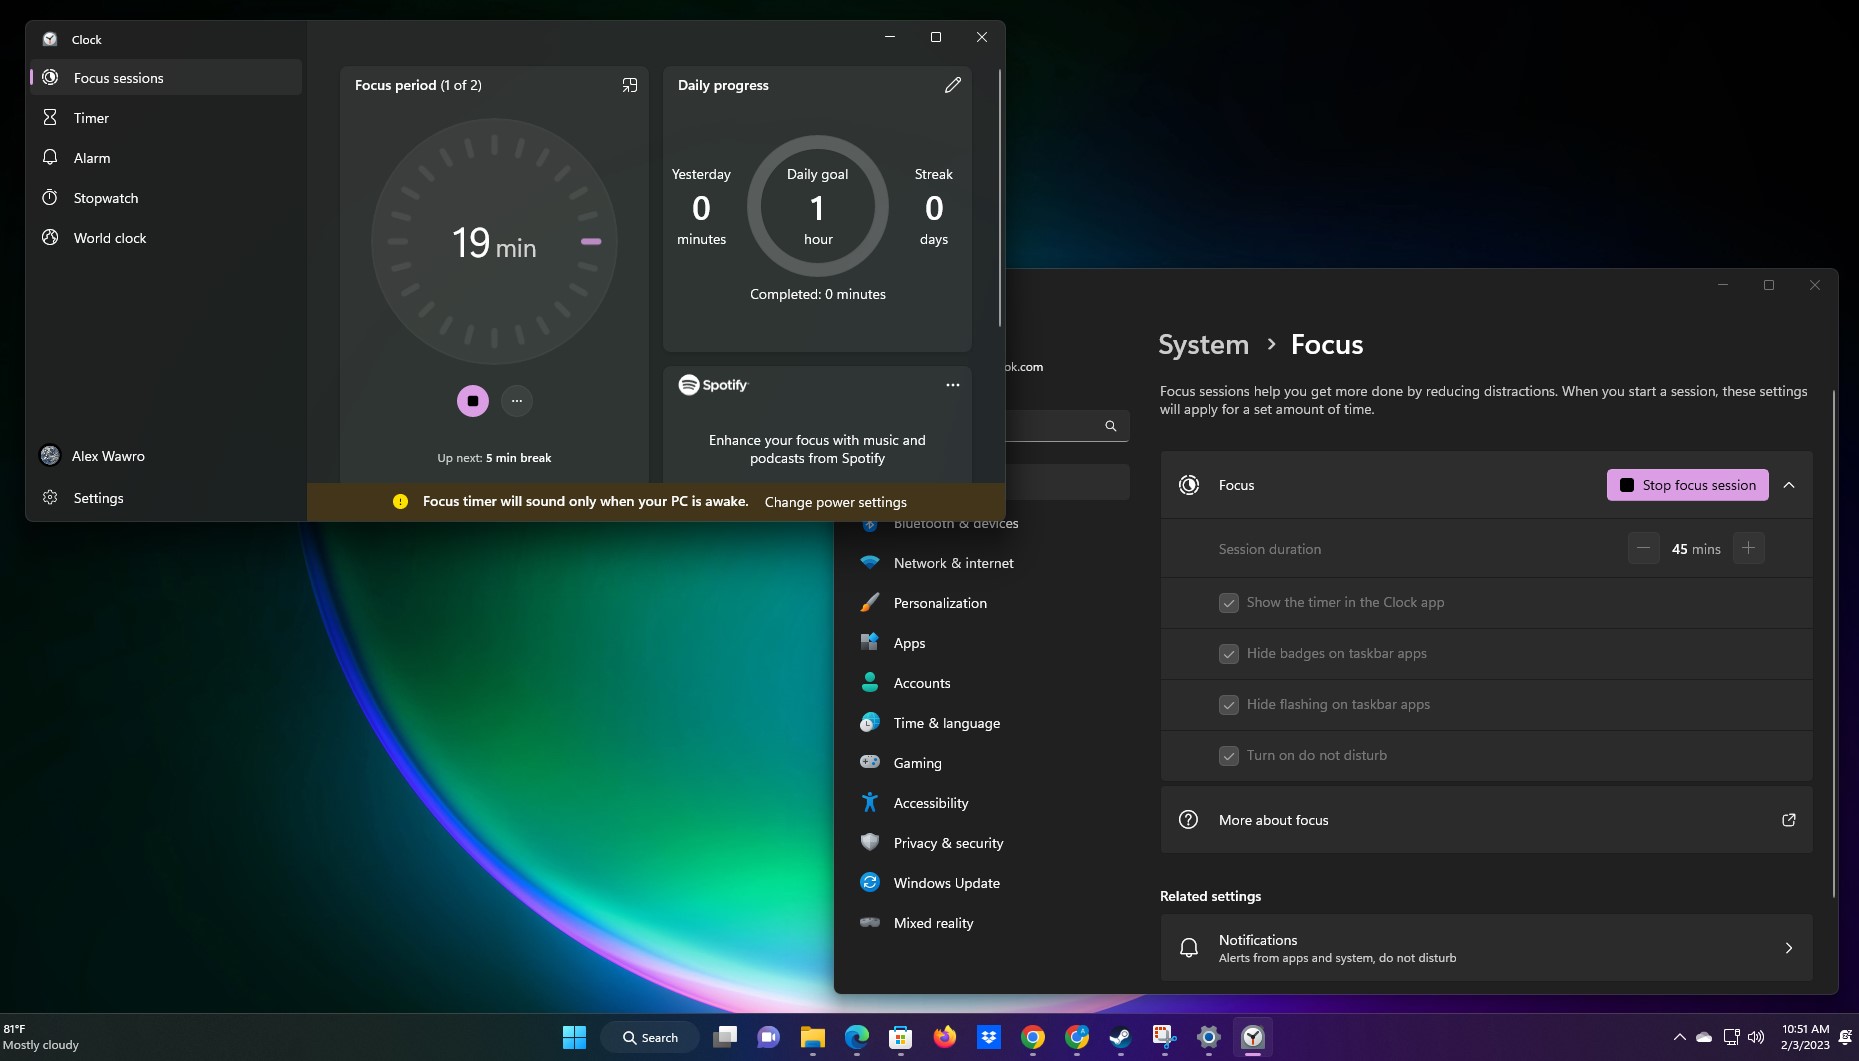
I love using Windows 11's Focus feature when I'm working and when I'm gaming because it puts the kibosh on annoying pop-ups and notifications for as long as you need.
To try it yourself, simply open the Focus settings menu within the Windows 11 Settings menu (the fastest way is to hit the Start button and type Focus, then hit Enter) and use the tools therein to customize how long you want a Focus session to last when you start the timer.
Once you do start a Focus session, a timer will appear on-screen (though you can choose to hide it) and Windows' built-in Do Not Disturb mode will switch on. This will hide things like notification badges on apps and stop apps flashing in the taskbar when they want your attention, but only for the duration of the Focus session.
You can customize which notifications appear and how in the Focus settings menu, which can make it a great resource for managing your attention.
Try out Dark Mode
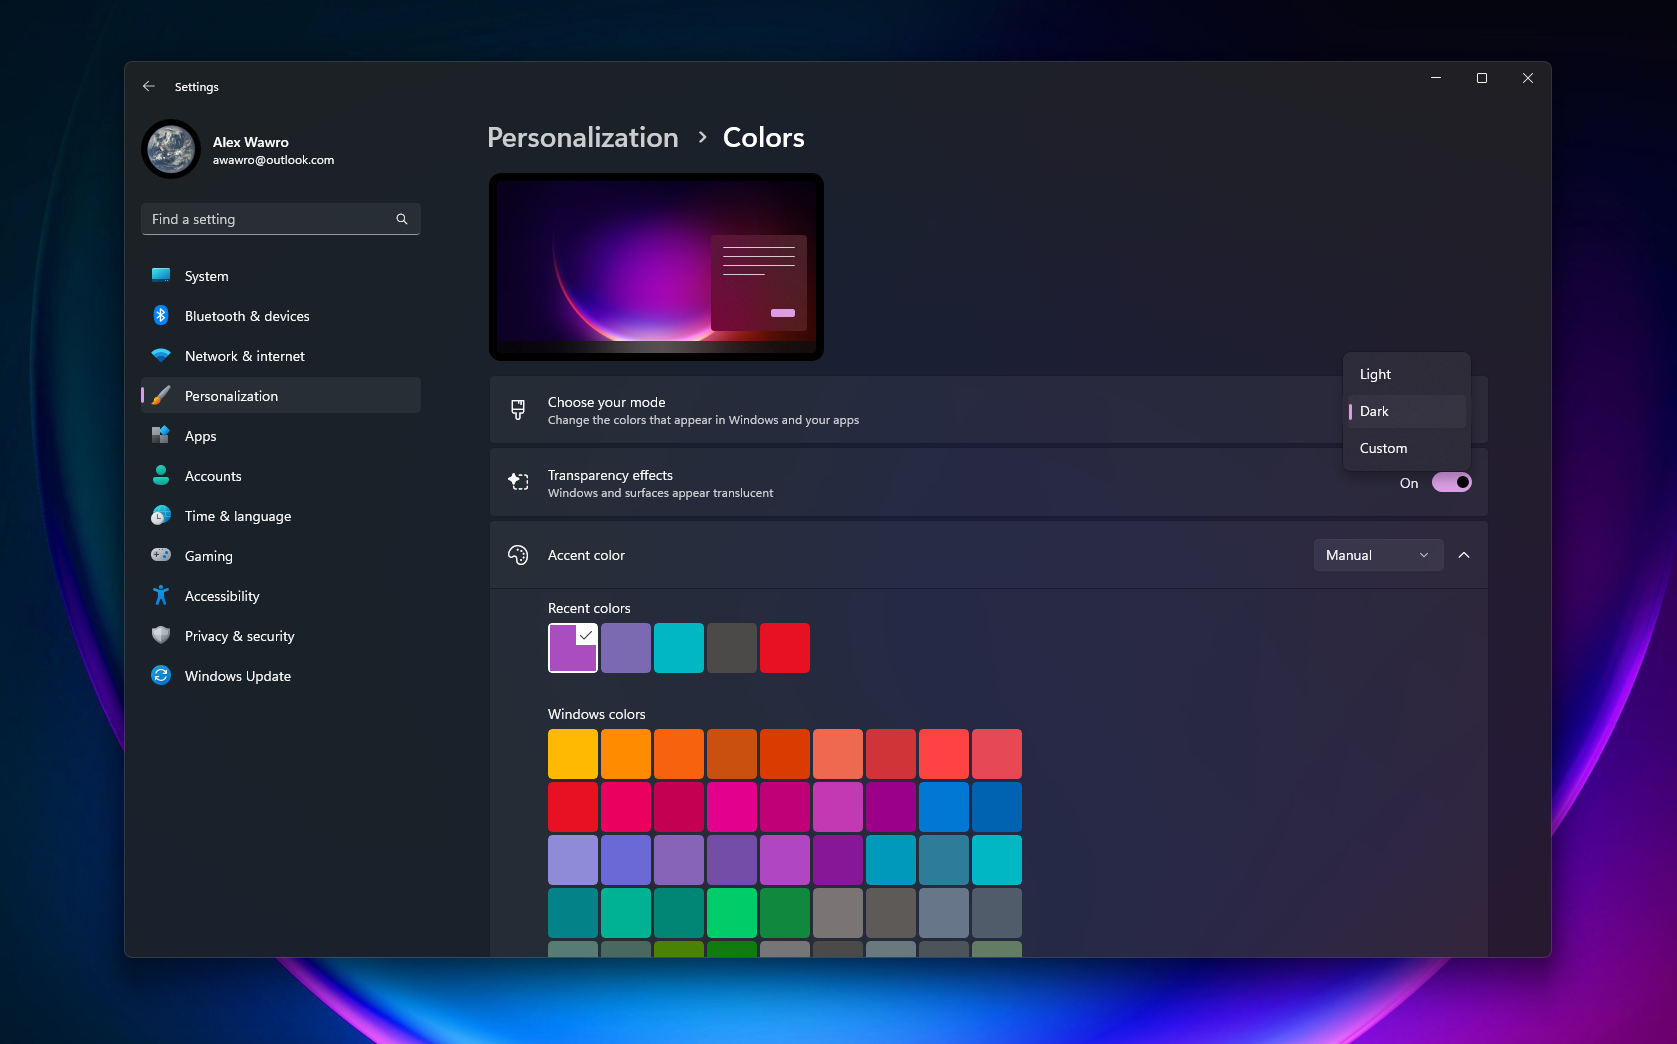
Now that so many of us are using monitors with sky-high brightness settings and HDR support, I truly feel that every app and website should offer a dark mode option.
Sadly that's not yet the case, and even when an app or 'site does have a dark mode it's often a hassle to fiddle with the settings on each and every one.
That's why I'm so grateful Windows 11 has a "dark mode" you can enable which will switch the appearance of Windows to a cooler, darker palette. Even better, it will do its best to automatically switch all apps which support it to dark mode, saving you some time and hassle.
To enable Dark Mode in Windows 11, navigate to Settings > Personalization > Colors and select "Dark" from the "Choose your mode" dropdown menu. You can also set up custom color palettes if you prefer.
Try out Phone Link to get texts on your PC
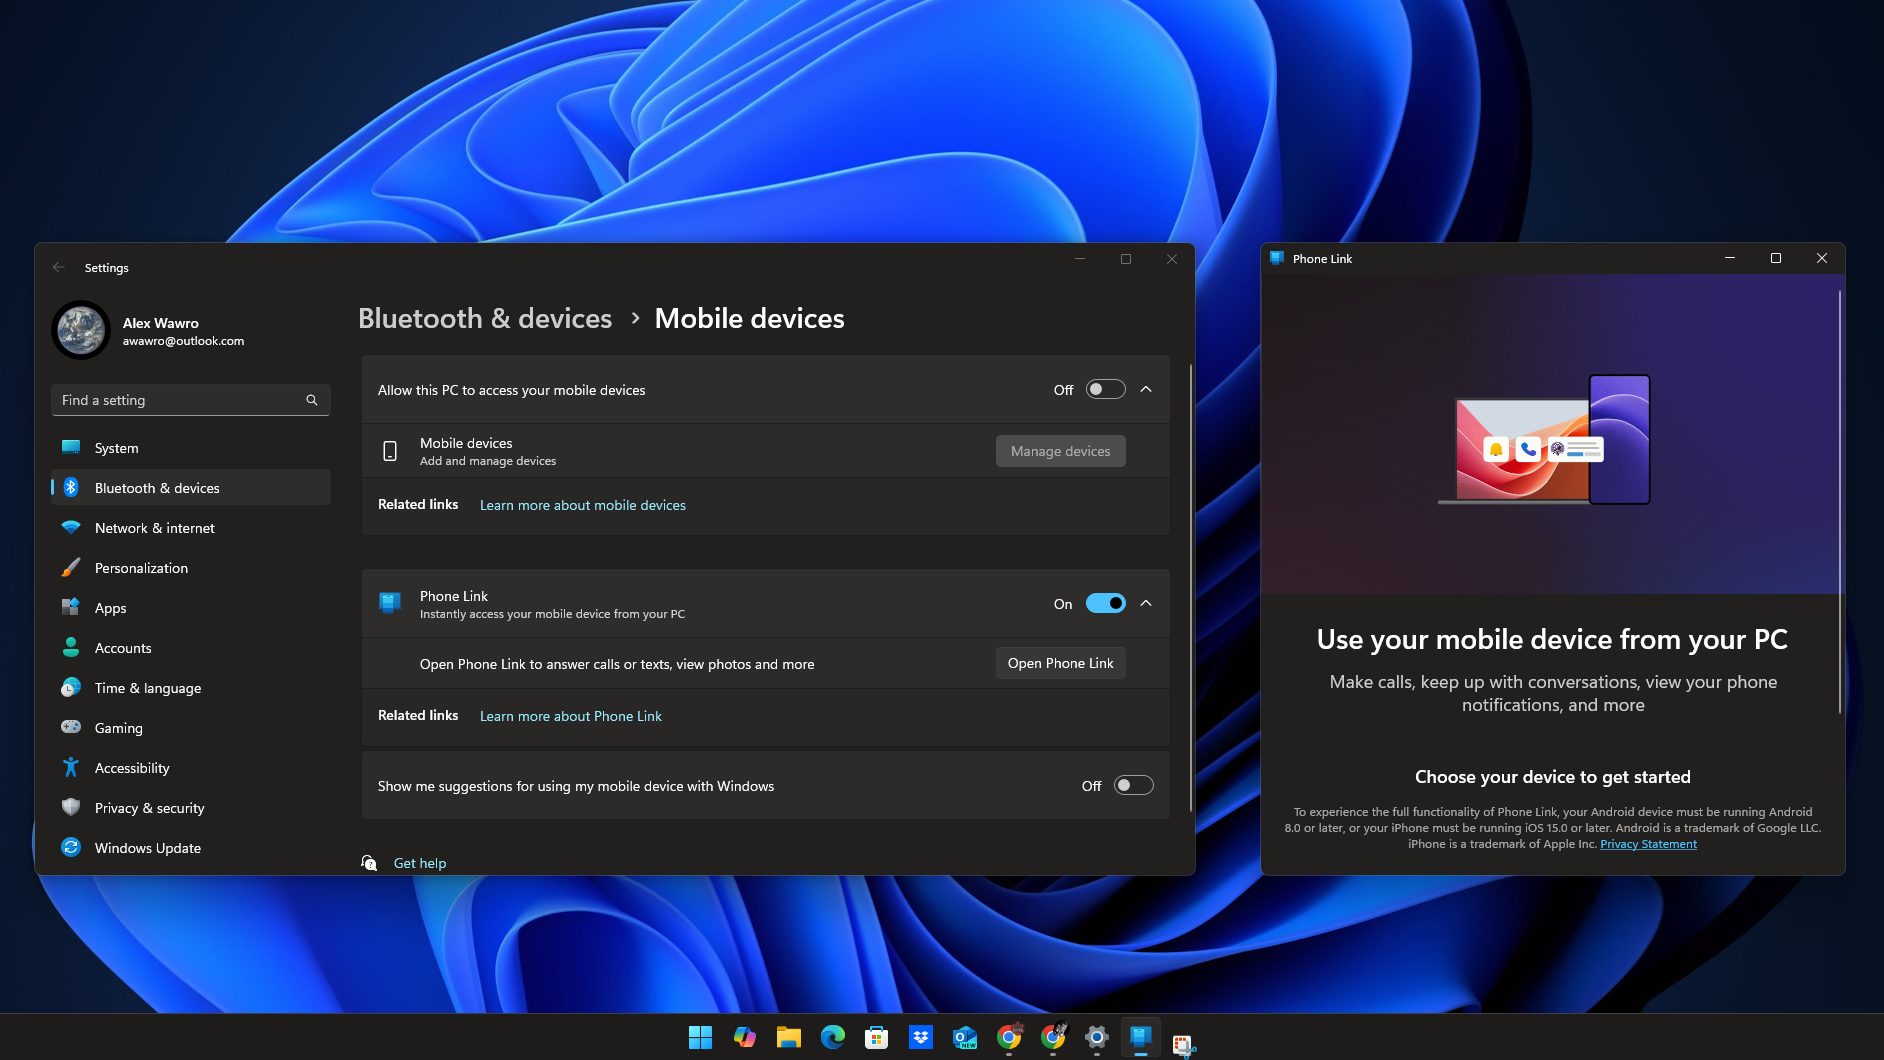
If you've been jealous of the way Macs and iPhones are so deeply integrated that owners of both can get texts right on their PC, it's time for you to try out Phone Link.
For the last year or so the Phone Link app has been included by default in Windows 11, so you should be able to summon it by just hitting the Start button and typing Phone, then clicking the Phone Link icon in the search results.
Once you launch it you can sync your iPhone or Android device to your PC and start sending and receiving text messages right from within Windows. Unfortunately, it's pretty limited with iPhones, so you can only take full advantage of this feature if you're using an Android device that's running Android 8 or later.
But I'm still using an iPhone and I find even the basic utilities of Phone Link pretty handy to have, so I recommend you give it a shot.
Clear out annoying taskbar clutter
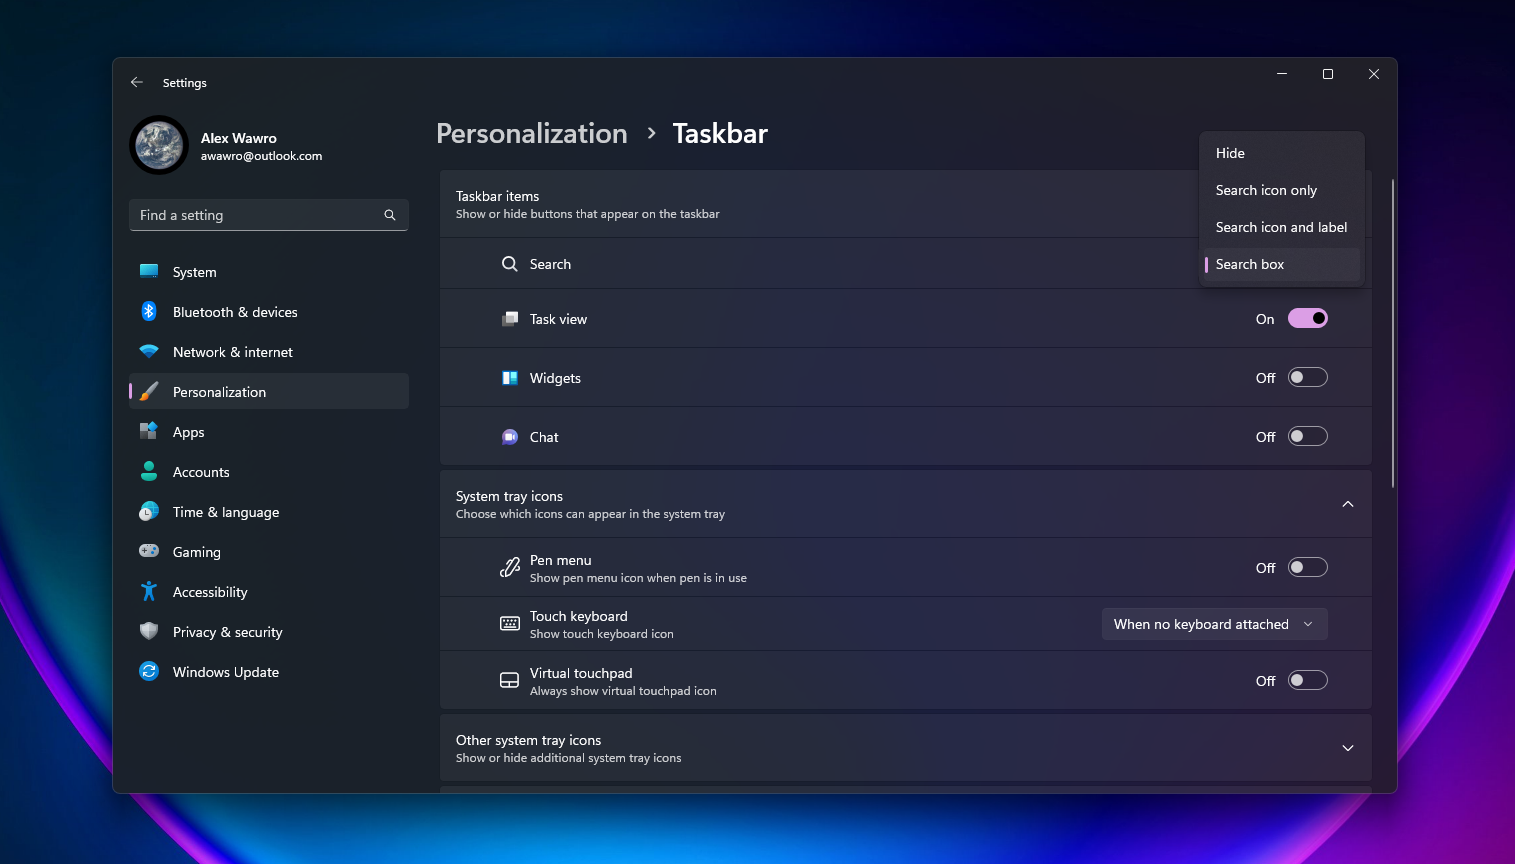
When I first started using Windows 11 I was so annoyed by what Microsoft did to the taskbar. I'm not talking about the centered Start menu, either; I got used to that pretty quickly, and after all you can move it back to the lefthand corner if you really want (just right-click the taskbar and select Taskbar settings > Taskbar behaviors and change Taskbar alignment to Left).
I like my Windows taskbar to work for me, so one of the first things I do on every new Windows PC I review is to get rid of all the default taskbar icons for apps like Copilot, Edge, the Microsoft Store and Task View.
Some of these, like the Microsoft Store shortcut, can be removed by simply right-clicking the icon on the taskbar and selecting Unpin from taskbar from the context menu.
Others take more work to dislodge. You can hide them from the taskbar by navigating to Settings > Personalization > Taskbar and opening the Taskbar items sub-menu, where you'll have the choice to disable the Microsoft Teams, Widgets, and Task view buttons.
Note that if you disable the Widgets button it will disappear from the taskbar, meaning you will no longer get live weather updates via it (if you have it configured that way) and you won't be able to access your Widget menu by mousing over it.
Shake things up to stay focused
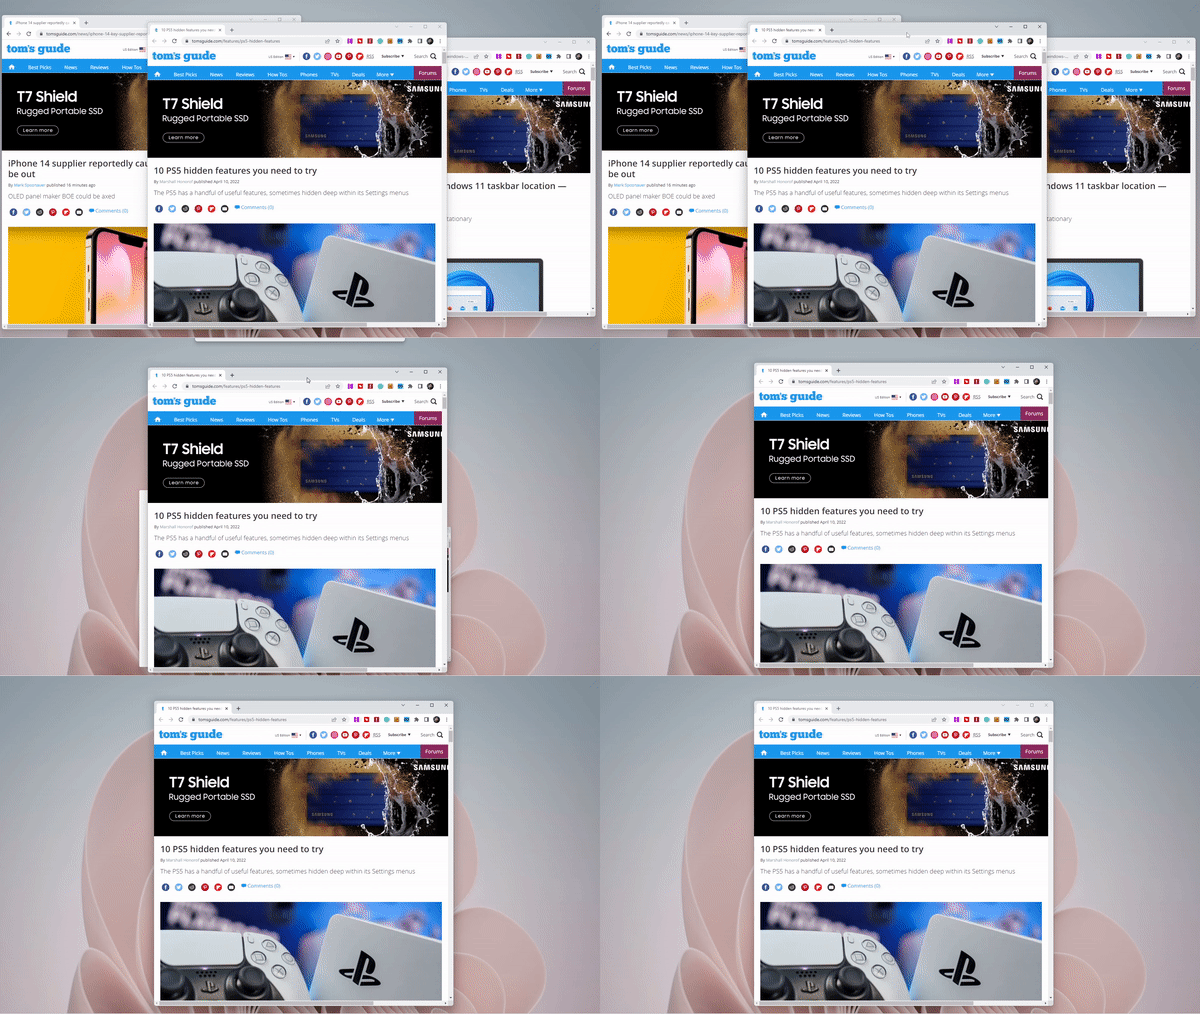
Windows 11 has a handy little feature that allows you to quickly minimize all windows except the one you're focusing on by simply shaking it around a bit. The window, that is, not your PC—try not to shake that around at all if possible.
This is a fun way to quickly get rid of (without actually closing) everything except what you want to focus on. I've found it comes in real handy when working across multiple monitors.
To enable it, simply navigate to Settings > System > Multitasking and switch Title bar window shake to On.
Fine-tune volume with a spin of your scroll wheel
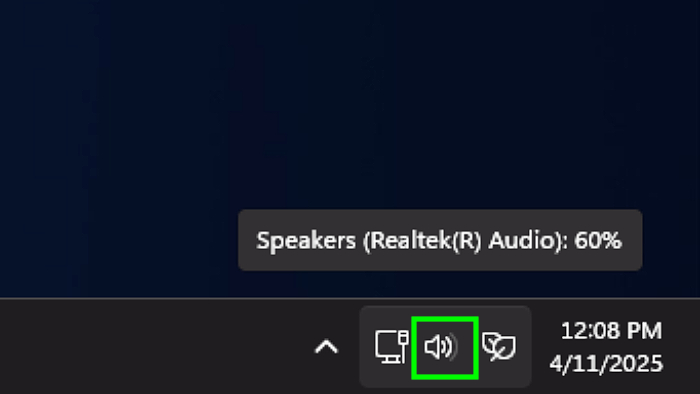
Here's a fun little secret not many Windows 11 users know: you can quickly adjust your PC volume by moving your mouse over the speaker icon in your taskbar and rolling the scroll wheel on your mouse or trackball up and down.
I really love doing this because it saves me at least two clicks every time, and that adds up in the course of a month. But more importantly, it makes me feel both cool and smart to know how to use this little feature.
You can put folders and key settings right on the Start menu
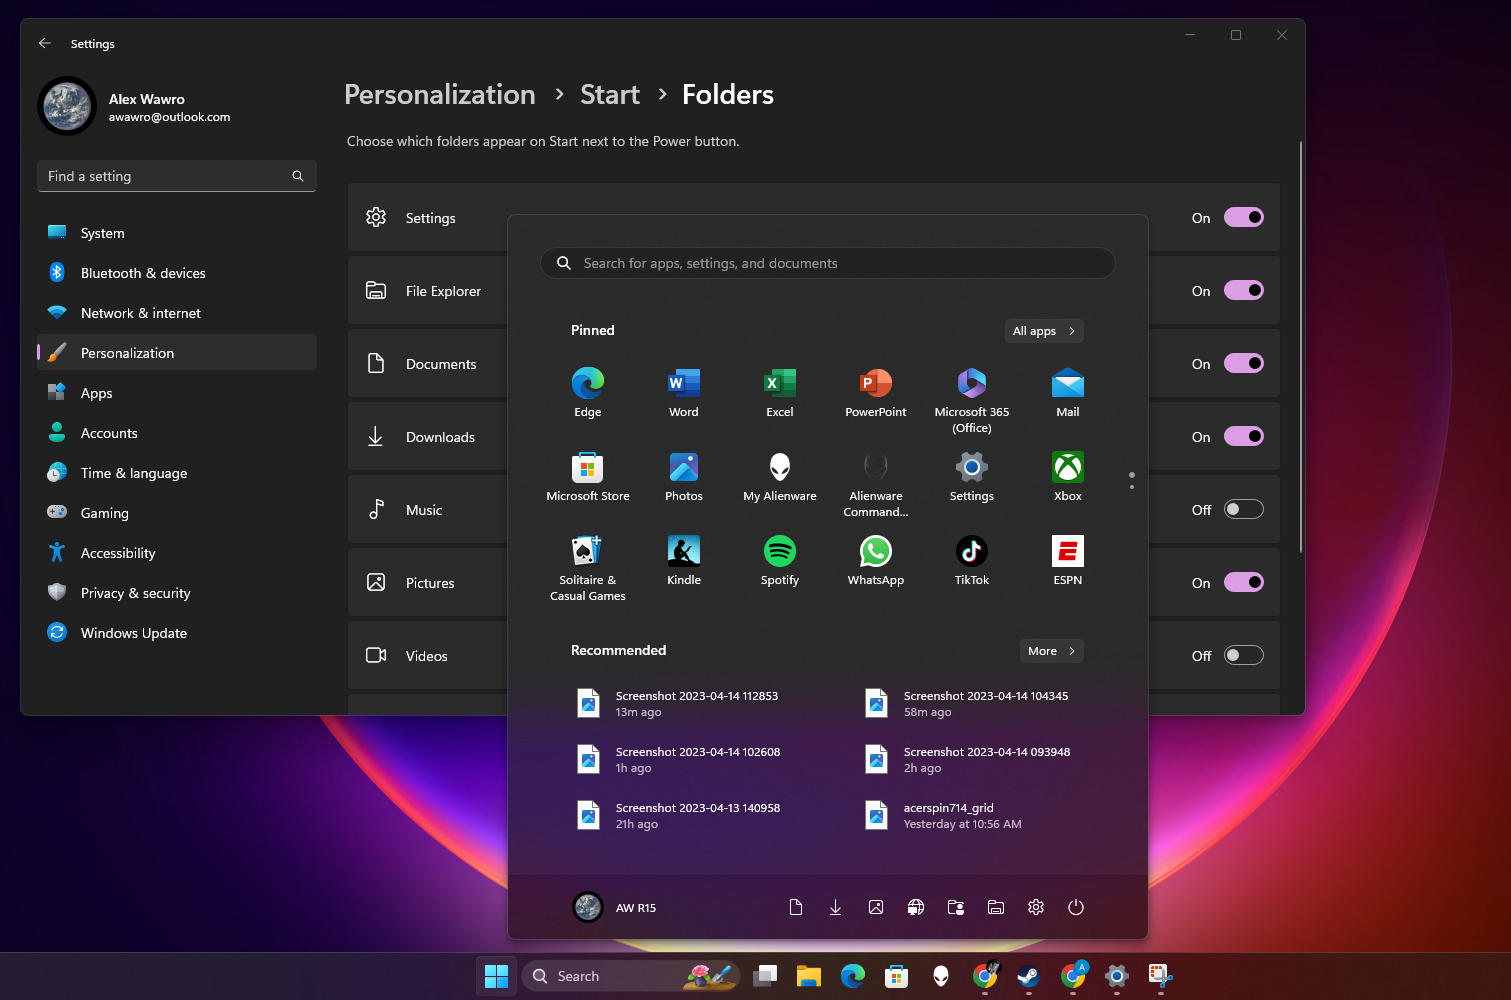
If you need faster access to key aspects of your PC like the Settings menu, the Downloads folder or your Network settings you can add them right to your Start menu with a few simple clicks.
To do so, navigate to Settings > Personalization > Start > Folders. In this sub-menu you'll see a list of nine folders (from Downloads to Pictures) you can choose to put back on the Start menu. Note that they appear not with their usual icons alongside everything else, but rather as small white glyphs in the lower-right corner of the Start Menu.
You can do even deeper customization of your Start Menu if you back out of the Folders sub-menu. In the general Settings > Personalization > Start settings you'll find even more options to change the way icons are spaced in the menu, whether or not your most recently-used apps and files appear, and more.
If you've made it this far you now know 15 of the most useful tips and tricks I know for having more fun and being more productive in Windows 11.
Anyone looking to to hone their skills even further should check out our guide to how to use Copilot to control Windows and get to grips with the new AI features Microsoft is bolting into its flagship operating system.
More from Tom's Guide

Alex Wawro is a lifelong tech and games enthusiast with more than a decade of experience covering both for outlets like Game Developer, Black Hat, and PC World magazine. A lifelong PC builder, he currently serves as a senior editor at Tom's Guide covering all things computing, from laptops and desktops to keyboards and mice.
You must confirm your public display name before commenting
Please logout and then login again, you will then be prompted to enter your display name.
