It doesn’t happen very often, but every now and then, I have the chance to try out a new device or gadget that’s so good, it warrants completely redoing my desk setup. From a desk shelf to a monitor stand to an entirely new way to do cable management, the Hexcal Studio completely changed how I normally put a desk setup together.
While most people will set up their desk and leave it as is for months or even years, I’m constantly adding new things to my desk. Whether it's a portable monitor for some extra screen real estate, a monitor light bar to help illuminate my workspace during the evenings or even a foot pedal underneath my desk to tap out keyboard shortcuts, I’ve tried everything you can imagine to make working from home the best experience it can possibly be.
I’ll admit that these small, incremental upgrades rarely require me to completely redo my desk setup. While I pride myself on the cable management tricks I’ve picked up over the years, I rarely change the configuration of my main desk. Instead, as someone who reviews the best standing desks for a living, I try to put together an entirely new desk setup for each one I review. This can certainly be time consuming but when it comes time to actually get to work, I know my main desk is there waiting for me exactly the way I left it.
When Hexcal sent over its advanced workstation for me to check out, I initially planned to use it for one of my many other desk setups. However, after unboxing the Hexcal Studio and seeing what it was capable of, I rolled up my sleeves and decided it was finally time to redo my main desk. After hours of hard work, I couldn’t be more pleased with the final result.
A different take on cable management

Normally when you want to put together a clean-looking desk setup, I’d recommend installing a cable management tray underneath your desk. This way, you can have your computer, your monitor, your speakers and everything else you need plugged into one of the best surge protectors, with all of the cables neatly tucked away underneath your desk. Then, you only have a single power cable hanging down from the back of your desk.
Hexcal has turns this idea completely on its head with the Hexcal Studio. You see, this aluminum desk riser isn’t just a shelf or a monitor stand. Instead, it’s actually a very discreet cable management system with all of the bells and whistles you’d expect from a premium desk accessory.
Along the front, there’s a built-in LED light strip in the center with the control buttons on the left side. There are 16 levels of control for both the light’s temperature and its intensity, a mode button to switch between them and a favorite button to save your preferred lighting configuration.

The panel in the middle slides off to reveal a 40-inch long, 6-inch wide and 1.6-inch deep cord storage chamber and you’re definitely going to need all of that space. With the standard legs attached, the Hexcal Studio is 5.9-inches tall with 1.4-inches underneath it to store one of the best laptops or your other accessories. However, you can make it taller with the set of short leg extenders that are stored on either side of the cord storage chamber.
When attached to the standard legs, these extenders raise the Hexcal Studio up to 7.1-inches and leave you with 2.5-inches of space underneath. It’s worth noting that there are also two USB ports on the interior of the left side of the cord storage chamber.

When you flip the Hexcal Studio around, there are a total of eight AC outlets. The four in the middle are for standard plugs while the two outlets on either side are for devices with bulkier power adapters. There are also grooves with rubber inserts along the top of the Hexcal Studio and locks on either side to hold its removable center panel in place.
This is really what sets the Hexcal Studio apart from your typical desk shelf or monitor stand. Rather than having all your cables in a tray under your desk, you plug them in at the back and store their power bricks inside the cord storage compartment. Not only does this help cut down on cable clutter but it’s also useful for desks where you can’t easily attach a cable management tray.
Simplifying my desk setup
After unboxing and setting up the Hexcal Studio, it was time to take down my current desk setup. As it’s 47.3-inches long, I knew I would have to make some serious changes to accommodate the Hexcal Studio, as my desk is only 60-inches wide.
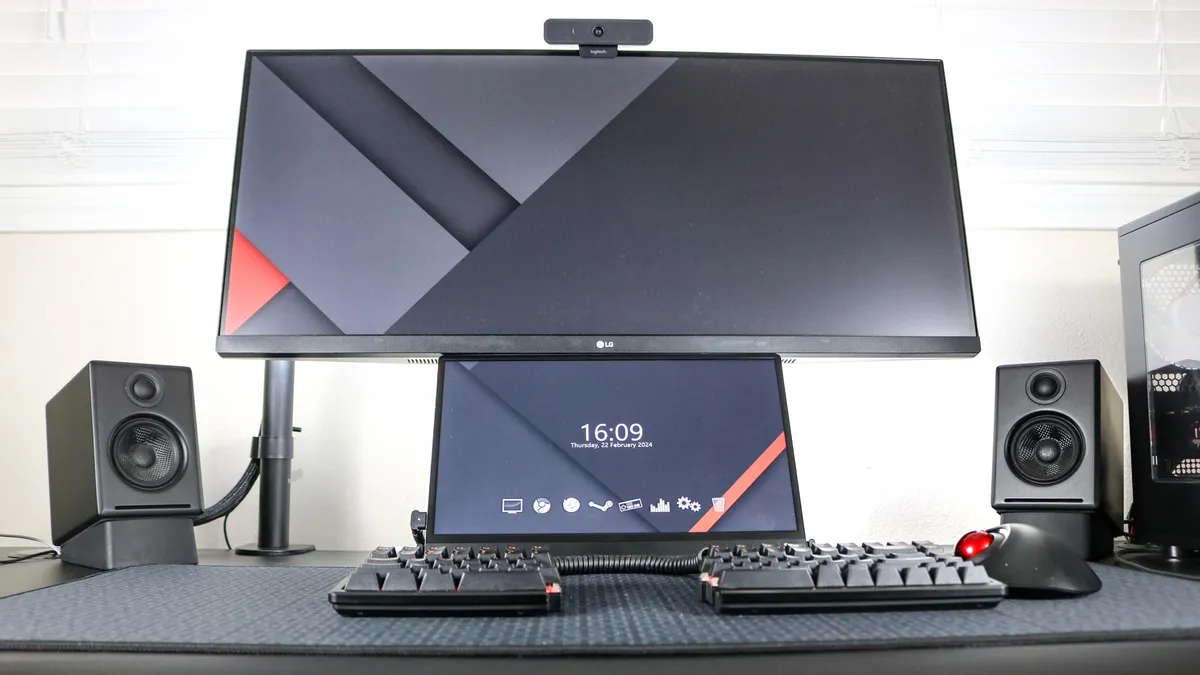
To that end, I decided to swap out my aging gaming PC for one of the best mini PCs as I primarily game while sitting at the Secretlab Magnus Pro after setting it up in the room next to my office. I also decided to place my Audioengine A2+ speakers on either side of the Hexcal Studio since, ideally, you want to have your computer speakers as close to ear level as possible.
From start to finish, it took me close to 7 hours to break down my current setup and put together my new one. One of the big reasons it took me so long is that I wanted to replace my retractable monitor arm with a fixed one from the same company that makes the dual monitor stand I used in one of my recent setups. However, that monitor arm wasn’t tall enough and with everything set up, my ultrawide monitor was actually resting on the top of the Hexcal Studio, somewhat defeating its purpose. I went back to my original monitor arm and along the way, I also cleaned my desk.

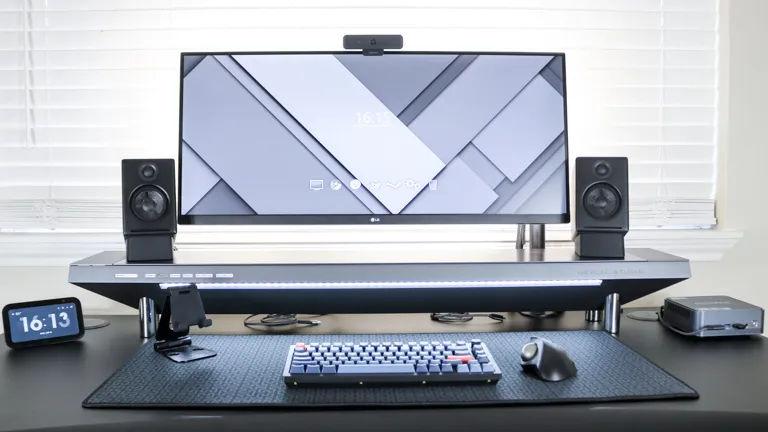
In the picture above, you can see how I utilized the cord storage chamber to house all of my power bricks and to route cables. The rubber gripping inside helps prevent your power bricks from moving around and there was so much extra space, I decided to store the Hexcal Studio’s manual and all of the included cables inside this compartment too.
If you regularly use one of the best external hard drives for storing photos and videos, you can actually leave it inside and connect it to the USB ports on the right side as these are actually USB bridging ports. There are USB ports on the outside of the Hexcal Studio to connect a Type-A to Type-A cable to your computer or laptop.

Around back, I plugged in all of my power cables and had the wires for my speaker coming out at either end. As I might want to use one of the best laptops while at my desk and not just the AceMagic F2A mini PC I have to the right of the Hexcal Studio, I also have a Genki Covert Dock Mini plugged in back there. While it’s technically a Nintendo Switch Dock, I’ve found it’s also useful for when you want to plug in and charge a laptop via USB-C to a monitor without a USB-C port.
Everything in its place

To complement the clean aesthetic of the Hexcal Studio, I decided to ditch my wired, split keyboard in favor of the wireless Keychron V1 Max and of course, I had to have a trackball mouse next to it. The one pictured above is actually a new model from Elecom called the IST Trackball and it has ruby bearings that are a lot smoother.
On the far left, I have an Echo Show 5 (3rd Gen) to keep an eye on the time, my upcoming appointments and of course, the best home security cameras around my house. For quieter typing and to protect my desk’s surface, I’m using a desk mat. I have several now as they’re quite inexpensive and I can easily swap this one for a new one when I want to quickly change the look of my desk setup.

On the far left of the Hexcal Studio, there’s a USB-C and a USB-A port for charging your devices while the two USB-A ports in the front are those bridging ports I mentioned earlier. I don’t use an external hard drive these days but I do need a microSD card reader to import photos from my camera to my PC. Fortunately, the Hexcal Studio’s USB bridging ports work both ways, so I have a USB-A to USB-A cable running through the cord storage chamber and plugged into the mini PC on the right side of my desk.

Adding a smart display and then later a portable monitor underneath my main monitor was one of the best upgrades to my desk setup. However, you don’t always need to have two screens. This is why I’m running a USB-C cable from my mini PC and leaving it underneath the Hexcal Studio. When I want some more screen space, I just take it out and plug in one of the several portable monitors I have in my office.

It’s worth noting that there are not one but two wireless chargers on the left side of the Hexcal Studio. While you can’t charge two phones simultaneously, you can charge a smartphone at the rear and a pair of the best wireless earbuds in the front. Even with my speakers on top of the Hexcal Studio, there’s just enough room to charge my Nothing Phone 2.
From desk setup to workstation
Adding the Hexcal Studio to my desk setup has been an absolute game changer, both in terms of aesthetics and cable management. While the way I had things set up before looked quite good, this one-of-a-kind cable management accessory has taken things to a whole new level. My desk setup has never looked cleaner and swapping my bulky gaming desktop for a mini PC has given me a lot more workspace on my desk.
I like that I don’t have to use the Quntis RGB Pro or a similar monitor light bar to illuminate my workspace at night, nor do I need to worry about adding a wireless charger to my desk. The Hexcal Studio is also quite sturdy and even when moving my desk up and down throughout the day, it has never budged an inch.
There’s one major downside to the Hexcal Studio that I’ve purposely left out until now, and that’s the price. At $900 – more than my Vari Curve Electric Standing Desk — this is probably the most expensive cable management accessory you can buy. However, this is a piece of gear that’s not really designed with the average consumer in mind. Even Hexcal says on its site that it’s for “Pro desk spaces”. For instance, maybe you're a music producer or a graphic designer with a lot of equipment on your desk or perhaps you’re an executive at a Fortune 500 company that wants a tidy workspace without all the extra work that goes into cable management on a budget.
While it handles cable management, lighting and supporting up to 101 pounds of equipment like a champ, there is one thing missing from the Hexcal Studio in my opinion. There’s more than enough space for a built-in laptop docking station and I'd love to see Hexcal add one to a later version or even as an add-on for the current one.
The Hexcal Studio has absolutely earned its place in my desk setup but if you want something similar functionality-wise, I highly recommend the Anker 675 USB-C Docking Station. While it doesn’t have built-in lights or a surge protector, it can serve as a monitor stand or a desk shelf, has an integrated wireless charger and more than enough ports plus an SD and microSD reader. You could theoretically use it in a similar way to how I have the Hexcal Studio with plenty of cash left to spare for other desk upgrades.
If you have the budget and want a quick and easy cable management solution that can replace several devices on your desk, though, the Hexcal Studio could be just what you’re looking for.
More from Tom's Guide