If you’ve ever seen an iMac or even the Surface Studio out in public, then you know just how beautiful one of the best all-in-one computers can be. However, their sleek and thin designs come with a few major drawbacks.
For starters, there’s the price. Typically, an all-in-one computer will cost nearly as much as one of the best gaming PCs with significantly less powerful components. This tradeoff could be worth it if you’re short on space or move around frequently and want to be able to bring everything in a single box though.
Then there’s the fact that instead of having two separate devices (a computer and a monitor), both are in the same enclosure. Back when I was a kid, my Dad always told me to avoid buying a TV/VCR combo because when one device breaks, you need to replace the entire unit. The same is often true with all-in-one computers.
For these reasons, I decided to build my own DIY all-in-one computer using one of the best mini PCs. In the end, the build went well but at Computex in Taiwan this year, I saw that things could have been a whole lot easier if I had used a different monitor instead.
If you have your eyes on an all-in-one computer but don’t quite have the budget for one, here’s how I built my own last year and why the whole process would have been even simpler if I had waited for one of MSI’s new monitors.
Trial and error

If you plan on mounting a mini PC to the back of your monitor, I recommend shopping for a monitor with an adjustable stand first and foremost. The Samsung M5 monitor I used for this project didn’t have one and I ended up having to buy a separate monitor stand just so that I could raise it up to eye level.
As the monitor stand I used needed to be installed using the display’s VESA mounting holes, I was left with another problem to solve. While you could use velcro or some other adhesive to attach a mini PC to the back of your monitor, the best and most secure way is to do so with a VESA mount. Many of the mini PCs actually include one of these in the boxes, so if you choose the right monitor beforehand, you won’t have anything to worry about.

Fortunately, I was able to find a cheap adapter online ($13, Amazon) that let me mount my mini PC off to the side while still being able to use my monitor stand. Getting the mini PC mounted to the adapter was all well and good but then when I went to attach it to the back of my monitor, I ran into another problem: the bolts I used stuck out too far and pushed up against the back of the monitor. Good thing I always save any extra bolts I have left over when doing a project and I swapped those longer bolts out for shorter ones.
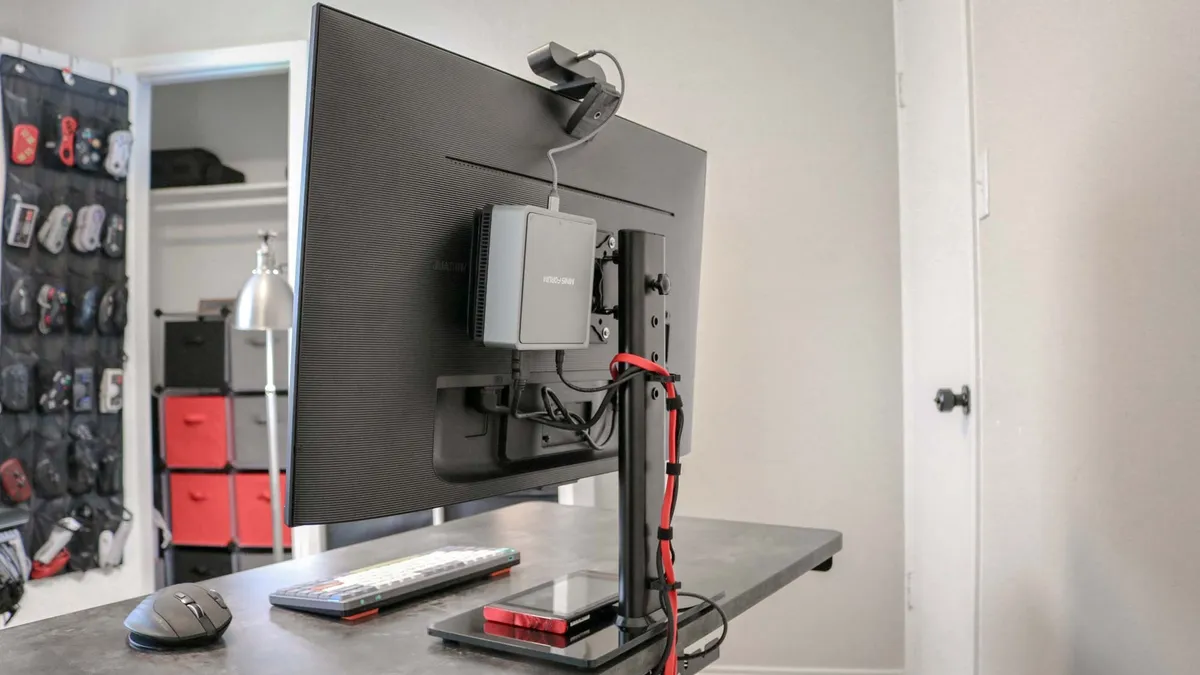
With the new bolts installed, it was time to put everything back together and manage all of the cables. With some cable ties, I got everything looking fairly neat and tidy with only a few cables visible from the back of my monitor. This setup has been working well for the past year and I haven’t had to make any alterations to it. However, the whole process could have been even easier with one of MSI’s new monitors.
No adapter necessary
During my time in Taiwan, I saw several similar setups to my own and this makes sense in a country where space is limited. In fact, even one of the monitors in the lobby at the hotel where I stayed had a mini PC mounted at the back of it.
As mounting a mini PC to the back of a monitor is becoming even more common, MSI has incorporated this into the design of some of its new monitors. Specifically its upcoming PRO MP275QPDG and PRO MP271AP E2 productivity monitors.
The PRO MP275QPDG is a more powerful and more expensive monitor at $399 but it packs in plenty of features including USB-C support with 98W power delivery, a KVM switch (keyboard, video and mouse) and a built-in webcam. Meanwhile, the PRO MP271AP E2 is much more affordable at $169. However, it’s no slouch when it comes to features with a 120Hz refresh rate and a built-in webcam too.

What I liked about both of these monitors after seeing and going hands-on with them at Computex is that they allow you to mount a mini PC to their stands instead of on the back of the monitor. While you could use MSI’s new Cubi NUC to build your own DIY all-in-one computer, you can actually mount any mini PC to the back of either monitor.
If you do go with one of MSI’s mini PCs though, you can take advantage of the company’s Power Link Support feature. This powers on the mini PC when you turn on the monitor so that you don’t have to reach around the back to do so. I don’t mind reaching behind my monitor to power on the mini PC mounted to the back of it but something like this would certainly be nice to have.
An even cleaner desk setup

I decided to mount a mini PC to the back of my monitor in the first place for a cleaner desk setup with fewer visible devices. It turned out well but doing so with either the PRO MP275QPDG and PRO MP271AP E2 from MSI would have made for an even cleaner setup since both monitors have built-in webcams.
We often take the webcams on our laptops for granted but when you primarily use a desktop like I do, then you have to invest in one of the best webcams to go with it. With a monitor like this though, you have everything you need right in one place.
If you spring for the more expensive PRO MP275QPDG though, you also get a built-in KVM switch which lets you use the same mouse and keyboard across multiple computers which is great for those who use a Mac and a PC or even a Chromebook and a PC simultaneously for work. With 98W fast charging and USB Type-C support, you can also easily plug in your work laptop to get more done on a larger screen.
The kinds of projects I like to do often involve trying one thing and then realizing there was an easier way to do it all along. Seeing both of these monitors and how simple they make building your own all-in-one computer definitely made me rethink how I put my own together last year. Still, learning about different adapters and ways to give your existing devices new life is half the fun though.
More from Tom's Guide